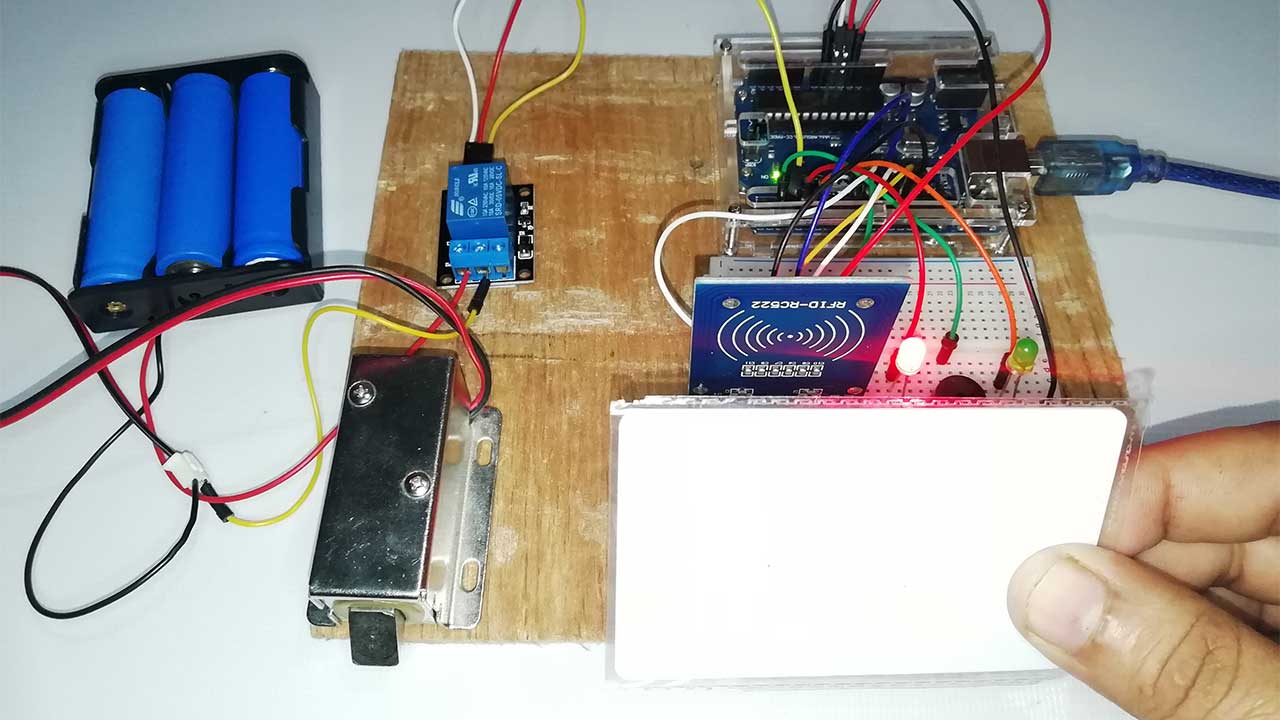
Hello everybody, in today’s project, you will learn to make your own RFID-based solenoid door lock system using Arduino. You will learn to interface and control the solenoid lock with Arduino and RFID MF-RC522 module.
RFID (Radio Frequency Identification) is a cheap and accessible technology. It can be used in many applications such as access control, security, asset tracking, person tracking, etc. You may have seen RFID door lock systems in hotels, offices, and many other places. Basically, they provide you a card and you have to just place the card near the RFID reader, within a second and the door will open.
This RFID Solenoid door lock can be easily made at home just following this tutorial. Previously, we have also used the same technology on our RFID and IoT based projects.
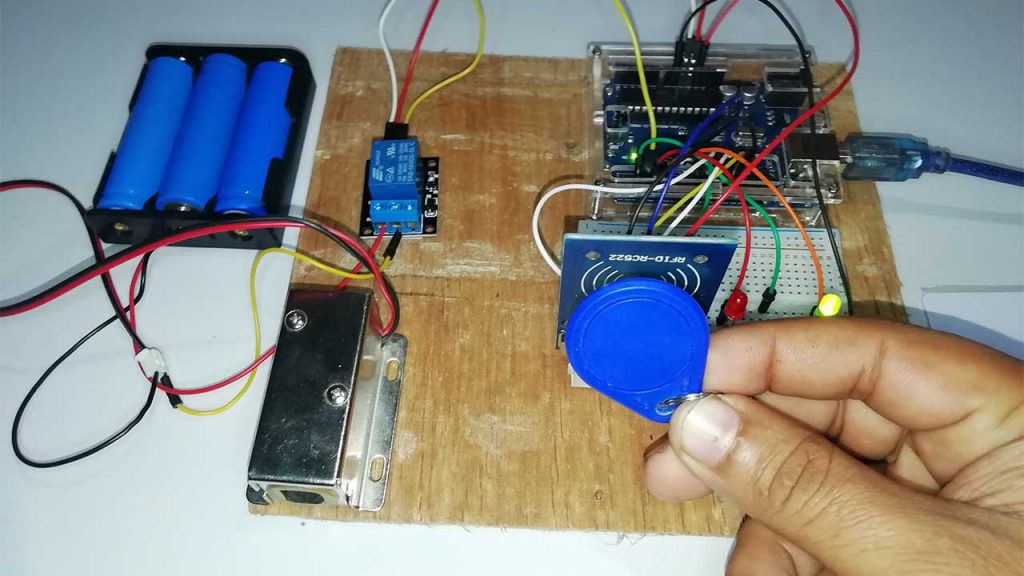
Here in this project, we are using Arduino and Relay to trigger the solenoid door lock. While RFID MF-RC522 is used to authenticate users so that your RFID tag acts as the key. If you place the wrong RFID card close to the RFID reader, a buzzer will beep to alert you about the wrong card.
Components Required
The following are the components required for RFID Based Contactless Door Lock Using Arduino.
- Arduino Uno
- RFID-RC522 Module
- 12v/9v Solenoid Lock
- Relay Module
- RED and Green LED
- Buzzer
- Jumper Wires
Circuit Diagram for RFID Solenoid Door lock using Arduino
The Circuit Diagram for RFID Based Solenoid Door lock using Arduino project is provided below.
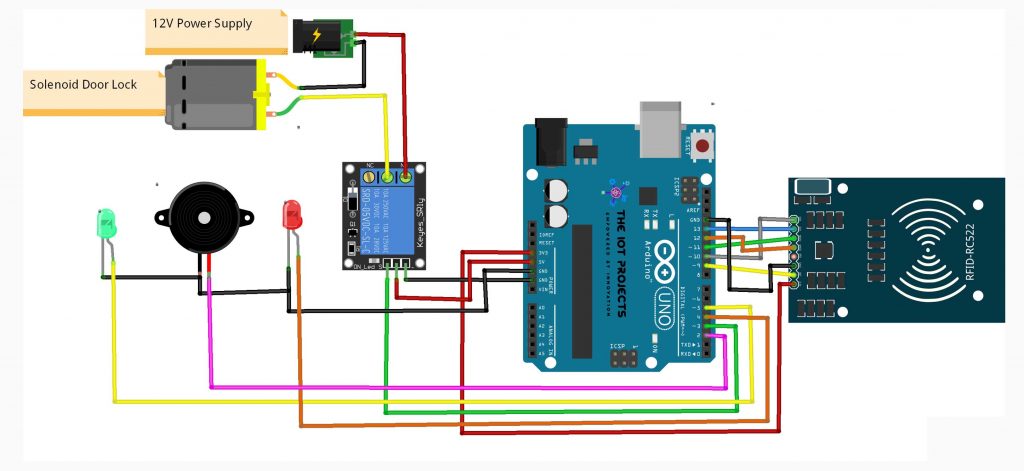
Connections between Arduino and RFID are given in the table below. The positive pin of the buzzer is connected to digital pin 2 of Arduino, and the GND pin is connected to the ground pin of Arduino. The solenoid lock is connected to Arduino through the relay module.
| RFID Pin | Arduino Uno Pin |
| SDA | Digital 10 |
| SCK | Digital 13 |
| MOSI | Digital 11 |
| MISO | Digital 12 |
| IRQ | Unconnected |
| GND | GND |
| RST | Digital 9 |
| 3.3V | 3.3V |
| Relay Pin | Arduino Uno Pin |
| Vcc | Vcc |
| GND | GND |
| Sinal | 3 |
Green LED Positive pin is connected to the digital pin 5 of Arduino and Negative pin to the GND. Similarly, RED LED Positive pin is interfaced with digital pin 4 and Negative pin to the GND.
Program Code
Let’s start coding by including all the required libraries. Here, this program only requires two libraries, one for SPI communication between Arduino and RFID, and the second for the RFID module. Both the libraries can be downloaded from the links provided below:
//RFID Based Solenoid Door lock using Arduino
//The IoT Projects https://www.youtube.com/c/TheIoTProjects
//website:https://iotprojectsideas.com/

#include <SPI.h>
#include <MFRC522.h>

#define SS_PIN 10
#define RST_PIN 9
#define LED_G 5 //define green LED pin
#define LED_R 4 //define red LED
#define RELAY 3 //relay pin
#define BUZZER 2 //buzzer pin
#define ACCESS_DELAY 2000
#define DENIED_DELAY 1000
MFRC522 mfrc522(SS_PIN, RST_PIN);   // Create MFRC522 instance.

void setup()
{
  Serial.begin(9600);   // Initiate a serial communication
  SPI.begin();          // Initiate  SPI bus
  mfrc522.PCD_Init();   // Initiate MFRC522
  pinMode(LED_G, OUTPUT);
  pinMode(LED_R, OUTPUT);
  pinMode(RELAY, OUTPUT);
  pinMode(BUZZER, OUTPUT);
  noTone(BUZZER);
  digitalWrite(RELAY, LOW);
  Serial.println("Put your card to the reader...");
  Serial.println();

}
void loop()
{
  // Look for new cards
  if ( ! mfrc522.PICC_IsNewCardPresent())
  {
    return;
  }
  // Select one of the cards
  if ( ! mfrc522.PICC_ReadCardSerial())
  {
    return;
  }
  //Show UID on serial monitor
  Serial.print("UID tag :");
  String content= "";
  byte letter;
  for (byte i = 0; i < mfrc522.uid.size; i++)
  {
     Serial.print(mfrc522.uid.uidByte[i] < 0x10 ? " 0" : " ");
     Serial.print(mfrc522.uid.uidByte[i], HEX);
     content.concat(String(mfrc522.uid.uidByte[i] < 0x10 ? " 0" : " "));
     content.concat(String(mfrc522.uid.uidByte[i], HEX));
  }
  Serial.println();
  Serial.print("Message : ");
  content.toUpperCase();
  if (content.substring(1) == "83 23 38 BB") //change here the UID of the card/cards that you want to give access
  {
    Serial.println("Authorized access");
    Serial.println();
    delay(500);
    digitalWrite(RELAY, HIGH);
    digitalWrite(LED_G, HIGH);
    delay(ACCESS_DELAY);
    digitalWrite(RELAY, LOW);
    digitalWrite(LED_G, LOW);
  }

 else   {
    Serial.println(" Access denied");
    digitalWrite(LED_R, HIGH);
    tone(BUZZER, 300);
    delay(DENIED_DELAY);
    digitalWrite(LED_R, LOW);
    noTone(BUZZER);
  }
}
Now copy the above Arduino Program code for RFID Based Solenoid Door lock using Arduino Project. Paste the copied code in your Arduino IDE. Here, you need to choose the correct Arduino Board and Its com port from Tools Menu. Basically, you need to compile the code before uploading the code to the Arduino to check any errors in the code.
After the successful upload of the code, open the serial monitor at the baud rate of 9600. Scan your RFID card, Now copy the UID from the serial monitor and paste it to the program code in the following lines.
if (content.substring(1) == "83 23 38 BB") //change here the UID of the card/cards that you want to give accessVideo Demonstration of RFID Based Solenoid Door lock using Arduino
Here, is a complete video demonstration of RFID Based Solenoid Door lock using the Arduino Project. I hope you will enjoy watching this video. If you did, then don’t forget to hit that like button. Share it with your friends and subscribe to this channel for more awesome content like this.
Conclusion
So, that’s pretty much for this session. I hope you enjoyed making this RFID Based Solenoid Door lock using Arduino project. If you did, don’t forget to share this article with your friends. If you have any doubts regarding this weather station project then do let me know them in the comment section below.
Recommended Readings:
- Digital Voltmeter using Arduino & 16×2 LCD
- Password Security Lock System Using Arduino & Keypad
- IoT Weather Station using DHT11 Sensor
- How 555 IC works in Astable Operation & Monostable Operation
- Temperature Controlled Home Automation using Arduino
- Internet Clock Using NodeMCU ESP8266 and 16×2 LCD without RTC Module
- Fire Security System using Arduino & Flame Sensor
- Dual Axis Solar Tracker Arduino Project Using LDR & Servo Motors
- Interfacing DHT11 Humidity and Temperature Sensor with Arduino & LCD
- IoT Based Patient Health Monitoring System Using ESP8266/ESP32 Web Server
- IoT based Fire Detector & Automatic Extinguisher using NodeMCU
- Top 10 Coolest IoT Devices of 2020
- BME280 Based Mini Weather Station using ESP8266/ESP32
- Home Automation with MIT App Inventor and ESP8266
- Interface LDR Photo Resistor to Arduino and Control LEDs


