In this project, we are going to DIY 2.4-inch Mobile Phone using GSM Module & Arduino with Nextion Display
Overview
In this project, I will reveal to you my homemade Mobile Phone that can be used for making as well as receiving calls and SMS. I have used GSM Module SIM800/SIM900 with Arduino UNO Microcontroller. Here display is used to visualize GUI interfaces. I selected a brand new Nextion TFT Intelligent LCD Touch Display. Its size is 2.4 inches. The 2.4-inch NX3224T024 Nextion display can display everything like a normal Mobile Phone. Using these homemade mobile phones You can make calls, receive calls, send an SMS, and receive an SMS.
After reading this article if you are interested in making your own phone, this guide is going to help you a lot.
To do this project, You will need a microcontroller. Firstly, Arduino UNO Board will be suitable for this project. Secondly, We also need a GSM module. We can use SIM800 or SIM900, both will work for this. For GUI Interface, we need a TFT LCD Display. Hence, I used Nextion NX3224T024 – Generic 2.4″ TFT LCD Touch Display.
Components
To make this Mobile Phone at home you will need the following components. Here, I have made a complete list of all the components needed. You can easily get these components from Amazon. So here is the list of the components with their purchase link:
- SIM800/SIM900 GSM Module
- NX3224T024 2.4 inch Nextion Display
- Card Reader
- Arduino UNO Board
- 8/16/32 GB SD Card
- 12V DC Adapter for GSM Module
- 5V DC Adapter for Arduino
- Connecting Jumper Wire
SIM800 GSM Module
SIM800 is a quad-band GSM/GPRS module made for the global market. Actually, the SIM800 GSM Module works with frequencies GSM 850MHz, EGSM 900MHz, DCS 1800MHz, and PCS 1900MHz. SIM800 module comes with GPRS multi-slot class 12/ class 10 (optional) and supports the GPRS coding schemes CS-1, CS-2, CS-3, and CS-4. With a small configuration of 24*24*3mm, SIM800 can meet almost all the requirements in user applications, such as M2M, smartphones, PDAs, and other mobile devices.

SIM800 has 68 SMT pads and provides all hardware interfaces between the customer’s boards and a module. Especially, SIM800 is designed with power-saving features so that the current consumption is very low as 1.2mA in sleep mode. SIM800 integrates TCP/IP protocol and extended TCP/IP AT commands which are required for data transfer applications.
Nextion NX3224T024 2.4″ TFT LCD Touch Display
Nextion is a Seamless (HMI) Human Machine Interface solution that helps to control and visualize the interface between a user and a process. The hardware part of Nextion includes (a series of TFT boards) and the software part include (the Nextion editor). Only one serial port is used to communicate in The Nextion TFT board. Basically, it lets users avoid the hassle of wiring.
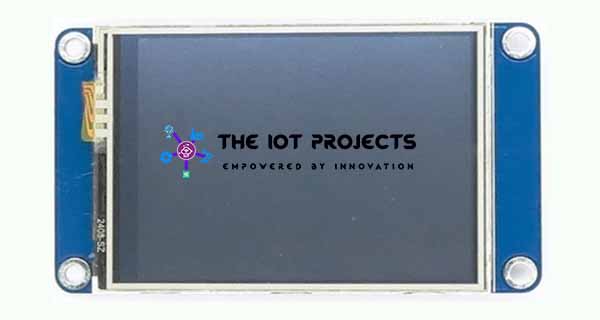
Adapting Nextion family HMI to existing projects is very simple. Users just need to provide it as a UART. NX2432T024 is a powerful 2.4-inch HMI, and this belongs to the Nextion family. Its Features are a 2.4″ TFT 320 x 240 resistive touchscreen display, 4M Flash, 2K Byte RAM, and 65k colors.
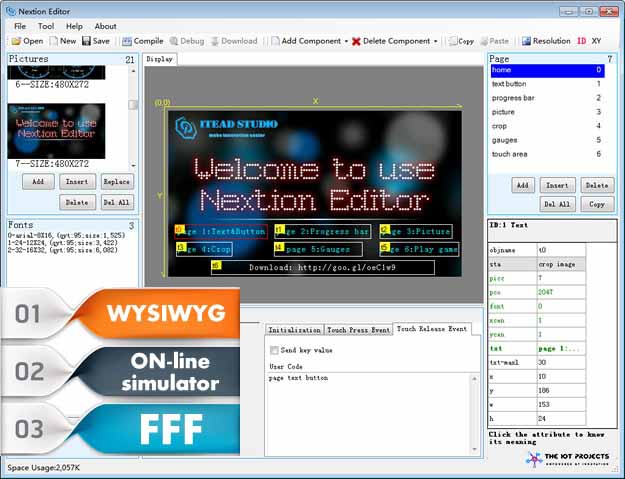
Nextion Editor
Graphical User Interface (GUI) is designed using Nextion Editor. There are many components in Nextion Editor like buttons, text, progress bar, slider, instrument panel, etc. to enrich the interface design. Furthermore, the drag-and-drop features allow the user to save time in programming.
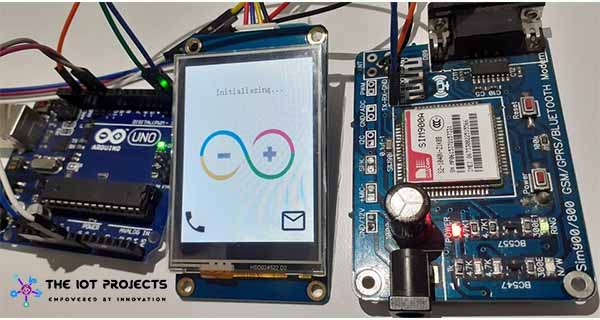
Circuit diagram & Connections
Let’s learn the circuit & connection now. Both the GSM Module and Nextion Display are UART Modules.
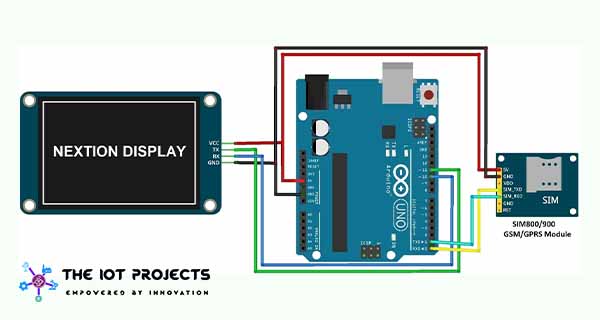
First of all, Connect the SIM800 GSM Module TX & RX pins with the RX & TX pins of Arduino. Here we will use software serial to interfere Nextion display with Arduino. So, connect the Nextion NX3224T024 Tx, Rx pins with Arduino Digital Pin 10 and 11. Provide 12v power Supply to GSM Module and 5V to Arduino respectively.
Setting Up Nextion Display for GUI
Now we need to design an HMI file using Nextion Editor to make Nextion Display the interfaces. This editor has features to design interfaces with plug-and-play components such as (Text, buttons, progress bar, pictures, gauge, checkbox, radio box, and much more). Furthermore, you can set codes & properties for each of these components.
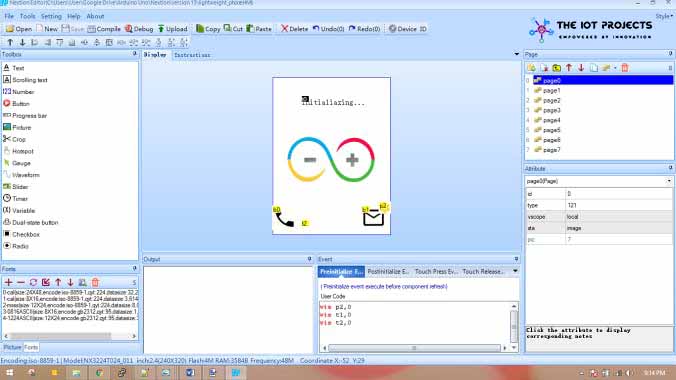
In this project, To make an interactive GUI 8 pages are used. We need to program the Nextion display and this is a time-consuming process. Especially, when you implement complex features like Numpad and Keyboards. But, we have provided you the final file which can be downloaded from below.
You need to follow the following steps to make the Nextion display workable. You can also follow the video instructions embedded below.
- First of all, Download the file above and extract it.
- Copy the .tft file & paste it into the SD card. But, make sure the SD card is already in the FAT32 file system.
- Once you copy the file, insert the SD card into the Nextion, and to power it up connect 5V & GND to Arduino.
- It will take some time to upload the .tft.
- Once the uploading gets complete Power it off.
- Now safely remove your SD card and then again power on. Yahoo! Your GUI is ready now.
Source Code/Program
This is a a source code/program for used for interfacing GSM Module & Nextion Display with Arduino. Copy these lines of code and upload to the Arduino Board. Mr. Avishek Hardin is The original developer of this project & code.
#include <SoftwareSerial.h>

SoftwareSerial nextionSerial(10, 11); //Rx, Tx
char msisdn[30], ATcomm[30];
String rawMsg, pageNum, msg, pls;

void setup(){
//Initialize HardwareSerial|SoftwareSerial|GSM module|Nextion display. Perform GSM Location Update.
  Serial.begin(9600);
  nextionSerial.begin(9600);
  while(!Serial)
  {
    ;
    }
    power_on();
    delay(3000);
}

void loop(){
  while(nextionSerial.available()){rawMsg.concat(char(nextionSerial.read()));
  }
  delay(10); //Read the SoftwareSerial
  if(!nextionSerial.available())
  {
    if(rawMsg.length())
    {
      pageNum = rawMsg[rawMsg.length()-4];           //Read Nextion: get the page number.
    msg = rawMsg.substring(1, rawMsg.length()-4);    //Read Nextion: get the Raw Msges from Nextion.

    if((pageNum == "0") && (msg.length() != 0)){querySMS(msg);
    }
    //Read Nextion: page0, Query all SMS from the GSM Buffer.
    if((pageNum == "1") && (msg.length() != 0)){connectCall(msg);
    }
      //Read Nextion: page1, Dial and Call the B-number.
    if((pageNum == "2") && (msg.length() != 0)){releaseCall(msg);
    }
      //Read Nextion: page2, Release the call.
    if((pageNum == "3") && (msg.length() != 0)){sendSMS(msg);
    }
      //Read Nextion: Page3, Get the content typed in page 3 and send SMS.
    if((pageNum == "5") && (msg.length() != 0)){answerCall(msg);
    }
    //Read Nextion: page5, Answer Incoming calls.
    if((pageNum == "6") && (msg.length() != 0)){delReadSMS(msg);
    }
    //Read Nextion: page6, Delete read SMS.
    if((pageNum == "7") && (msg.length() != 0)){delSMS(msg);
    }
    //Read Nextion: page7, Delete all SMS (incl unread) from the GSM Buffer.
    rawMsg="";
    pageNum="";
    msg="";
    }
  }

  while(Serial.available())
  {
    pls=Serial.readString();
    }         //Read the HardwareSerial.
  if(!Serial.available() && pls.length())
  {
    if(pls.indexOf("NO CARRIER") != -1)
    {
      //Goto to page0, if B-party Hang up.
      String nextionCallStr = "page page0";
      writeString(nextionCallStr);
    sendATcommand("AT", "OK", 2000);
    }
  if(pls.indexOf("BUSY") != -1)
  {
    //Goto to page0, if B-Number rejects incoming calls.
      String nextionCallStr = "page page0";
      writeString(nextionCallStr);
    sendATcommand("AT", "OK", 2000);
  }
  if(pls.indexOf("NO ANSWER") != -1)
  {
    //Goto to page0, if B-Number does not answer incoming calls.
    String nextionCallStr = "page page0";
    writeString(nextionCallStr);
    sendATcommand("AT", "OK", 2000);
  }
    if(pls.indexOf("+CLIP") != -1)
    {
    //Goto to page5, for any incoming calls.
    int msisdnFirstDelim = pls.indexOf(""");
    int msisdnSeconddDelim = pls.indexOf(""", msisdnFirstDelim+1);
    String mobNum = pls.substring(msisdnFirstDelim+1, msisdnSeconddDelim);
    String nextionCallStr = "page page5";
    writeString(nextionCallStr);
    nextionCallStr = "page5.t1.txt=""+mobNum+""";
    writeString(nextionCallStr);
    nextionCallStr = "page5.t0.txt="Incoming Call"";
    writeString(nextionCallStr);
    nextionCallStr = "page5.p0.pic=20";
    writeString(nextionCallStr);
    sendATcommand("AT", "OK", 2000);
    }
  if(pls.indexOf("+CMTI") != -1)
  {
    //If new Msges|Query Msges|Display star picture.
    smsComputation();
    String nextionCallStr = "vis p2,1";
    writeString(nextionCallStr);
  }
  pls="";
  }
}

void power_on(){
//Initialize GSM module, perform Location Update, latch to cellular network, read GSM SMS buffer.
  uint8_t answer = 0;
  while(answer == 0){answer = sendATcommand("AT", "OK", 2000);
  }
  while((sendATcommand("AT+CREG?", "+CREG: 0,1", 500) || sendATcommand("AT+CREG?", "+CREG: 0,5", 500)) == 0);
  writeString("page0.t0.txt="Searching..."");delay(2000);
  searchNetwork();
  delay(2000);
  smsComputation();
}

int8_t sendATcommand(char* ATcommand, char* expected_answer, unsigned int timeout)
{
//Function to send AT commands and read responses to/from the GSM module.
  uint8_t x=0, answer=0;
  char GSMreponse[100];
  unsigned long previous;
  memset(GSMreponse, '', 100);
  delay(100);
  while(Serial.available()>0) Serial.read();
  Serial.println(ATcommand);
  previous = millis();
  do{if(Serial.available() != 0){GSMreponse[x] = Serial.read();
  x++;
      if(strstr(GSMreponse, expected_answer) != NULL){answer = 1;
      }
    }
  }
    while((answer == 0) &&((millis() - previous) < timeout));
  return answer;
}

void searchNetwork(){
//Function to search for available cellular networks|Get network registration|Send attched network to Nextion display.
  String sendCOPScommand, readCOPScommad, networkOperator, sendNetOperator;
  int startCOPS=-1, copsFirstcomma, copsSecondcomma, copsNL;
  while(Serial.available())(Serial.read());
  sendCOPScommand="AT+COPS?";
  Serial.println(sendCOPScommand);
  while(!Serial.available());
  while(Serial.available())
  {
    readCOPScommad=Serial.readString();
    }
  if(readCOPScommad.indexOf("+COPS:") != -1)
  {
    copsFirstcomma=readCOPScommad.indexOf(",", startCOPS+1);
    copsSecondcomma=readCOPScommad.indexOf(",", copsFirstcomma+2);
    copsNL=readCOPScommad.indexOf("n", copsSecondcomma+1);
    networkOperator=readCOPScommad.substring(copsSecondcomma+2, copsNL-2);
    sendNetOperator="page0.t0.txt=""+networkOperator+""";
    writeString(sendNetOperator);
  }
  sendCOPScommand=readCOPScommad=networkOperator="";
  copsFirstcomma=copsNL=0;
}

void querySMS(String querySMSContent)
{
//Function to query all SMS from the GSM buffer.
  Serial.println(querySMSContent);
}

void connectCall(String conCallContent){
//Function to Initiate Mobile Originated Call To Dial B-Number.
  String nextionCallStr = "page2.t0.txt="Connecting"";
  writeString(nextionCallStr);
  while((sendATcommand("AT+CREG?", "+CREG: 0,1", 500) ||  //0,1:  User registered, home network.
  sendATcommand("AT+CREG?", "+CREG: 0,5", 500)) == 0);  //0,5:  User registered, roaming.
  conCallContent.toCharArray(msisdn, rawMsg.length());
  sprintf(ATcomm, "ATD%s;", msisdn);
  sendATcommand(ATcomm, "OK", 10000);
  nextionCallStr = "page2.t0.txt="Calling"";
  writeString(nextionCallStr);
  memset(msisdn, '', 30);
  memset(ATcomm, '', 30);
}

void releaseCall(String relCallContent)
{
//Function to Hang up a call
  Serial.println(relCallContent);
}

void sendSMS(String sendSMSContent){
//Function to get content typed from Nextion|select SMS Message Format|Send SMS Message to B-number.
  int firstDelim = sendSMSContent.indexOf(byte(189));
  int secondDelim = sendSMSContent.indexOf(byte(189), firstDelim+1);
  String smsContent = sendSMSContent.substring(0, firstDelim);
  String phoneNumber = sendSMSContent.substring(firstDelim+1, secondDelim);
  while((sendATcommand("AT+CREG?", "+CREG: 0,1", 500) || sendATcommand("AT+CREG?", "+CREG: 0,5", 500)) == 0);
  if(sendATcommand("AT+CMGF=1", "OK", 2500)){phoneNumber.toCharArray(msisdn, msg.length());
  sprintf(ATcomm, "AT+CMGS="%s"", msisdn);
    if(sendATcommand(ATcomm, ">", 2000))
    {
      Serial.println(smsContent);
      Serial.write(0x1A);
      if(sendATcommand("", "OK", 20000))
      {
        Serial.println("message sent");
        }
    else{Serial.println("error sending");
    }
    }
  else{Serial.println("not found >");
  }
  }smsContent="";
  phoneNumber="";
  memset(msisdn, '', 30);
  memset(ATcomm, '', 30);
}

void answerCall(String ansCallContent)
{
//Function to change Nextion text and picture, if Incoming call is accepted.
  Serial.println(ansCallContent);
  String nextionCallStr = "page5.t0.txt="Connected"";
  writeString(nextionCallStr);
  nextionCallStr = "page5.p0.pic=21";
  writeString(nextionCallStr);
}

void smsComputation()
{
//Function to Read SMS from GSM buffer. Normally, SMS buffer size=20 & select only 10 SMS.
  int startCPMS=-1, CPMS1comma, CPMS2comma, msgCount=0;
  int startCMGR=-1, cmgrIndex, cmgrNLindex, smsNLindex;
  String sendCPMScommand, readCPMScommand, CPMSMsgCount;
  String sendCMGRcommand, readCMGRcommand, inCMGR, inSMS, dspCount;
  sendCPMScommand = "AT+CPMS?";
  Serial.println(sendCPMScommand);
  while(!Serial.available());
  while(Serial.available())
  {
    readCPMScommand=Serial.readString();
    }
  if(readCPMScommand.indexOf("+CPMS:") != -1)
  {
    CPMS1comma = readCPMScommand.indexOf(",", startCPMS+1);
    CPMS2comma = readCPMScommand.indexOf(",", CPMS1comma+1);
    CPMSMsgCount = readCPMScommand.substring(CPMS1comma+1, CPMS2comma);
    msgCount = CPMSMsgCount.toInt();
    dspCount="page6.t51.txt=""+CPMSMsgCount+""";
    writeString(dspCount);
    if((msgCount > 0) && (msgCount <= 10)){writeString("page6.p1.pic=35");
    }
    if(msgCount > 10){writeString("page6.p1.pic=34");
    }
    int spotSelect = 0;
    while(Serial.available())(Serial.read());
    if(msgCount != 0)
    {
      for(int iSMS=20; iSMS>0; iSMS--)
      {
        sendCMGRcommand="AT+CMGR="+String(iSMS, DEC);
        Serial.println(sendCMGRcommand);
        while(!Serial.available());
        while(Serial.available())
        {
          readCMGRcommand=Serial.readString();
          }
        if((readCMGRcommand.indexOf("+CMGR:")!=-1) && (spotSelect<(50)))
        {
          cmgrIndex = readCMGRcommand.indexOf("+CMGR:", startCMGR+1);
          cmgrNLindex = readCMGRcommand.indexOf("n", cmgrIndex+1);
          inCMGR = readCMGRcommand.substring(cmgrIndex, cmgrNLindex-1);
          smsNLindex = readCMGRcommand.indexOf("n", cmgrNLindex+1);
          inSMS = readCMGRcommand.substring(cmgrNLindex+1, smsNLindex-1);
          readSMS(inCMGR, inSMS, iSMS, spotSelect);
          spotSelect=spotSelect+5;
        }
        startCMGR=-1;
        cmgrIndex=cmgrNLindex=smsNLindex=0;
        inCMGR=inSMS=readCMGRcommand="";
      }
    }
  }readCPMScommand=CPMSMsgCount="";
  startCPMS=-1;
  CPMS1comma=CPMS2comma=msgCount=0;
}

void readSMS(String readinCMGR, String readinSMS, int readiSMS ,int readinspotSelect)
{
//Function to parse the loaded SMS from GSM module and present to Nextion display.
  int startComma=-1, firstColon, firstComma, secondComma, thirdComma;
  String smsSeqNum, smsStatus, smsBNumber, smsDateTime, actualSMS;
  String startOfPage="page6.t", middleOfPage=".txt="", pageContent;

  firstColon = readinCMGR.indexOf(":", startComma+1);
  firstComma = readinCMGR.indexOf(",", startComma+1);
  secondComma = readinCMGR.indexOf(",", firstComma+1);
  thirdComma = readinCMGR.indexOf(",", secondComma+1);
  smsSeqNum = String(readiSMS);
  smsStatus = readinCMGR.substring(firstColon+7, firstComma-1);
  smsBNumber = readinCMGR.substring(firstComma+2, secondComma-1);
  smsDateTime = readinCMGR.substring(thirdComma+2, readinCMGR.length()-1);
  actualSMS = readinSMS.substring(0, readinSMS.length());
  pageContent = startOfPage + readinspotSelect + middleOfPage + smsStatus+""";
  writeString(pageContent);readinspotSelect++;
  pageContent = startOfPage + readinspotSelect + middleOfPage + smsBNumber+""";
  writeString(pageContent);readinspotSelect++;
  pageContent = startOfPage + readinspotSelect + middleOfPage + smsSeqNum+""";
  writeString(pageContent);readinspotSelect++;
  pageContent = startOfPage + readinspotSelect + middleOfPage + smsDateTime+""";
  writeString(pageContent);readinspotSelect++;
  pageContent = startOfPage + readinspotSelect + middleOfPage + actualSMS+""";
  writeString(pageContent);
  smsSeqNum=smsStatus=smsBNumber=smsDateTime=actualSMS=pageContent="";
  firstColon=firstComma=secondComma=thirdComma=readinspotSelect=0;
}

void delReadSMS(String inDelReadSMS)
{
//Function to delete only read SMS from the GSM Buffer.
  Serial.println(inDelReadSMS);
}

void delSMS(String indelSMS)
{
//Function to delete all (Read/Unread) SMS from the GSM Buffer.
  Serial.println(indelSMS);
}

void writeString(String stringData)
{
//Function to send commands to the Nextion display.
  for(int i=0; i < stringData.length(); i++)
  {
    nextionSerial.write(stringData[i]);
  }
  nextionSerial.write(0xff);
  nextionSerial.write(0xff);
  nextionSerial.write(0xff);
}
Once you upload the code, your Nextion Display Based Mobile Phone using GSM & Arduino is ready. Likewise our normal touch screen phone you can easily make call or SMS.

Embedded video Tutorial of making Mobile Phone using GSM & Arduino.
Here is the embedded video Tutorial of making Mobile Phone using GSM & Arduino. Watch the full video below. The video explains all the necessary steps you need to follow to make this Simple DIY Mobile Phone using GSM Module & Arduino.


