In this project, I will tell you how to build a Portable IoT based RFID Attendance System using ESP32, 0.96” OLED Display & MF-RC522 Module. RFID Attendance Systems are commonly used to mark the presence of students or staff in schools and offices.
- How IoT based RFID Attendance System Works?
- Features of RFID Attendance Website
- Components Required
- Technology Used in RFID attendance System with ESP32
- Network Topology: IoT Based RFID Attendance System using ESP32
- Interfacing RFID RC522 & 0.96" OLED Display to ESP32 Module
- How to run a server for this project?
- Deploying RFID Attendance Web App
- Setting Up Arduino IDE for ESP32
- Program/Sketch Code
- Final Code: IoT Based RFID Attendance System using ESP32
- Conclusion
This project has a wide area in the modern era of schools, colleges, business organizations, offices where accurate attendance data is required. The RFID attendance system makes the process much easier and more reliable. But before getting started, let’s learn How RFID Attendance System works?
How IoT based RFID Attendance System Works?
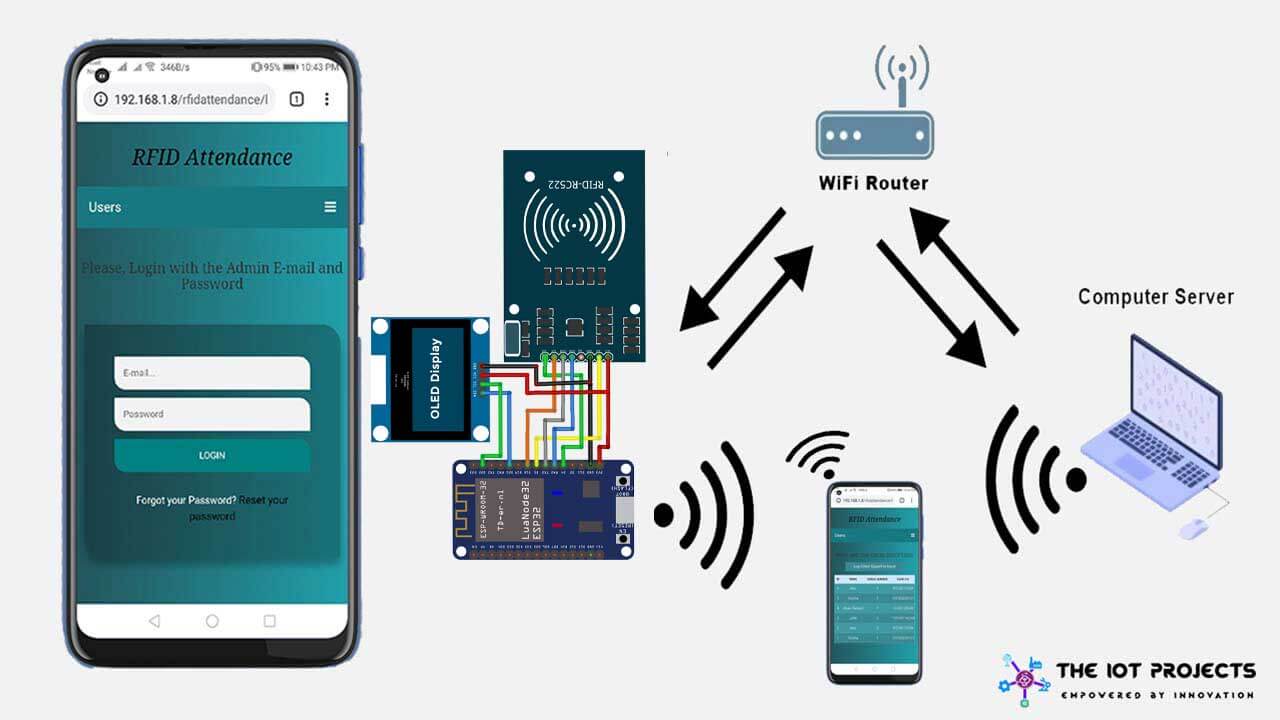
The ESP32 Wi-Fi Module will collect the RFID CARD/keychain UID from the multiple users and sends it over the internet to a website. The Enrollment of RFID CARD is done on the server using any MF-RC522 RFID Module that is available on the market. The verification of the Card/keychain will be done on the webserver, while Card UID is transmitted over the WiFi.
The website used in this project is developed using PHP, CSS, and Javascript, it has a database to record Card UID. By logging in to the web server, we can collect personal records of each attendee as well as all attendance records, including incoming and outgoing times. These data can also be downloaded and exported to an excel sheet.
Features of RFID Attendance Website
- Safe Login System
- Admin Panel
- User Entry Log
- User Management System
- Multiple Device Management System
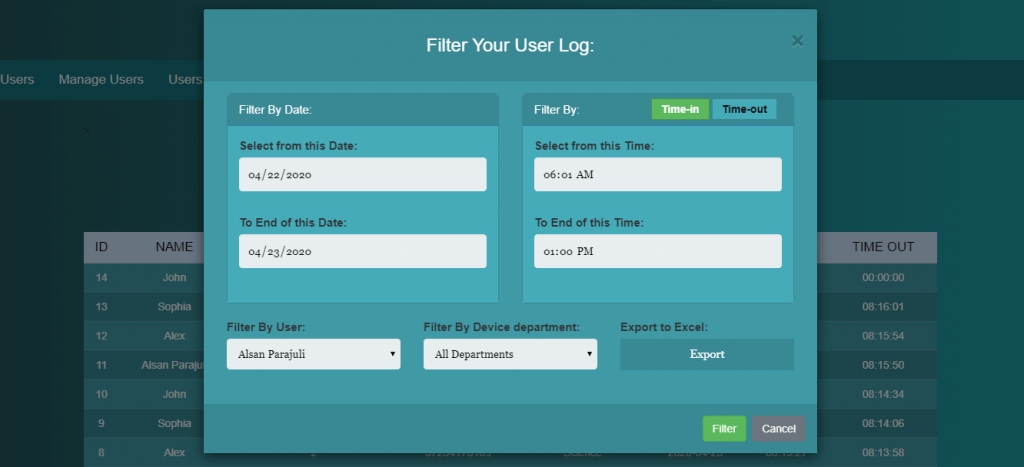
- Filter log data by date, On-time, time-out, and department
- Export those filtered data to Excel.
Note: Generally, administrators play an important role in the management of this system.
Functions Provided to users and Admin
Now, talking about the features of the RFID based Attendance system using ESP32. The home page displays the admin login page. Until you login to the system, you will not be able to browse other available options. So the system is safe. In general, the design of the RFID presence system project is quite simple. So the user does not find any difficulties in registering his/her Attendance. The user must swipe his/her card or keychain to enroll in attendance, including entry time. The main tasks assigned to the administrator are as follows:
You can watch the following video tutorial for detailed information, or you can read the article written here.
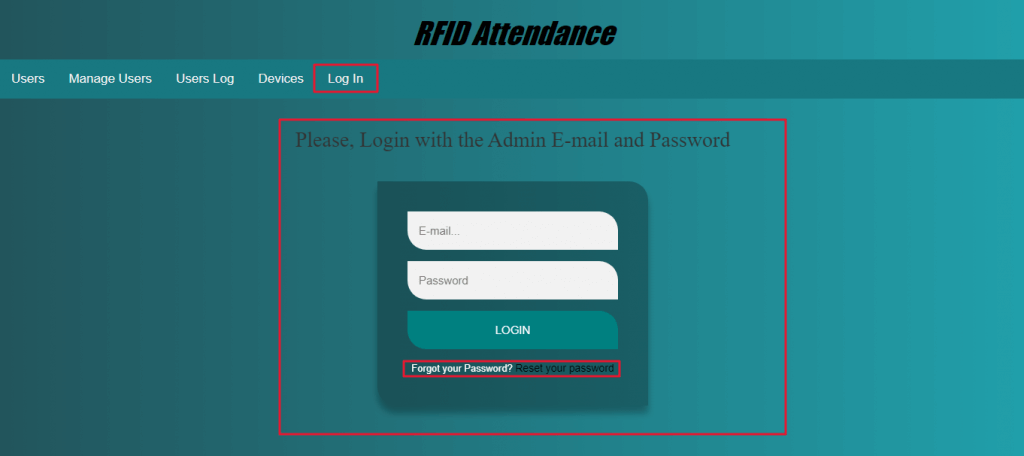
- Admin Login/Logout System
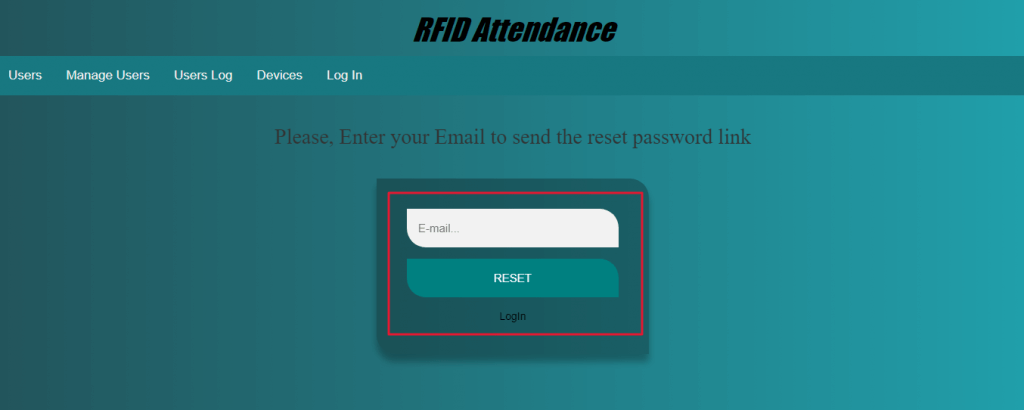
- Forgot Password for admin
- Edit and Update admin profile
Manage Users

- View users
- Add New User
- Edit and update the existing users
- Remove Users
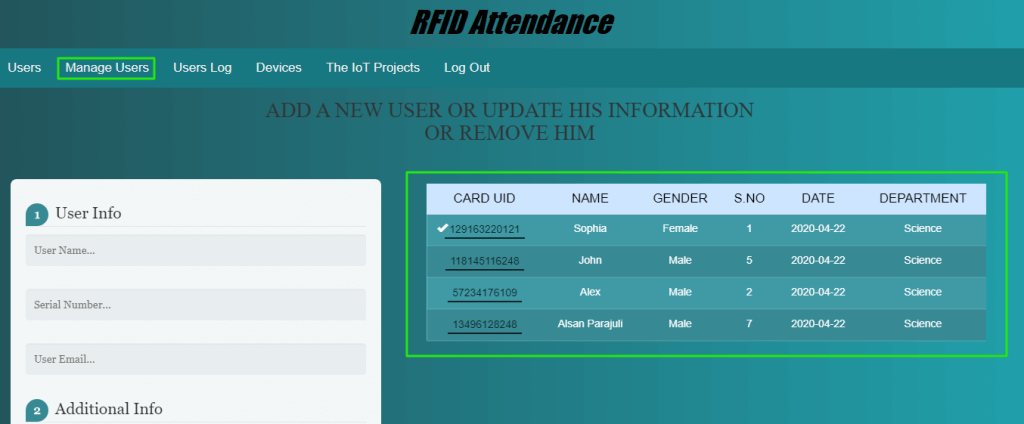
From the admin panel, administrators can add new users, update and remove users using the user management system. Additionally, the administrator can view all attendance records.

Manage Device
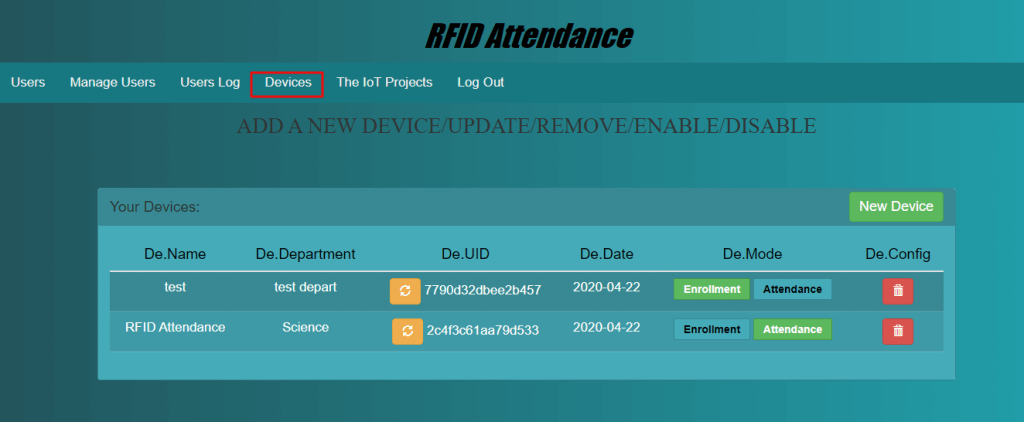
- Add new device
- Update existing device
- Delete device
- Update New token to the device
- Change the device mode (Enrollment mode: to register new users to the system, Attendance Mode: To record attendance of registered users)
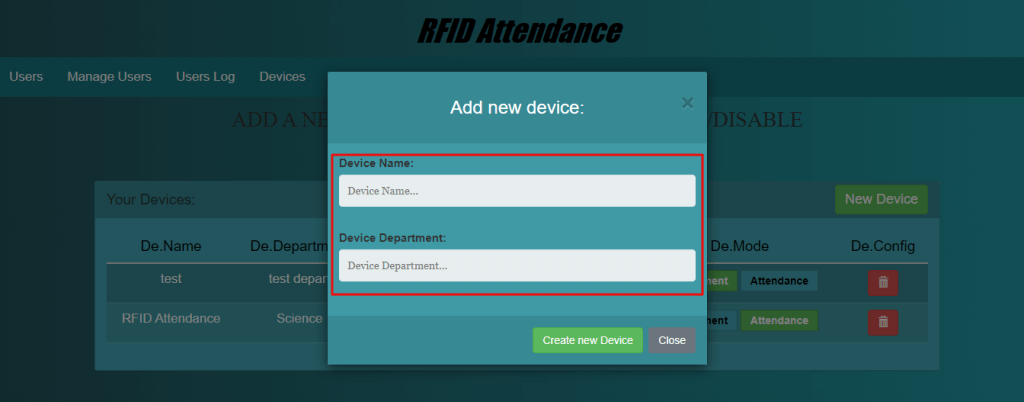
In fact, from device section administrators can add a new device, update, and remove too. To add a new device you need to enter the device name and its depart. Additionally, you can update the device token from the device UID section.
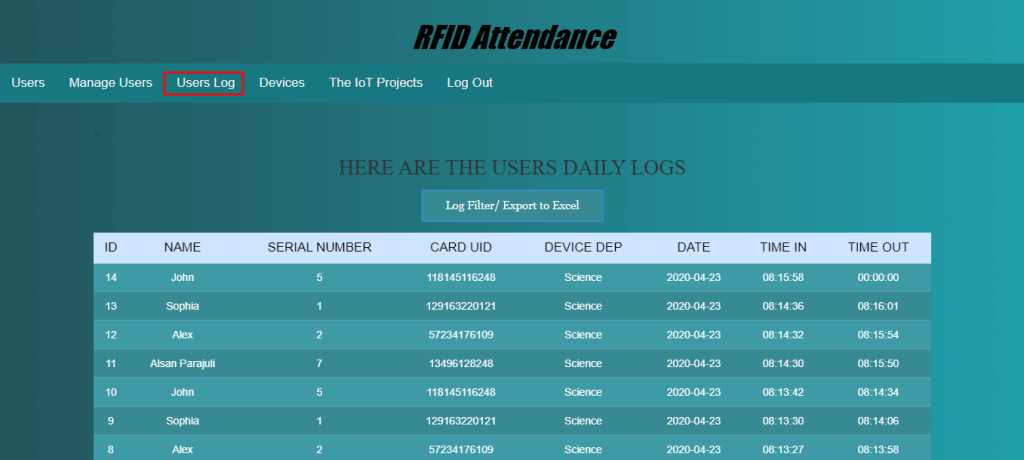
View user log
From the User Log menu, you can navigate to all user log data. You can also see their arrival and departure times. It also filters your logs to filter user, date, arrival time, timeout, and various sections. So you can export that data to Excel.
Components Required
Following are the Hardware and Software components required for making IoT Based RFID Attendance System Using ESP32.
Hardware Components
| S.N | Components Name | Description | Quantity | |
|---|---|---|---|---|
| 1 | ESP32 Board | ESP32 ESP-32S Development Board | 1 | https://amzn.to/3sfU0or |
| 2 | 0.96 Inch OLED Display | 0.96 Inch OLED Module 128x64 SSD1306 Driver I2C Serial Self-Luminous Display Board | 1 | https://amzn.to/3pGssa7 |
| 3 | RFID Module | RFID-RC522 Module | 1 | https://amzn.to/3pOPpb4 |
| 4 | Jumper Wires | Male to Male Jumper Wires | 10 | https://amzn.to/2JWSR44 |
| 5 | Breadboard | Solderless Breadboard MIni | 1 | https://amzn.to/3n33uRT |
Software Components
Technology Used in RFID attendance System with ESP32
Here we are listing all the major required software components for this project to develop the user interface.
- Embedded C: All the hardware interface coding has been done in embedded C Language.
- PHP: All the Logics and web interface is written in PHP Language.
- MYSQL: For database, MYSQL Database is used.
- Apache 2: To run the web interface over the Apache 2 server.
- Javascript and CSS: To Style web Interface with animation and validate the form.
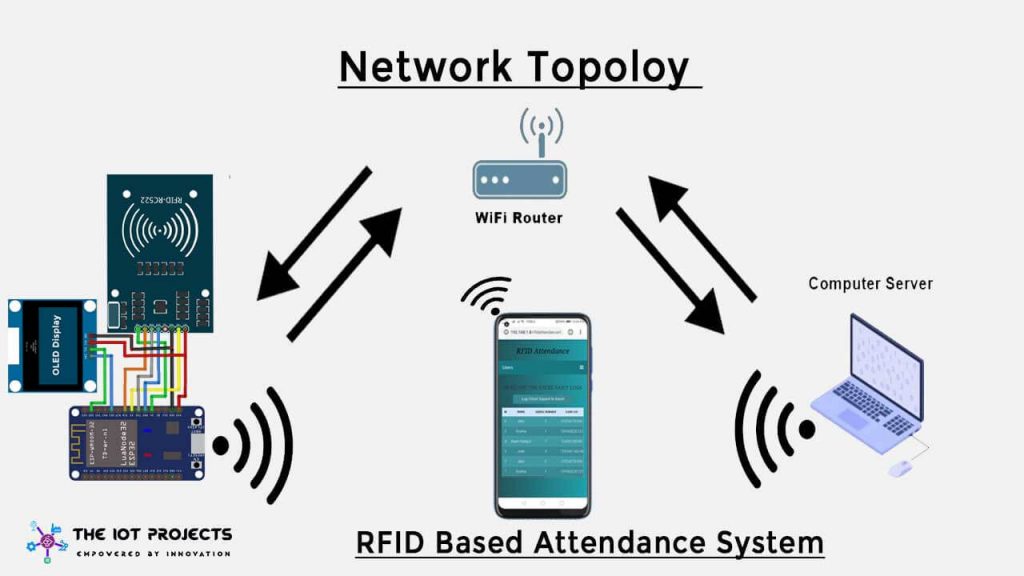
Network Topology: IoT Based RFID Attendance System using ESP32
This is a simple network topology designed to run this project through a local network. Project devices and computer servers are connected to the same network via Wi-Fi.
Now its time to interface all the components together to build the project.
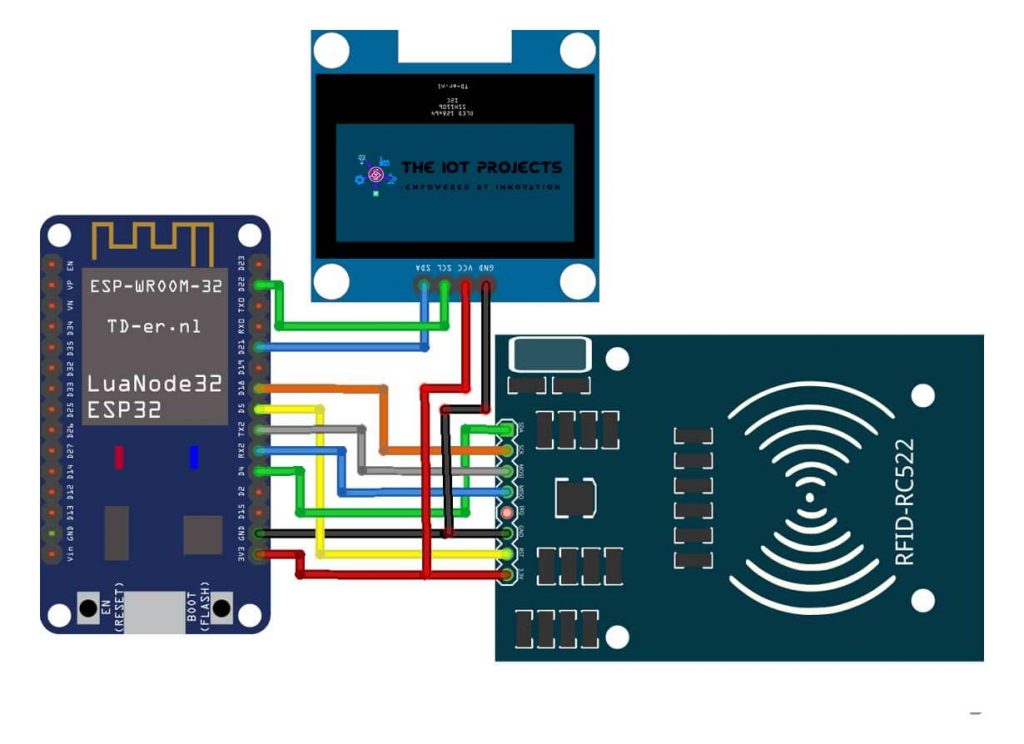
Interfacing RFID RC522 & 0.96″ OLED Display to ESP32 Module
Using the table and circuit diagram provided below you can easily assemble your circuit.
| ESP32 | RFID MFRC522 / RC522 |
| GPIO 4 | SDA/SS |
| GPIO 18 | SCK |
| GPIO 17 | MOSI |
| GPIO 16 | MISO |
| GND | GND |
| GPIO 5 | RST |
| Vcc/3.3v | 3.3V |
| ESP32 | 0.96″OLED Display |
| GPIO 22 | SCL |
| GPIO 21 | SDA |
| GND | GND |
| Vcc | 3.3V/Vin for 5V |
How to run a server for this project?
In fact, we can use this PHP web application on hosting servers as well. However, you need a public IP from your broadband connection to send data to the hosting server.
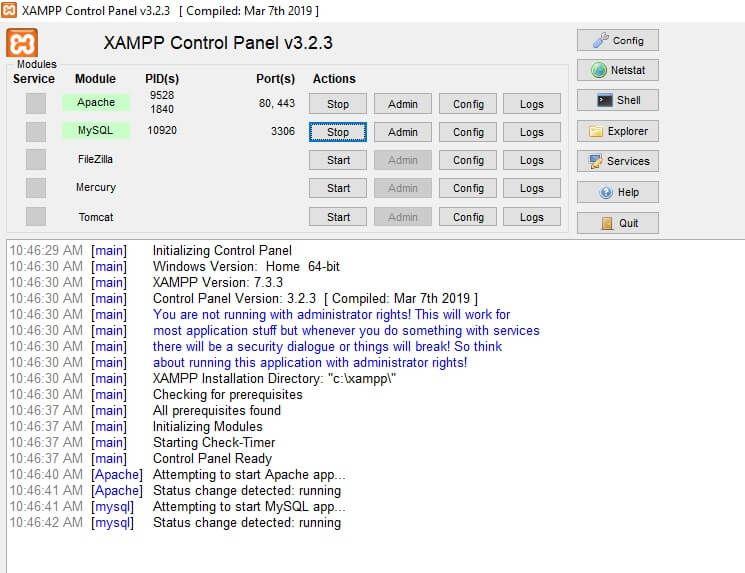
Anyway, we are using the XAMPP server. It can be used on both Windows and Linux. Generally, Ubuntu users can use LAMP which is better than XAMPP. But, I am using Windows so I am going to use the XAMPP server. So you can download XAMPP server from this link
Deploying RFID Attendance Web App
- Start your Mysql and Apache from XAMPP Control Panel.
- Download the PHP web app and the Arduino IDE Program code.
- Extract the file.
- Copy the rfidattendance folder (Main Project folder).
- Paste the folder in C:>xampp/htdocs/ folder.
Now let’s connect the database to the RFID attendance system.
- Open the browser and go to the URL “http://localhost/phpmyadmin/”
- Then click on the database tab.
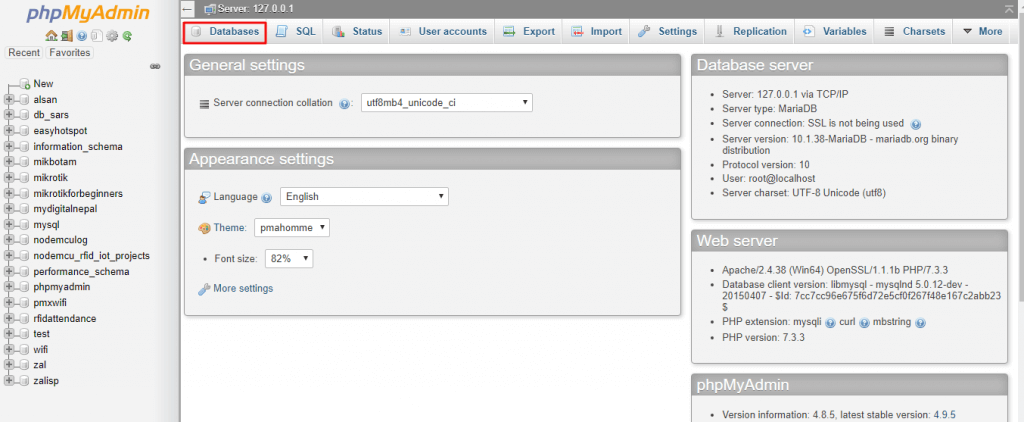
- Create a database name “rfidattendance” and then click on the import tab.
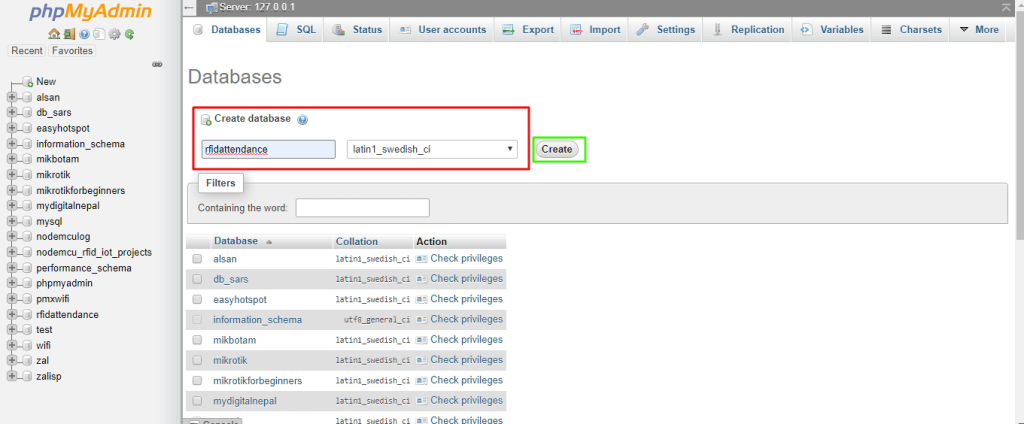
- Click on the browse file and then choose the “rfidattendance.sql” file located inside the rfidattendance folder.

- Click on Go.
After creating a database, open a browser and go to the URL “http://localhost/rfidattenddance/”. Now, the admin login panel will be displayed.
- Enter the admin email and password to enter the system.
- The default admin credentials is: email= admin@gmail.com, and password= 123.
Setting Up Arduino IDE for ESP32
We need to add the esp32 board to our Arduino IDE. Open up your IDE then go to “File -> Preferences” or simply hit “Ctrl + comma”.
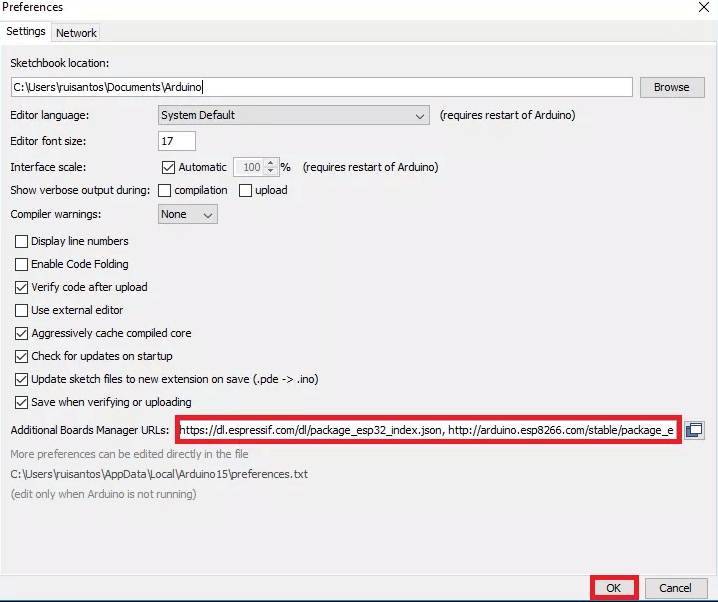
Paste https://dl.espressif.com/dl/package_esp32_index.json in additional board manager URLs.
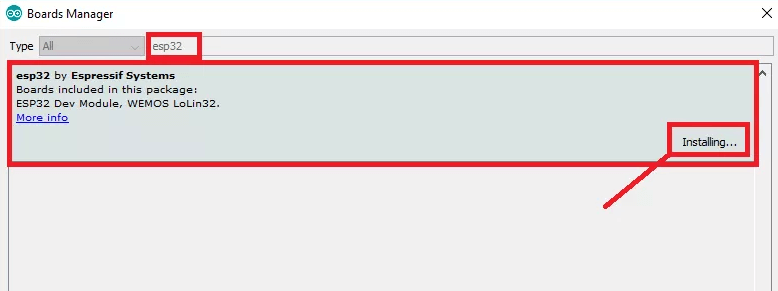
Go to “Tools -> Board -> Boards Manager” search and install ESP32.
Selecting Port and Board
Go to Tools -> Port and select the COM Port of your ESP32. If you are not sure what port your ESP32 is plugged in, go to Device Manager -> Ports (COM & LPT).
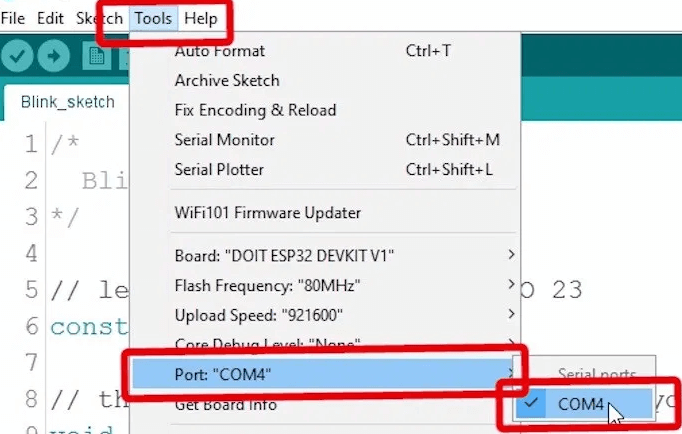
Now select Your ESP32 Board by clicking Tools -> Board. Scroll down until you find it.
Library Files for IoT Based RFID Attendance System
You have to install the following library files to your Arduino IDE Libraries folder:
Program/Sketch Code
The source code for the Portable IoT Based RFID Attendance System using ESP32 is here. In this source code, you need to do some modifications like your WiFi Network credentials, Device token from the website, and PC IP Address.
Include ESP32, RFID, Adafruit GFX, and Adafruit SSD1306 Library header files.
#include <WiFi.h>
#include <HTTPClient.h>
#include <time.h>
//RFID-----------------------------
#include <SPI.h>
#include <MFRC522.h>
//OLED-----------------------------
#include <Wire.h>
#include <Adafruit_GFX.h>
#include <Adafruit_SSD1306.h>
Defining Pin of all the components that are interfaced to ESP32 board.
#define SS_PIN  4 // SCK-GPIO 18, MOSI-GPIO 17, MISO-GPIO 16, Vcc-3.3v, GND -GND,
#define RST_PIN 5
// Declaration for SSD1306 display connected using software I2C pins are(22 SCL, 21 SDA)
#define SCREEN_WIDTH 128 // OLED display width, in pixels
#define SCREEN_HEIGHT 64 // OLED display height, in pixels
#define OLED_RESET     0 // Reset pin # (or -1 if sharing Arduino reset pin)
Adafruit_SSD1306 display(SCREEN_WIDTH, SCREEN_HEIGHT, &Wire, OLED_RESET);
Create MFRC522 instance.
MFRC522 mfrc522(SS_PIN, RST_PIN); Set these to your desired credentials. Your WiFi SSID Name, Password, and Device Token.
const char *ssid = "SSID";
const char *password = "Password";
const char* device_token  = "Device Token";
Replace “x” your timezone.
int timezone = x * 3600;
int time_dst = 0;
Your computer IP or the server domain.
String URL = "http://YourComputerIP/rfidattendance/getdata.php"; Initiate SPI bus and MFRC522 card
SPI.begin();
mfrc522.PCD_Init();
check if there’s a connection to Wi-Fi or not.
if(!WiFi.isConnected())
Retry to connect to Wi-Fi
connectToWiFi();look for new card
if ( ! mfrc522.PICC_IsNewCardPresent()) {go to start of loop if there is no card present
if ( ! mfrc522.PICC_IsNewCardPresent()) {
    return;
Select one of the cards. If read card serial(0) returns 1, the UID struct contains the ID of the read card.
if ( ! mfrc522.PICC_ReadCardSerial()) {
    return;
Send the Card UID to the website.
void SendCardID( String Card_uid ){
  Serial.println("Sending the Card ID");
  if(WiFi.isConnected()){
    HTTPClient http;    //Declare object of class HTTPClient
    //GET Data
    getData = "?card_uid=" + String(Card_uid) + "&device_token=" + String(device_token); // Add the Card ID to the GET array in order to send it
    //GET methode
    Link = URL + getData;
    http.begin(Link); //initiate HTTP request   //Specify content-type header

    int httpCode = http.GET();   //Send the request
    String payload = http.getString();    //Get the response payload

//    Serial.println(Link);   //Print HTTP return code
    Serial.println(httpCode);   //Print HTTP return code
    Serial.println(Card_uid);     //Print Card ID
    Serial.println(payload);    //Print request response payload

    if (httpCode == 200) {
      if (payload.substring(0, 5) == "login") {
        String user_name = payload.substring(5);
    //  Serial.println(user_name);

      }
      else if (payload.substring(0, 6) == "logout") {
        String user_name = payload.substring(6);
    //  Serial.println(user_name);

      }
      else if (payload == "succesful") {

      }
      else if (payload == "available") {

      }
      delay(100);
      http.end();  //Close connection
    }
  }
}
connect to the WiFi
void connectToWiFi(){
    WiFi.mode(WIFI_OFF);        //Prevents reconnection issue (taking too long to connect)
    delay(1000);
    WiFi.mode(WIFI_STA);
    Serial.print("Connecting to ");
    Serial.println(ssid);
    WiFi.begin(ssid, password);

    while (WiFi.status() != WL_CONNECTED) {
      delay(500);
      Serial.print(".");
    }
    Serial.println("");
    Serial.println("Connected");

    Serial.print("IP address: ");
    Serial.println(WiFi.localIP());  //IP address assigned to your ESP

    delay(1000);
}
Print the IP address assigned to your ESP32
Serial.print("IP address: ");
    Serial.println(WiFi.localIP());
Final Code: IoT Based RFID Attendance System using ESP32
Also Read:
/* -----------------------------------------------------------------------------
  - Project: RFID attendance system using ESP32
  - Author:  https://www.youtube.com/ElectronicsTechHaIs
  - Date:  6/03/2020
   -----------------------------------------------------------------------------
  This code was created by Electronics Tech channel for
  the RFID attendance project with ESP32.
   ---------------------------------------------------------------------------*/
//*******************************libraries********************************
//ESP32----------------------------
#include <WiFi.h>
#include <HTTPClient.h>
#include <time.h>
//RFID-----------------------------
#include <SPI.h>
#include <MFRC522.h>
//OLED-----------------------------
#include <Wire.h>
#include <Adafruit_GFX.h>          //https://github.com/adafruit/Adafruit-GFX-Library
#include <Adafruit_SSD1306.h>      //https://github.com/adafruit/Adafruit_SSD1306
//************************************************************************
#define SS_PIN  4 // SCK-GPIO 18, MOSI-GPIO 17, MISO-GPIO 16, Vcc-3.3v, GND -GND,
#define RST_PIN 5
// Declaration for SSD1306 display connected using software I2C pins are(22 SCL, 21 SDA)
#define SCREEN_WIDTH 128 // OLED display width, in pixels
#define SCREEN_HEIGHT 64 // OLED display height, in pixels
#define OLED_RESET     0 // Reset pin # (or -1 if sharing Arduino reset pin)
Adafruit_SSD1306 display(SCREEN_WIDTH, SCREEN_HEIGHT, &Wire, OLED_RESET);
//************************************************************************
MFRC522 mfrc522(SS_PIN, RST_PIN); // Create MFRC522 instance.
//************************************************************************
/* Set these to your desired credentials. */
const char *ssid = "SSID";
const char *password = "Password";
const char* device_token  = "Device Token";
//************************************************************************
int timezone = x * 3600;   //Replace "x" your timezone.
int time_dst = 0;
String getData, Link;
String OldCardID = "";
unsigned long previousMillis1 = 0;
unsigned long previousMillis2 = 0;
String URL = "http://YourComputerIP/rfidattendance/getdata.php"; //computer IP or the server domain
//*************************Biometric Icons*********************************
#define Wifi_start_width 54
#define Wifi_start_height 49
const uint8_t PROGMEM Wifi_start_bits[] = {
  0x00,0x00,0x00,0x00,0x00,0x00,0x00
,0x00,0x00,0x00,0x00,0x00,0x00,0x00
,0x00,0x00,0x00,0x00,0x00,0x00,0x00
,0x00,0x00,0x00,0x00,0x00,0x00,0x00
,0x00,0x00,0x00,0x00,0x00,0x00,0x00
,0x00,0x00,0x1f,0xf0,0x00,0x00,0x00
,0x00,0x03,0xff,0xff,0x80,0x00,0x00
,0x00,0x1f,0xf0,0x1f,0xf0,0x00,0x00
,0x00,0x7e,0x00,0x00,0xfc,0x00,0x00
,0x01,0xf0,0x00,0x00,0x1f,0x00,0x00
,0x03,0xc0,0x00,0x00,0x07,0xc0,0x00
,0x0f,0x00,0x00,0x00,0x01,0xe0,0x00
,0x1c,0x00,0x00,0x00,0x00,0x70,0x00
,0x38,0x00,0x07,0xc0,0x00,0x38,0x00
,0x70,0x00,0xff,0xfe,0x00,0x1e,0x00
,0xe0,0x03,0xfc,0x7f,0xc0,0x0e,0x00
,0x00,0x1f,0x80,0x03,0xf0,0x00,0x00
,0x00,0x3c,0x00,0x00,0x78,0x00,0x00
,0x00,0xf0,0x00,0x00,0x1c,0x00,0x00
,0x01,0xe0,0x00,0x00,0x0c,0x00,0x00
,0x03,0x80,0x00,0x00,0x00,0x00,0x00
,0x03,0x00,0x00,0x00,0x00,0x00,0x00
,0x00,0x00,0x3f,0xf8,0x07,0x1e,0x00
,0x00,0x00,0xff,0xfe,0x1f,0xbf,0x80
,0x00,0x03,0xe0,0x04,0x7f,0xff,0xc0
,0x00,0x07,0x80,0x00,0xff,0xff,0xe0
,0x00,0x0e,0x00,0x00,0xff,0xff,0xe0
,0x00,0x0c,0x00,0x00,0x7f,0xff,0xc0
,0x00,0x00,0x00,0x00,0xfe,0x07,0xe0
,0x00,0x00,0x00,0x03,0xf8,0x03,0xf8
,0x00,0x00,0x07,0xe7,0xf9,0xf1,0xfc
,0x00,0x00,0x1f,0xe7,0xf1,0xf9,0xfc
,0x00,0x00,0x1f,0xe7,0xf3,0xf9,0xfc
,0x00,0x00,0x3f,0xe7,0xf3,0xf9,0xfc
,0x00,0x00,0x3f,0xe7,0xf1,0xf1,0xfc
,0x00,0x00,0x3f,0xe3,0xf8,0xe3,0xfc
,0x00,0x00,0x3f,0xf3,0xfc,0x07,0xf8
,0x00,0x00,0x1f,0xf0,0x7f,0x0f,0xc0
,0x00,0x00,0x0f,0xe0,0x7f,0xff,0xe0
,0x00,0x00,0x07,0xc0,0xff,0xff,0xe0
,0x00,0x00,0x00,0x00,0x7f,0xff,0xe0
,0x00,0x00,0x00,0x00,0x3f,0xff,0x80
,0x00,0x00,0x00,0x00,0x1f,0xbf,0x00
,0x00,0x00,0x00,0x00,0x03,0x18,0x00
,0x00,0x00,0x00,0x00,0x00,0x00,0x00
,0x00,0x00,0x00,0x00,0x00,0x00,0x00
,0x00,0x00,0x00,0x00,0x00,0x00,0x00
,0x00,0x00,0x00,0x00,0x00,0x00,0x00
,0x00,0x00,0x00,0x00,0x00,0x00,0x00
};
#define Wifi_connected_width 63
#define Wifi_connected_height 49
const uint8_t PROGMEM Wifi_connected_bits[] = {
  0x00,0x00,0x00,0x00,0x00,0x00,0x00,0x00
,0x00,0x00,0x00,0x00,0x00,0x00,0x00,0x00
,0x00,0x00,0x00,0x00,0x00,0x00,0x00,0x00
,0x00,0x00,0x00,0x00,0x00,0x00,0x00,0x00
,0x00,0x00,0x00,0x00,0x00,0x00,0x00,0x00
,0x00,0x00,0x00,0x00,0x00,0x00,0x00,0x00
,0x00,0x00,0x00,0x00,0x00,0x00,0x00,0x00
,0x00,0x00,0x03,0xff,0xff,0x80,0x00,0x00
,0x00,0x00,0x3f,0xff,0xff,0xf8,0x00,0x00
,0x00,0x01,0xff,0xff,0xff,0xff,0x00,0x00
,0x00,0x0f,0xff,0xff,0xff,0xff,0xe0,0x00
,0x00,0x3f,0xff,0xc0,0x07,0xff,0xf8,0x00
,0x00,0xff,0xf8,0x00,0x00,0x3f,0xfe,0x00
,0x03,0xff,0x80,0x00,0x00,0x03,0xff,0x80
,0x07,0xfe,0x00,0x00,0x00,0x00,0xff,0xc0
,0x1f,0xf8,0x00,0x00,0x00,0x00,0x3f,0xf0
,0x3f,0xe0,0x01,0xff,0xff,0x00,0x0f,0xf8
,0x7f,0x80,0x0f,0xff,0xff,0xe0,0x03,0xfc
,0xff,0x00,0x7f,0xff,0xff,0xfc,0x01,0xfe
,0xfc,0x01,0xff,0xff,0xff,0xff,0x00,0x7e
,0x78,0x07,0xff,0xc0,0x07,0xff,0xc0,0x3c
,0x00,0x0f,0xfc,0x00,0x00,0x7f,0xe0,0x00
,0x00,0x1f,0xf0,0x00,0x00,0x1f,0xf0,0x00
,0x00,0x3f,0xc0,0x00,0x00,0x07,0xf8,0x00
,0x00,0x7f,0x00,0x01,0x00,0x01,0xfc,0x00
,0x00,0x7e,0x00,0x7f,0xfc,0x00,0xfc,0x00
,0x00,0x3c,0x03,0xff,0xff,0x80,0x78,0x00
,0x00,0x00,0x07,0xff,0xff,0xc0,0x00,0x00
,0x00,0x00,0x1f,0xff,0xff,0xf0,0x00,0x00
,0x00,0x00,0x3f,0xf0,0x1f,0xf8,0x00,0x00
,0x00,0x00,0x3f,0x80,0x03,0xf8,0x00,0x00
,0x00,0x00,0x3f,0x00,0x01,0xf8,0x00,0x00
,0x00,0x00,0x1c,0x00,0x00,0x70,0x00,0x00
,0x00,0x00,0x00,0x01,0x00,0x00,0x00,0x00
,0x00,0x00,0x00,0x0f,0xe0,0x00,0x00,0x00
,0x00,0x00,0x00,0x1f,0xf0,0x00,0x00,0x00
,0x00,0x00,0x00,0x3f,0xf8,0x00,0x00,0x00
,0x00,0x00,0x00,0x3f,0xf8,0x00,0x00,0x00
,0x00,0x00,0x00,0x3f,0xf8,0x00,0x00,0x00
,0x00,0x00,0x00,0x3f,0xf8,0x00,0x00,0x00
,0x00,0x00,0x00,0x1f,0xf0,0x00,0x00,0x00
,0x00,0x00,0x00,0x0f,0xe0,0x00,0x00,0x00
,0x00,0x00,0x00,0x00,0x00,0x00,0x00,0x00
,0x00,0x00,0x00,0x00,0x00,0x00,0x00,0x00
,0x00,0x00,0x00,0x00,0x00,0x00,0x00,0x00
,0x00,0x00,0x00,0x00,0x00,0x00,0x00,0x00
,0x00,0x00,0x00,0x00,0x00,0x00,0x00,0x00
,0x00,0x00,0x00,0x00,0x00,0x00,0x00,0x00
,0x00,0x00,0x00,0x00,0x00,0x00,0x00,0x00
};
//************************************************************************
void setup() {
  delay(1000);
  Serial.begin(115200);
  SPI.begin();  // Init SPI bus
  mfrc522.PCD_Init(); // Init MFRC522 card
  //-----------initiate OLED display-------------
  if(!display.begin(SSD1306_SWITCHCAPVCC, 0x3C)) { // Address 0x3D for 128x64
    Serial.println(F("SSD1306 allocation failed"));
    for(;;); // Don't proceed, loop forever
  }
  // you can delet these three lines if you don't want to get the Adfruit logo appear
  display.display();
  delay(2000); // Pause for 2 seconds
  display.clearDisplay();
  //---------------------------------------------
  connectToWiFi();
  //---------------------------------------------
  configTime(timezone, time_dst, "pool.ntp.org","time.nist.gov");
}
//************************************************************************
void loop() {
  //check if there's a connection to Wi-Fi or not
  if(!WiFi.isConnected()){
    connectToWiFi();    //Retry to connect to Wi-Fi
  }
  //---------------------------------------------
  if (millis() - previousMillis1 >= 1000) {
    previousMillis1 = millis();
    display.clearDisplay();

    time_t now = time(nullptr);
    struct tm* p_tm = localtime(&now);
    display.setTextSize(1);             // Normal 2:2 pixel scale
    display.setTextColor(WHITE);        // Draw white text
    display.setCursor(10,0);
    Serial.println(p_tm);
    display.setTextSize(4);             // Normal 2:2 pixel scale
    display.setTextColor(WHITE);        // Draw white text
    display.setCursor(0,21);
    if ((p_tm->tm_hour)<10) {display.print("0");display.print(p_tm->tm_hour);}
    else display.print(p_tm->tm_hour);
    display.print(":");
    if ((p_tm->tm_min)<10) {display.print("0");display.println(p_tm->tm_min);}
    else display.println(p_tm->tm_min);
    display.display();
  }
  //---------------------------------------------
  if (millis() - previousMillis2 >= 15000) {
    previousMillis2 = millis();
    OldCardID="";
  }
  delay(50);
  //---------------------------------------------
  //look for new card
  if ( ! mfrc522.PICC_IsNewCardPresent()) {
    return;//got to start of loop if there is no card present
  }
  // Select one of the cards
  if ( ! mfrc522.PICC_ReadCardSerial()) {
    return;//if read card serial(0) returns 1, the uid struct contians the ID of the read card.
  }
  String CardID ="";
  for (byte i = 0; i < mfrc522.uid.size; i++) {
    CardID += mfrc522.uid.uidByte[i];
  }
  //---------------------------------------------
  if( CardID == OldCardID ){
    return;
  }
  else{
    OldCardID = CardID;
  }
  //---------------------------------------------
//  Serial.println(CardID);
  SendCardID(CardID);
  delay(1000);
  display.clearDisplay();
}
//************send the Card UID to the website*************
void SendCardID( String Card_uid ){
  Serial.println("Sending the Card ID");
  if(WiFi.isConnected()){
    HTTPClient http;    //Declare object of class HTTPClient
    //GET Data
    getData = "?card_uid=" + String(Card_uid) + "&device_token=" + String(device_token); // Add the Card ID to the GET array in order to send it
    //GET methode
    Link = URL + getData;
    http.begin(Link); //initiate HTTP request   //Specify content-type header

    int httpCode = http.GET();   //Send the request
    String payload = http.getString();    //Get the response payload

//    Serial.println(Link);   //Print HTTP return code
    Serial.println(httpCode);   //Print HTTP return code
    Serial.println(Card_uid);     //Print Card ID
    Serial.println(payload);    //Print request response payload

    if (httpCode == 200) {
      if (payload.substring(0, 5) == "login") {
        String user_name = payload.substring(5);
    //  Serial.println(user_name);

        display.clearDisplay();
        display.setTextSize(2);             // Normal 2:2 pixel scale
        display.setTextColor(WHITE);        // Draw white text
        display.setCursor(15,0);             // Start at top-left corner
        display.print(F("Welcome"));
        display.setCursor(0,20);
        display.print(user_name);
        display.display();
      }
      else if (payload.substring(0, 6) == "logout") {
        String user_name = payload.substring(6);
    //  Serial.println(user_name);

        display.clearDisplay();
        display.setTextSize(2);             // Normal 2:2 pixel scale
        display.setTextColor(WHITE);        // Draw white text
        display.setCursor(10,0);             // Start at top-left corner
        display.print(F("Good Bye"));
        display.setCursor(0,20);
        display.print(user_name);
        display.display();
      }
      else if (payload == "succesful") {
        display.clearDisplay();
        display.setTextSize(2);             // Normal 2:2 pixel scale
        display.setTextColor(WHITE);        // Draw white text
        display.setCursor(5,0);             // Start at top-left corner
        display.print(F("New Card"));
        display.display();
      }
      else if (payload == "available") {
        display.clearDisplay();
        display.setTextSize(2);             // Normal 2:2 pixel scale
        display.setTextColor(WHITE);        // Draw white text
        display.setCursor(5,0);             // Start at top-left corner
        display.print(F("Free Card"));
        display.display();
      }
      delay(100);
      http.end();  //Close connection
    }
  }
}
//********************connect to the WiFi******************
void connectToWiFi(){
    WiFi.mode(WIFI_OFF);        //Prevents reconnection issue (taking too long to connect)
    delay(1000);
    WiFi.mode(WIFI_STA);
    Serial.print("Connecting to ");
    Serial.println(ssid);
    WiFi.begin(ssid, password);

    display.clearDisplay();
    display.setTextSize(1);             // Normal 1:1 pixel scale
    display.setTextColor(WHITE);        // Draw white text
    display.setCursor(0, 0);             // Start at top-left corner
    display.print(F("Connecting to n"));
    display.setCursor(0, 50);
    display.setTextSize(2);
    display.print(ssid);
    display.drawBitmap( 73, 10, Wifi_start_bits, Wifi_start_width, Wifi_start_height, WHITE);
    display.display();

    while (WiFi.status() != WL_CONNECTED) {
      delay(500);
      Serial.print(".");
    }
    Serial.println("");
    Serial.println("Connected");

    display.clearDisplay();
    display.setTextSize(2);             // Normal 1:1 pixel scale
    display.setTextColor(WHITE);        // Draw white text
    display.setCursor(8, 0);             // Start at top-left corner
    display.print(F("Connected n"));
    display.drawBitmap( 33, 15, Wifi_connected_bits, Wifi_connected_width, Wifi_connected_height, WHITE);
    display.display();

    Serial.print("IP address: ");
    Serial.println(WiFi.localIP());  //IP address assigned to your ESP

    delay(1000);
}
//=======================================================================
Thank You so much Electronics Tech Channel for this awesome Project.
Conclusion
Finally, we have completed the IoT Based RFID Attendance System Using ESP32 with a Website and Database. I hope you found this project useful! Drop a comment below if you have any doubts or queries. l will try my best to answer your questions.
Also Read:


Hello how do i change time in and out acording to my country time zone ?
replace x with a numer . like 1 is = +1 hour
Great work! But can we use MQTT protocol instead of http in this project. If yes then can you please explain in brief as how to use it.
can i do this using esp8266
Yes you can do
can you make the tutorial sir?
bhai apka ho gya ye project muche a=bata to kaise krn
Hi Alsan the password is not 123. I change it in db with MD5 field but doesn.t work. Whot can I do? thanks
if I want to add a mlx90614 sensor to the database, how do I do it? Help me
Hi Alsan,
After successfully getting a WEMOS d1 mini running with NodeMCU_RFIDv2.0.INO with your help.
I now want to run my ESP32-WROOM with ESP32_RFID.INO.
I see in serial port:
Connecting to Ziggo6480948
…..
Connected
IP address: 192.168.178.117
Thu Jan 1 02:00:07 1970
Sat May 8 02:17:22 2021
Sat May 8 02:17:23 2021
Sat May 8 02:17:24 2021
Sat May 8 02:17:25 2021
Sat May 8 02:17:26 2021
And date and time keeps running ….
I have no response when I hold a card in front of the RFID RC522 Module.
I use same IP adres as with NodeMCU_RFIDv2.0.INO so connection doesn’t seems the problem.
Do you have any idea why that is?
pudiste solucionar el problema con la esp32 para que la fecha y la hora no siguen corriendo?
Hi i have a problem with exporting to excel after i click export to excel nothing is going to my downloads as spreadsheet for user logs how can i fix it please ?
I got the same problem exporting to excel. Anyone can help solve this problem
i have the same problem did you find solution ? please help me
Hey did your figure out how to do this?
I think there is any problem in code for logout from the system, because the system is always showing login indication. Is there any solution for this?
Just for reference. Someone will face problem in the user log is because the database not accepting the am & pm in the time string. Just remove the a inside getdata.php on [h:i:sa]
How do you do this? Currently having this problem
Can you show me how to make a connection for ESP32 because u are showing a connection for ESP8266..Then, how to import ESP32 library..
Hi, why I can’t add new device, and also when I clicked at “Admin” it doesn’t do what it supposed to do, means the page doesn’t reload
Hi, is there any solution since when I clicked on the “Admin” and “New Device” the page doesn’t reload to its page. I really needs someones help
Hi, have you solved this problem yet? If you have, can you email me: adam.mikhaild@gmail.com
rfid RC522 – AZDelivery ESP32-wroom-23
SDK-g4
SCK-g18
MOSI-g23
MISO-g19
GND-GND
RST-g5
3.3v-3.3v
DPL-AZDelivery ESP32-wroom-23
SDA-g21
SCL-g22
VCC-3.3v
Hey thanks for the awesome project and resources. Unfortunately it seems there are way too many bugs with all the code in all of the source files rendering this project non usable because I have no PHP knowledge to fix it,
However thanks to your the Arduino source code you have provided, I was able to take the useable bits and reprogram it to be used with my own API server built with Node, Express, and Mongoose, so thank you for the fun project and now it works great!
I can’t register new user, the device not detected rfid card. plz help me.
Hi George,
did you find a solution to your problem?? I’ve the same behaviour with my esp32. I’ve alredy tested the sketch on the esp8266 and works great. I leave you my mail in case you’d like to help me. Thanks Roberto
hi Roberto,
Unfortunately I couldn’t get it to work on the ESP32.
Sadly no response from the developer which is a shame as I think he certainly has the knowledge to get it working on an ESP32.
As I said in my post it works fine on my WEMOS D1 mini / ESP8266.
However, I have given up on the project….. As soon as it works on an ESP32 I may start working on it again.
So if you can do it, please let me know.
Have a nice day and stay healthy.
Hi George,
finally after many hours I can proudly say to have the solution!!!
On esp32 you need to first define the pins where connect the RF522 to. So try this!!
******************************************************************************
//RFID libraries—————————–
#include
#include
//than replace with your pin numbers the following lines
#define SS_PIN 4
#define RST_PIN 5
#define SCK_PIN 18
#define MISO_PIN 16
#define MOSI_PIN 17
//in the setup section nothing to change, just copy and paste
void setup() {
Serial.begin(115200);
SPI.begin(SCK_PIN, MISO_PIN, MOSI_PIN); // Init SPI bus
mfrc522.PCD_Init(); // Init MFRC522 card
}
void loop() {
}
*********************************************************************************
Let me know if it works, I’m pretty sure it will !!!
Greetings from italy
Roberto
hiii i checked and updated the codes it seems to throw
what a great solution, thank u a lot
Hello, my problem about accessing the local URL is “Not Found
The requested URL was not found on this server.” that is the response, how can I do with that?
Hello, the response of URL is “Not Found
The requested URL was not found on this server”. and it cannot proceed to RFID attendance website. How should I do?
hey if u dont mind can you share your solution to me? my email is reynaldykwok@gmail.com
Thank you very much, appreciated!!
i have the same problem
Hello! I have issue with the website not displaying prompt/popup as it should. I have tried disabling extensions, which does not work. My RC522 module also does not seem to detect my RFID tags/cards. Can you help me out resolving this issue? Thanks!
ma a qualcuno ha funzionato con esp32???
how to send this data to cloud
To those that are having issues with reading the card for the ESP32, the issues are the pins which is why the card is not sending data to the website. Here are the pins i have configured;
SS/SDA Pin = GPIO 5
SCK Pin = GPIO 18
MOSI Pin = GPIO 23
MISO Pin = GPIO 19
IRQ Pin = empty
GND Pin = GND
RST Pin = GPIO 27
VCC Pin = 3.3V
Change the pin definitions in the top of the code to;
#define SS_PIN 5
#define RST_PIN 27
#define SCK_PIN 18
#define MISO_PIN 19
#define MOSI_PIN 23
and change the void setup() code to;
void setup() {
delay(1000);
Serial.begin(115200);
SPI.begin(SCK_PIN, MISO_PIN, MOSI_PIN); // Init SPI bus
mfrc522.PCD_Init(); // Init MFRC522 card
//———–initiate OLED display————-
if(!display.begin(SSD1306_SWITCHCAPVCC, 0x3C)) { // Address 0x3D for 128×64
Serial.println(F(“SSD1306 allocation failed”));
for(;;); // Don’t proceed, loop forever
}
// you can delet these three lines if you don’t want to get the Adfruit logo appear
display.display();
delay(2000); // Pause for 2 seconds
display.clearDisplay();
//———————————————
connectToWiFi();
//———————————————
configTime(timezone, time_dst, “pool.ntp.org”,”time.nist.gov”);
}
Hope this fixes the issues for ESP32 users. 🙂
Can I email you.
hii i have tried the above codes and it doesnt seem to respond on the website it would be really helpfull if we could get in touch
how to add a card …?
Have you know how to add a card
Can I email you.
hi am trying to use the esp 32with thw above codes and have not been succesfull
could u provide me with ur phone number
6361201032
Hello,
how does the idea to do this project with esp32-cam, when the card/tag is read to take a photo of the user.
How do we d=find timezone
hello good day
how to solve this error.
The requested URL was not found on this server.
Apache/2.4.56 (Win64) OpenSSL/1.1.1t PHP/8.2.4 Server at localhost Port 80
bonjour , j’ai aussi le même problème , avez vous trouver le solution ? merci
This is the error i am facing can someone help me please
Arduino: 1.8.19 (Linux), Board: “Arduino Uno”
ESP32_RFID:12:10: fatal error: HTTPClient.h: No such file or directory
#include
^~~~~~~~~~~~~~
compilation terminated.
exit status 1
HTTPClient.h: No such file or directory
Error downloading https://downloads.arduino.cc/packages/package_index.json
This report would have more information with
“Show verbose output during compilation”
option enabled in File -> Preferences.
anyone can tell me how to add RFID card on website
Thank you for this project. It’s very good and useful. But I don’t understand the Manage Device part. What is this system used for? Can anyone explain it to me? Sorry I’m Vietnamese
Hello well done excellent work works perfectly but the filter on the UsersLog page does not work message filter applied but nothing is displayed why?
hey sir how do i do the oled thing in esp 8266? can you give me the schema for it?