ESP32 CAM Object Detection & Identification with OpenCV
Object Detection & Identification with ESP32 CAM & OpenCV
- Overview: ESP32 CAM Based Object Detection & Identification System
- Components Required
- ESP32-CAM FTDI Connection
- Project PCB Gerber File & PCB Ordering Online
- Guide to Installing ESP32 CAM Library
- Source Code for ESP32 CAM Module
- Uploading Code to ESP32 CAM Module
- Python Library Installation
- Python Code for ESP32 CAM Object Detection/Identification
- Replacing IP Address in Python Code
- Conclusion
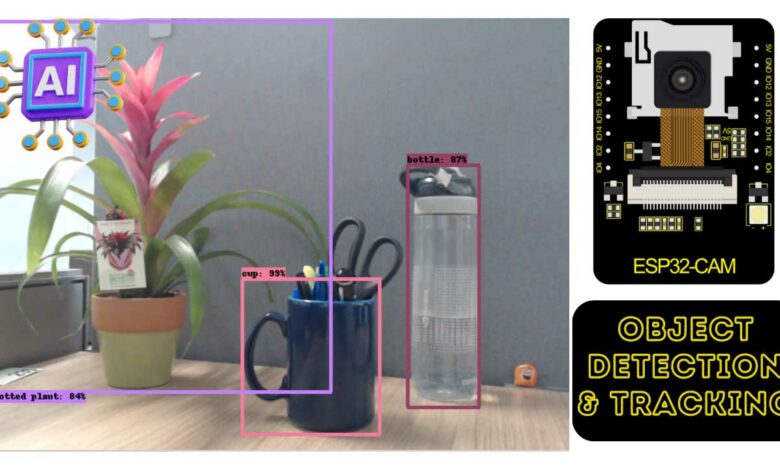
Overview: ESP32 CAM Based Object Detection & Identification System
Welcome to this tutorial on ESP32 CAM Based Object Detection & Identification with OpenCV. OpenCV is a powerful, open-source image processing library that is widely used in industry, as well as in research and development.
For object detection, we will use the cvlib Library, which utilizes a pre-trained AI model on the COCO dataset to detect objects. Specifically, we will be using the YOLOv3 pre-trained model.
Throughout this tutorial, we will explore the features of the ESP32 Camera Module and its pins, and demonstrate how to program it using an FTDI Module. We will also set up the Arduino IDE for the ESP32 Camera Module and upload the firmware. After that, we will dive into the object detection & identification aspect of the project. To accomplish this, we will write a script in Python, which is the language used for this project. In order to follow along, we will need to install Python and the required Libraries.
In a previous ESP32 CAM Based project, we explored a QR Code Scanner with ESP32 CAM Module & OpenCV. This project also utilizes OpenCV for Object Detection & Identification.
Components Required
Below is a list of materials needed to build an ESP32 CAM Based Object Detection & Identification System. When combined with other hardware and firmware, the ESP32 CAM can track and identify objects. All components can be purchased on Amazon.
| S.N | COMPONENTS NAME | QUANTITY | PURCHASE LINKS |
|---|---|---|---|
| 1 | ESP32-CAM Board AI-Thinker | 1 | Amazon | AliExpress |
| 2 | FTDI Module | 1 | Amazon | AliExpress |
| 3 | Micro-USB Cable | 1 | Amazon | AliExpress |
| 4 | Jumper Cables | 10 | Amazon | AliExpress |
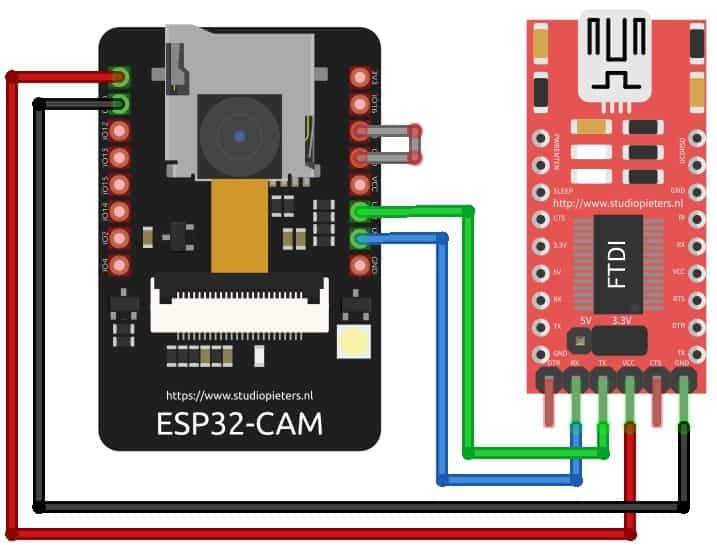
ESP32-CAM FTDI Connection
The board does not have a programmer chip, so in order to program it, any USB-to-TTL module can be used. There are numerous FTDI modules available based on the CP2102 or CP2104 chip, among others.
To connect the FTDI module to the ESP32 CAM module, make the following connections:
| ESP32-CAM | FTDI Programmer |
| GND | GND |
| 5V | VCC |
| U0R | TX |
| U0T | RX |
| GPIO0 | GND |
To connect the ESP32 module to the FTDI module, follow these steps: First, connect the 5V and GND pins of the ESP32 module to the 5V and GND pins of the FTDI module. Next, connect the Rx pin of the ESP32 module to the UOT pin of the FTDI module and the Tx pin of the ESP32 module to the UOR pin of the FTDI module.
Finally, it is essential to shorten the IO0 and GND pins together to put the device in programming mode. Once programming is complete, this connection can be removed.
Project PCB Gerber File & PCB Ordering Online
If you don’t want to assemble the circuit on a breadboard and you want PCB for the project, then here is the PCB for you. The PCB Board for the Arducam Board looks something like the one below.
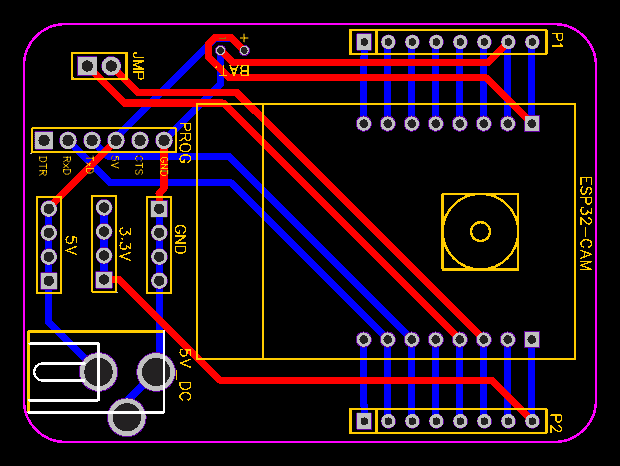
The Gerber File for the PCB is given below. You can simply download the Gerber File and order the PCB from https://www.pcbway.com/
Now you can visit the PCBWay official website by clicking here: https://www.pcbway.com/. So you will be directed to the PCBWay website.

You can now upload the Gerber File to the Website and place an order. The PCB quality is superb & high. That is why most people trust PCBWay for PCB & PCBA Services.
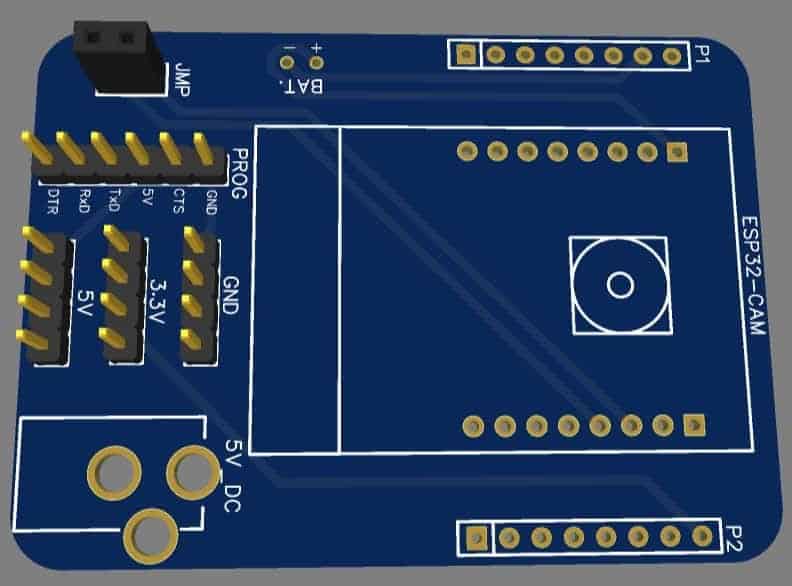
The two-dimensional view of the printed circuit board (PCB) is truly impressive. It has the potential to look lifelike once all the components have been assembled onto the PCB.
Guide to Installing ESP32 CAM Library
For this project, we will not be using the general ESP webserver example, but instead a streaming process. To accomplish this, we will need to add another library to our setup: the ESPCAM library. This library provides an object-oriented API for using the OV2640 camera on the ESP32 microcontroller and is a wrapper of the esp32-camera library.
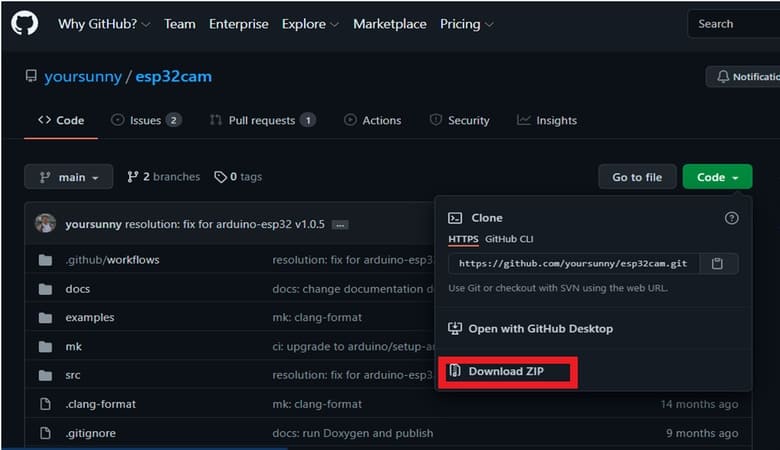
To download the ESPCAM library, simply go to the following Github link and download the zip library as shown in the image.
Once the library is downloaded, we need to add it to the Arduino Library Folder. Follow these steps to do so:
- Open Arduino
- Go to Sketch
- Click on Include Library
- Select Add .ZIP Library…
- Navigate to the downloaded zip file and select it to add it to the library
Source Code for ESP32 CAM Module
Below is the source code for Object Detection & Identification using ESP32 Camera and OpenCV. To use it, simply copy the code and paste it into the Arduino IDE.
#include <WebServer.h>
#include <WiFi.h>
#include <esp32cam.h>

const char* WIFI_SSID = "Your SSID";
const char* WIFI_PASS = "Your Password";

WebServer server(80);


static auto loRes = esp32cam::Resolution::find(320, 240);
static auto midRes = esp32cam::Resolution::find(350, 530);
static auto hiRes = esp32cam::Resolution::find(800, 600);
void serveJpg()
{
  auto frame = esp32cam::capture();
  if (frame == nullptr) {
    Serial.println("CAPTURE FAIL");
    server.send(503, "", "");
    return;
  }
  Serial.printf("CAPTURE OK %dx%d %dbn", frame->getWidth(), frame->getHeight(),
                static_cast<int>(frame->size()));

  server.setContentLength(frame->size());
  server.send(200, "image/jpeg");
  WiFiClient client = server.client();
  frame->writeTo(client);
}

void handleJpgLo()
{
  if (!esp32cam::Camera.changeResolution(loRes)) {
    Serial.println("SET-LO-RES FAIL");
  }
  serveJpg();
}

void handleJpgHi()
{
  if (!esp32cam::Camera.changeResolution(hiRes)) {
    Serial.println("SET-HI-RES FAIL");
  }
  serveJpg();
}

void handleJpgMid()
{
  if (!esp32cam::Camera.changeResolution(midRes)) {
    Serial.println("SET-MID-RES FAIL");
  }
  serveJpg();
}


void  setup(){
  Serial.begin(115200);
  Serial.println();
  {
    using namespace esp32cam;
    Config cfg;
    cfg.setPins(pins::AiThinker);
    cfg.setResolution(hiRes);
    cfg.setBufferCount(2);
    cfg.setJpeg(80);

    bool ok = Camera.begin(cfg);
    Serial.println(ok ? "CAMERA OK" : "CAMERA FAIL");
  }
  WiFi.persistent(false);
  WiFi.mode(WIFI_STA);
  WiFi.begin(WIFI_SSID, WIFI_PASS);
  while (WiFi.status() != WL_CONNECTED) {
    delay(500);
  }
  Serial.print("http://");
  Serial.println(WiFi.localIP());
  Serial.println("  /cam-lo.jpg");
  Serial.println("  /cam-hi.jpg");
  Serial.println("  /cam-mid.jpg");

  server.on("/cam-lo.jpg", handleJpgLo);
  server.on("/cam-hi.jpg", handleJpgHi);
  server.on("/cam-mid.jpg", handleJpgMid);

  server.begin();
}

void loop()
{
  server.handleClient();
}
Uploading Code to ESP32 CAM Module
Before uploading the code, you must make a small change to the code by updating the SSID and password variables to match your WiFi network.
Once you have made this change, compile and upload the code to the ESP32 CAM board. However, there are a few steps you must follow every time you upload the code:
Ensure the IO0 pin is shorted with the ground when you press the upload button. If you see dots and dashes while uploading, press the reset button immediately.
Once the code is uploaded, remove the IO0 pin shorting with Ground and press the reset button once again. If the output in the Serial monitor does not appear, press the reset button again. You should now see a similar output to the image below.
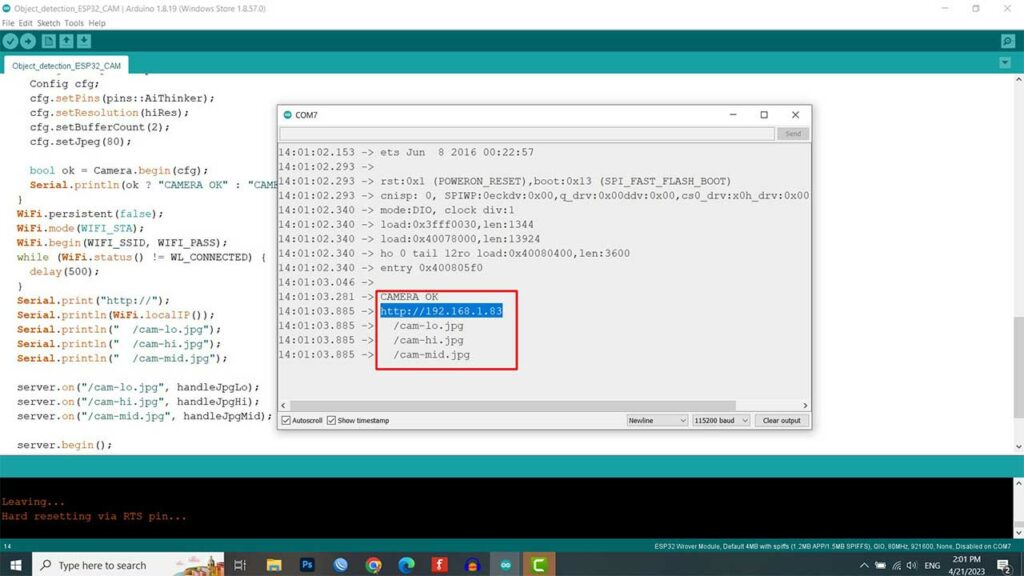
Copy the visible IP address, as we will use it to edit the URL in the Python code.
Python Library Installation
To enable us to retrieve the frames of the live video stream on our computer, we need to write a Python script. The first step is to install Python. To do this, go to python.org and download Python.
Once downloaded, install Python. Then, open the command prompt and install the NumPy, OpenCV, and cvlib libraries by typing the following commands:
- pip install numpy
- pip install opencv-python
- pip install cvlib and tensorflow
- After each installation is complete, close the command prompt.
In our Python code, we use urllib.request to retrieve the frames from the URL and the OpenCV library for image processing. For object detection, we use the Cvlib library which utilizes an AI model. As this process requires a good amount of processing power, we have used multiprocessing to utilize multiple cores of our CPU.
Python Code for ESP32 CAM Object Detection/Identification
To begin, open Idle code editor or any other Python code editor. Copy and paste the code below, and replace the IP address in the URL with the IP address you copied earlier.
import cv2
import matplotlib.pyplot as plt
import cvlib as cv
import urllib.request
import numpy as np
from cvlib.object_detection import draw_bbox
import concurrent.futures

url='http://192.168.1.83/cam-hi.jpg'
im=None

def run1():
    cv2.namedWindow("live transmission", cv2.WINDOW_AUTOSIZE)
    while True:
        img_resp=urllib.request.urlopen(url)
        imgnp=np.array(bytearray(img_resp.read()),dtype=np.uint8)
        im = cv2.imdecode(imgnp,-1)

        cv2.imshow('live transmission',im)
        key=cv2.waitKey(5)
        if key==ord('q'):
            break

    cv2.destroyAllWindows()

def run2():
    cv2.namedWindow("detection", cv2.WINDOW_AUTOSIZE)
    while True:
        img_resp=urllib.request.urlopen(url)
        imgnp=np.array(bytearray(img_resp.read()),dtype=np.uint8)
        im = cv2.imdecode(imgnp,-1)

        bbox, label, conf = cv.detect_common_objects(im)
        im = draw_bbox(im, bbox, label, conf)

        cv2.imshow('detection',im)
        key=cv2.waitKey(5)
        if key==ord('q'):
            break

    cv2.destroyAllWindows()


if __name__ == '__main__':
    print("started")
    with concurrent.futures.ProcessPoolExecutor() as executer:
            f1= executer.submit(run1)
            f2= executer.submit(run2)
Replacing IP Address in Python Code
To continue with the object detection and identification process, we need to replace the IP address in the Python code with the IP address visible on the Arduino Serial Monitor. If the required files are not present in the system, it will install them automatically for the first time.
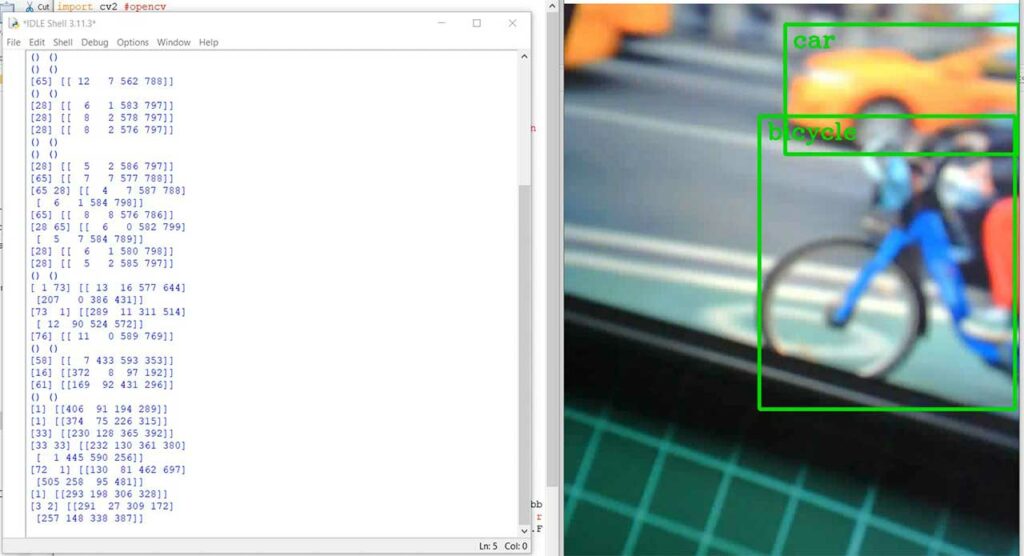
Upon successful installation, we can observe the window named “ESP32 CAM“. This window displays various detected objects as different colored boxes around them.
Video Tutorial & Guide
Conclusion
So. that’s all about ESP32 CAM Object Detection & Identification with OpenCV Python Libraries. Object detection has a wide range of applications in various industries. It can be used for object tracking, people counting, automated CCTV surveillance, vehicle detection, and more. These are just a few examples, and the possibilities are endless.
Need help with the project, please.
using “Python 3.11.4 (tags/v3.11.4:d2340ef, Jun 7 2023, 05:45:37) [MSC v.1934 64 bit (AMD64)] on win32
Type “help”, “copyright”, “credits” or “license()” for more information.
= RESTART: C:\Users\ajper\AppData\Local\Programs\Python\Python311\Code for object recog on ESP32.py
started”
A window headed detection opens but it is blank and shows it isn’t responding. Another window headed live transmission shows what the camera sees.
Do you know what I may have done wrong?
Nice project !
I have a problem with detection. The Detection window pops up but stays black.
There is a live transmission window, this works well.
The OS is windows 10.
Python version: 3.9.2
Compiling of the .ino file in the Ardfuino IDE ia succesful.
I installed all libraries needed with pip install.
No error messages or warnings.
Have you any idea what is missing ?
Hi! Did you find out the solution? Because I’m having the same problem… If you find out the solution Please tell me as well.
Thanks!
Same, how to solve
same……how to solve?