Arduino RFID Master Card Door Lock with EEPROM
RFID Door Lock with Arduino & MF-RC522 Module
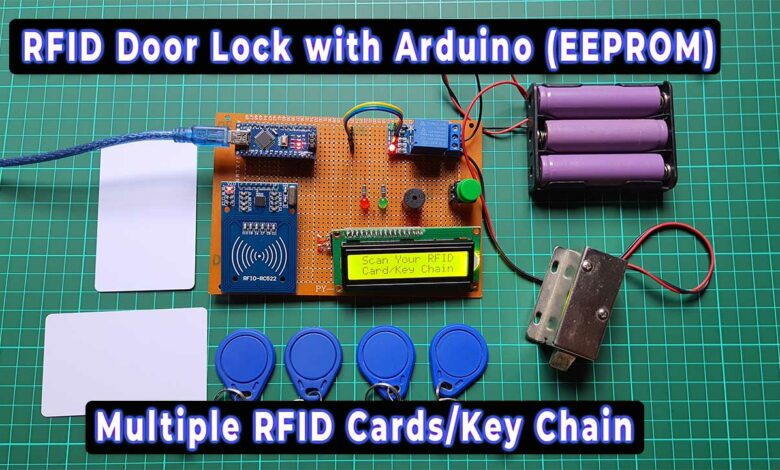
Today we will build an Arduino based RFID Master Card Door Lock with EEPROM functionality. The system uses an RFID RC522 reader module to read RFID cards, and a solenoid door lock to lock or unlock the door. The program allows for multiple RFID cards to be added/removed from the system. A master card is used to perform administrative tasks such as adding or removing cards. This feature provides flexibility and convenience, as users can add or remove cards as needed without having to reprogram the entire system.
Overview: RFID Door Lock with EEPROM
The project includes an EEPROM module that can store up to 20 card data, allowing users to customize access to their homes or businesses. So this EEPROM based Arduino RFID door lock is a versatile project that offers a wide range of useful features for home security systems.
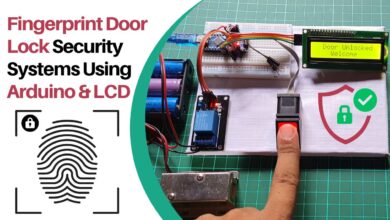
The project also features a built-in LCD screen that displays important information such as access granted or denied notifications, the status of the system, newly added card or Removed cards and Mastercard Detection on LCD. The LCD screen makes the system easy to use and understand, as users can quickly see if access has been granted or denied and identify any issues that need to be addressed.
Other notable features of this project include a buzzer that provides audible feedback when access is granted or denied and LED lights that indicate the system’s status. The project is also equipped with a button that can be used to override the system and open the door manually if needed. We can use a jumper and place this button on the back panel of the door. So that when you are inside the room you can easily press this button and unlock the door without RFID cards.
Overall, this RFID-based solenoid door lock using Arduino is a practical and user-friendly project that offers a wide range of useful features for home security systems.
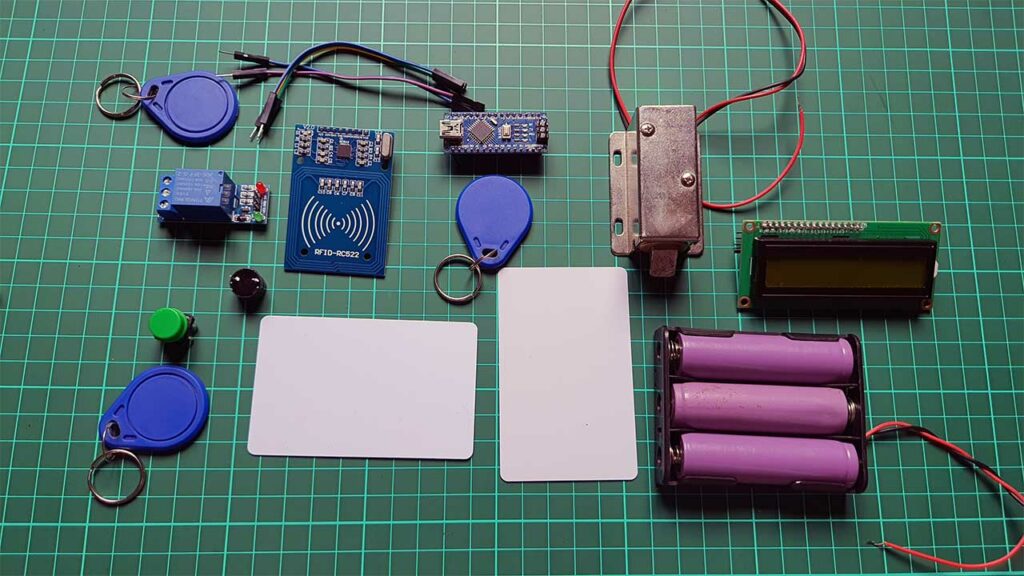
Components Required
To make this project, there are several components that you will need. The exact list of components may vary depending on the specific details of your project and your personal preferences. But here are some general components that you may find useful. You can easily purchase the components required for making this project from the following.
| S.N | COMPONENTS NAME | QUANTITY | PURCHASE LINKS |
|---|---|---|---|
| 1 | Arduino Nano Board | 1 | Amazon | AliExpress |
| 2 | RFID Module RC522 | 1 | Amazon | AliExpress |
| 3 | RFID Cards | 5 | Amazon | AliExpress |
| 4 | 16x2 I2C LCD Display | 1 | Amazon | AliExpress |
| 5 | 12V Solenoid Lock | 1 | Amazon | AliExpress |
| 6 | 5V Buzzer | 1 | Amazon | AliExpress |
| 7 | 5V Single Channel Relay | 1 | Amazon | AliExpress |
| 8 | Push Buttons | 1 | Amazon | AliExpress |
| 9 | 5MM Mixed LEDs | 10 | Amazon | AliExpress |
| 10 | Breadboard | 1 | Amazon | AliExpress |
| 11 | 12V Power Supply | 1 | Amazon | AliExpress |
| 12 | Jumper Cables | 20 | Amazon | AliExpress |
Also Read:
Interfacing MF-RC522 Module, LCD, & Solenoid Lock with Arduino
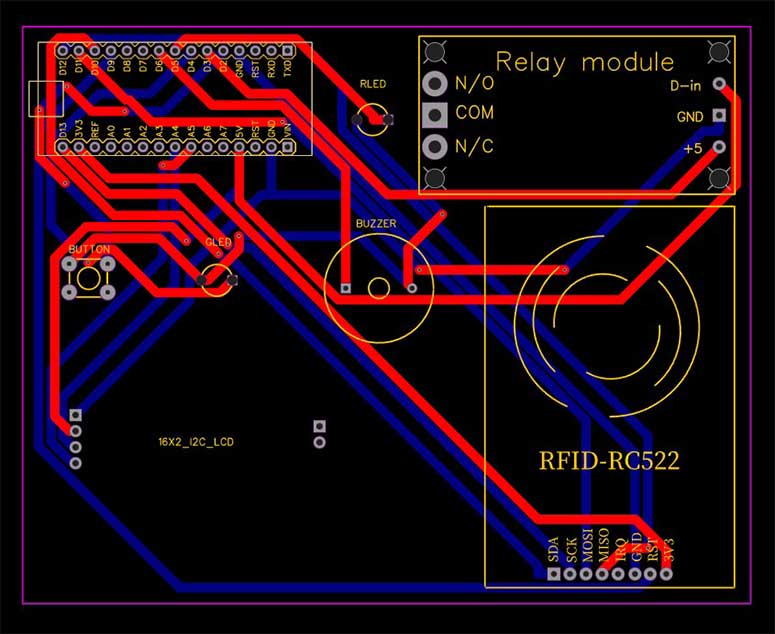
Here is the circuit connection diagram of this Arduino RFID Master Card Door Lock with EEPROM functionality.
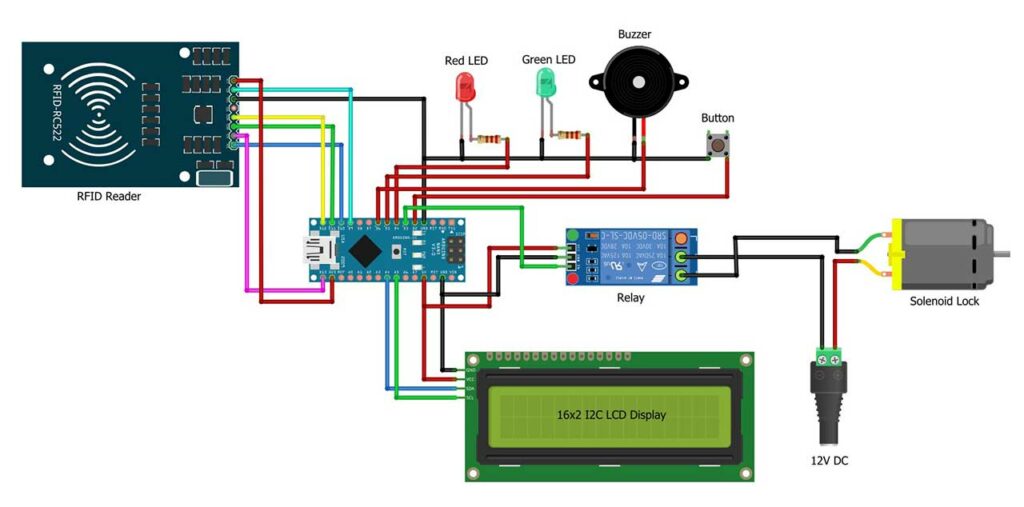
First Connect the RFID MF-RC522 reader module to the Arduino board as follows:
- SDA pin of the reader to pin D10 of the Arduino
- SCK pin of the reader to pin D13 of the Arduino
- MOSI pin of the reader to pin D11 of the Arduino
- MISO pin of the reader to pin D12 of the Arduino
- GND pin of the reader to the GND pin of the Arduino
- RST pin of the reader to pin D9 of the Arduino
- 3.3V pin of the reader to 3.3V pin of the Arduino
Now Connect the 16×2 I2C LCD Display to the Arduino board as follows:
- Connect the SDA pin of the screen to the A4 pin of the Arduino
- Connect the SCL pin of the screen to the A5 pin of the Arduino
- Connect the VCC pin of the screen to the 5V pin of the Arduino
- Connect the GND pin of the screen to the GND pin of the Arduino
Now, Connect the LED lights, buzzer, and push button to the Arduino board as follows:
- Connect the red LED to pin D4 of the Arduino
- Connect the green LED to pin D5 of the Arduino
- Connect the buzzer to pin D6 of the Arduino
- Connect the push button to pin D2 of the Arduino
Finally, Connect the Relay module to the Arduino board as follows:
- Connect the relay VCC pin to the 5V pin of the Arduino
- Connect the relay GND pin to the GND pin of the Arduino
- Connect the relay IN pin to the D3 pin of the Arduino
Interfacing Solenoid Lock with Relay Module
To interface the 12V solenoid door lock with the relay module connect the 12V power supply positive pin to the positive pin of the solenoid lock. Then connect the negative terminal of the power supply to the Common pin on the Relay module. Now Connect Solenoid Lock negative terminal to the Normally Open pin of the Relay Module.
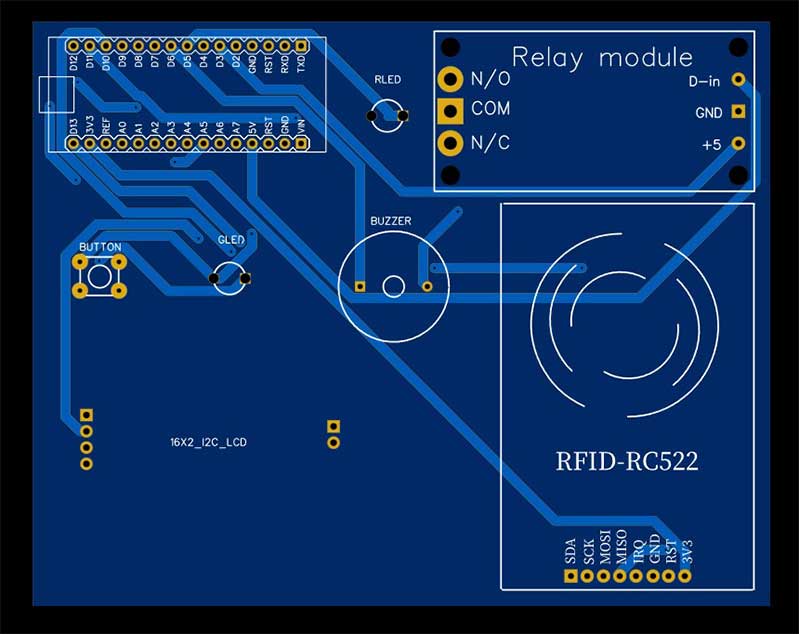
Project PCB Gerber File & PCB Ordering Online
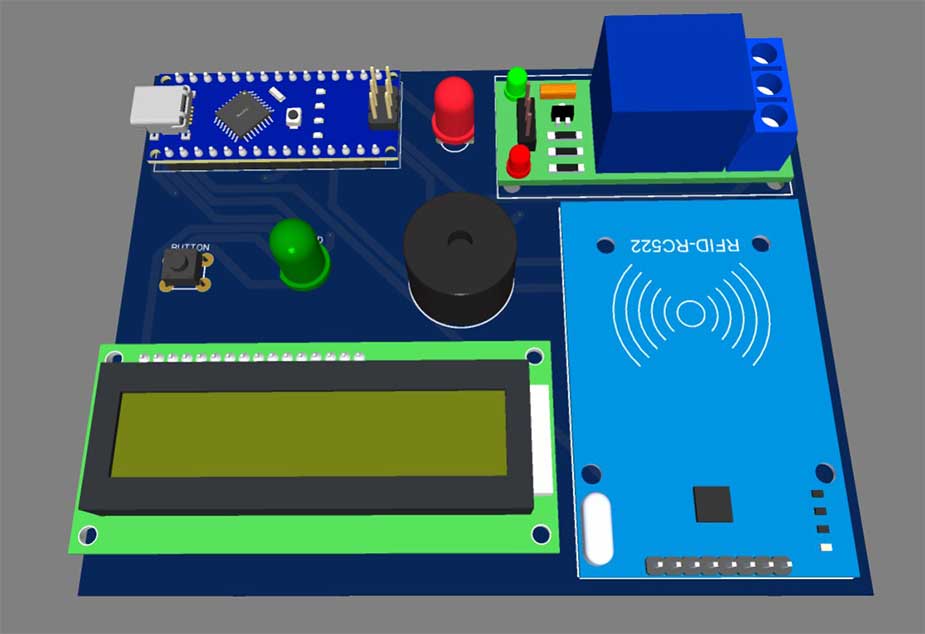
To implement this whole system you will need a PCB. You can use breadboard assembly just to test this project. So, to make your work easier I have designed a custom PCB for this project. You can directly order your PCB from PCBWay.com.
Now you can visit the PCBWay official website by clicking here: PCBWay.com. So you will be directed to the PCBWay website.

PCBWay is a PCB prototype and assembly manufacturer that offers high-quality boards at affordable prices. Simply upload your Gerber files and choose your preferences like layers, board thickness, solder mask, etc. Then select your preferred shipping method and place your order. Overall, ordering a custom PCB from PCBWay is a simple and efficient way to get exactly what you need for this project.
Arduino Program Code
Now let’s take a look at the Arduino program code. Here we are using the MFRC522 library to communicate with the RFID reader. We are also using the EEPROM library to store the card data in the EEPROM memory of the Arduino Nano board. Below is the complete program code of the Arduino RFID Master Card Door Lock with EEPROM.
//RFID Based Solenoid Door lock using Arduino
//The IoT Projects https://www.youtube.com/@iotprojectsideas
//website:https://iotprojectsideas.com/
//RFID RC522 Master Card, Add and Remove multiple Cards
#include <SPI.h>
#include <Wire.h>
#include <MFRC522.h>
#include <EEPROM.h>
#include <LiquidCrystal_I2C.h>
LiquidCrystal_I2C lcd(0x27, 16, 2);
#define RST_PIN 9
#define SS_PIN 10
#define Relay 3
#define REDLED 4
#define GREENLED 5
#define BUZZER 6
const int Btn = 2;
int lastState = LOW;
int NewState;
#define STATE_STARTUP 0
#define STATE_STARTING 1
#define STATE_WAITING 2
#define STATE_SCAN_INVALID 3
#define STATE_SCAN_VALID 4
#define STATE_SCAN_MASTER 5
#define STATE_ADDED_CARD 6
#define STATE_REMOVED_CARD 7
const int cardArrSize = 10;
const int cardSize = 4;
byte cardArr[cardArrSize][cardSize];
byte masterCard[cardSize] = {129, 163, 220, 121}; //Change Master Card ID
byte readCard[cardSize];
byte cardsStored = 0;
// Create MFRC522 instance
MFRC522 mfrc522(SS_PIN, RST_PIN);
byte currentState = STATE_STARTUP;
unsigned long LastStateChangeTime;
unsigned long StateWaitTime;
//------------------------------------------------------------------------------------
int readCardState()
{
int index;
Serial.print("Card Data - ");
for (index = 0; index < 4; index++)
{
readCard[index] = mfrc522.uid.uidByte[index];
Serial.print(readCard[index]);
if (index < 3)
{
Serial.print(",");
}
}
Serial.println(" ");
//Check Master Card
if ((memcmp(readCard, masterCard, 4)) == 0)
{
return STATE_SCAN_MASTER;
}
if (cardsStored == 0)
{
return STATE_SCAN_INVALID;
}
for (index = 0; index < cardsStored; index++)
{
if ((memcmp(readCard, cardArr[index], 4)) == 0)
{
return STATE_SCAN_VALID;
}
}
return STATE_SCAN_INVALID;
}
//------------------------------------------------------------------------------------
void addReadCard()
{
int cardIndex;
int index;
if (cardsStored <= 20)
{
cardsStored++;
cardIndex = cardsStored;
cardIndex--;
}
for (index = 0; index < 4; index++)
{
cardArr[cardIndex][index] = readCard[index];
}
// Write the updated card list to EEPROM
EEPROM.write(0, cardsStored);
for (int i = 0; i < cardsStored; i++)
{
for (int j = 0; j < 4; j++)
{
EEPROM.write((i * 4) + j + 1, cardArr[i][j]);
}
}
//EEPROM.commit();
}
//------------------------------------------------------------------------------------
void removeReadCard()
{
int cardIndex;
int index;
boolean found = false;
if (cardsStored == 0)
{
return;
}
for (index = 0; index < cardsStored; index++)
{
if ((memcmp(readCard, cardArr[index], 4)) == 0)
{
found = true;
cardIndex = index;
}
}
if (found == true)
{
// Remove the card from the array
for (index = cardIndex; index < (cardsStored - 1); index++)
{
for (int j = 0; j < 4; j++)
{
cardArr[index][j] = cardArr[index + 1][j];
}
}
cardsStored--;
// Write the updated card list to EEPROM
EEPROM.write(0, cardsStored);
for (int i = 0; i < cardsStored; i++)
{
for (int j = 0; j < 4; j++)
{
EEPROM.write((i * 4) + j + 1, cardArr[i][j]);
}
}
//EEPROM.commit();
}
}
//------------------------------------------------------------------------------------
void updateState(byte aState)
{
if (aState == currentState)
{
return;
}
// do state change
switch (aState)
{
case STATE_STARTING:
StateWaitTime = 1000;
digitalWrite(REDLED, HIGH);
digitalWrite(GREENLED, LOW);
break;
case STATE_WAITING:
StateWaitTime = 0;
digitalWrite(REDLED, LOW);
digitalWrite(GREENLED, LOW);
break;
case STATE_SCAN_INVALID:
if (currentState == STATE_SCAN_MASTER)
{
addReadCard();
aState = STATE_ADDED_CARD;
StateWaitTime = 2000;
digitalWrite(REDLED, LOW);
digitalWrite(GREENLED, HIGH);
Serial.println("Access Granted. Card added");
success_buzzer();
lcd.clear();
lcd.setCursor(0, 0); // column, row
lcd.print(" Access Granted ");
lcd.setCursor(0, 1); // column, row
lcd.print(" New Card Added ");
delay(3000);
lcd.clear();
lcd.setCursor(0, 0); // column, row
lcd.print(" Scan Your RFID ");
lcd.setCursor(0, 1); // column, row
lcd.print(" Card/Key Chain ");
}
else if (currentState == STATE_REMOVED_CARD)
{
return;
}
else
{
StateWaitTime = 2000;
digitalWrite(REDLED, HIGH);
digitalWrite(GREENLED, LOW);
Serial.println("Access Denied. Invalid Card detected");
Failure_buzzer();
lcd.clear();
lcd.setCursor(0, 0); // column, row
lcd.print(" Access Denied ");
lcd.setCursor(0, 1); // column, row
lcd.print(" Invalid Card ");
delay(3000);
lcd.clear();
lcd.setCursor(0, 0); // column, row
lcd.print(" Scan Your RFID ");
lcd.setCursor(0, 1); // column, row
lcd.print(" Card/Key Chain ");
}
break;
case STATE_SCAN_VALID:
if (currentState == STATE_SCAN_MASTER)
{
removeReadCard();
aState = STATE_REMOVED_CARD;
StateWaitTime = 2000;
digitalWrite(REDLED, LOW);
digitalWrite(GREENLED, HIGH);
Serial.println("Access Granted. Card removed");
success_buzzer();
lcd.clear();
lcd.setCursor(0, 0); // column, row
lcd.print(" Access Granted ");
lcd.setCursor(0, 1); // column, row
lcd.print(" Card Removed ");
delay(3000);
lcd.clear();
lcd.setCursor(0, 0); // column, row
lcd.print(" Scan Your RFID ");
lcd.setCursor(0, 1); // column, row
lcd.print(" Card/Key Chain ");
}
else if (currentState == STATE_ADDED_CARD)
{
return;
}
else
{
StateWaitTime = 2000;
digitalWrite(REDLED, LOW);
digitalWrite(GREENLED, HIGH);
Serial.println("Access Granted. Valid Card detected");
lcd.clear();
lcd.setCursor(0, 0); // column, row
lcd.print(" Access Granted ");
lcd.setCursor(0, 1); // column, row
lcd.print(" Door Un-Locked ");
beep();
digitalWrite(Relay, LOW);
delay(3000);
digitalWrite(Relay, HIGH);
lcd.clear();
lcd.setCursor(0, 0); // column, row
lcd.print(" Scan Your RFID ");
lcd.setCursor(0, 1); // column, row
lcd.print(" Card/Key Chain ");
}
break;
case STATE_SCAN_MASTER:
StateWaitTime = 5000;
digitalWrite(REDLED, LOW);
digitalWrite(GREENLED, HIGH);
Serial.println("Access Granted. Master Card detected");
beep();
lcd.clear();
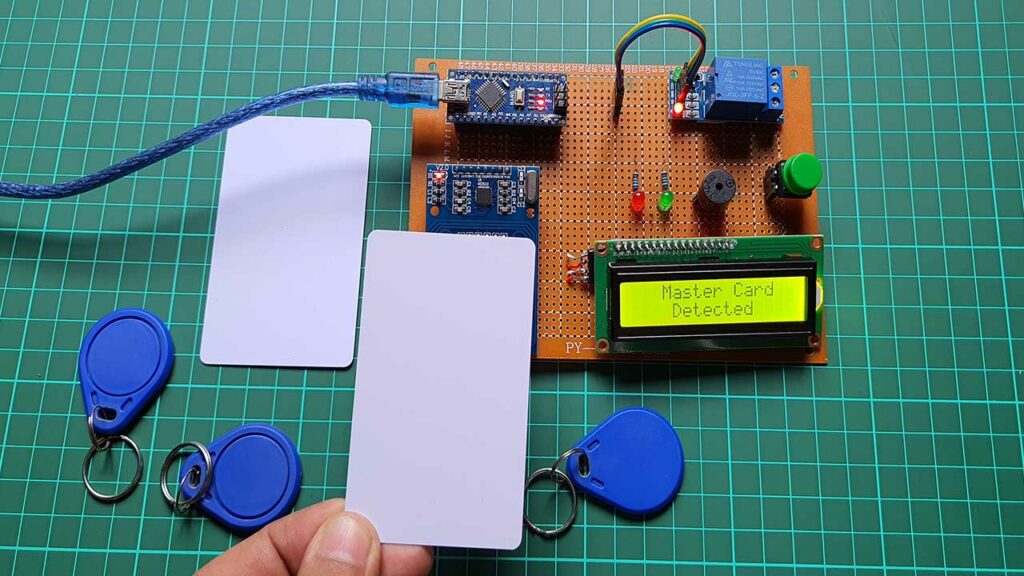
lcd.setCursor(0, 0); // column, row
lcd.print(" Master Card ");
lcd.setCursor(0, 1); // column, row
lcd.print(" Detected ");
delay(2000);
lcd.clear();
lcd.setCursor(0, 0); // column, row
lcd.print(" Scan Your RFID ");
lcd.setCursor(0, 1); // column, row
lcd.print(" Card/Key Chain ");
break;
}
currentState = aState;
LastStateChangeTime = millis();
}
void setup()
{
// Start serial communication
Serial.begin(115200);
// Initialize the SPI bus
SPI.begin();
// Initialize the MFRC522 reader
mfrc522.PCD_Init();
// Initialize the EEPROM
//EEPROM.begin(512);
// Read the stored card list from EEPROM
cardsStored = EEPROM.read(0);
if (cardsStored > cardArrSize)
{
cardsStored = 0;
}
for (int i = 0; i < cardsStored; i++)
{
for (int j = 0; j < 4; j++)
{
cardArr[i][j] = EEPROM.read((i * 4) + j + 1);
}
}
LastStateChangeTime = millis();
updateState(STATE_STARTING);
pinMode(REDLED, OUTPUT);
pinMode(GREENLED, OUTPUT);
pinMode(Relay, OUTPUT);
pinMode(BUZZER, OUTPUT);
pinMode(Btn, INPUT_PULLUP);
digitalWrite(Relay, HIGH);
Serial.println("Put your card to the reader...");
Serial.println();
lcd.init();
lcd.backlight();
lcd.clear();
lcd.setCursor(0, 0); // column, row
lcd.print(" Scan Your RFID ");
lcd.setCursor(0, 1); // column, row
lcd.print(" Card/Key Chain ");
}
void loop()
{
NewState = digitalRead(Btn);
if (lastState == HIGH && NewState == LOW) {
Serial.println("Button Pressed. Access Granted");
Serial.println();
digitalWrite(REDLED, LOW);
digitalWrite(GREENLED, HIGH);
digitalWrite(Relay, LOW);
lcd.clear();
lcd.setCursor(0, 0); // column, row
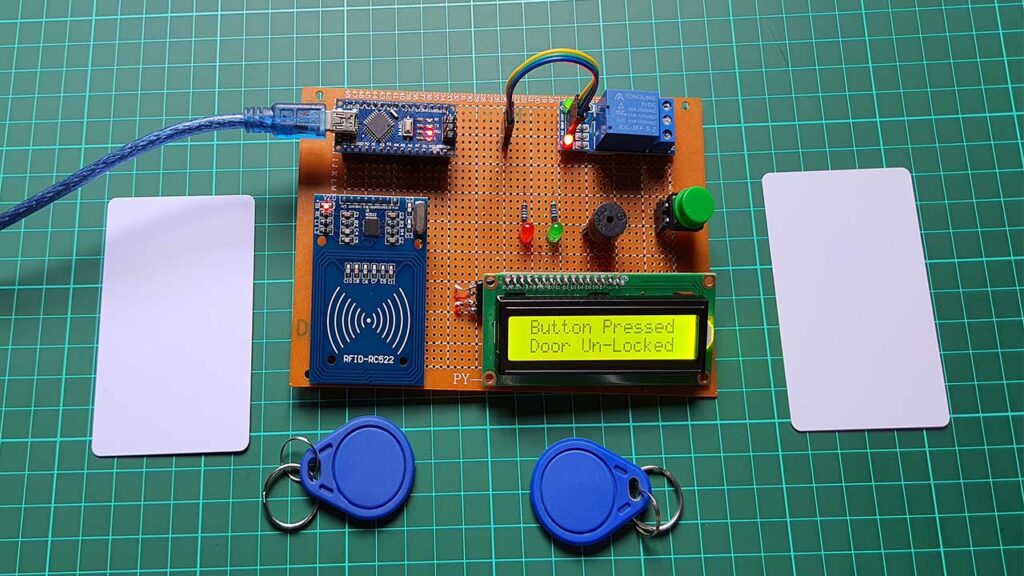
lcd.print(" Button Pressed ");
lcd.setCursor(0, 1); // column, row
lcd.print(" Door Un-Locked ");
beep();
delay(3000);
digitalWrite(Relay, HIGH);
digitalWrite(GREENLED, LOW);
delay(50);
lcd.clear();
lcd.setCursor(0, 0); // column, row
lcd.print(" Scan Your RFID ");
lcd.setCursor(0, 1); // column, row
lcd.print(" Card/Key Chain ");
}
byte cardState;
if ((currentState != STATE_WAITING) &&
(StateWaitTime > 0) &&
(LastStateChangeTime + StateWaitTime < millis()))
{
updateState(STATE_WAITING);
}
// Look for new cards
if ( ! mfrc522.PICC_IsNewCardPresent())
{
return;
}
// Select one of the cards
if ( ! mfrc522.PICC_ReadCardSerial())
{
return;
}
cardState = readCardState();
updateState(cardState);
lastState = NewState;
}
void success_buzzer()
{
digitalWrite(BUZZER, HIGH);
delay(2000);
digitalWrite(BUZZER, LOW);
}
void Failure_buzzer()
{
for (int i = 0; i < 3; i++)
{
digitalWrite(BUZZER, HIGH);
delay(100);
digitalWrite(BUZZER, LOW);
delay(50);
}
}
void beep()
{
digitalWrite(BUZZER, HIGH);
delay(100);
digitalWrite(BUZZER, LOW);
}Installing Libraries
The code is started by including the MFRC522 library, the EEPROM library, and the LiquidCrystal_I2C library for the LCD. You can find the links to these libraries below.
#include <SPI.h>
#include <Wire.h>
#include <MFRC522.h>
#include <EEPROM.h>
#include <LiquidCrystal_I2C.h>
Program Code Explanation
The code defines various pins used in the circuit, including RST_PIN and SS_PIN for the RFID reader, Relay pin to control the solenoid lock, REDLED and GREENLED pins for status indication, and BUZZER pin for audio indication.
#define RST_PIN 9
#define SS_PIN  10
#define Relay 3
#define REDLED 4
#define GREENLED 5
#define BUZZER 6
The source code starts by initializing the RFID reader and EEPROM libraries, setting the current state to STATE_STARTUP. It also defines various other states such as STATE_STARTING, STATE_WAITING, STATE_SCAN_INVALID, STATE_SCAN_VALID, STATE_SCAN_MASTER, STATE_ADDED_CARD, and STATE_REMOVED_CARD, and defines a card array with cardArrSize = 10 and cardSize = 4, which can store up to 10 cards with each card having 4 bytes.
#define STATE_STARTUP       0
#define STATE_STARTING      1
#define STATE_WAITING       2
#define STATE_SCAN_INVALID  3
#define STATE_SCAN_VALID    4
#define STATE_SCAN_MASTER   5
#define STATE_ADDED_CARD    6
#define STATE_REMOVED_CARD  7

const int cardArrSize = 10;
const int cardSize    = 4;
The program also defines functions to read the RFID card, add a new card to the card array, remove a card from the card array, and update the state based on the card scanned.
//------------------------------------------------------------------------------------
int readCardState()
{
int index;
Serial.print("Card Data - ");
for (index = 0; index < 4; index++)
{
readCard[index] = mfrc522.uid.uidByte[index];
Serial.print(readCard[index]);
if (index < 3)
{
Serial.print(",");
}
}
Serial.println(" ");
//Check Master Card
if ((memcmp(readCard, masterCard, 4)) == 0)
{
return STATE_SCAN_MASTER;
}
if (cardsStored == 0)
{
return STATE_SCAN_INVALID;
}
for (index = 0; index < cardsStored; index++)
{
if ((memcmp(readCard, cardArr[index], 4)) == 0)
{
return STATE_SCAN_VALID;
}
}
return STATE_SCAN_INVALID;
}
//------------------------------------------------------------------------------------
void addReadCard()
{
int cardIndex;
int index;
if (cardsStored <= 20)
{
cardsStored++;
cardIndex = cardsStored;
cardIndex--;
}
for (index = 0; index < 4; index++)
{
cardArr[cardIndex][index] = readCard[index];
}
// Write the updated card list to EEPROM
EEPROM.write(0, cardsStored);
for (int i = 0; i < cardsStored; i++)
{
for (int j = 0; j < 4; j++)
{
EEPROM.write((i * 4) + j + 1, cardArr[i][j]);
}
}
//EEPROM.commit();
}
//------------------------------------------------------------------------------------
void removeReadCard()
{
int cardIndex;
int index;
boolean found = false;
if (cardsStored == 0)
{
return;
}
for (index = 0; index < cardsStored; index++)
{
if ((memcmp(readCard, cardArr[index], 4)) == 0)
{
found = true;
cardIndex = index;
}
}
if (found == true)
{
// Remove the card from the array
for (index = cardIndex; index < (cardsStored - 1); index++)
{
for (int j = 0; j < 4; j++)
{
cardArr[index][j] = cardArr[index + 1][j];
}
}
cardsStored--;
// Write the updated card list to EEPROM
EEPROM.write(0, cardsStored);
for (int i = 0; i < cardsStored; i++)
{
for (int j = 0; j < 4; j++)
{
EEPROM.write((i * 4) + j + 1, cardArr[i][j]);
}
}
//EEPROM.commit();
}
}
//------------------------------------------------------------------------------------
void updateState(byte aState)
{
if (aState == currentState)
{
return;
}
// do state change
switch (aState)
{
case STATE_STARTING:
StateWaitTime = 1000;
digitalWrite(REDLED, HIGH);
digitalWrite(GREENLED, LOW);
break;
case STATE_WAITING:
StateWaitTime = 0;
digitalWrite(REDLED, LOW);
digitalWrite(GREENLED, LOW);
break;
case STATE_SCAN_INVALID:
if (currentState == STATE_SCAN_MASTER)
{
addReadCard();
aState = STATE_ADDED_CARD;
StateWaitTime = 2000;
digitalWrite(REDLED, LOW);
digitalWrite(GREENLED, HIGH);
Serial.println("Access Granted. Card added");
success_buzzer();
lcd.clear();
lcd.setCursor(0, 0); // column, row
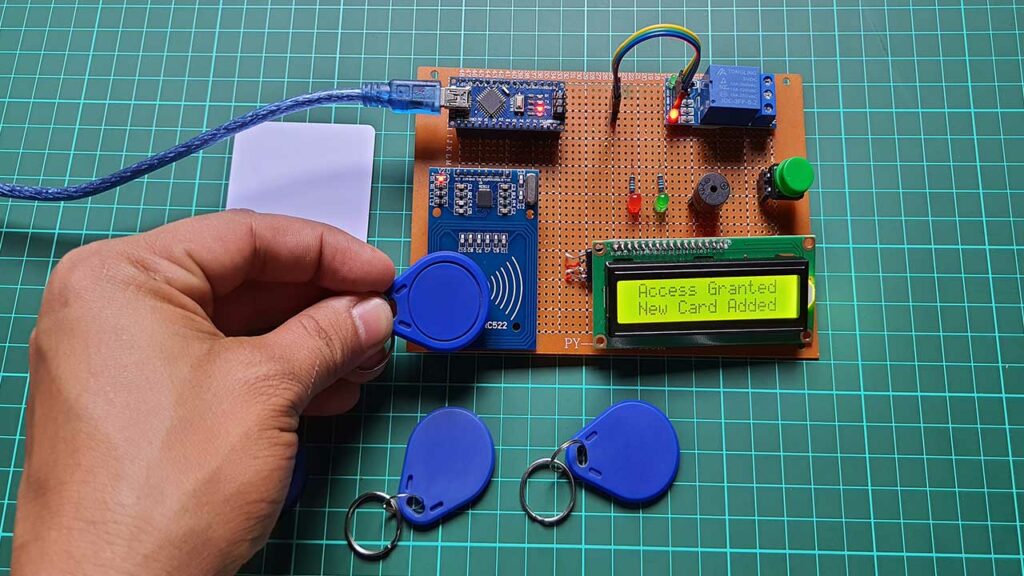
lcd.print(" Access Granted ");
lcd.setCursor(0, 1); // column, row
lcd.print(" New Card Added ");
delay(3000);
lcd.clear();
lcd.setCursor(0, 0); // column, row
lcd.print(" Scan Your RFID ");
lcd.setCursor(0, 1); // column, row
lcd.print(" Card/Key Chain ");
}
else if (currentState == STATE_REMOVED_CARD)
{
return;
}
else
{
StateWaitTime = 2000;
digitalWrite(REDLED, HIGH);
digitalWrite(GREENLED, LOW);
Serial.println("Access Denied. Invalid Card detected");
Failure_buzzer();
lcd.clear();
lcd.setCursor(0, 0); // column, row
lcd.print(" Access Denied ");
lcd.setCursor(0, 1); // column, row
lcd.print(" Invalid Card ");
delay(3000);
lcd.clear();
lcd.setCursor(0, 0); // column, row
lcd.print(" Scan Your RFID ");
lcd.setCursor(0, 1); // column, row
lcd.print(" Card/Key Chain ");
}
break;
case STATE_SCAN_VALID:
if (currentState == STATE_SCAN_MASTER)
{
removeReadCard();
aState = STATE_REMOVED_CARD;
StateWaitTime = 2000;
digitalWrite(REDLED, LOW);
digitalWrite(GREENLED, HIGH);
Serial.println("Access Granted. Card removed");
success_buzzer();
lcd.clear();
lcd.setCursor(0, 0); // column, row
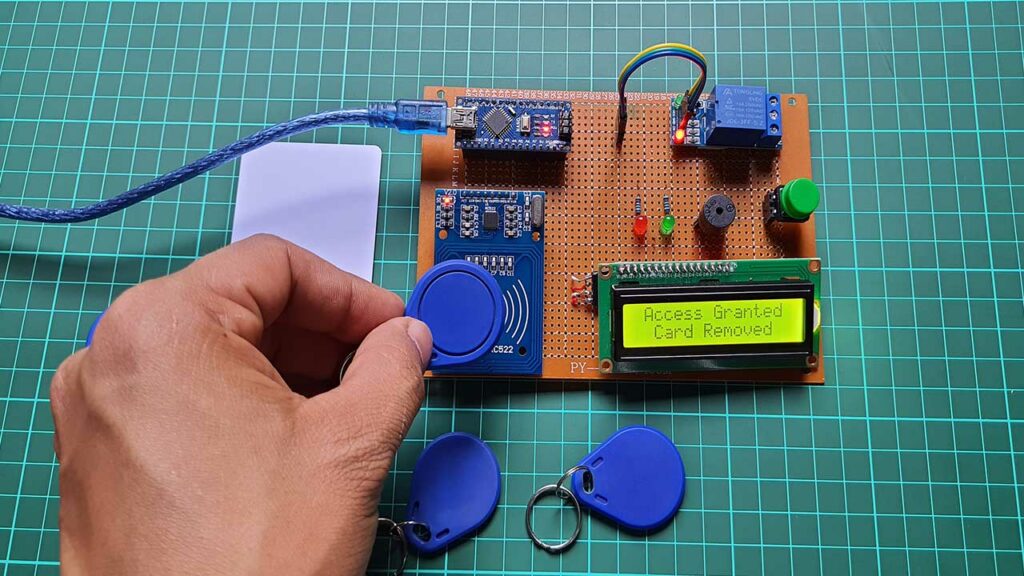
lcd.print(" Access Granted ");
lcd.setCursor(0, 1); // column, row
lcd.print(" Card Removed ");
delay(3000);
lcd.clear();
lcd.setCursor(0, 0); // column, row
lcd.print(" Scan Your RFID ");
lcd.setCursor(0, 1); // column, row
lcd.print(" Card/Key Chain ");
}
else if (currentState == STATE_ADDED_CARD)
{
return;
}
else
{
StateWaitTime = 2000;
digitalWrite(REDLED, LOW);
digitalWrite(GREENLED, HIGH);
Serial.println("Access Granted. Valid Card detected");
lcd.clear();
lcd.setCursor(0, 0); // column, row
lcd.print(" Access Granted ");
lcd.setCursor(0, 1); // column, row
lcd.print(" Door Un-Locked ");
beep();
digitalWrite(Relay, LOW);
delay(3000);
digitalWrite(Relay, HIGH);
lcd.clear();
lcd.setCursor(0, 0); // column, row
lcd.print(" Scan Your RFID ");
lcd.setCursor(0, 1); // column, row
lcd.print(" Card/Key Chain ");
}
break;
case STATE_SCAN_MASTER:
StateWaitTime = 5000;
digitalWrite(REDLED, LOW);
digitalWrite(GREENLED, HIGH);
Serial.println("Access Granted. Master Card detected");
beep();
lcd.clear();
lcd.setCursor(0, 0); // column, row
lcd.print(" Master Card ");
lcd.setCursor(0, 1); // column, row
lcd.print(" Detected ");
delay(2000);
lcd.clear();
lcd.setCursor(0, 0); // column, row
lcd.print(" Scan Your RFID ");
lcd.setCursor(0, 1); // column, row
lcd.print(" Card/Key Chain ");
break;
}
currentState = aState;
LastStateChangeTime = millis();
}The loop function continuously runs and waits for an RFID card to be scanned. When a card is scanned, the program reads the card data and checks if the card is a MasterCard, an existing card, or a new card. If the card is a MasterCard, the program unlocks the door and enters STATE_SCAN_MASTER. When the card is an existing card, the program enters STATE_SCAN_VALID. If the card is a new card, the program adds the card to the card array and enters STATE_ADDED_CARD. If the card is invalid, the program denies access to the door and enters STATE_SCAN_INVALID.
void loop()
{
  NewState = digitalRead(Btn);
  if (lastState == HIGH && NewState == LOW) {

    Serial.println("Button Pressed. Access Granted");
    Serial.println();
    digitalWrite(REDLED, LOW);
    digitalWrite(GREENLED, HIGH);
    digitalWrite(Relay, LOW);
    lcd.clear();
    lcd.setCursor(0, 0); // column, row
    lcd.print(" Button Pressed ");
    lcd.setCursor(0, 1); // column, row
    lcd.print(" Door Un-Locked ");
    beep();
    delay(3000);
    digitalWrite(Relay, HIGH);
    digitalWrite(GREENLED, LOW);
    delay(50);
    lcd.clear();
    lcd.setCursor(0, 0); // column, row
    lcd.print(" Scan Your RFID ");
    lcd.setCursor(0, 1); // column, row
    lcd.print(" Card/Key Chain ");
  }


  byte cardState;

  if ((currentState != STATE_WAITING) &&
      (StateWaitTime > 0) &&
      (LastStateChangeTime + StateWaitTime < millis()))
  {
    updateState(STATE_WAITING);
  }

  // Look for new cards
  if ( ! mfrc522.PICC_IsNewCardPresent())
  {
    return;
  }

  // Select one of the cards
  if ( ! mfrc522.PICC_ReadCardSerial())
  {
    return;
  }

  cardState = readCardState();
  updateState(cardState);
  lastState = NewState;
}
void success_buzzer()
{
digitalWrite(BUZZER, HIGH);
delay(2000);
digitalWrite(BUZZER, LOW);
}
void Failure_buzzer()
{
for (int i = 0; i < 3; i++)
{
digitalWrite(BUZZER, HIGH);
delay(100);
digitalWrite(BUZZER, LOW);
delay(50);
}
}
void beep()
{
digitalWrite(BUZZER, HIGH);
delay(100);
digitalWrite(BUZZER, LOW);
}When the program adds or removes a card, it also writes the updated card list to the EEPROM. Finally, the program uses an LCD display and buzzer to provide a visual and audio indication of the status of the lock.
Uploading Program Code & Setting up MasterCard
Before uploading the code make sure you have already installed the required libraries from above. After installing the libraries, We need to set up our Master RFID Card. So let’s quickly upload the program to the Arduino Nano board by selecting the correct board and COM Port. Once the upload is complete.
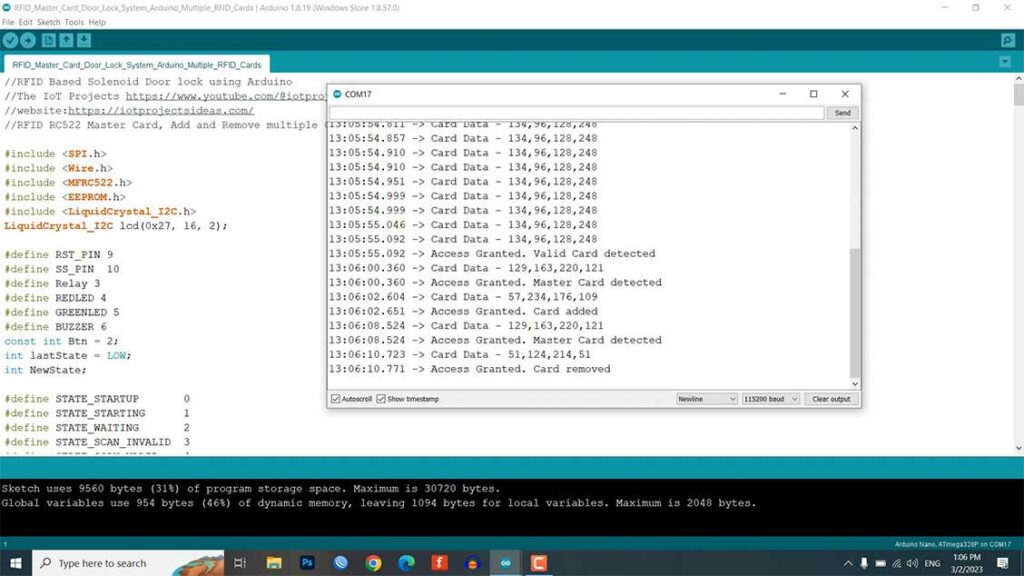
Open the serial monitor then Scan one of your RFID Cards or Key Chain to the reader. You will find the Card ID just copy that UID and Paste it into the Code here. Now This RFID card will be your Master Card. It helps you to add or remove the RFID cards at any time without re-programming the Arduino board.
Now again upload this program code to your Arduino board. Once the upload is complete, the RFID door lock is ready to be tested.
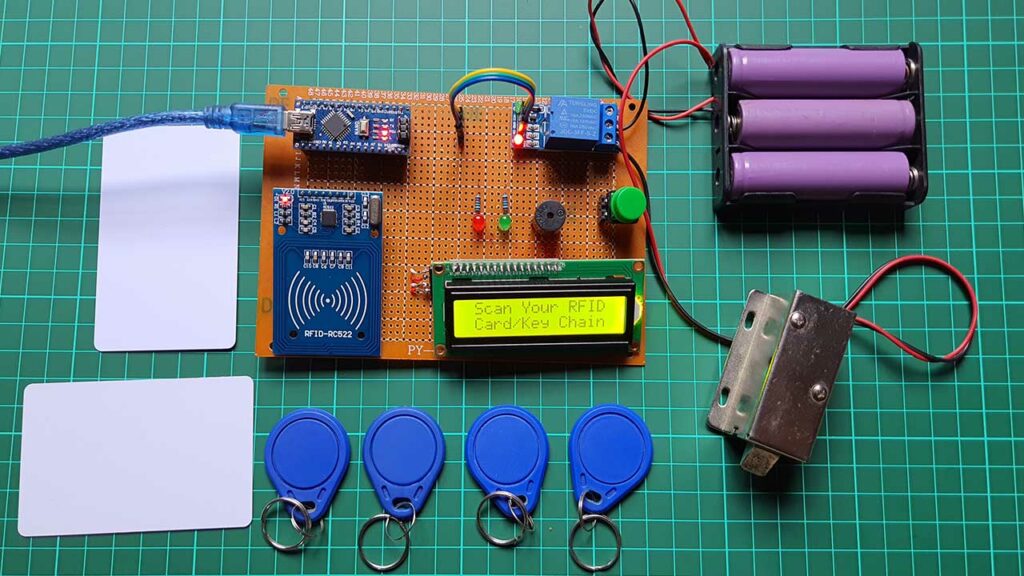
Testing: RFID MasterCard Door Lock System
Let’s test the RFID door lock now. When a valid card is swiped, the green LED indicator will turn on, the buzzer will beep, and the solenoid lock will unlock the door. You can also see the Access Granted Door unlocked message on the LCD screen. On the other hand, when an invalid card is detected, an Access Denied Invalid Card message is displayed and the red LED indicator will turn on, and the buzzer will beep to indicate that the card is not authorized.

You can swipe the master card and swipe a new card to Add that card to the system.
The New card UID will be saved on EEPROM so that authorized cards won’t get deleted after a power failure or system reboot.
Similarly to remove the registered card from the system you need to swipe MasterCard and swipe the card you want to remove from the system. That’s it. Now the card is removed from EEPROM and You won’t be able to open the door lock with this card.
This small push button will help you to bypass the system and get access to the door lock when needed. As said earlier you can add a jumper and place this button on the back side of your door so that you can easily open the lock when you are inside the room.
Conclusion
That’s all about Arduino RFID Master Card Door Lock with EEPROM functionality project. You can modify the program code to suit your specific needs or hardware setup. I hope this helps you a lot. If you have any queries related to this project then Let me know in the comment section below.


Thank you for this project that helped me a lot and saved a lot of time, too.
While the code keeps running perfectly, I was thinking of adding a second function to valid keys, such as triggering a different/second relay when the key is held longer than a given time – like a short and long button press with a threshold time when to be regarded as what.
For this I added another CASE block with an additional state STATE_SCAN_LONG, but I keep struggling to get this STATE into updateState() correctly without messing up or also triggering the main switch function that should be unchanged. Have you implemented such, or does the readCardType routine have to be modified, since valid key triggers come in rapidly when held to the reader, but will be ignored due to the same (valid) state.
Cheers, S
Hello. I need help.
I would like to develop this project further, but I am not very familiar with Arduino programming.
In the project, the Master Card, New RFD function is wonderful, the Delete function is not necessary.
Could you make such a program for me?
Of course I’ll pay for it.
Can I email you the details?
send a private email address?
Tenx
Gyuszi
How many cards can we add?
good day, can you send me a scheme for the production of a surface board by e-mail?
Thank you for this project, I saved a lot of time.