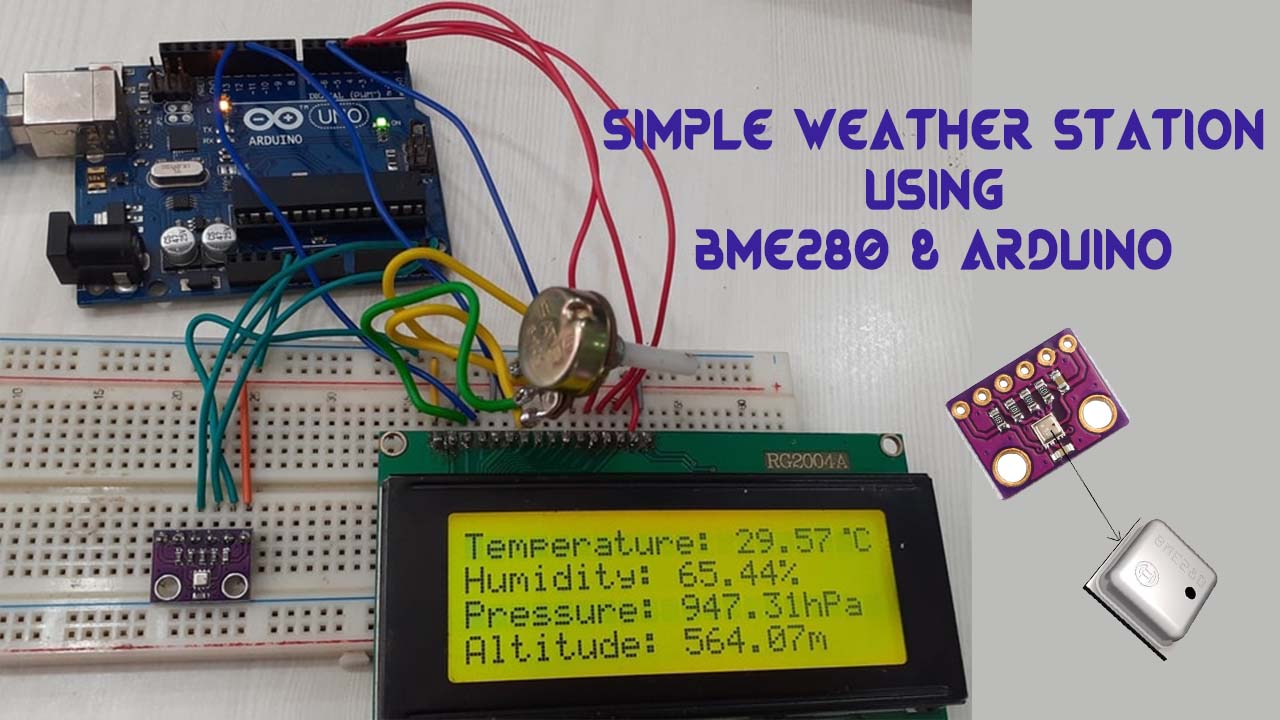
In this project, you will learn how to make a Simple Weather station using Arduino & BME280 Barometric Pressure Sensor. This sensor can give real-time information of Atmospheric Pressure, Temperature and Humidity.We can also measure the altitude above sea level using BME280 Sensor.
Overview
BME280 is simple and easy to use. It is pre-calibrated and don’t require extra components. Using this you can measure relative humidity, temperature, barometric pressure & approx. altitude within a seconds. Here, we will use BME280 Barometric Pressure Sensor with Arduino and display all the measured data like temperature, pressure, humidity and altitude in 20×4 LCD Display.
First of all, a device which collects data related to the weather & environment using different sensors is called weather station. Actually, they are of two types, one which have their own sensors and the second type of weather station pull data from the weather station servers using IoT Processor. In this project, we will go for the first one. Which means we will build our own weather station using only one sensor i.e BME280.
Components Required
Here are some of the components that are required for building BME280 weather Station. All these components are available in Amazon. You can purchase them via the links given below.
- Arduino UNO Board
- BME280 Sensor
- 20X4 LCD Display
- 10K Potentiometer
- Connecting Jumper Wires
- Breadboard
More Arduino Projects:
DIY Mobile Phone using GSM Module & Arduino with Nextion Display
ESP8266 based IoT Health Care Panic Alarm for Elderly Folks
IoT Based RFID Smart Door Lock System Using NodeMCU ESp8266
Interfacing Temperature and Humidity Sensor with Arduino
BME280 Temperature, Pressure, & Humidity Sensor
Bosch BME280 Humidity, Temperature & Pressure Sensor is an integrated environmental sensor. This sensor is very small in size with low power consumption.This BME280 Atmospheric Sensor is used to measure barometric pressure, humidity, and temperature readings all without taking up too much space. Basically, from this tiny breakout you can find out anything you need to know about atmospheric conditions.
This module uses an environmental sensor made by Bosch with temperature, barometric pressure sensor. Which is the next generation upgrade to the popular BMP085/BMP180/BMP183 Sensor. Actually, This sensor can be used for all sorts of weather sensing. Even this sensor can be used in both I2C and SPI! This is the best and low-cost sensor from Bosch. This can be used in precision sensing solution for measuring barometric pressure with ±1 hPa absolute accuracy, and temperature with ±1.0°C accuracy. As we know that pressure changes with altitude. Here, the pressure measurements are so good, you can also use this sensor as an altimeter with ±1 meter accuracy.
BME280 Sensor Features
- Interface: I2C & SPI
- Supply Voltage: 1.71V to 3.6V
- Temperature Range: -40 to +85°C
- Humidity Range: 0% to 100% rel. humidity
- Pressure Range: 300hPa to 1100hPa
- Humidity sensor and pressure sensor can be independently enabled/disabled
Applications of BME280
- Context awareness, e.g. skin detection, room change detection
- Health monitoring/well-being
- Home automation control
- Control heating, ventilation, air conditioning (HVAC)
- IoT- Internet of things
- GPS enhancement & Indoor/Outdoor navigation
- Weather forecast
- Vertical velocity indicator (rise/sink speed)
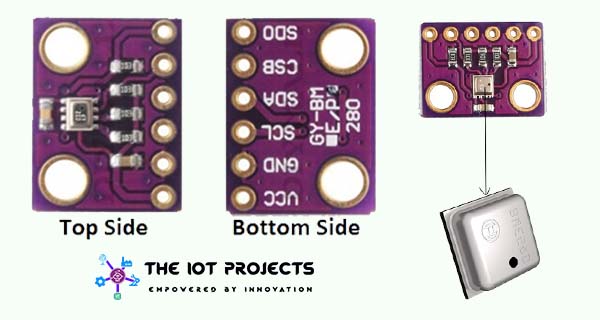
BME280 Pinout
The BME280 I2C interface uses the following pins:
- VCC: 1.71V to 3.6V
- GND: Connect to GND
- SCL: serial clock (SCK)
- SDA: Serial data (SDI)
- CSB: Must be connected to VDDIO to select I2C interface.
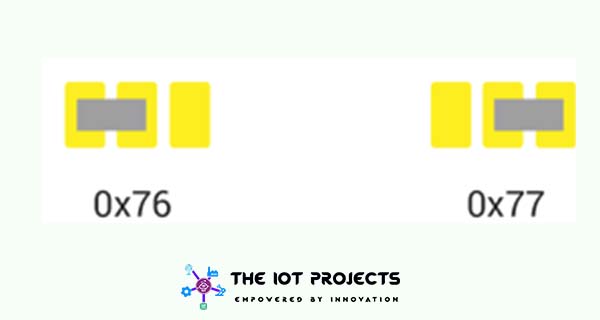
- SDO: The I2C address decides the pin. If SDO connects to GND(0), the address is 0x76, if it connects to VDDIO(1), the address is 0x77. In this module, we have connected it to VDDIO, so the address should be 0x77
I2C Interface
This module features a simple two-wire I2C interface. Due to this feature, it can be easily interfaced with any microcontroller I2C Pins. The default I2C Interface address of the BME280 module is 0x76 and can be modified to 0x77 easily.
In the market two different types of BME280 module are available whose I2C address can be changed. For the module used in below, Remove a connection from SDO to GND, the address will be changed to 0x77.
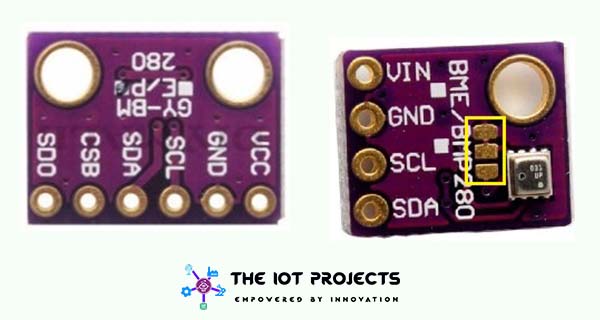
You can get another type of module which comes with 4 pins.To change its I2C address you can Locate the solder jumper besides chip.
By default, the middle copper pad is always connected to the left pad. So you need to pull out the connection between the middle and the left copper pad. This will disconnect them. Now we can add a solder blob between the middle and the right copper pad and join them. It will help you to set the I2C address 0x77.
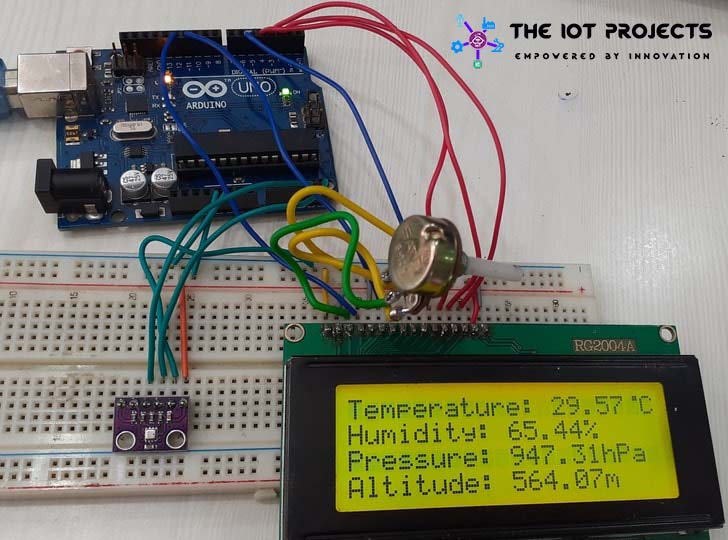
Interfacing BME280 with 20×4 LCD Display & Arduino
- The BME280
Here we have interfaced Barometric Pressure Sensor with Arduino to make a simple Weather Station. Hence, Connect the SDA SCL pins of BME280 to Arduino I2C Pins, i.e. A5 & A4 Pins.
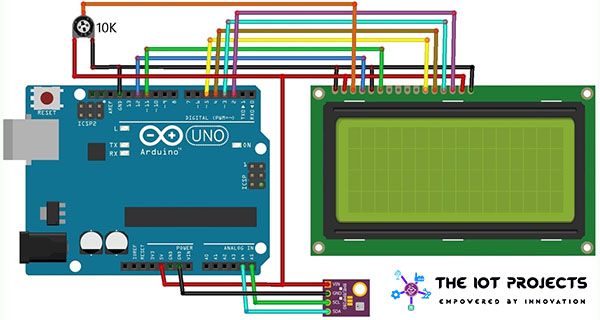
Connect the pins 1, 5, 16 of LCD to GND & Pin 2, 15 as 5V VCC. Connect the LCD pin 4, 6, 11, 12, 13, 14 to Arduino 12, 11, 5, 4, 3, 2 Pins. We need to use 10K Potentiometer at Pin 3 of LCD to adjust its contrast.
Source Code/Program
The Source Code/Program for Interfacing BME280 with Arduino & LCD Display is provided below. You simply copy these lines of codes and upload them to your Arduino Board.
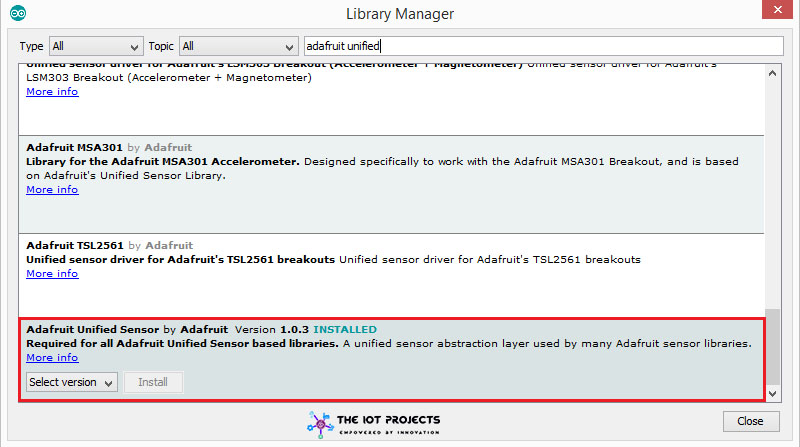
But before going to this process we need to install two libraries, i.e BME280 Library & Adafruit Unified Sensor Library. Simply go to the library manager and install these two libraries:

#include <Wire.h>
#include <Adafruit_Sensor.h>
#include <Adafruit_BME280.h>
#include <LiquidCrystal.h>
LiquidCrystal lcd(12, 11, 5, 4, 3, 2);

#define SEALEVELPRESSURE_HPA (1013.25)
byte degree[8] =
              {
                0b00011,
                0b00011,
                0b00000,
                0b00000,
                0b00000,
                0b00000,
                0b00000,
                0b00000
              };

Adafruit_BME280 bme;

void setup() {
  Serial.begin(9600);
  lcd.begin(20, 4);
  lcd.createChar(1, degree);

  if (!bme.begin(0x76)) {
    Serial.println("Could not find a valid BME280 sensor, check wiring!");
    while (1);
  }
}

void loop() {
  Serial.print("Temperature = ");
  Serial.print(bme.readTemperature());
  Serial.println("*C");

  Serial.print("Humidity = ");
  Serial.print(bme.readHumidity());
  Serial.println("%");

  Serial.print("Pressure = ");
  Serial.print(bme.readPressure() / 100.0F);
  Serial.println("hPa");

  Serial.print("Approx. Altitude = ");
  Serial.print(bme.readAltitude(SEALEVELPRESSURE_HPA));
  Serial.println("m");

  lcd.setCursor(0, 0);
  lcd.print("Temperature: ");
  lcd.print(bme.readTemperature());
  lcd.write(1);
  lcd.print("C");

  lcd.setCursor(0, 1);
  lcd.print("Humidity: ");
  lcd.print(bme.readHumidity());
  lcd.print("%");

  lcd.setCursor(0, 2);
  lcd.print("Pressure: ");
  lcd.print(bme.readPressure() / 100.0F);
  lcd.print("hPa");

  lcd.setCursor(0, 3);
  lcd.print("Altitude: ");
  lcd.print(bme.readAltitude(SEALEVELPRESSURE_HPA));
  lcd.print("m");

  Serial.println();
  delay(1000);
  lcd.clear();
}
view rawBME280 Arduino.ino hosted with ❤ by GitHub
Code Explanation
#include <Wire.h>
#include <Adafruit_Sensor.h>
#include <Adafruit_BME280.h>
#include <LiquidCrystal.h>
LiquidCrystal lcd(12, 11, 5, 4, 3, 2);
The sketch starts with including 4 libraries, i.e Wire.h, Adafruit_Sensor.h, Adafruit_BME280.h & LiquidCrystal.h.
#define SEALEVELPRESSURE_HPA (1013.25)
byte degree[8] =
              {
                0b00011,
                0b00011,
                0b00000,
                0b00000,
                0b00000,
                0b00000,
                0b00000,
                0b00000
              };
Adafruit_BME280 bme;
Next, we define SEALEVELPRESSURE_HPA variable to calculate the altitude and create an object of Adafruit_BME280 library. The byte degree[8] is used to print the degree Symbol in 20×4 LCD.
Serial.print("Temperature = ");
  Serial.print(bme.readTemperature());
  Serial.println("*C");

  Serial.print("Humidity = ");
  Serial.print(bme.readHumidity());
  Serial.println("%");

  Serial.print("Pressure = ");
  Serial.print(bme.readPressure() / 100.0F);
  Serial.println("hPa");

  Serial.print("Approx. Altitude = ");
  Serial.print(bme.readAltitude(SEALEVELPRESSURE_HPA));
  Serial.println("m");

  lcd.setCursor(0, 0);
  lcd.print("Temperature: ");
  lcd.print(bme.readTemperature());
  lcd.write(1);
  lcd.print("C");

  lcd.setCursor(0, 1);
  lcd.print("Humidity: ");
  lcd.print(bme.readHumidity());
  lcd.print("%");

  lcd.setCursor(0, 2);
  lcd.print("Pressure: ");
  lcd.print(bme.readPressure() / 100.0F);
  lcd.print("hPa");

  lcd.setCursor(0, 3);
  lcd.print("Altitude: ");
  lcd.print(bme.readAltitude(SEALEVELPRESSURE_HPA));
  lcd.print("m");
In looping section of the code, following functions are used to read temperature, relative humidity & barometric pressure from the BME280 module.
readTemperature() function returns the temperature from the sensor.

readPressure() function returns the barometric pressure from the sensor.

readAltitude(SEALEVELPRESSURE_HPA) function calculates the altitude.

readHumidity() function returns the relative humidity from the sensor.


BME280 has a maximum Vcc = 3.6 V and you connected to 5 V, how is this possible?
thank you.
connect BME280 VCC to 3.3V pin. I have connected both LCD and BME280 to 5v. LCD requires more power to operate so this becomes possible.