Today we are going to make a Password Security Lock System Using Arduino, Keypad & Servo. Security is becoming a major concern these days as theft is on the rise. So digital password lock can easily secure your home or locker. It only opens your door when the correct password is entered.
- Components Required:
- Circuit Diagram of Password-Based Security Lock System
- How does the password security door lock system work?
- Source code/program:
- Program code Explanation: Password Security Lock System Using Arduino & Keypad
- Video Demonstration
- Tinkercad Simulation: Password Security Lock System Using Arduino & Keypad
- Conclusion
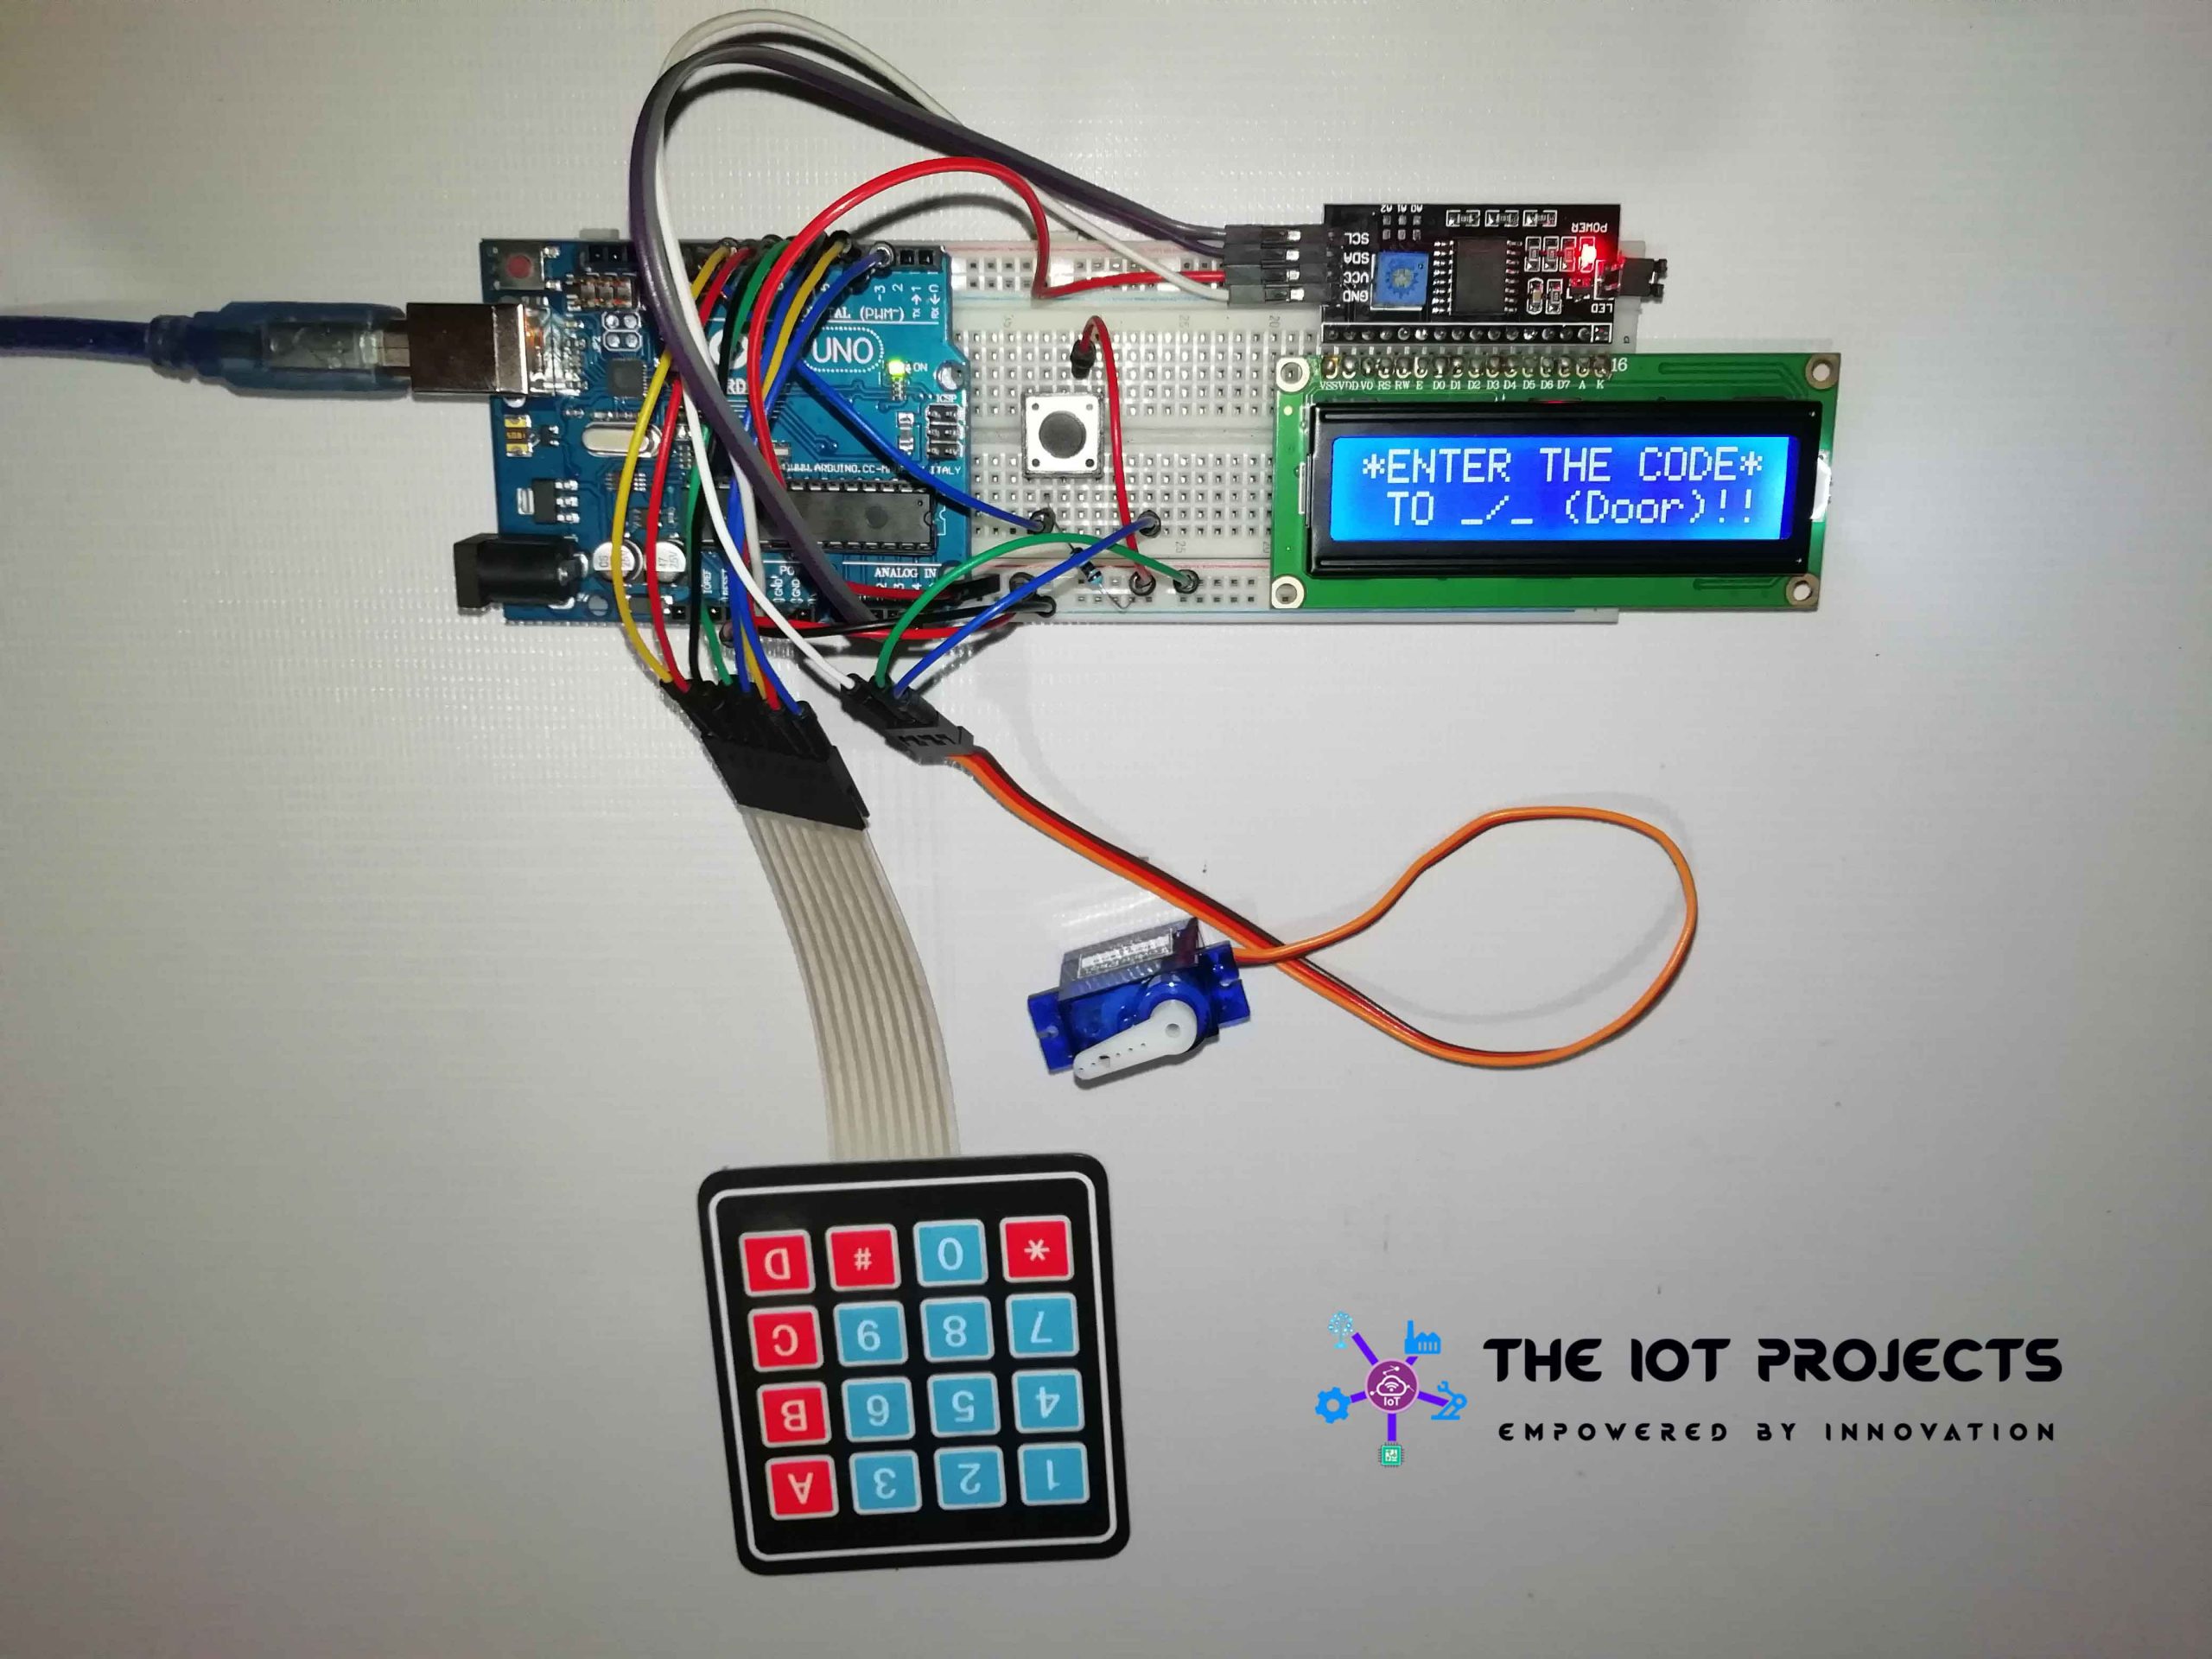
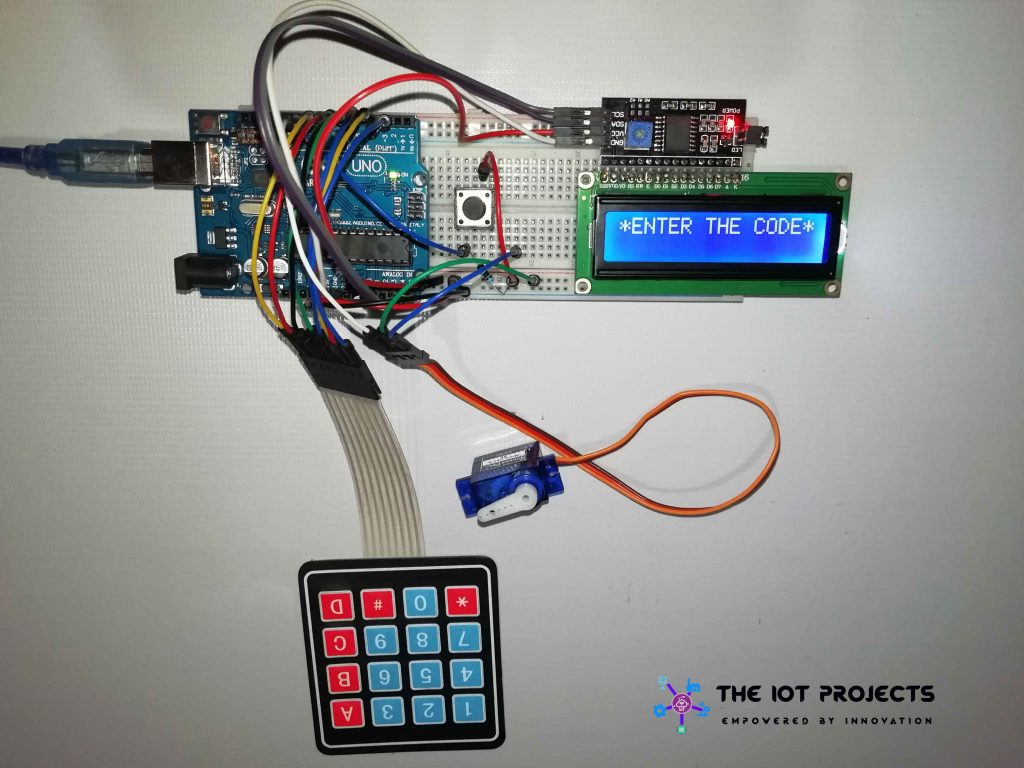
The circuit of this project is very simple which includes Arduino, keypad module, button, servo motor, and LCD. Arduino controls the entire process, such as taking the password from a keypad module, comparing passwords, changing passwords, turning the servo motor, and sending the status to the LCD display. The keypad is used to enter the password. Similarly, the servo motor is used to open the gate when the motor is rotating and the LCD is used to display status or a message on it.
You can check out some of our previous security system projects:
- IoT Based RFID Smart Door Lock System Using NodeMCU ESp8266
- Contactless Smart Doorbell Using ESP8266 & Blynk
- IoT based Silent Intruder Alarm using Arduino
Components Required:
| S.N. | Components Name | Description | Quantity |
|---|---|---|---|
| 1 | Arduino Board | Arduino UNO R3 Development Board | 1 |
| 2 | Keypad | 4X4 Keypad | 1 |
| 3 | LCD Display | I2C 16×2 LCD Display | 1 |
| 4 | Servo Motor | SG90 Servo Motor | 1 |
| 5 | Connecting Wires | Jumper Wires | 20 |
| 6 | Breadboard | – | 1 |
Circuit Diagram of Password-Based Security Lock System
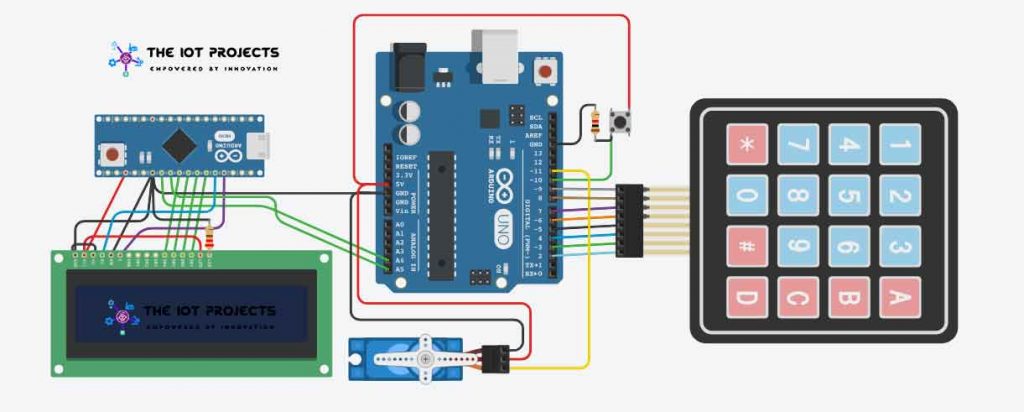
First of all, we will make a connection with 4 × 4 keypads. We are using digital pin D2 to D9 for a keypad connection with Arduino. Connect all Eight pins of the Keypad to Arduino’s pin D2 ~ D9.
To connect the servo motor to the Arduino, use the Arduino’s digital pin D11 to output the servo motor’s PWM pin. Now connect the positive wire of the servo to the pin 5volt of Arduino and the negative wire to the ground.
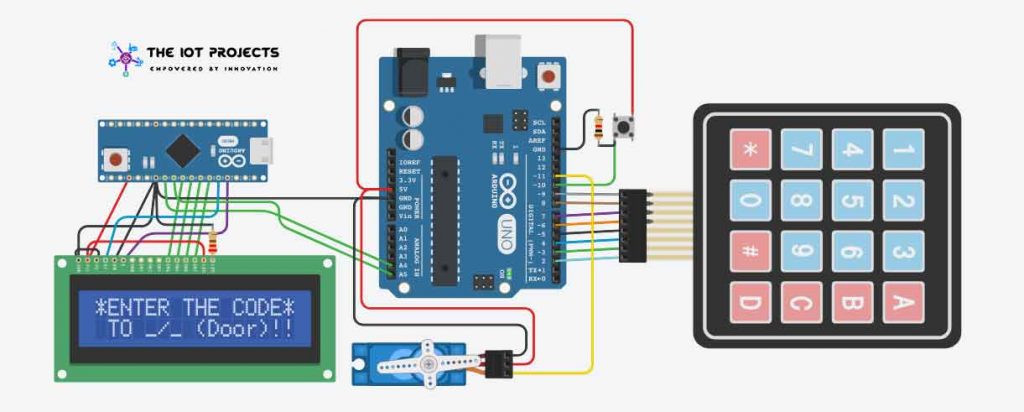
We will now connect 16 × 2 I2C LCD to Arduino. Connect the VCC and GND pin of 16×2 I2C LCD to the 5 volts and GND pin of Arduino respectively. Similarly, connect SDA and SCL pin to Analog Pin A5 and A4 respectively.
How does the password security door lock system work?
At first, Arduino is initialized in stand by mode where it asks the user to enter the password to unlock the door. In this Password Security Lock System Using Arduino project, we have defined the default password in Arduino as “1234”. However, You can change this via coding later.
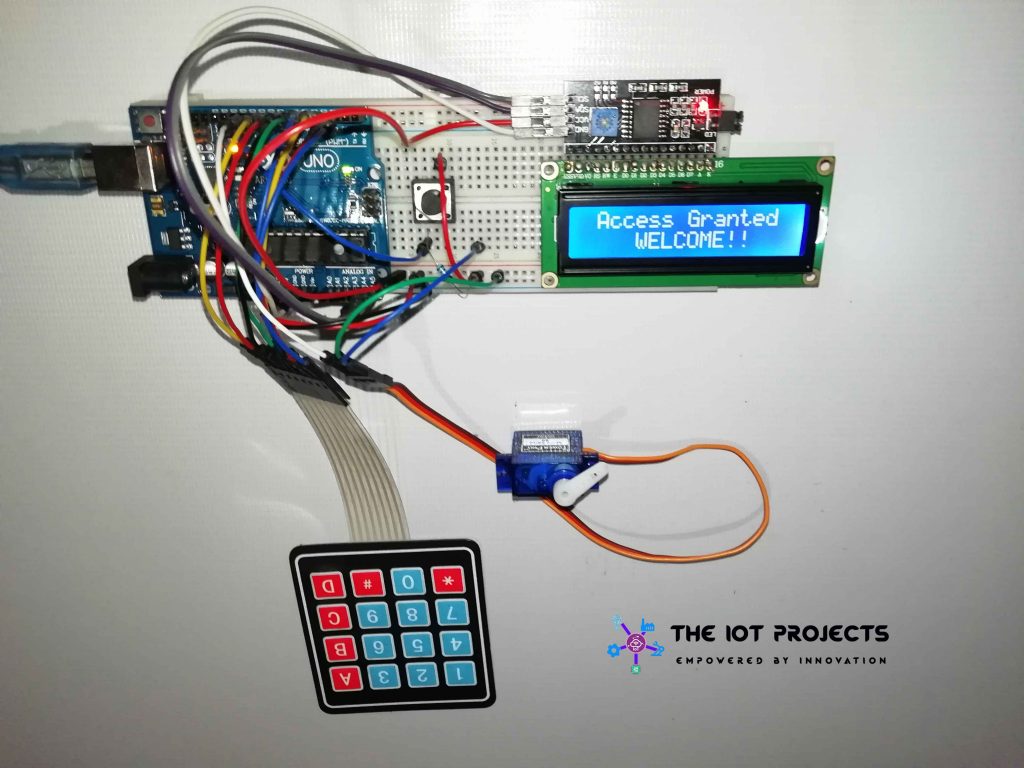
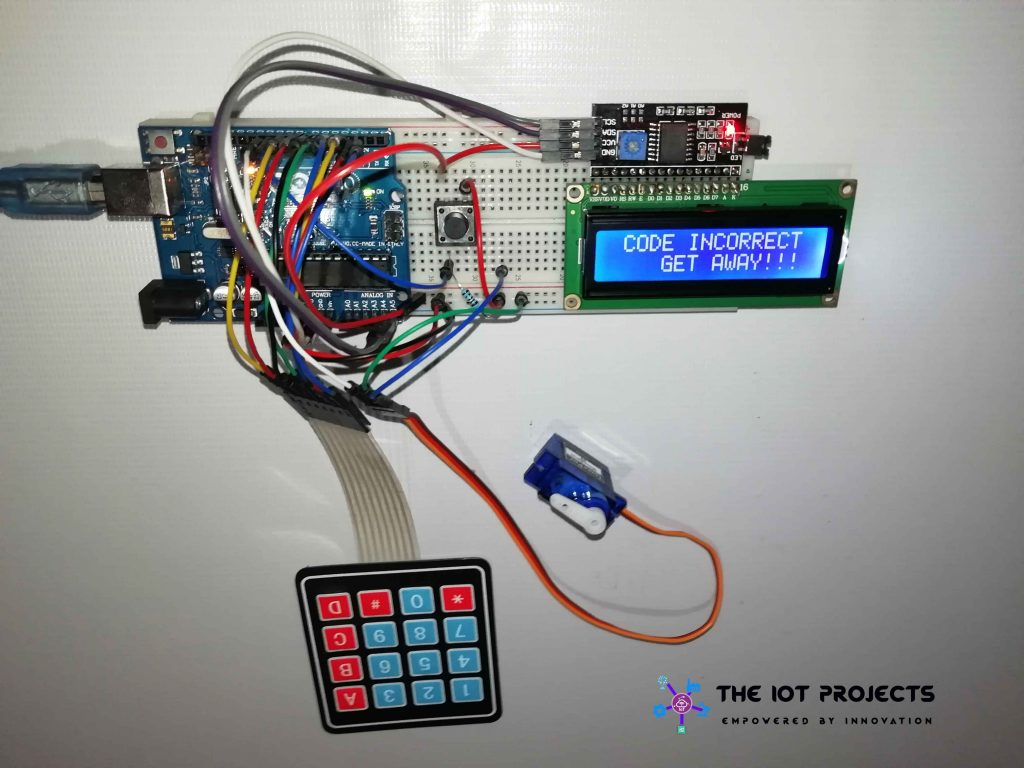
When users enter the “*” key it will allow the user to enter the password. Now, it checks the password stored in this Arduino EEPROM. If it is correct, it will show ‘Access is granted, welcome‘, and then the door is opened. But, if the password is incorrect then it will go back to the standby mode by displaying “Incorrect Code Get Away“.
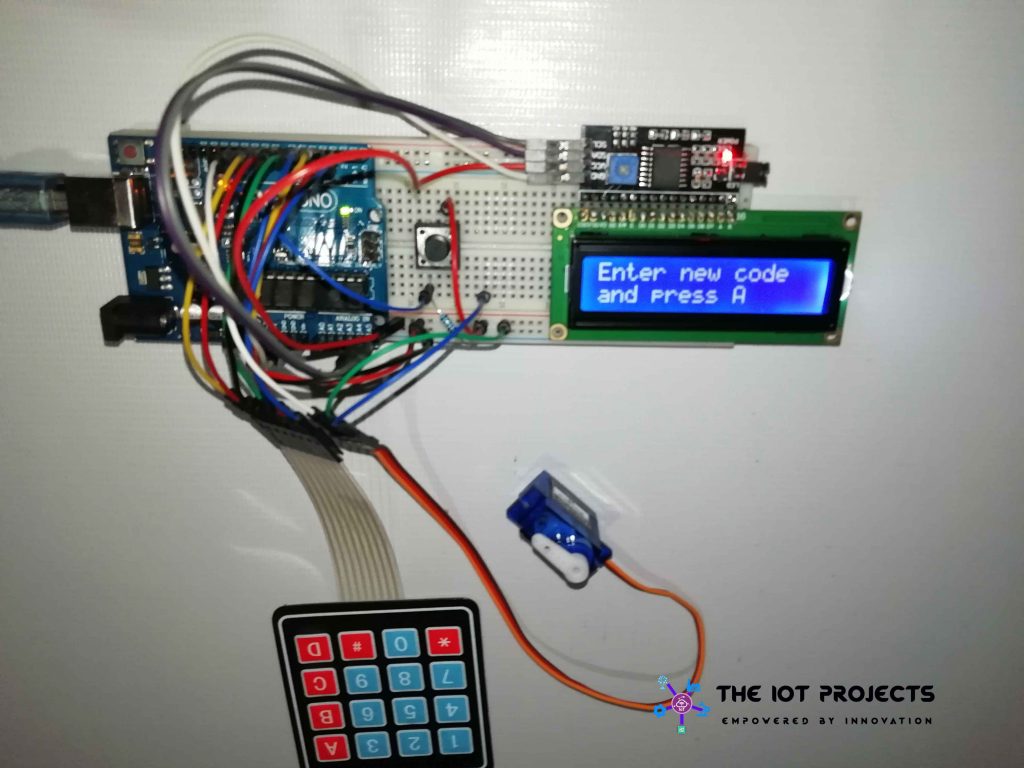
Similarly, in Arduino Password Security Lock System, if the user press “#” it will ask for the code. Now, if the entered code is incorrect then it will get back to standby mode. and if it is correct it will ask the user to enter the new password and confirm the password by retyping it. Here, the Arduino will compare the code, if it is incorrect then again it will get back to standby mode. But, if it is correct then it will change your current password.
Source code/program:
The code is provided for a Password Security Lock System Using Arduino & Keypad project. You can easily copy and paste the code using the Arduino IDE. Just compile it and finally upload it to the ATmega328 microcontroller.
#include <Wire.h>
#include <Keypad.h>
#include <Servo.h>
#include <EEPROM.h>
#include <LiquidCrystal_I2C.h>

int Button = 10;           //Push Button

const byte numRows = 4;         //number of rows on the keypad
const byte numCols = 4;         //number of columns on the keypad

char keymap[numRows][numCols] =
{
  {'1', '2', '3', 'A'},
  {'4', '5', '6', 'B'},
  {'7', '8', '9', 'C'},
  {'*', '0', '#', 'D'}
};

char keypressed;                 //Where the keys are stored it changes very often
char code[] = {'1', '2', '3', '4'}; //The default code, you can change it or make it a 'n' digits one

char check1[sizeof(code)];  //Where the new key is stored
char check2[sizeof(code)];  //Where the new key is stored again so it's compared to the previous one

short a = 0, i = 0, s = 0, j = 0; //Variables used later

byte rowPins[numRows] = {2, 3, 4, 5}; //Rows 0 to 3 //if you modify your pins you should modify this too
byte colPins[numCols] = {6, 7, 8, 9}; //Columns 0 to 3

LiquidCrystal_I2C lcd(0x27, 16, 2);
Keypad myKeypad = Keypad(makeKeymap(keymap), rowPins, colPins, numRows, numCols);
Servo myservo;
void setup()
{
  lcd.init();                      // initialize the lcd
  lcd.backlight();
  lcd.begin (16, 2);
  lcd.setCursor(0, 0);
  lcd.print("*ENTER THE CODE*");
  lcd.setCursor(1 , 1);

  lcd.print("TO _/_ (Door)!!");      //What's written on the LCD you can change
  pinMode(Button, INPUT);
  myservo.attach(11);
  myservo.write(0);
  //  for(i=0 ; i<sizeof(code);i++){        //When you upload the code the first time keep it commented
  //            EEPROM.get(i, code[i]);             //Upload the code and change it to store it in the EEPROM
  //           }                                  //Then uncomment this for loop and reupload the code (It's done only once)


}


void loop()
{

  keypressed = myKeypad.getKey();               //Constantly waiting for a key to be pressed
  if (keypressed == '*') {                    // * to open the lock
    lcd.clear();
    lcd.setCursor(0, 0);
    lcd.println("*ENTER THE CODE*");            //Message to show
    ReadCode();                          //Getting code function
    if (a == sizeof(code))        //The ReadCode function assign a value to a (it's correct when it has the size of the code array)
      OpenDoor();                   //Open lock function if code is correct
    else {
      lcd.clear();
      lcd.setCursor(1, 0);
      lcd.print("CODE"); //Message to print when the code is wrong
      lcd.setCursor(6, 0);
      lcd.print("INCORRECT");
      lcd.setCursor(15, 1);
      lcd.print(" ");
      lcd.setCursor(4, 1);
      lcd.print("GET AWAY!!!");
    }
    delay(2000);
    lcd.clear();
    lcd.setCursor(0, 0);
    lcd.print("*ENTER THE CODE*");
    lcd.setCursor(1 , 1);

    lcd.print("TO _/_ (Door)!!");
    //Return to standby mode it's the message do display when waiting
  }

  if (keypressed == '#') {                //To change the code it calls the changecode function
    ChangeCode();
    lcd.clear();
    lcd.setCursor(0, 0);
    lcd.print("*ENTER THE CODE*");
    lcd.setCursor(1 , 1);

    lcd.print("TO _/_ (Door)!!");                 //When done it returns to standby mode
  }

  if (digitalRead(Button) == HIGH) {  //Opening by the push button
    myservo.write(0);
  }

}

void ReadCode() {                 //Getting code sequence
  i = 0;                    //All variables set to 0
  a = 0;
  j = 0;

  while (keypressed != 'A') {                                   //The user press A to confirm the code otherwise he can keep typing
    keypressed = myKeypad.getKey();
    if (keypressed != NO_KEY && keypressed != 'A' ) {     //If the char typed isn't A and neither "nothing"
      lcd.setCursor(j, 1);                                 //This to write "*" on the LCD whenever a key is pressed it's position is controlled by j
      lcd.print("*");
      j++;
      if (keypressed == code[i] && i < sizeof(code)) {       //if the char typed is correct a and i increments to verify the next caracter
        a++;
        i++;
      }
      else
        a--;                                               //if the character typed is wrong a decrements and cannot equal the size of code []
    }
  }
  keypressed = NO_KEY;

}

void ChangeCode() {                     //Change code sequence
  lcd.clear();
  lcd.print("Changing code");
  delay(1000);
  lcd.clear();
  lcd.print("Enter old code");
  ReadCode();                      //verify the old code first so you can change it

  if (a == sizeof(code)) {  //again verifying the a value
    lcd.clear();
    lcd.print("Changing code");
    GetNewCode1();            //Get the new code
    GetNewCode2();            //Get the new code again to confirm it
    s = 0;
    for (i = 0 ; i < sizeof(code) ; i++) { //Compare codes in array 1 and array 2 from two previous functions
      if (check1[i] == check2[i])
        s++;                                //again this how we verifiy, increment s whenever codes are matching
    }
    if (s == sizeof(code)) {        //Correct is always the size of the array

      for (i = 0 ; i < sizeof(code) ; i++) {
        code[i] = check2[i];       //the code array now receives the new code
        EEPROM.put(i, code[i]);        //And stores it in the EEPROM

      }
      lcd.clear();
      lcd.print("Code Changed");
      delay(2000);
    }
    else {                        //In case the new codes aren't matching
      lcd.clear();
      lcd.print("Codes are not");
      lcd.setCursor(0, 1);
      lcd.print("matching !!");
      delay(2000);
    }

  }

  else {                    //In case the old code is wrong you can't change it
    lcd.clear();
    lcd.print("Wrong");
    delay(2000);
  }
}

void GetNewCode1() {
  i = 0;
  j = 0;
  lcd.clear();
  lcd.print("Enter new code");   //tell the user to enter the new code and press A
  lcd.setCursor(0, 1);
  lcd.print("and press A");
  delay(2000);
  lcd.clear();
  lcd.setCursor(0, 1);
  lcd.print("and press A");     //Press A keep showing while the top row print ***

  while (keypressed != 'A') {          //A to confirm and quits the loop
    keypressed = myKeypad.getKey();
    if (keypressed != NO_KEY && keypressed != 'A' ) {
      lcd.setCursor(j, 0);
      lcd.print("*");               //On the new code you can show * as I did or change it to keypressed to show the keys
      check1[i] = keypressed;   //Store caracters in the array
      i++;
      j++;
    }
  }
  keypressed = NO_KEY;
}

void GetNewCode2() {                        //This is exactly like the GetNewCode1 function but this time the code is stored in another array
  i = 0;
  j = 0;

  lcd.clear();
  lcd.print("Confirm code");
  lcd.setCursor(0, 1);
  lcd.print("and press A");
  delay(3000);
  lcd.clear();
  lcd.setCursor(0, 1);
  lcd.print("and press A");

  while (keypressed != 'A') {
    keypressed = myKeypad.getKey();
    if (keypressed != NO_KEY && keypressed != 'A' ) {
      lcd.setCursor(j, 0);
      lcd.print("*");
      check2[i] = keypressed;
      i++;
      j++;
    }
  }
  keypressed = NO_KEY;
}

void OpenDoor() {            //Lock opening function open for 3s
  lcd.clear();
  lcd.setCursor(1, 0);
  lcd.print("Access Granted");
  lcd.setCursor(4, 1);
  lcd.print("WELCOME!!");
  myservo.write(90);


}
Download Keypad.h Arduino Library file from below:
Program code Explanation: Password Security Lock System Using Arduino & Keypad
For programming Arduino, we have to include these necessary libraries. We use the keypad.h, servo.h EEPROM.h, and LiquidCrystal_I2C.h.
#include <Wire.h>
#include <Keypad.h>
#include <Servo.h>
#include <EEPROM.h>
#include <LiquidCrystal_I2C.h>
let’s learn how this EEPROM works
#include <EEPROM.h>To save the previous code to the Arduino we will be using EEPROM. EEPROM stands for Electrically Erasable Programmable Read-Only Memory. That is a built-in memory of the Arduino. This memory is non-volatile. So, we are using this in our Password protected Security Door Lock System Using Arduino & Keypad project.
int Button = 10;           //Push Button

const byte numRows = 4;         //number of rows on the keypad
const byte numCols = 4;         //number of columns on the keypad

char keymap[numRows][numCols] =
{
  {'1', '2', '3', 'A'},
  {'4', '5', '6', 'B'},
  {'7', '8', '9', 'C'},
  {'*', '0', '#', 'D'}
};

char keypressed;                 //Where the keys are stored it changes very often
char code[] = {'1', '2', '3', '4'}; //The default code, you can change it or make it a 'n' digits one

char check1[sizeof(code)];  //Where the new key is stored
char check2[sizeof(code)];  //Where the new key is stored again so it's compared to the previous one

short a = 0, i = 0, s = 0, j = 0; //Variables used later
Here we have initialized the button. we have declared a variable code to store the default code. Again we have created two variables check1 and check2 to check the user entered code is right o wrong. short variable to use later. We have initialized keypad and servo.
LiquidCrystal_I2C lcd(0x27, 16, 2);
Keypad myKeypad = Keypad(makeKeymap(keymap), rowPins, colPins, numRows, numCols);
Servo myservo;
void setup()
{
  lcd.init();                      // initialize the lcd
  lcd.backlight();
  lcd.begin (16, 2);
  lcd.setCursor(0, 0);
  lcd.print("*ENTER THE CODE*");
  lcd.setCursor(1 , 1);

  lcd.print("TO _/_ (Door)!!");      //What's written on the LCD you can change
  pinMode(Button, INPUT);
  myservo.attach(11);
  myservo.write(0);
  //  for(i=0 ; i<sizeof(code);i++){        //When you upload the code the first time keep it commented
  //            EEPROM.get(i, code[i]);             //Upload the code and change it to store it in the EEPROM
  //           }                                  //Then uncomment this for loop and reupload the code (It's done only once)
let’s discuss the setup part of the program. we have initialized the LCD. then we have printed information to the LCD. we have configured the button pin as the input pin. here, we use the button pin to close the door. this is the pin D11 of Arduino at which the servo is attached. Initially, we gave the servo to stay at angle zero.
myservo.write(0);Use of ReadCode Function
Before discussing the loop function, let’s discuss the ReadCode function used in the keypad. we can only get single characters to type the word. so we have used a while loop. let’s discuss it in detail. This while loop does not stop until you press A. Basically, this while loop stores the password and display Asterisk * on its behalf. on the second loop, it checks the password typed is the same or not. It will increment on match and decrement on incorrect.
void ReadCode() {                 //Getting code sequence
  i = 0;                    //All variables set to 0
  a = 0;
  j = 0;

  while (keypressed != 'A') {                                   //The user press A to confirm the code otherwise he can keep typing
    keypressed = myKeypad.getKey();
    if (keypressed != NO_KEY && keypressed != 'A' ) {     //If the char typed isn't A and neither "nothing"
      lcd.setCursor(j, 1);                                 //This to write "*" on the LCD whenever a key is pressed it's position is controlled by j
      lcd.print("*");
      j++;
      if (keypressed == code[i] && i < sizeof(code)) {       //if the char typed is correct a and i increments to verify the next caracter
        a++;
        i++;
      }
      else
        a--;                                               //if the character typed is wrong a decrements and cannot equal the size of code []
    }
  }
  keypressed = NO_KEY;

}
Getting Code From Keypad
let’s discuss the getNewCode part: Here, we are initializing two characters i=0 and j=0. This code is just used to print command on LCD. we have already discussed the while loop part before only one thing is different that is the check part. it stores characters in the array.
void GetNewCode1() {
  i = 0;
  j = 0;
  lcd.clear();
  lcd.print("Enter new code");   //tell the user to enter the new code and press A
  lcd.setCursor(0, 1);
  lcd.print("and press A");
  delay(2000);
  lcd.clear();
  lcd.setCursor(0, 1);
  lcd.print("and press A");     //Press A keep showing while the top row print ***

  while (keypressed != 'A') {          //A to confirm and quits the loop
    keypressed = myKeypad.getKey();
    if (keypressed != NO_KEY && keypressed != 'A' ) {
      lcd.setCursor(j, 0);
      lcd.print("*");               //On the new code you can show * as I did or change it to keypressed to show the keys
      check1[i] = keypressed;   //Store caracters in the array
      i++;
      j++;
    }
  }
  keypressed = NO_KEY;
}
In getNewCode2 we are repeating the same process. we are using the check2 variable to store the retyped password in the array.
void GetNewCode2() {                        //This is exactly like the GetNewCode1 function but this time the code is stored in another array
  i = 0;
  j = 0;

  lcd.clear();
  lcd.print("Confirm code");
  lcd.setCursor(0, 1);
  lcd.print("and press A");
  delay(3000);
  lcd.clear();
  lcd.setCursor(0, 1);
  lcd.print("and press A");

  while (keypressed != 'A') {
    keypressed = myKeypad.getKey();
    if (keypressed != NO_KEY && keypressed != 'A' ) {
      lcd.setCursor(j, 0);
      lcd.print("*");
      check2[i] = keypressed;
      i++;
      j++;
    }
  }
  keypressed = NO_KEY;
}
Open Door Function for servo
Finally, we have OpenDoor function. This part belongs to the servo motor. rotating servo depends upon your requirements. for the demonstration, I am using 90 degrees.
void OpenDoor() {            //Lock opening function open for 3s
  lcd.clear();
  lcd.setCursor(1, 0);
  lcd.print("Access Granted");
  lcd.setCursor(4, 1);
  lcd.print("WELCOME!!");
  myservo.write(90);


}
Use of change code function
Now let’s move towards the change code part. Here LCD asks for an old password if the password is correct it will enter the GetNewCode loop. Otherwise, it will enter the else loop. Here, it will clear the screen and print “Incorrect password, Get Away”
void ChangeCode() {                     //Change code sequence
  lcd.clear();
  lcd.print("Changing code");
  delay(1000);
  lcd.clear();
  lcd.print("Enter old code");
  ReadCode();                      //verify the old code first so you can change it

  if (a == sizeof(code)) {  //again verifying the a value
    lcd.clear();
    lcd.print("Changing code");
    GetNewCode1();            //Get the new code
    GetNewCode2();            //Get the new code again to confirm it
    s = 0;
    for (i = 0 ; i < sizeof(code) ; i++) { //Compare codes in array 1 and array 2 from two previous functions
      if (check1[i] == check2[i])
        s++;                                //again this how we verifiy, increment s whenever codes are matching
    }
    if (s == sizeof(code)) {        //Correct is always the size of the array

      for (i = 0 ; i < sizeof(code) ; i++) {
        code[i] = check2[i];       //the code array now receives the new code
        EEPROM.put(i, code[i]);        //And stores it in the EEPROM

      }
      lcd.clear();
      lcd.print("Code Changed");
      delay(2000);
    }
    else {                        //In case the new codes aren't matching
      lcd.clear();
      lcd.print("Codes are not");
      lcd.setCursor(0, 1);
      lcd.print("matching !!");
      delay(2000);
    }

  }

  else {                    //In case the old code is wrong you can't change it
    lcd.clear();
    lcd.print("Wrong");
    delay(2000);
  }
}
Video Demonstration
Here is a complete video demonstration of password based security door lock system project using Arduino.
Tinkercad Simulation: Password Security Lock System Using Arduino & Keypad
In this pandemic situation, many of our regular visitors don’t have the required hardware. So I have decided to provide you Tinkercad simulation file of this Password Security Lock System Using Arduino & Keypad project. Hence your lockdown will be productive.
Conclusion
In this tutorial, I have shown you how to make a Password Security Lock System Using Arduino, Keypad, and Servo motor. I hope you enjoyed reading this article. If you have any questions, comments, or ideas? Let me know in the comment section below.
You might also like reading:
- IoT Based Patient Health Monitoring System Using ESP8266/ESP32 Web Server
- Getting Started with Arduino UNO
- Capacitive Soil Moisture Sensor with OLED Display & Arduino
- RFID Based Attendance System Using NodeMCU with PHP Web App
- ESP8266 Plot Sensor readings to Webserver in Real-Time Chart
- Home Automation with MIT App Inventor and ESP8266
- Interfacing PIR Sensor with ESP8266 and EasyIoT
- ESP8266 RGB LED Controller Web Server


I have a single channel 5v relay instead of the servo, can u tell me what i can change in code to make it work with relay?
Btw relay is connected to solenoid and solenoid to 12v power source
Pls answer and thank u in advance
Link expired for simulating files
Thanks for your kind info.
The Post has been updated with a new link: https://www.tinkercad.com/things/1hR23eLOeiv-password-protected-door-lock-using-arduino/editel?sharecode=_uRB_nPbBZfcspjN2KlHDL0jQNOgeC-A7HwXq9aeZTI
The share link has expired
Hello, your system shows me 16 squares on one line, basically there is nothing to display, I am using a 1602A display with 12C, the iDEE is V1.6.2 is the correct version?
Adjust the LCD backlight from Potentiometer and Reset your Arduino
yes I did it, it’s always the same I only have one line displayed and not two
your link is not working.
you link is not working. please update it
Now it is updated check the link: https://www.tinkercad.com/things/1hR23eLOeiv-password-protected-door-lock-using-arduino/editel?sharecode=UM6LqZkZDN8ZocPzVo5ijrpN5XvCi7BDQ1pD-BzBFZk
Link is not working .The simulation link
Link is not working. please update it.
Please share new link, this link has expired
Please share link for simulation, I need it for my project.
Please share the link of Tinkercad
the link is error