Introduction to Arduino
Arduino is an Open-Source physical computing platform that is designed for experimenting with electronics and has more fun with intuitive. Actually, Arduino has its own programming language, huge potential uses, and vast support of Network. That makes it a perfect platform for both Beginners and Advanced Enthusiasts.
Arduino is a Computer for the Physical World:
Honestly, the friendly blue board in your desk or in your hand is an Arduino. In a similar way, you can also think of an Arduino as the baby of our traditional computers. At its core, the Arduino is commonly a small portable computer. Arduino is capable of taking inputs from the sensors (like the push of a button or reading from a light sensor). Basically, Arduino Interpretes that information to control various outputs (Such as Blinking Light or an electric motor).
This is the reason where the term “Physical- Computing” is born. Usually, Arduino has the capability to take the world of electronics and relate it to the physical world in a real way. Trust me this will make sense very soon.
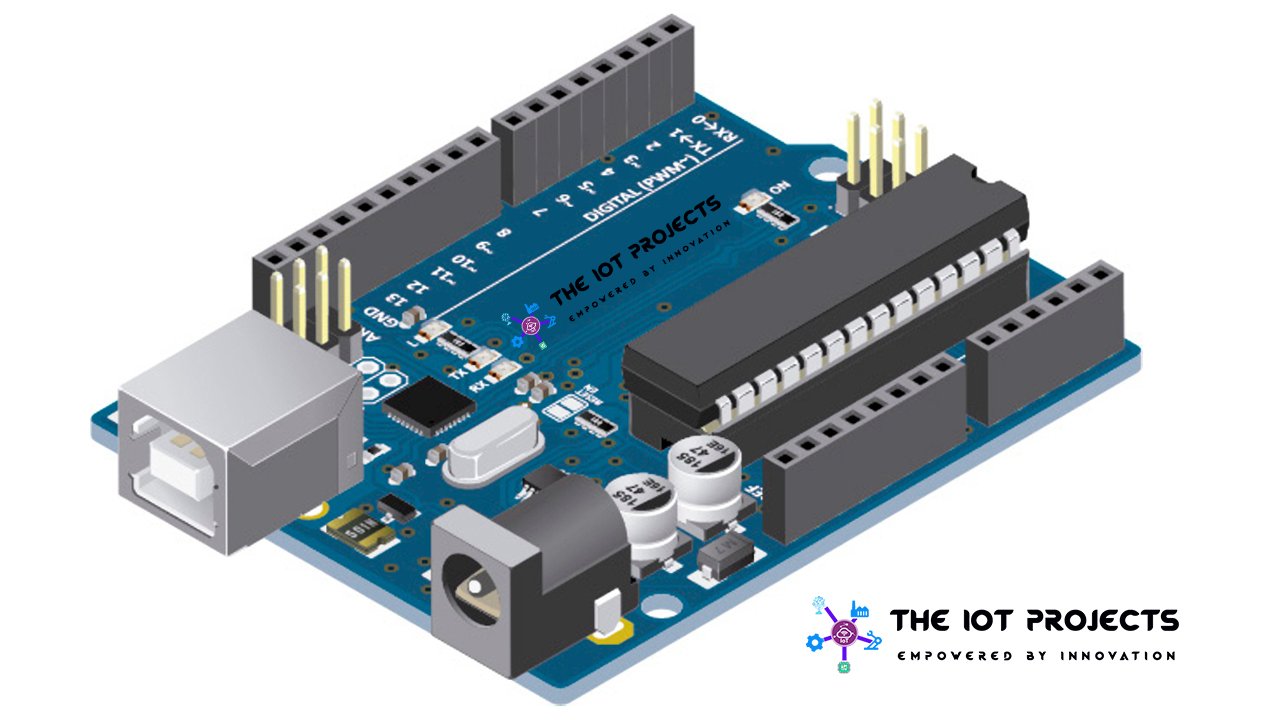
Arduino UNO SMD R3
The Arduino Uno is one of the most popular development boards based on the ATmega328. Everybody prefers this board because of its versatility and extensive support Network. Actually, it has 14 pins (Digital Input/output). In which 6 of them are PWM outputs, 6 Analog inputs, a 16 Mhz crystal oscillator and a USB connection. It also has a power jack, a reset button, and an ICSP header. But, don’t worry I will teach all these things later after installing Arduino IDE.
Installing Arduino IDE and Using Uno R3 board
STEP-1: Download the Arduino IDE (Integrated Development Environment)
Access the Internet:
In order to run Arduino, first of all, you need to download some software. This is completely free!. You can download it from the Arduino official site. This software is known as Arduino IDE. It will allow you to program the Arduino board to do exactly what we want.
Now Download Arduino IDE for different Operating System from the link below:
www.arduino.cc/en/Main/Software
For different operating system platforms, there are different ways of using the Arduino IDE. So, Visit these links to know more:
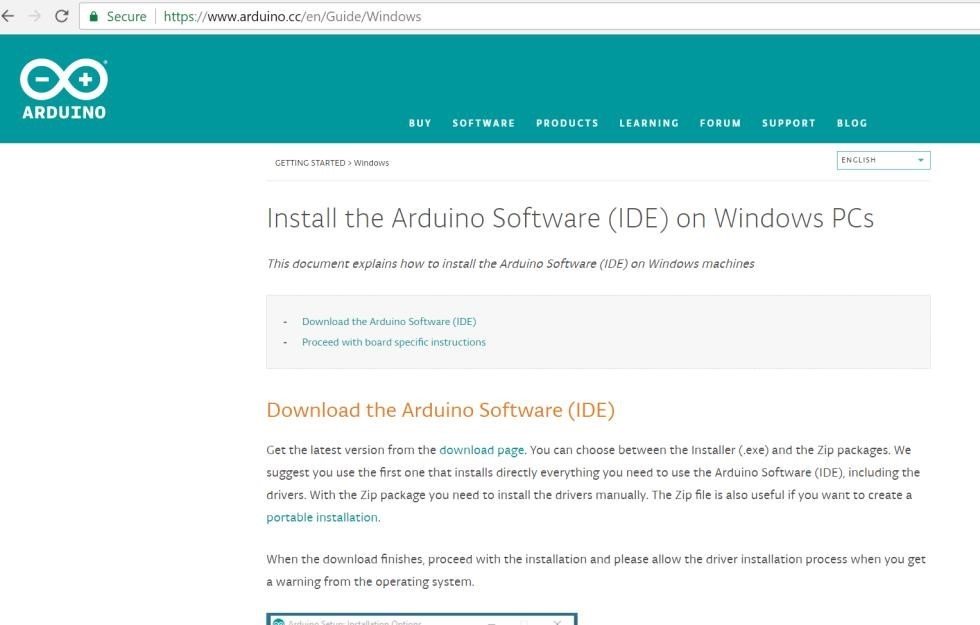
Windows User:https://www.arduino.cc/en/Guide/Windows
Mac OS X User:https://www.arduino.cc/en/Guide/MacOSX
Linux User:https://playground.arduino.cc/Learning/Linux
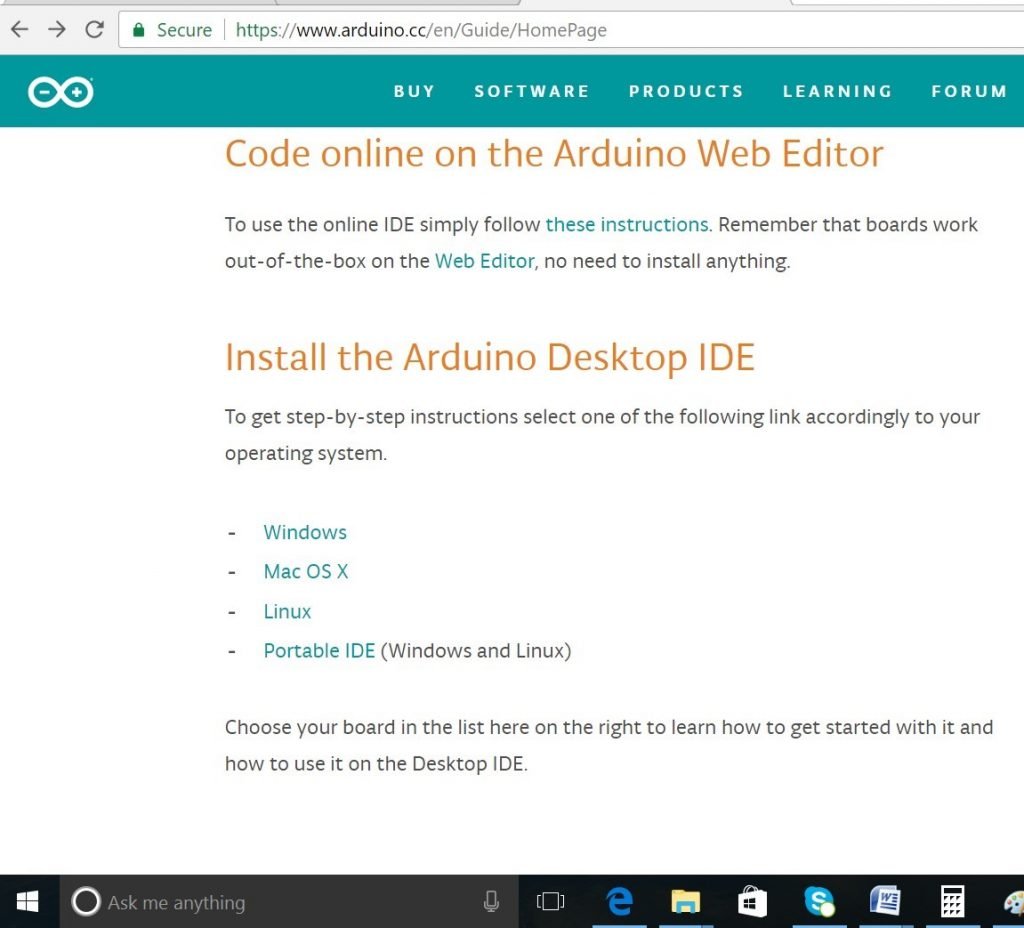
For more detailed information about Arduino IDE, please refer to the following link: https://www.arduino.cc/en/Guide/HomePage
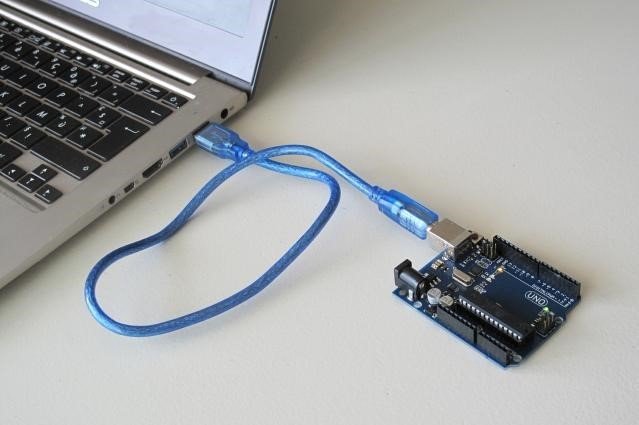
STEP-2: Connect your Arduino Uno to your Computer:
Use the USB cable that comes with the Arduino kit to connect the Arduino to your Desktop PC or a Laptop USB Input.
STEP-3: Install Drivers
Basically, depending upon the Operating System that you are using, you’ll need to follow the specific instructions. Actually, you can follow the specific instructions for installing drivers onto your Arduino using the links provided below:
Windows Installation Process: Go to the web address provided below to access the instructions for installations of drivers on a Windows-based computer. https://arduino.cc/en/Guide/Windows
Macintosh OS X Installation Process: Mac OS users do not require to install drivers. But, you can follow the URL if you have questions. Otherwise, proceed to the next process.. https://arduino.cc/en/Guide/MacOSX
Linux: 32 bit / 64 bit, Installation Process: Go to the web address provided below to access the instructions for installing drivers on a Linux-based computer. https://www.arduino.cc/playground/Learning/Linux
STEP-4: Open the Arduino IDE
Now, Open the Arduino IDE software on your Desktop PC or Laptop. See around its menu to know the interface. We aren’t going to learn to code here, this is just an introduction. This step is to set your Arduino IDE to identify your Arduino Uno.
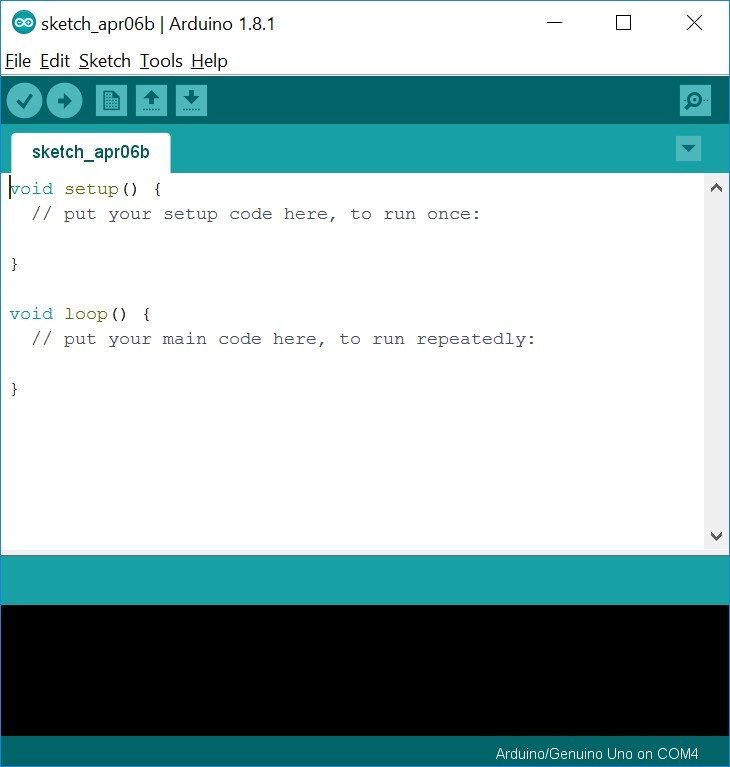
GUI (Graphical User Interface) of Arduino IDE
[wp-svg-icons icon=”checkmark-circle” wrap=”i”] Verify
- Checks your code for errors while compiling it.
[wp-svg-icons icon=”arrow-right-3″ wrap=”i”] Upload
- It Compiles your code and uploads it to the selected board. See uploading below for details.
[wp-svg-icons icon=”file-3″ wrap=”i”] New
- Creates a new sketch.
[wp-svg-icons icon=”upload-2″ wrap=”i”] Open
- Presents a menu of all the sketches in your sketchbook. Clicking one will open it within the current window overwriting its content.
[wp-svg-icons icon=”download-2″ wrap=”i”] Save
- Saves your sketch.
[wp-svg-icons icon=”zoom-out” wrap=”i”] Serial Monitor
- Opens the serial monitor.
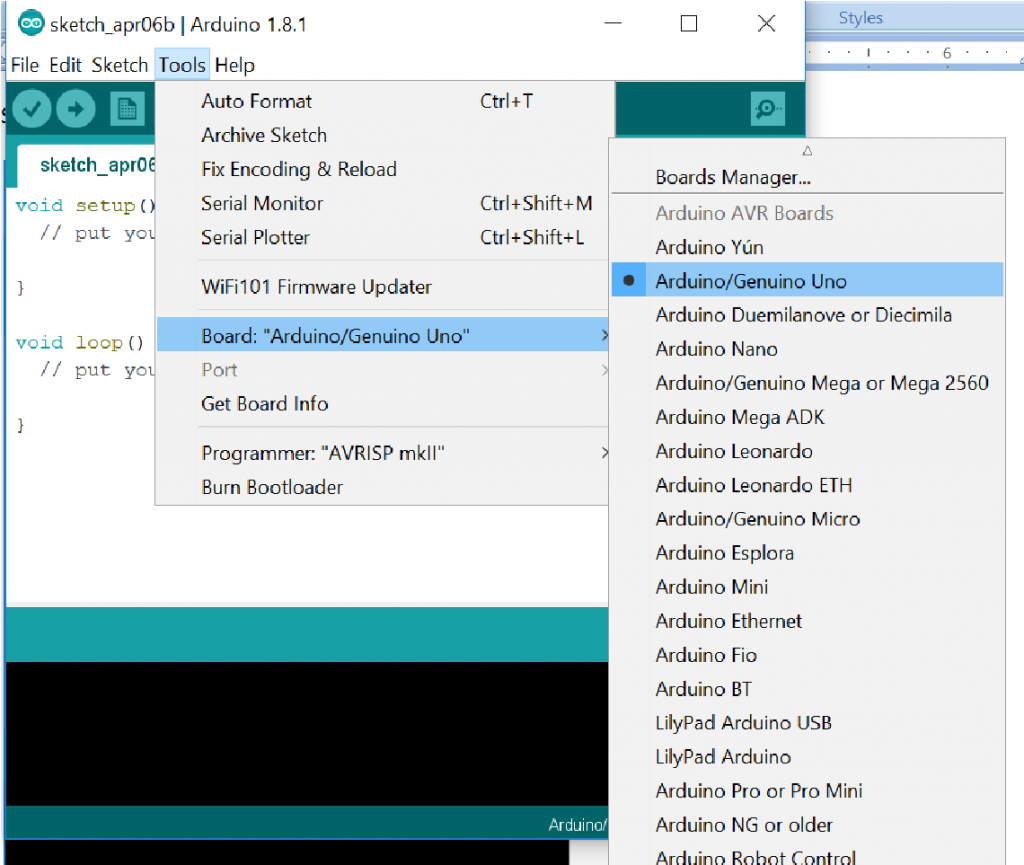
STEP-5: Select your board: Arduino Uno
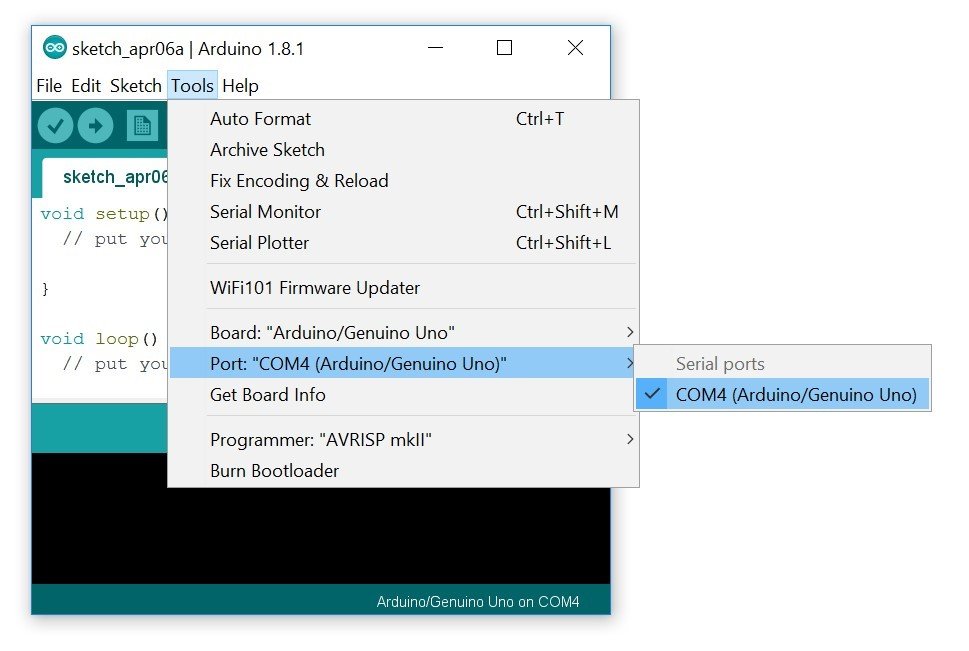
STEP-6: Select your Serial Device Windows:
For Windows: Basically, from the Tools>> Serial Port Menu you can select your Arduino Board. In most cases, the port is likely to be com3 or higher (COM1 and COM2 are usually reserved for hardware serial ports). To find out, you can disconnect your Arduino board and re-open the menu; the entry that disappears should be the Arduino board. Reconnect the board and select that serial port.
Mac OS: Select the serial device of the Arduino board from the Tools > Serial Port menu. On the Mac, this should be something with /dev/tty.usbmodem (for the Uno or Mega 2560) or /dev/tty.usbserial (for older boards) in it.
For Linux: https://playground.arduino.cc/Learning/Linux
About Arduino Uno R3 board
What’s on the board?
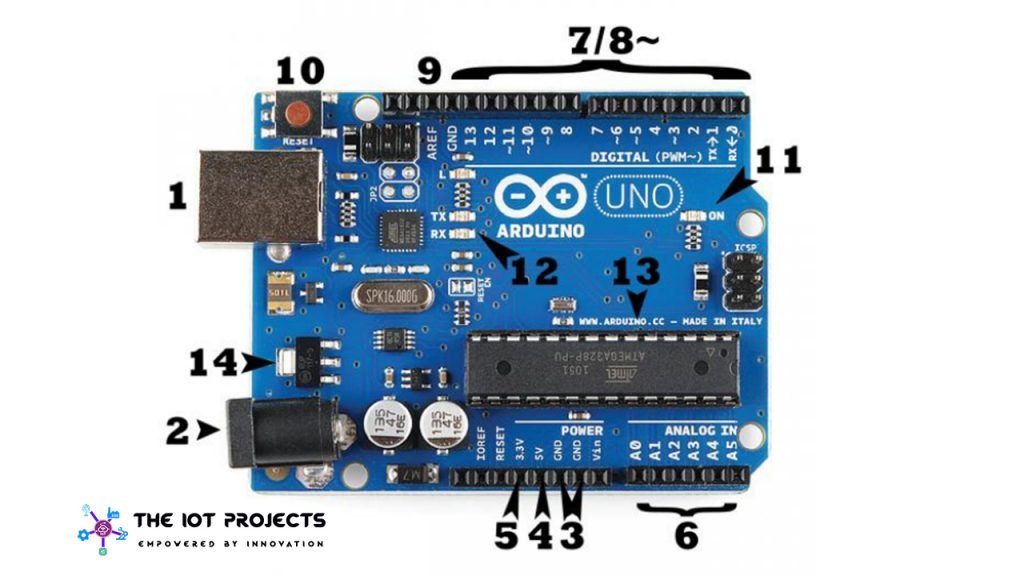
There are many varieties of Arduino boards available on the market that can be used for different purposes. Some Arduino boards look a bit different from the one below, but most Arduino has the majority of these components in common:
Power (USB [1] / Barrel Jack [2])
Every Arduino board needs a power Source to be connected. You can power on Arduino UNO either from the USB cable or DC power barrel jack. In the picture above, the USB connection is labeled as [1] and the barrel jack is labeled as [2].
NOTE: Do NOT use a power supply that is greater than 20 Volts. It will overpower and thereby destroy your Arduino. The recommended voltage for most Arduino models is between 6 and 12 Volts.
The Pins (5V, 3.3V, GND, Analog, Digital, PWM, AREF) on your Arduino are the places where you connect wires to construct a circuit. Usually, they have black plastic “Headers”. Those female headers allow you to plug a wire right into the Arduino UNO. The Arduino has several different kinds of pins, each of them are labeled on the board and used for different functions.
GND [3]:
Short for ‘Ground’. You can find several GND pins on the Arduino, any of them can be used to ground your circuit.
5V [4] & 3.3V [5]:
As you may already know from its level, the 5V pin supplies 5 volts of power, and the 3.3V pin supplies 3.3 volts of power. Most of the simple components used with the Arduino run happily with 5v or 3.3 volts power supply.
Analog [6]:
The area of pins under the ‘Analog In’ label (A0 through A5 on the UNO) is Analog In pins. These pins can read the signal from an analog sensor (like temperature, humidity, and heart rate sensor) and process it into a digital value that we can read.
Digital [7]:
Across from the analog pins, there are the digital pins as well (0 through 13 on the UNO). These pins can be used for both digital input (Such as telling if a button is pushed) and digital output (Such as powering an LED).
PWM [8]:
You may have noticed the tilde (~) next to some of the digital pins (3, 5, 6, 9, 10, and 11 on the UNO). These pins act as normal digital pins, but can also be used for something called Pulse-Width Modulation (PWM). We have a tutorial on PWM, but for now, think of these pins as being able to simulate analog output (like fading an LED in and out).
AREF [9]:
Stands for Analog Reference. Most of the time you can leave this pin alone. It is sometimes used to set an external reference voltage (between 0 and 5 Volts) as the upper limit for the analog input pins.
Reset Button [10]
Likewise the original Nintendo, the Arduino has a reset button (10). Pushing it will temporarily connect the reset pin to the ground and restart any code that is loaded on the Arduino Board. This can be very useful if your code doesn’t work or repeat, but you want to test it multiple times. Actually clicking the reset button on the Arduino doesn’t usually fix any problems.
Power LED Indicator [11]
Just below and right side of the word “UNO” on your circuit board, there’s a tiny LED next to the word ‘ON’ (11). This LED should always light up whenever you connect your Arduino to a power source. If this light doesn’t turn on, then there is something wrong on your board.
TX and RX indicator LEDs [12]
TX is a short form for transmitting, RX is a short form for receiving. These markings appear quite a bit in electronics. Basically, to indicate the pins responsible for serial communication. In our case, there are two places on the Arduino UNO where TX and RX appear – once by digital pins 0 and 1, and a second time next to the TX and RX indicator LEDs (12). These LEDs will provide us some nice visual indications whenever our Arduino UNO is receiving or transmitting data (Such as when we’re loading a new program onto the board).
Main IC [13]
The black thing with all the metal legs is an IC, or Integrated Circuit (13). It is the brains of our Arduino UNO. The main IC on the Arduino board is slightly different from the board type that you have but is usually from the ATmega line of IC’s from the ATMEL company. The board type and IC model information can usually be found in writing on the top side of the IC. So, reading datasheets is often a good idea.
Voltage Regulator [14]
Usually, you cannot interact with the voltage regulator (14) on the Arduino Board. But, you can know that is available and used for what purposes?. Actually, it controls the amount of voltage that is let into the Arduino UNO. It is a kind of gatekeeper. It will block the extra voltage that might harm the circuit board. Although, it can regulate voltage up to 20 volts only. So of course, don’t hook up your Arduino UNO to the power source that has more than 20 volts.
Conclusion
So with this, we came to the conclusion of this Getting Started with Arduino UNO | Getting Started For Beginners Article. But, we are going to come up with more beginners level tutorials. Also, a lot more interesting articles and various Projects on Arduino and IoT (Internet of Things). So if there’s some project that really you want to know more about please allow us to know within the comment section below.
With this thank you and goodbye I hope you have enjoyed reading this article. Please be kind enough to share it on social media. You can comment on any of your doubts and queries and we will reply to them as soon as possible. Actually, you subscribe to our website newsletter to learn more happily.


