Home Automation using Raspberry Pi Pico W & Blynk 2.0
Home Automation Project with Pico W MicroPython Code & Blynk IoT App
Overview: Raspberry Pi Pico Home Automation
This project demonstrates how to create a Home Automation using Raspberry Pi Pico W & Blynk 2.0 by writing MicroPython Code.
In recent years, homeowners have increasingly sought out remote control solutions for their home systems, making home automation more popular than ever. Raspberry Pi Pico W, a low-cost microcontroller board with multiple input/output pins, and the Blynk app, a smartphone app that allows customized interfaces for internet-connected devices, can provide an affordable and personalized solution for controlling a 4-channel relay.
Raspberry Pi Pico W, programmable in C or MicroPython, has the ability to control other devices via its input/output pins. By connecting a 4-channel relay to Raspberry Pi Pico W and writing MicroPython Code, homeowners can have control over a wide range of home automation systems like lighting, HVAC, and security. This setup is budget-friendly, adaptable, and can be tailored to meet the unique requirements of each homeowner.
Components Required
To complete this project, you will need to gather the necessary components listed above. Fortunately, many of these items can be easily purchased from online marketplaces such as Amazon and AliExpress. By using these websites, you can easily browse through a wide variety of options and select the best components to suit your needs.
| S.N | COMPONENTS NAME | QUANTITY | PURCHASE LINKS |
|---|---|---|---|
| 1 | Raspberry Pi Pico W Board | 1 | Amazon | AliExpress |
| 2 | 4 channel Relay Module | 1 | Amazon | AliExpress |
| 3 | Breadboard | 1 | Amazon | AliExpress |
| 4 | Jumper Cables | 20 | Amazon | AliExpress |
Once you have acquired all the necessary components. You can begin to assemble them and follow the instructions to complete the project. With a little patience and careful attention to detail, you will be able to successfully create your own Home Automation project using Raspberry Pi Pico W and Blynk 2.0!
Circuit Diagram
The circuit connection is fairly simple. To interface a 4-channel relay module with the Raspberry Pi Pico W, follow the steps below:
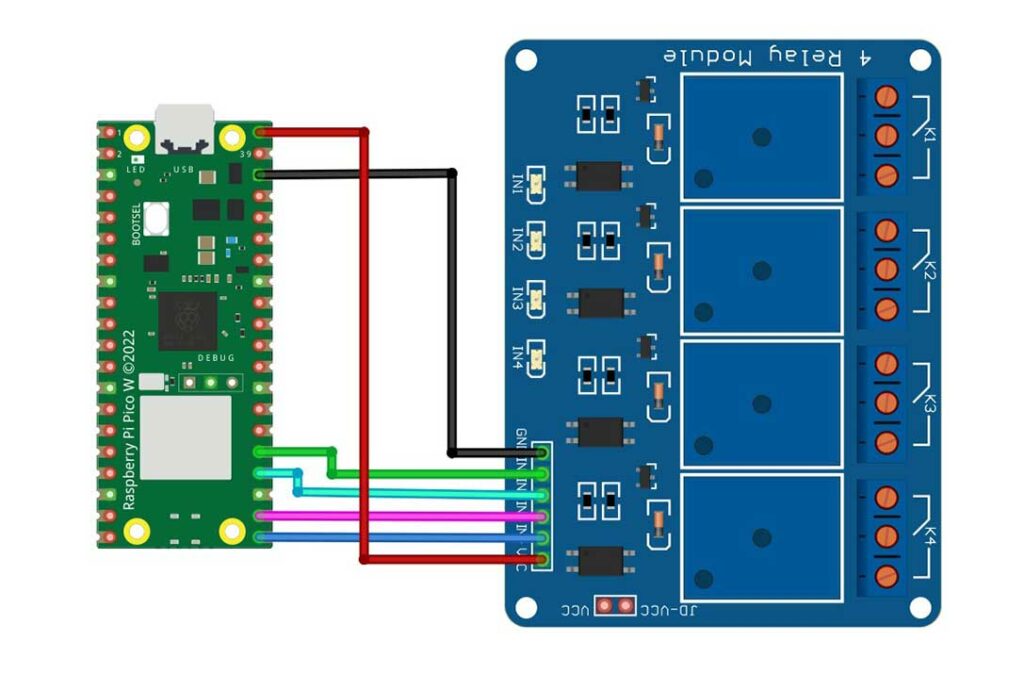
- Connect the VCC pin of the relay module to the 5V pin of the Raspberry Pi Pico W.
- Connect the GND pin of the relay module to the GND pin of the Raspberry Pi Pico W.
- Connect the IN1 pin of the relay module to the GP19 pin of the Raspberry Pi Pico W.
- Connect the IN2 pin of the relay module to the GP18 pin of the Raspberry Pi Pico W.
- Connect the IN3 pin of the relay module to the GP17 pin of the Raspberry Pi Pico W.
- Connect the IN4 pin of the relay module to the GP16 pin of the Raspberry Pi Pico W.
Once you have successfully connected the relay module to the Raspberry Pi Pico W, you can attach 4 AC light bulbs to the relays by connecting each bulb to the normally open (NO) terminal of each relay. The other end of the bulb should be connected to the AC power source.
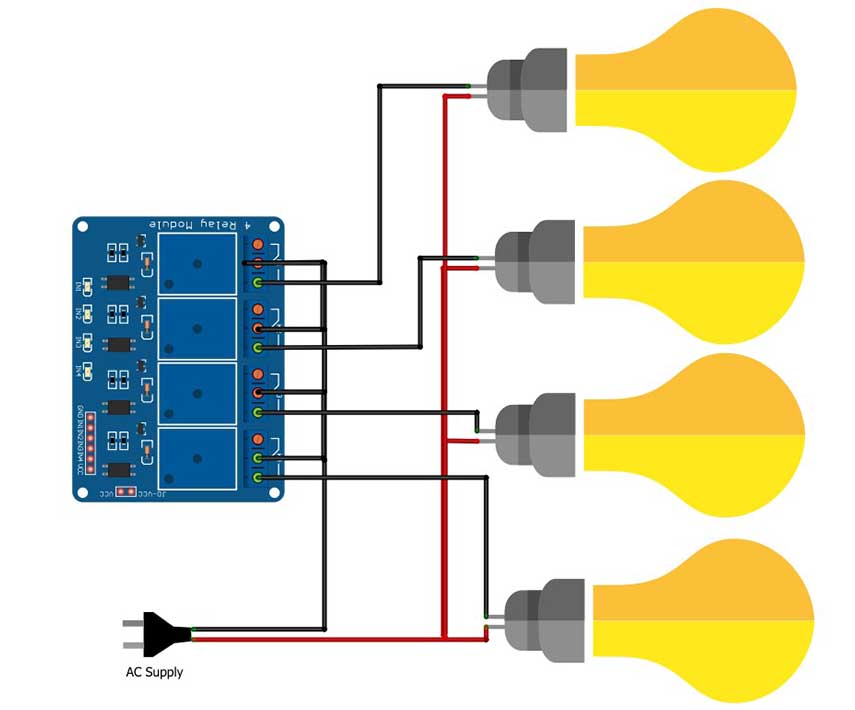
Please keep in mind that working with AC power can be dangerous and should only be done by experienced individuals with the necessary knowledge and precautions.
Project PCB Gerber File & PCB Ordering Online
If you don’t want to assemble the circuit on a breadboard and you want PCB for the project, then here is the PCB for you. The PCB Board for the Arducam Board looks something like the one below.

The Gerber File for the PCB is given below. You can simply download the Gerber File and order the PCB from https://www.pcbway.com/
Download Gerber File
Now you can visit the PCBWay official website by clicking here: https://www.pcbway.com/. So you will be directed to the PCBWay website.
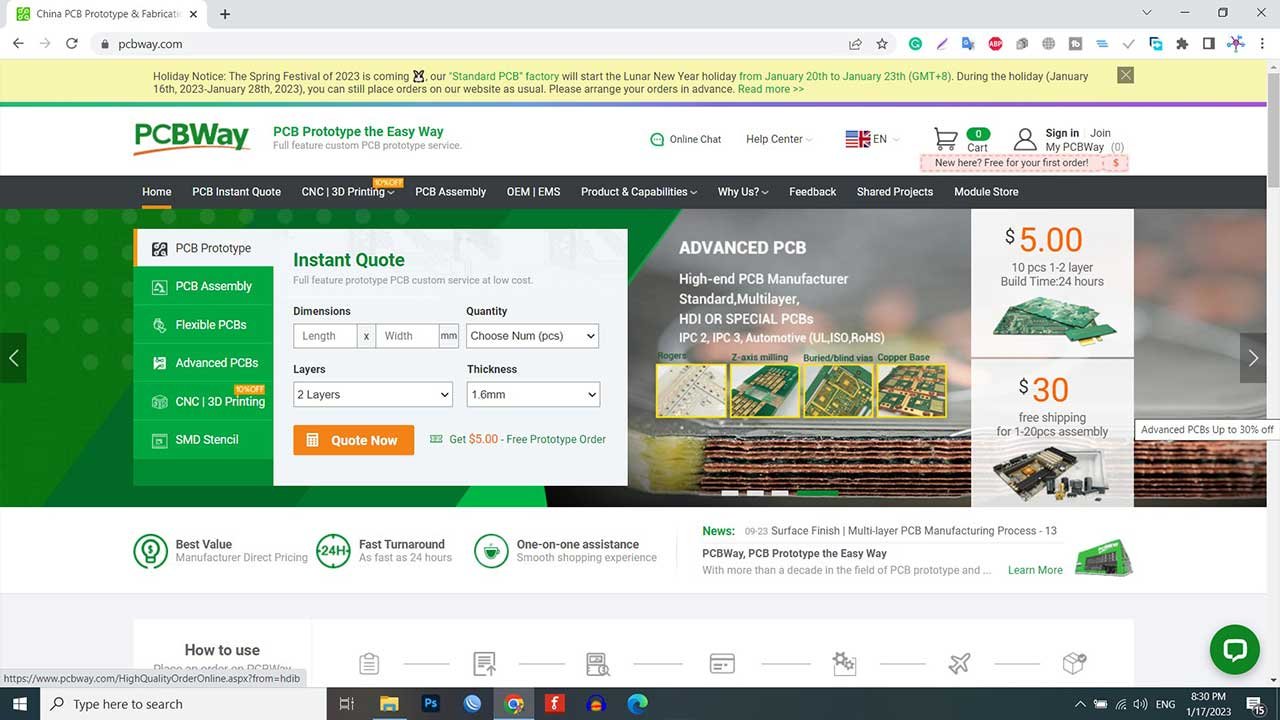
You can now upload the Gerber File to the Website and place an order. The PCB quality is superb & high. That is why most people trust PCBWay for PCB & PCBA Services.
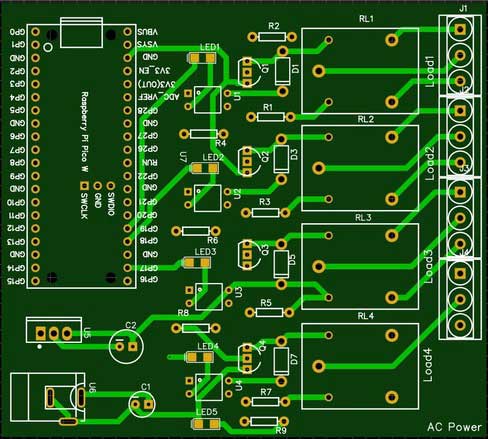
The two-dimensional view of the printed circuit board (PCB) is truly impressive. It has the potential to look lifelike once all the components have been assembled onto the PCB.
Setting up Blynk 2.0 Application
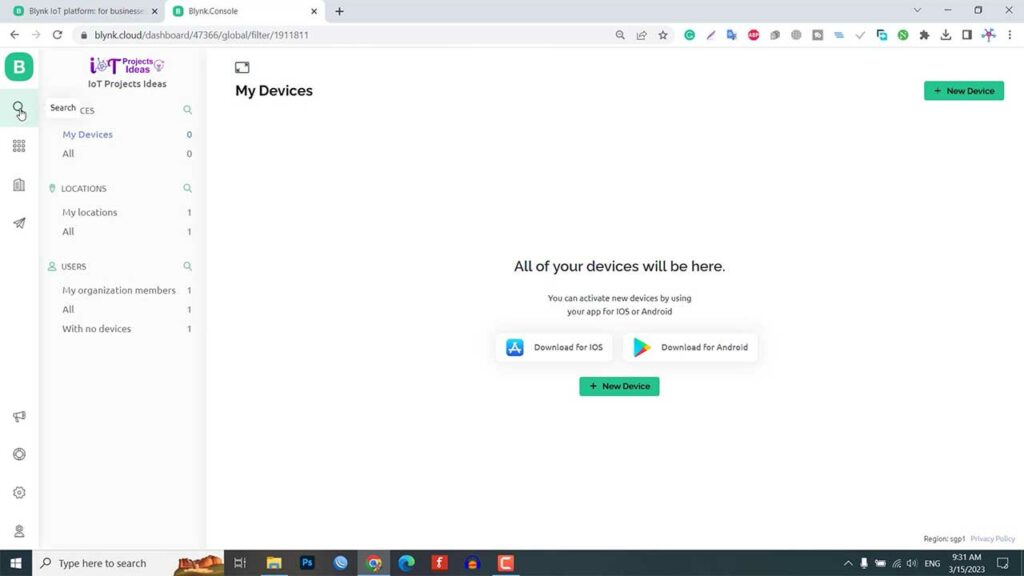
In order to manage and control the four home appliances using Blynk and Raspberry Pi Pico W, it is necessary to create a Blynk project and set up a dashboard using either the mobile or web application. The following steps outline the process for setting up the dashboard:
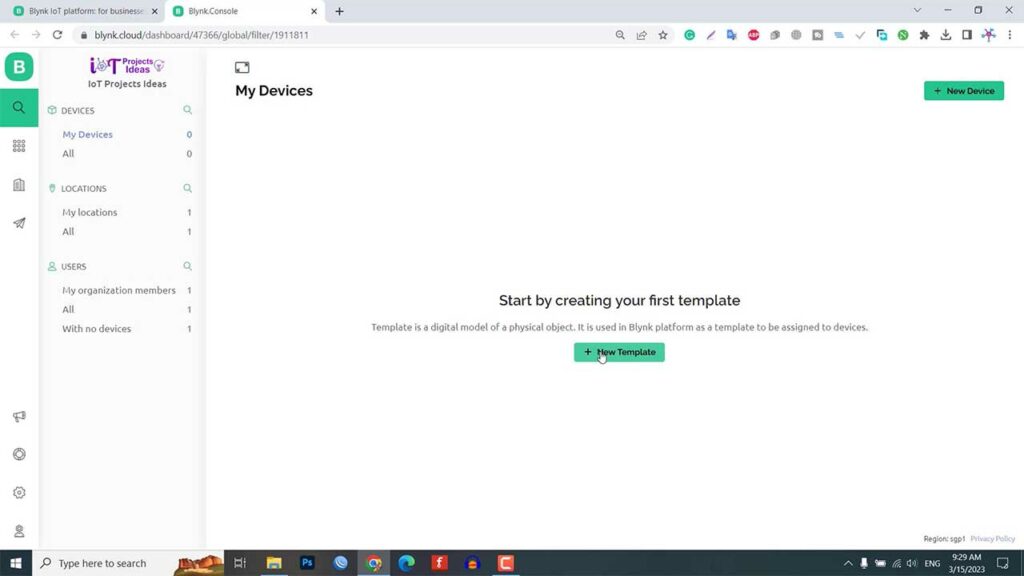
Go to https://blynk.cloud and either create a new Blynk account on the website or sign in using your registered email ID.
Click on “Add New Template“.
Provide a name for the project and select “Other” as the hardware type, with the connection type set to WiFi.
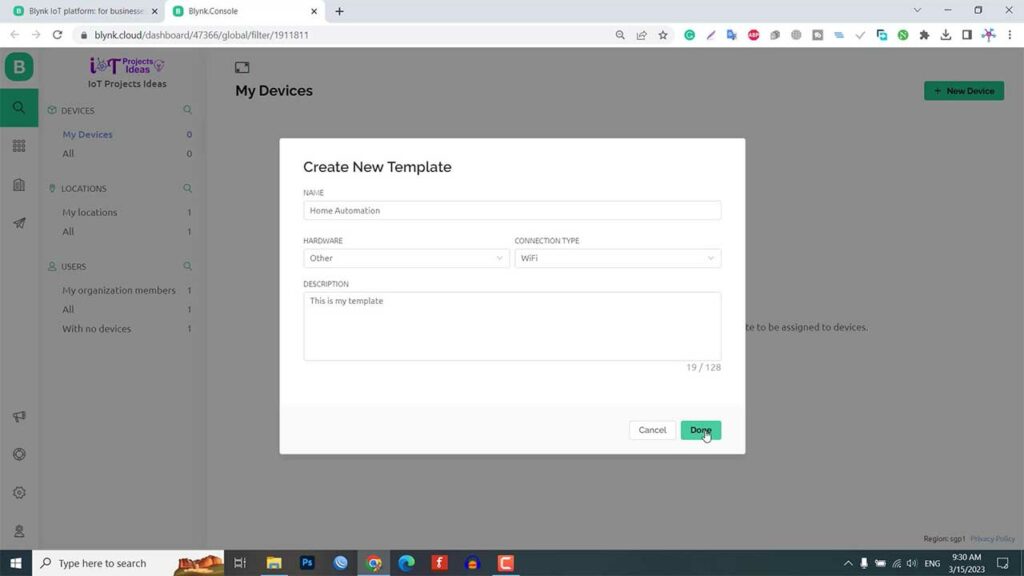
Click on Done so that the template is created successfully.
Configure Widgets with Datastream
Using the web dashboard, you can create four switch widgets and configure them for relays.

To do this, click on the gear icon next to each button and create a new datastream. Choose the virtual pin and name the data stream “Relay1“, assigning it the virtual pin V1 and setting the data type to integer.
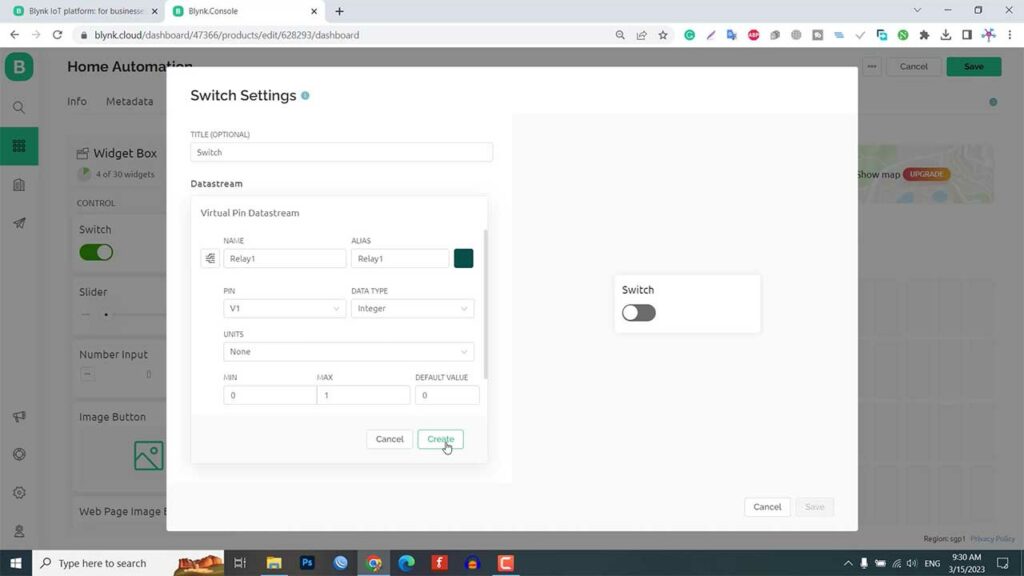
Repeat this process for the other three relays, assigning them to virtual pins V2, V3, and V4. Once all four datastreams have been created, click “Save ” to save the entire project settings.

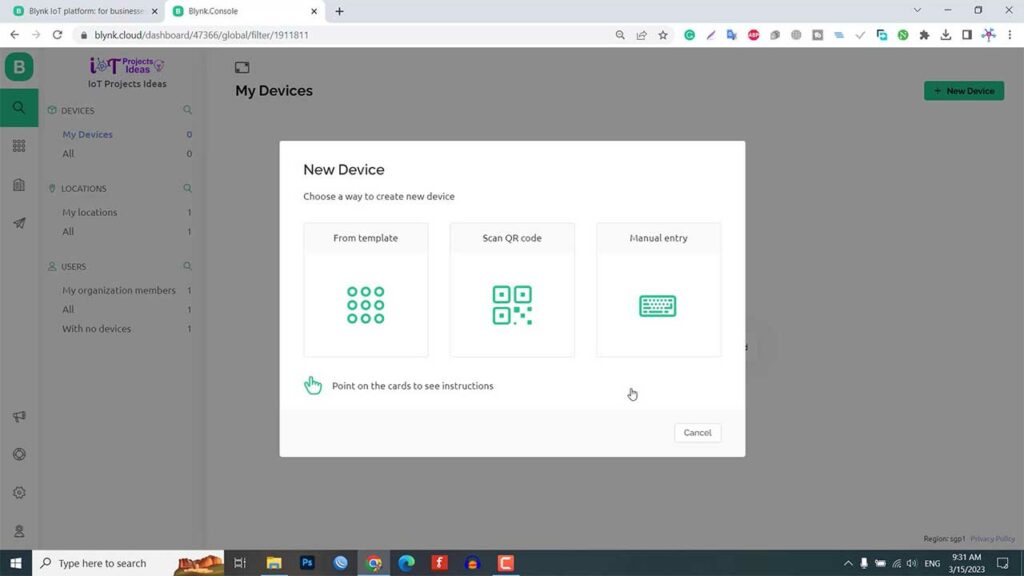
Adding New Device from Template
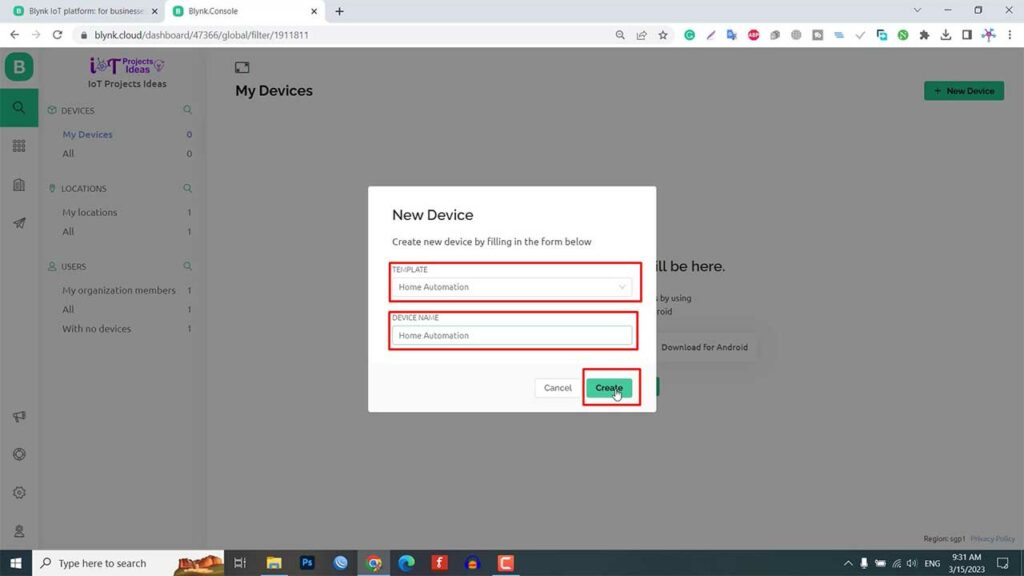
Next, we need to create a device for this project by selecting “Choose from Template” and then selecting the previously created template.
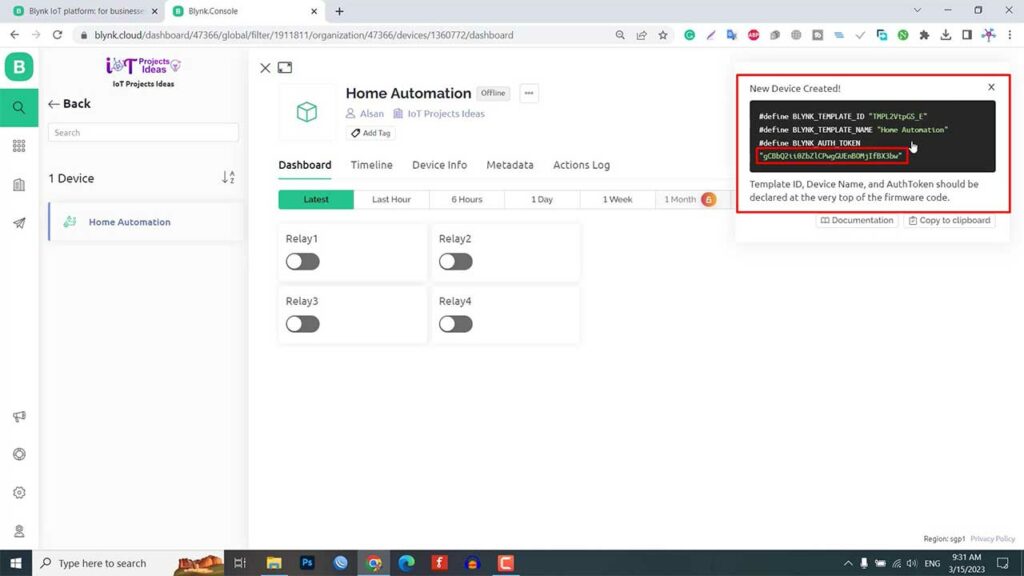
Give a name to the device and the new device will be created, displaying the Blynk authentication token.
Copy this token as it is required for the MicroPython code. With the web dashboard now complete, you can control up to four home appliances for your Blynk-based home automation project using the Raspberry Pi Pico W.
Once the device has been added to the newly created template and the program code has been uploaded, you can also set up your mobile app dashboard in addition to the web dashboard.
Source Code/Program
The program code for the Home Automation project using the Raspberry Pi Pico W Blynk 2.0 app consists of two parts: BlynkLib.py and main.py. To control the Relays, the Blynk Library for MicroPython is required.
BlynkLib.py
The BlynkLib.py library provides an API that enables connectivity between your IoT hardware that supports Micropython/Python and the Blynk Cloud. This API allows you to send both raw and processed sensor data and remotely control any connected hardware (such as relays, motors, and servos) from anywhere in the world using the Blynk mobile apps available on both iOS and Android.
To use this library, copy the following code and save it to your Raspberry Pi Pico W board with the name ‘BlynkLib.py‘.
# Copyright (c) 2015-2019 Volodymyr Shymanskyy. See the file LICENSE for copying permission.
__version__ = "1.0.0"
import struct
import time
import sys
import os
try:
import machine
gettime = lambda: time.ticks_ms()
SOCK_TIMEOUT = 0
except ImportError:
const = lambda x: x
gettime = lambda: int(time.time() * 1000)
SOCK_TIMEOUT = 0.05
def dummy(*args):
pass
MSG_RSP = const(0)
MSG_LOGIN = const(2)
MSG_PING = const(6)
MSG_TWEET = const(12)
MSG_NOTIFY = const(14)
MSG_BRIDGE = const(15)
MSG_HW_SYNC = const(16)
MSG_INTERNAL = const(17)
MSG_PROPERTY = const(19)
MSG_HW = const(20)
MSG_HW_LOGIN = const(29)
MSG_EVENT_LOG = const(64)
MSG_REDIRECT = const(41) # TODO: not implemented
MSG_DBG_PRINT = const(55) # TODO: not implemented
STA_SUCCESS = const(200)
STA_INVALID_TOKEN = const(9)
DISCONNECTED = const(0)
CONNECTING = const(1)
CONNECTED = const(2)
print("""
___ __ __
/ _ )/ /_ _____ / /__
/ _ / / // / _ \/ '_/
/____/_/\_, /_//_/_/\_\
/___/ for Python v""" + __version__ + " (" + sys.platform + ")n")
class EventEmitter:
def __init__(self):
self._cbks = {}
def on(self, evt, f=None):
if f:
self._cbks[evt] = f
else:
def D(f):
self._cbks[evt] = f
return f
return D
def emit(self, evt, *a, **kv):
if evt in self._cbks:
self._cbks[evt](*a, **kv)
class BlynkProtocol(EventEmitter):
def __init__(self, auth, tmpl_id=None, fw_ver=None, heartbeat=50, buffin=1024, log=None):
EventEmitter.__init__(self)
self.heartbeat = heartbeat*1000
self.buffin = buffin
self.log = log or dummy
self.auth = auth
self.tmpl_id = tmpl_id
self.fw_ver = fw_ver
self.state = DISCONNECTED
self.connect()
def virtual_write(self, pin, *val):
self._send(MSG_HW, 'vw', pin, *val)
def send_internal(self, pin, *val):
self._send(MSG_INTERNAL, pin, *val)
def set_property(self, pin, prop, *val):
self._send(MSG_PROPERTY, pin, prop, *val)
def sync_virtual(self, *pins):
self._send(MSG_HW_SYNC, 'vr', *pins)
def log_event(self, *val):
self._send(MSG_EVENT_LOG, *val)
def _send(self, cmd, *args, **kwargs):
if 'id' in kwargs:
id = kwargs.get('id')
else:
id = self.msg_id
self.msg_id += 1
if self.msg_id > 0xFFFF:
self.msg_id = 1
if cmd == MSG_RSP:
data = b''
dlen = args[0]
else:
data = ('�'.join(map(str, args))).encode('utf8')
dlen = len(data)
self.log('<', cmd, id, '|', *args)
msg = struct.pack("!BHH", cmd, id, dlen) + data
self.lastSend = gettime()
self._write(msg)
def connect(self):
if self.state != DISCONNECTED: return
self.msg_id = 1
(self.lastRecv, self.lastSend, self.lastPing) = (gettime(), 0, 0)
self.bin = b""
self.state = CONNECTING
self._send(MSG_HW_LOGIN, self.auth)
def disconnect(self):
if self.state == DISCONNECTED: return
self.bin = b""
self.state = DISCONNECTED
self.emit('disconnected')
def process(self, data=None):
if not (self.state == CONNECTING or self.state == CONNECTED): return
now = gettime()
if now - self.lastRecv > self.heartbeat+(self.heartbeat//2):
return self.disconnect()
if (now - self.lastPing > self.heartbeat//10 and
(now - self.lastSend > self.heartbeat or
now - self.lastRecv > self.heartbeat)):
self._send(MSG_PING)
self.lastPing = now
if data != None and len(data):
self.bin += data
while True:
if len(self.bin) < 5:
break
cmd, i, dlen = struct.unpack("!BHH", self.bin[:5])
if i == 0: return self.disconnect()
self.lastRecv = now
if cmd == MSG_RSP:
self.bin = self.bin[5:]
self.log('>', cmd, i, '|', dlen)
if self.state == CONNECTING and i == 1:
if dlen == STA_SUCCESS:
self.state = CONNECTED
dt = now - self.lastSend
info = ['ver', __version__, 'h-beat', self.heartbeat//1000, 'buff-in', self.buffin, 'dev', sys.platform+'-py']
if self.tmpl_id:
info.extend(['tmpl', self.tmpl_id])
info.extend(['fw-type', self.tmpl_id])
if self.fw_ver:
info.extend(['fw', self.fw_ver])
self._send(MSG_INTERNAL, *info)
try:
self.emit('connected', ping=dt)
except TypeError:
self.emit('connected')
else:
if dlen == STA_INVALID_TOKEN:
self.emit("invalid_auth")
print("Invalid auth token")
return self.disconnect()
else:
if dlen >= self.buffin:
print("Cmd too big: ", dlen)
return self.disconnect()
if len(self.bin) < 5+dlen:
break
data = self.bin[5:5+dlen]
self.bin = self.bin[5+dlen:]
args = list(map(lambda x: x.decode('utf8'), data.split(b'�')))
self.log('>', cmd, i, '|', ','.join(args))
if cmd == MSG_PING:
self._send(MSG_RSP, STA_SUCCESS, id=i)
elif cmd == MSG_HW or cmd == MSG_BRIDGE:
if args[0] == 'vw':
self.emit("V"+args[1], args[2:])
self.emit("V*", args[1], args[2:])
elif cmd == MSG_INTERNAL:
self.emit("internal:"+args[0], args[1:])
elif cmd == MSG_REDIRECT:
self.emit("redirect", args[0], int(args[1]))
else:
print("Unexpected command: ", cmd)
return self.disconnect()
import socket
class Blynk(BlynkProtocol):
def __init__(self, auth, **kwargs):
self.insecure = kwargs.pop('insecure', False)
self.server = kwargs.pop('server', 'blynk.cloud')
self.port = kwargs.pop('port', 80 if self.insecure else 443)
BlynkProtocol.__init__(self, auth, **kwargs)
self.on('redirect', self.redirect)
def redirect(self, server, port):
self.server = server
self.port = port
self.disconnect()
self.connect()
def connect(self):
print('Connecting to %s:%d...' % (self.server, self.port))
s = socket.socket()
s.connect(socket.getaddrinfo(self.server, self.port)[0][-1])
try:
s.setsockopt(socket.IPPROTO_TCP, socket.TCP_NODELAY, 1)
except:
pass
if self.insecure:
self.conn = s
else:
try:
import ussl
ssl_context = ussl
except ImportError:
import ssl
ssl_context = ssl.create_default_context()
self.conn = ssl_context.wrap_socket(s, server_hostname=self.server)
try:
self.conn.settimeout(SOCK_TIMEOUT)
except:
s.settimeout(SOCK_TIMEOUT)
BlynkProtocol.connect(self)
def _write(self, data):
#print('<', data)
self.conn.write(data)
# TODO: handle disconnect
def run(self):
data = b''
try:
data = self.conn.read(self.buffin)
#print('>', data)
except KeyboardInterrupt:
raise
except socket.timeout:
# No data received, call process to send ping messages when needed
pass
except: # TODO: handle disconnect
return
self.process(data)main.py
Save the code provided below on the Raspberry Pi Pico W with the name ‘main.py‘.
Make sure to update the WiFi SSID, password, and Blynk Authentication Token on the relevant lines before running the code.
wlan.connect("SSID","Password")
BLYNK_AUTH = '*****************************'
Here is the complete code.
import time
import network
from machine import Pin
import BlynkLib
wlan = network.WLAN(network.STA_IF)
wlan.active(True)
wlan.connect("SSID","Password")
BLYNK_AUTH = '**************************'
# Wait for network connection
wait = 10
while wait > 0:
if wlan.status() < 0 or wlan.status() >= 3:
break
wait -= 1
print('waiting for connection...')
time.sleep(1)
# Handle connection error
if wlan.status() != 3:
raise RuntimeError('network connection failed')
else:
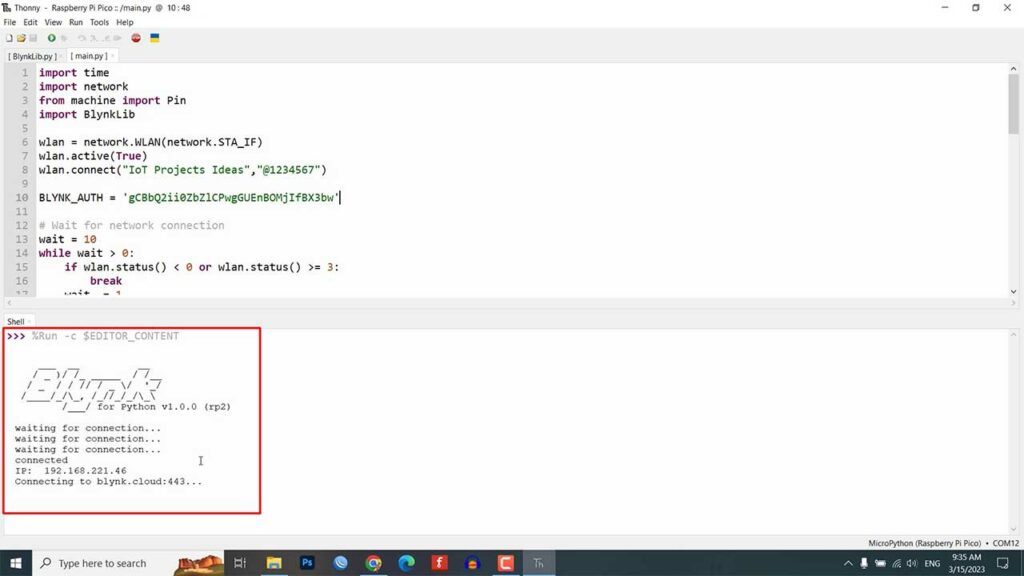
print('connected')
ip = wlan.ifconfig()[0]
print('IP: ', ip)
# Connect to Blynk
blynk = BlynkLib.Blynk(BLYNK_AUTH)
# Initialize the relay pins
relay1_pin = Pin(19, Pin.OUT)
relay2_pin = Pin(18, Pin.OUT)
relay3_pin = Pin(17, Pin.OUT)
relay4_pin = Pin(16, Pin.OUT)
# Register virtual pin handler
@blynk.on("V1") #virtual pin V1
def v1_write_handler(value): #read the value
if int(value[0]) == 0:
relay1_pin.value(1) #turn the relay1 on
else:
relay1_pin.value(0) #turn the relay1 off
@blynk.on("V2") #virtual pin V2
def v2_write_handler(value): #read the value
if int(value[0]) == 0:
relay2_pin.value(1) #turn the relay2 on
else:
relay2_pin.value(0) #turn the relay2 off
@blynk.on("V3") #virtual pin V3
def v3_write_handler(value): #read the value
if int(value[0]) == 0:
relay3_pin.value(1) #turn the relay3 on
else:
relay3_pin.value(0) #turn the relay3 off
@blynk.on("V4") #virtual pin V4
def v4_write_handler(value): #read the value
if int(value[0]) == 0:
relay4_pin.value(1) #turn the relay4 on
else:
relay4_pin.value(0) #turn the relay4 off
while True:
blynk.run()Program Code Explanation
The Micropython code presented here facilitates a connection to a Blynk server via a WiFi network and enables the control of 4 relays based on the user’s inputs from the Blynk app.
First, the code imports necessary libraries such as time, network, machine, and BlynkLib. It establishes a connection to a WiFi network using the provided SSID and password. The code waits for the network connection to be established and raises a RuntimeError if the connection fails.
Next, the code initializes 4 relay pins using the Pin class from the machine library. It then registers 4 virtual pin handlers for pins V1 to V4 on the Blynk server using the @blynk.on() decorator. Each virtual pin handler function reads the value of the corresponding virtual pin and toggles the corresponding relay on or off based on the received value.
Finally, the code enters an infinite loop and continuously calls blynk.run() to handle incoming data from the Blynk server. This allows the code to monitor for changes in the virtual pins and control the relays accordingly in real time.
Overall, this code enables a connection to a Blynk server, provides control over 4 relays based on user inputs, and operates continuously in an infinite loop to keep an eye on changes in virtual pins.
Blynk IoT Mobile App Dashboard
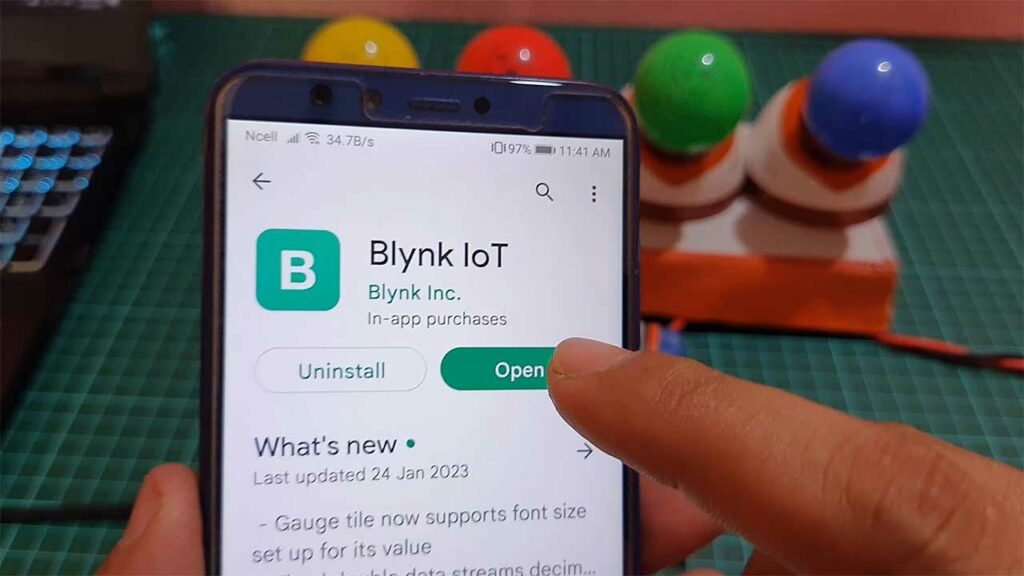
To set up the Blynk IoT dashboard on mobile phones, first, download the Blynk application on your mobile device. You can download it from the Google Play Store for Android or the App Store for iOS.
After installing the application, log in to your account. You will see a new device named “Home Automation“. Click on it to start configuring the mobile dashboard. Similar to the web dashboard, you can create four-button widgets to control the relays.
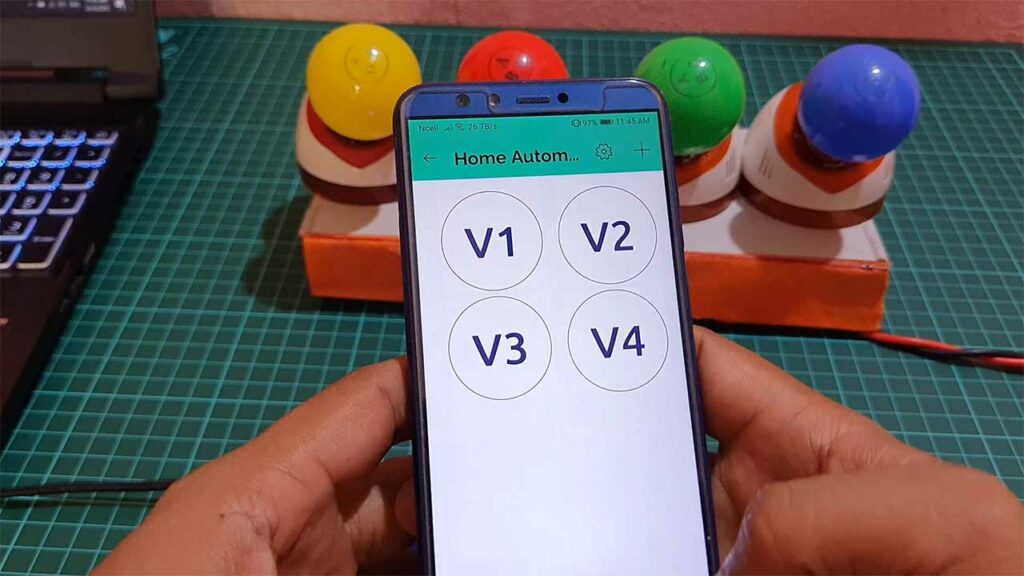
Refer to the screenshot for the configuration and setup of each widget used in this project. That’s all for the mobile dashboard setup. Now, you can control the relays using these buttons on your mobile device.
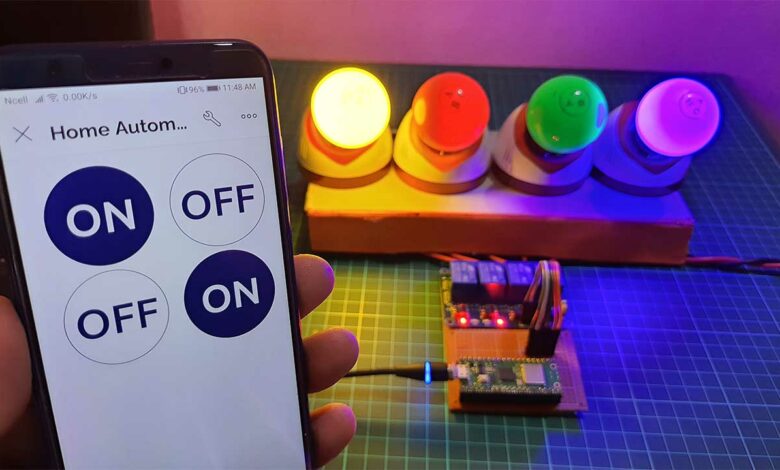
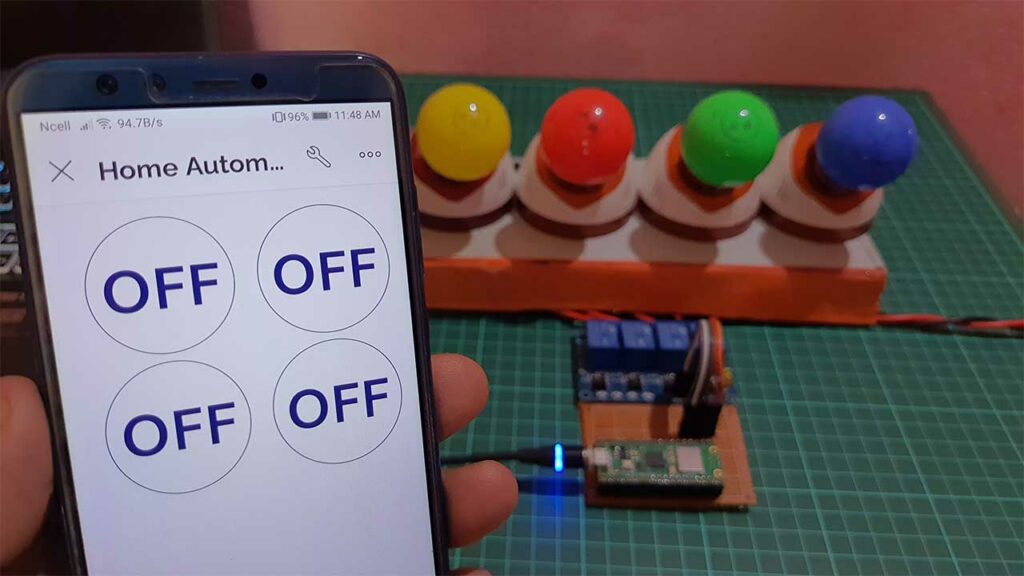
Home Automation Testing & Demo with Blynk
To test and demo the Raspberry Pi Pico Home Automation Project, first save the provided code and run it on the Pico W board. Once the code is running, you can begin testing the project using the Blynk web app or mobile dashboard.
In the web app, navigate to the project dashboard and click on the button widget. This should turn on the corresponding Relay. Click the button again to turn off the Relay.
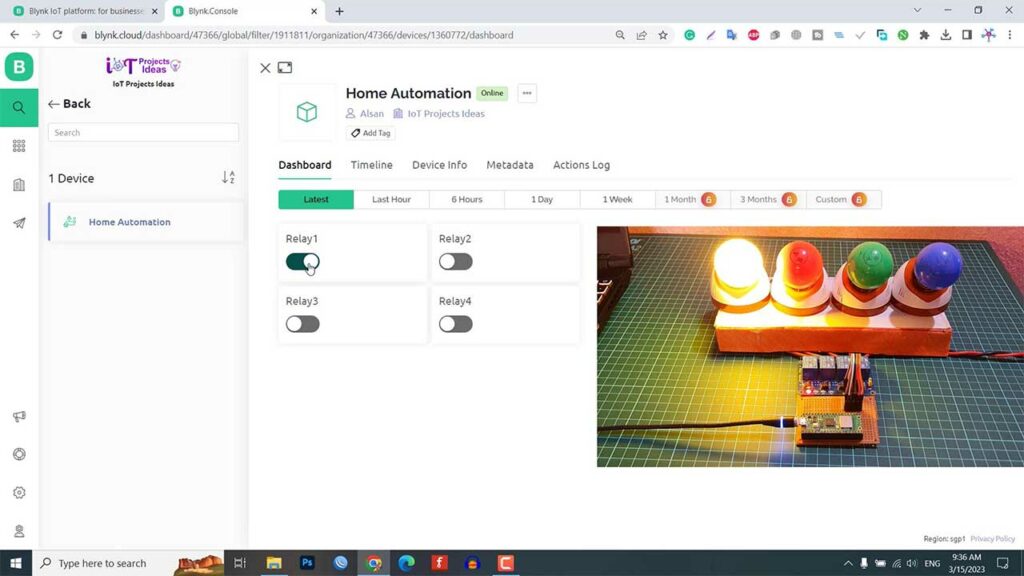
Similarly, you can control the Relay using the Blynk mobile app. Open the app and navigate to the project dashboard. Tap the button widget to turn on the Relay, and tap it again to turn it off.
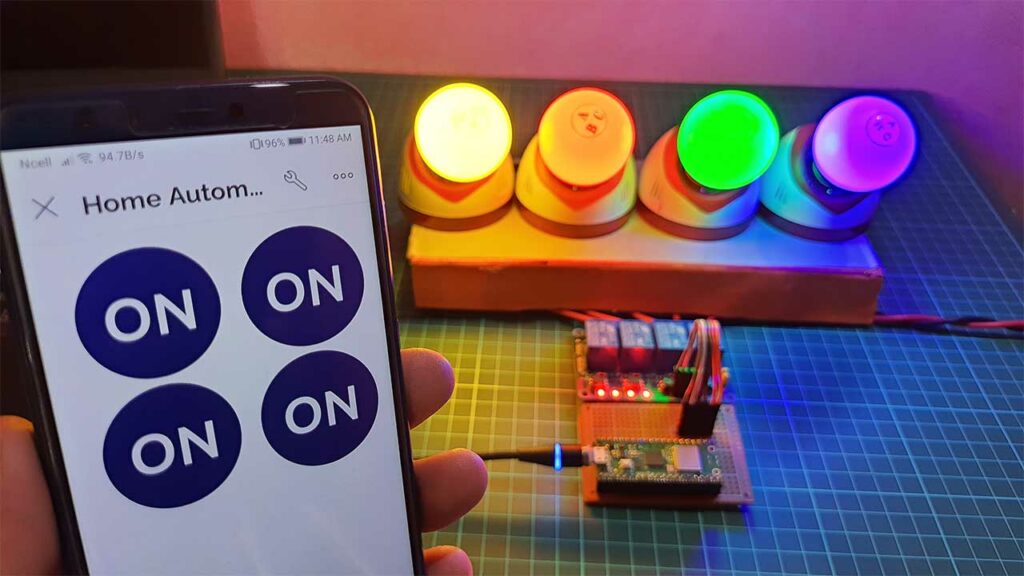
With both the web app and mobile dashboard, you can control your AC home appliances from anywhere in the world. Overall, testing and demoing this project is straightforward and allows you to see the project in action.
Conclusion
In conclusion, this home automation project using Raspberry Pi Pico W and Blynk IoT provides a convenient and accessible way to control AC home appliances from anywhere in the world. With the setup of the mobile app and web dashboard, users can easily control their devices with just a few clicks. Overall, this project showcases the potential of IoT and microcontroller technologies in providing efficient and effective solutions for home automation.
can we make automation using firebase real time database using raspberry pi pico w