Interfacing MPU6050 with Raspberry Pi Pico W & MicroPython
Monitor Tilt Angles on Blynk IoT using MPU6050 & Raspberry Pi Pico W
In this tutorial, we’ll learn Interfacing MPU6050 with Raspberry Pi Pico W & MicroPython. You will also learn how to monitor the tilt angles using the MPU6050 sensor and Raspberry Pi Pico W and control them using Blynk IoT with MicroPython code.
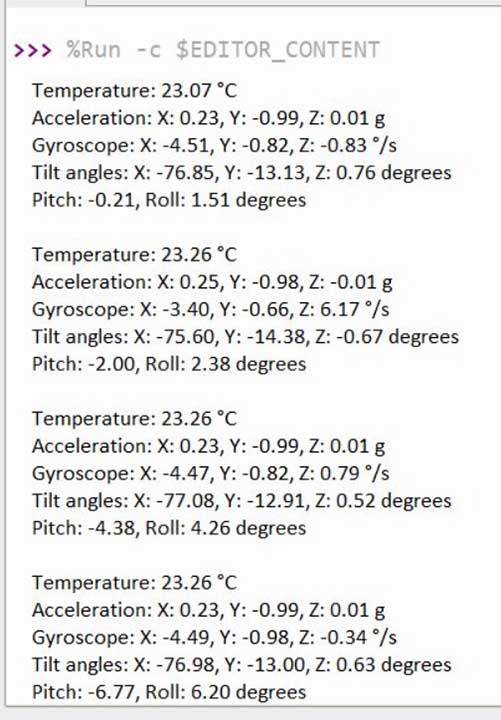
In the Thonny IDE Console, you can see Temperature, Accelerometer, and Gyroscope values, along with Tilt Angle in X, Y, and Z axis, and Pitch and Roll values. However, the code doesn’t calculate the Yaw value as it requires a magnetometer that MPU6050 doesn’t have. Hence, the Yaw angle cannot be accurately derived from an accelerometer and gyroscope.
Components Required
To follow along with this tutorial, you will need the following materials:
| S.N | COMPONENTS NAME | QUANTITY | PURCHASE LINKS |
|---|---|---|---|
| 1 | Raspberry Pi Pico W Board | 1 | Amazon | AliExpress |
| 2 | MPU6050 Sensor | 1 | Amazon | AliExpress |
| 3 | Breadboard | 1 | Amazon | AliExpress |
| 4 | Jumper Cables | 10 | Amazon | AliExpress |
MPU6050 Accelerometer Gyroscope Sensor
InvenSense has developed a widely-used, affordable, and compact 6-axis MotionTracking sensor called the MPU6050. This sensor integrates a 3-axis gyroscope, a 3-axis accelerometer, and a Digital Motion Processor (DMP) into one IC package. Its highly precise motion-tracking abilities and sensitivity make it suitable for use in various applications, including wearable technology, smartphones, gaming devices, and robotics.

The MPU6050 sensor functions by merging the features of a 3-axis accelerometer, a 3-axis gyroscope, and a Digital Motion Processor (DMP) to evaluate and process motion data. The accelerometer gauges linear acceleration, while the gyroscope evaluates angular velocity. These sensors work together to provide a complete understanding of an object’s movement in six degrees of freedom (DOF).
Once converted to digital signals, the DMP processes the data and sends it to a host microcontroller through the I2C interface for further analysis and processing specific to the application.
MPU6050 Features & Speicifications
The MPU6050 is suitable for motion tracking and sensing applications due to its various features and specifications, which include:
- A 3-axis gyroscope with a full-scale programmable range of ±250, ±500, ±1000, and ±2000 degrees per second (dps).
- A 3-axis accelerometer with a full-scale programmable range of ±2g, ±4g, ±8g, and ±16g.
- 16-bit analog-to-digital converters (ADCs) for accelerometers and gyroscopes provide high-resolution data.
- A Digital Motion Processor (DMP) for on-chip motion processing reduces the load on the host processor.
- I2C (Inter-Integrated Circuit) and SPI (Serial Peripheral Interface) communication interfaces.
- A power supply voltage range of 2.375V to 3.46V.
- Low power consumption: 3.9mA in normal mode and 5μA in sleep mode.
- A temperature sensor with a range of –40°C to 85°C.
- Interrupt functionality for data-ready and motion detection.
- Small package size of 4x4x0.9mm QFN.
MPU6050 I2C Interface
The MPU6050 communicates with microcontrollers or other devices using the I2C interface, which is a synchronous, bidirectional, two-wire communication protocol. It enables multiple devices to be connected to a single bus, and the two wires in the I2C bus are Serial Data Line (SDA) and Serial Clock Line (SCL).
As a slave device on the I2C bus, the MPU6050 has a 7-bit I2C address that can be either 0x68 or 0x69, depending on the logic level of the AD0 pin.
MPU6050 Pinout
The MPU6050 module is mounted on a breakout board to make it easy to access its pins and connections. The breakout board can have extra components, like voltage regulators or pull-up resistors for the I2C lines, to make it more user-friendly for prototyping.
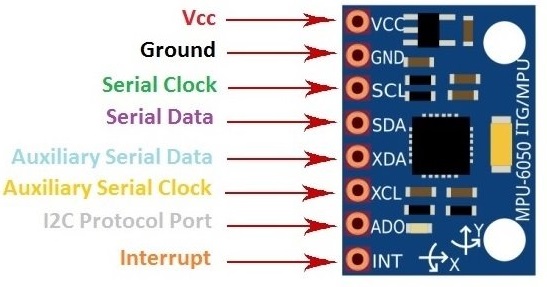
The MPU6050 module’s pinout includes the following pins:
- VCC: The power supply pin, usually takes input voltage in the range of 3.3V to 5V, depending on the onboard voltage regulator.
- GND: Ground reference pin.
- SCL: I2C serial clock line for communication with the host microcontroller.
- SDA: I2C serial data line for communication with the host microcontroller.
- XDA: Auxiliary I2C data line, for external I2C sensor connection.
- XCL: Auxiliary I2C clock line, for external I2C sensor connection.
- AD0 (or ADDR): I2C address selection pin. The MPU6050’s 7-bit I2C address can be changed depending on the logic level (0: 0x68, 1: 0x69).
- INT: Interrupt pin, used to indicate data-ready or motion-detection events to the host microcontroller.
Interfacing MPU6050 with Raspberry Pi Pico W
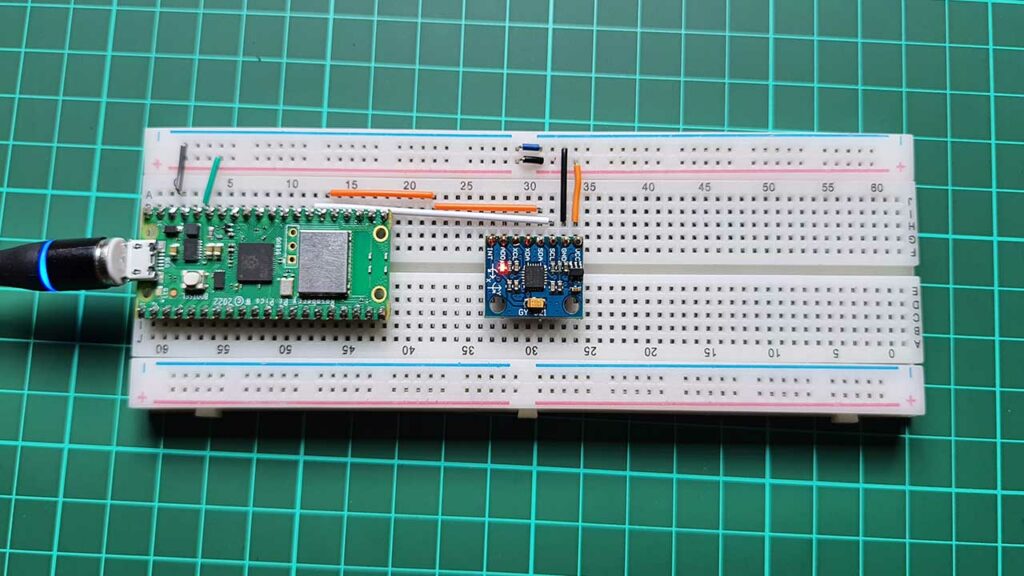
Now, let us interface the MPU6050 sensor with Raspberry Pi Pico W using the MicroPython Code. The connection is straightforward.
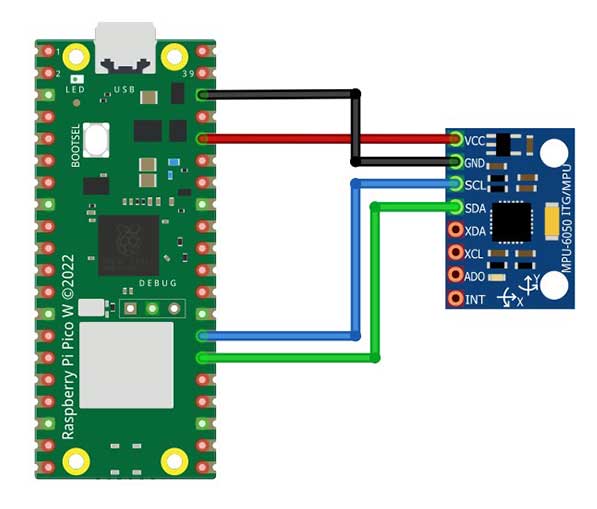
The first step is to connect the MPU6050 sensor to the Raspberry Pi Pico W. To do this, connect the SDA and SCL pins of the MPU6050 sensor to the GP20 and GP21 pins of the Raspberry Pi Pico W, respectively. Connect the VCC pin to the 3.3V pin of the Raspberry Pi Pico W and the GND pin to the GND pin of the Raspberry Pi Pico W.
Project PCB Gerber File & PCB Ordering Online
If you don’t want to assemble the circuit on a breadboard and you want PCB for the project, then here is the PCB for you. The PCB Board for the Arducam Board looks something like the one below.

The Gerber File for the PCB is given below. You can simply download the Gerber File and order the PCB from https://www.pcbway.com/
Download Gerber File
Now you can visit the PCBWay official website by clicking here: https://www.pcbway.com/. So you will be directed to the PCBWay website.

You can now upload the Gerber File to the Website and place an order. The PCB quality is superb & high. That is why most people trust PCBWay for PCB & PCBA Services.

The two-dimensional view of the printed circuit board (PCB) is truly impressive. It has the potential to look lifelike once all the components have been assembled onto the PCB.
Setting up Blynk 2.0 Application
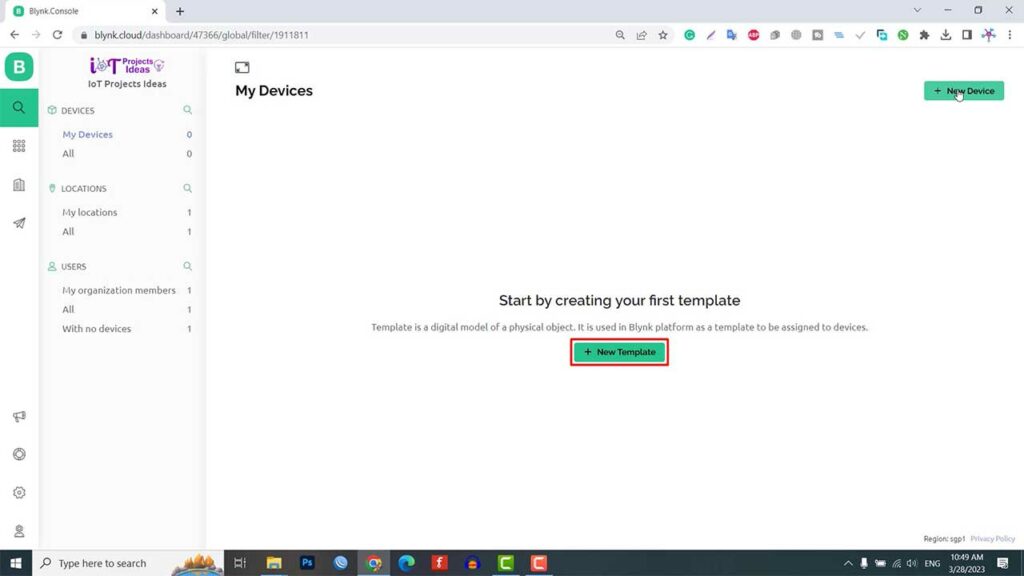
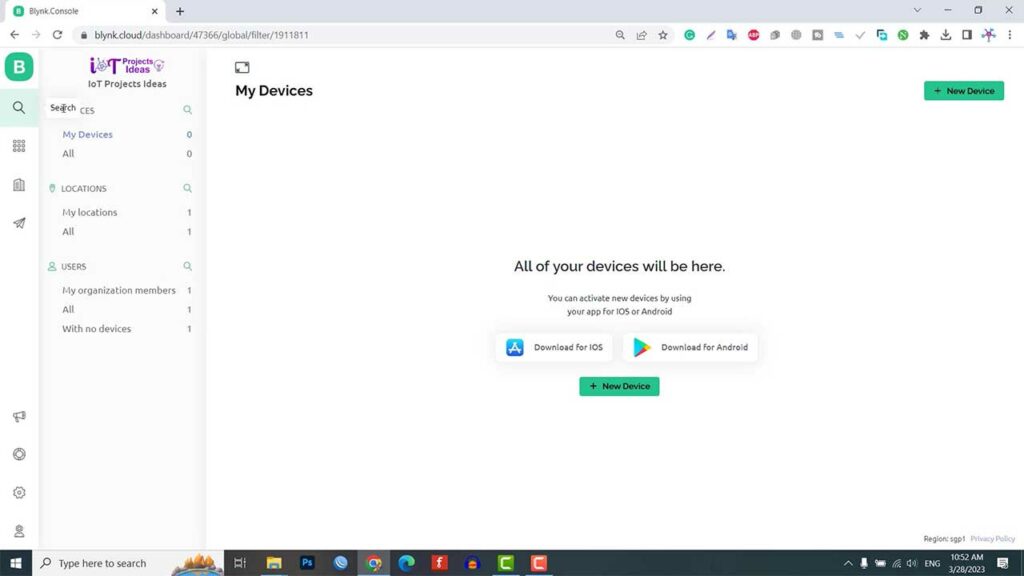
To Monitor tilt angles on Blynk IoT using MPU6050 & Raspberry Pi Pico W, you need to create a Blynk project and set up a dashboard in the mobile or web application. Visit blynk.cloud and create a Blynk account on the Blynk website. Or you can simply sign in using the registered Email ID.
Click on Add New Template.
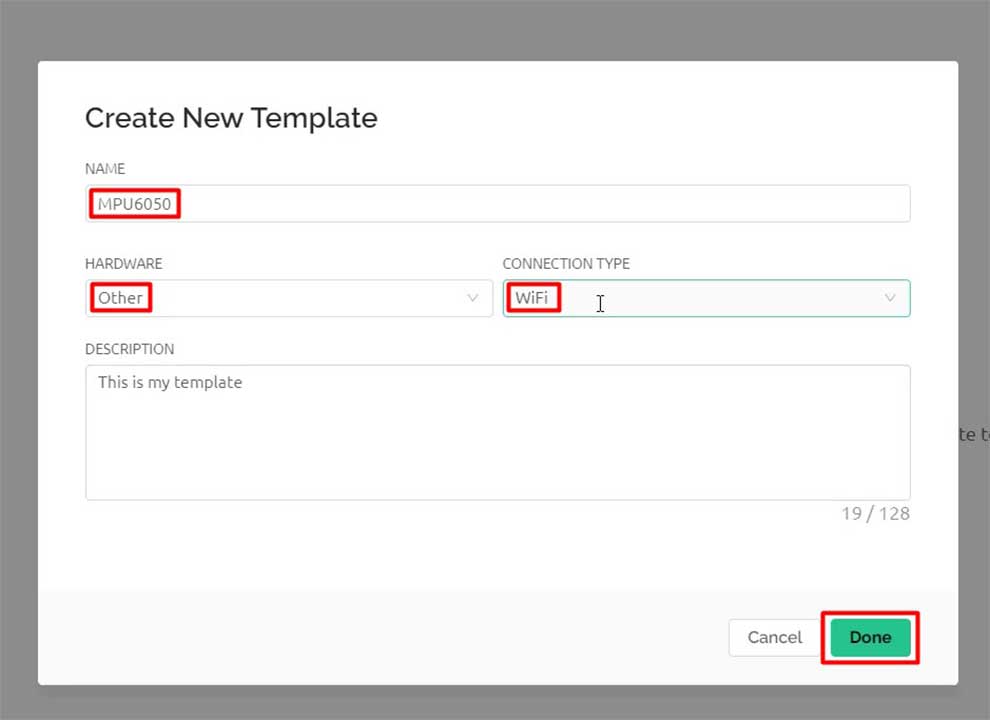
Give any name to the Hardware. Choose the Hardware type as Other and the connection type as WiFi. Now, The template is created successfully.
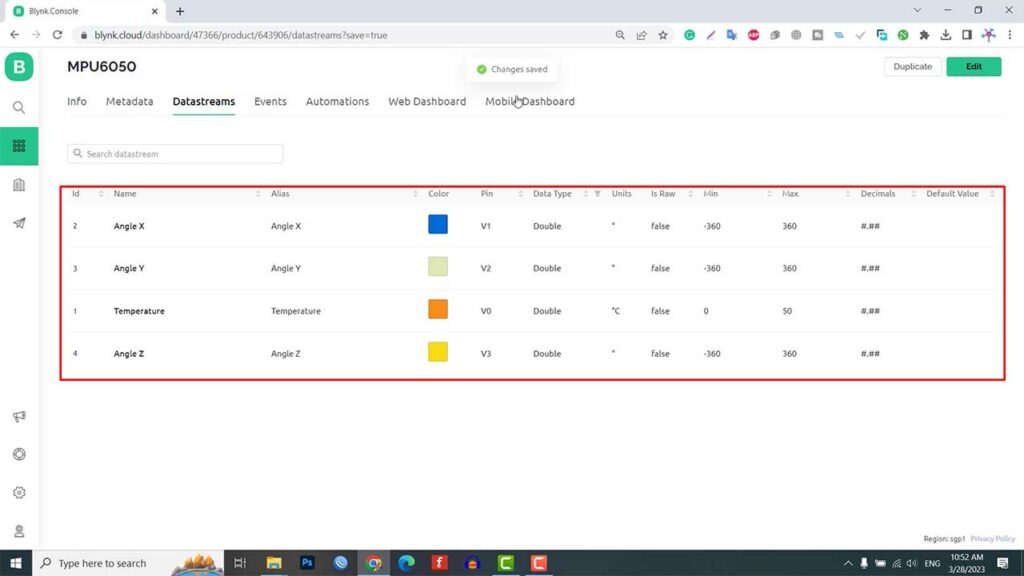
Now go to the Web Dashboard. In the Web Dashboard, drag and drop 4 Gauge Widgets on the dashboard. You need to set all 4 widgets one by one.
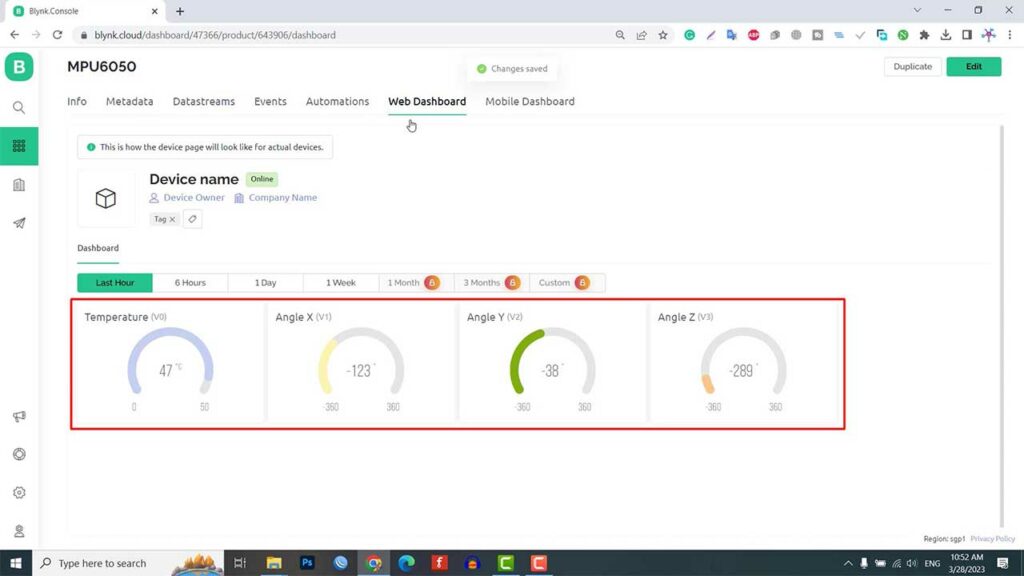
Assign virtual pins V0, V1, V2, and V3 to Temperature, Angle X, Angle Y, and Angle Z. As shown here.
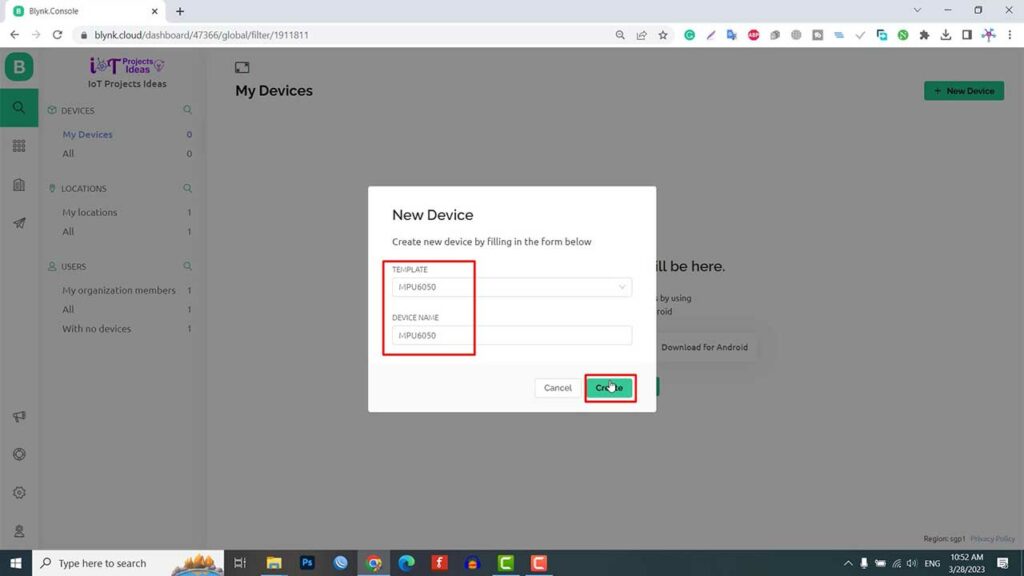
Adding New Device from Template
Now we need to add New Devices here. Click on the search Icon. Then click on Add new Device.
Select the device from a template that you created earlier. Give any name and click on Create.
A device authentication token is generated now. Copy this token as this will be used in the code.
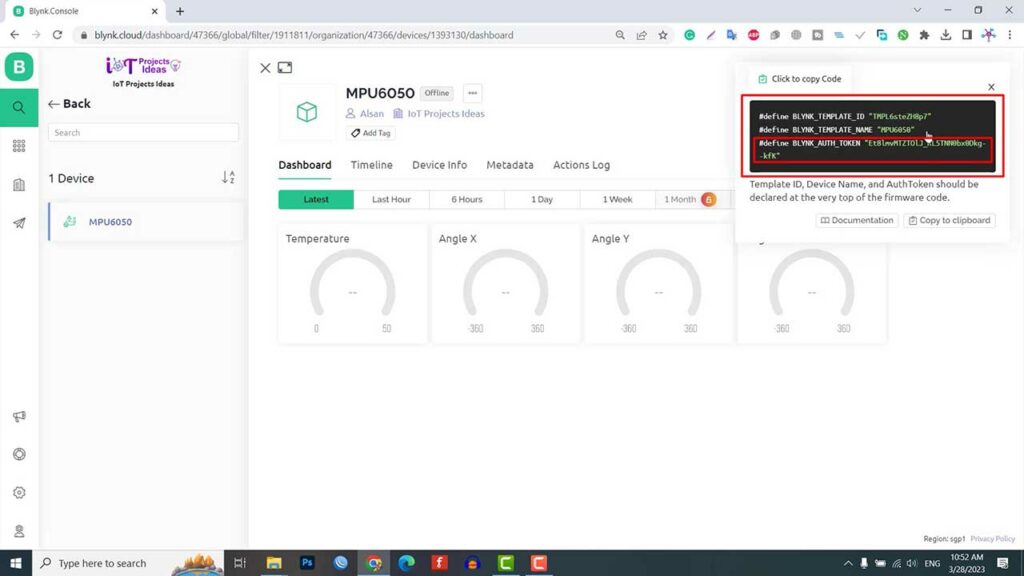
The Blynk Dashboard setup is successfully completed now.
MicroPython Code to measure Tilt Angles, Pitch, Roll, Yaw
Next, let’s write the MicroPython code to monitor the tilt angles on Blynk IoT. The micropython code for interfacing the MPU6050 Sensor with Raspberry Pi Pico W & sending the sensor data to Blynk Dashboard is divided into 3 parts:
- MPU6050.py
- BlynkLib.py
- Main.py
mpu6050.py MicroPython Library
This MPU6050 MicroPython Library is responsible for measuring various accelerometer and gyroscope parameters. Open your Thonny IDE and save it as mpu6050.py on your Raspberry Pi Pico W.
from machine import Pin, I2C
import utime

PWR_MGMT_1 = 0x6B
SMPLRT_DIV = 0x19
CONFIG = 0x1A
GYRO_CONFIG = 0x1B
ACCEL_CONFIG = 0x1C
TEMP_OUT_H = 0x41
ACCEL_XOUT_H = 0x3B
GYRO_XOUT_H = 0x43

def init_mpu6050(i2c, address=0x68):
    i2c.writeto_mem(address, PWR_MGMT_1, b'x00')
    utime.sleep_ms(100)
    i2c.writeto_mem(address, SMPLRT_DIV, b'x07')
    i2c.writeto_mem(address, CONFIG, b'x00')
    i2c.writeto_mem(address, GYRO_CONFIG, b'x00')
    i2c.writeto_mem(address, ACCEL_CONFIG, b'x00')

def read_raw_data(i2c, addr, address=0x68):
    high = i2c.readfrom_mem(address, addr, 1)[0]
    low = i2c.readfrom_mem(address, addr + 1, 1)[0]
    value = high << 8 | low
    if value > 32768:
        value = value - 65536
    return value

def get_mpu6050_data(i2c):
    temp = read_raw_data(i2c, TEMP_OUT_H) / 340.0 + 36.53
    accel_x = read_raw_data(i2c, ACCEL_XOUT_H) / 16384.0
    accel_y = read_raw_data(i2c, ACCEL_XOUT_H + 2) / 16384.0
    accel_z = read_raw_data(i2c, ACCEL_XOUT_H + 4) / 16384.0
    gyro_x = read_raw_data(i2c, GYRO_XOUT_H) / 131.0
    gyro_y = read_raw_data(i2c, GYRO_XOUT_H + 2) / 131.0
    gyro_z = read_raw_data(i2c, GYRO_XOUT_H + 4) / 131.0

    return {
        'temp': temp,
        'accel': {
            'x': accel_x,
            'y': accel_y,
            'z': accel_z,
        },
        'gyro': {
            'x': gyro_x,
            'y': gyro_y,
            'z': gyro_z,
        }
    }
BlynkLib.py MicroPython Library
BlynkLib.py provides an API that enables connectivity between your IoT hardware, which supports Micropython/Python, and the Blynk Cloud. With this API, you can send both raw and processed sensor data and remotely control any connected hardware from anywhere in the world using the Blynk mobile app. Copy this code and save it as BlynkLib.py on your Raspberry Pi Pico W board.
# Copyright (c) 2015-2019 Volodymyr Shymanskyy. See the file LICENSE for copying permission.
__version__ = "1.0.0"
import struct
import time
import sys
import os
try:
import machine
gettime = lambda: time.ticks_ms()
SOCK_TIMEOUT = 0
except ImportError:
const = lambda x: x
gettime = lambda: int(time.time() * 1000)
SOCK_TIMEOUT = 0.05
def dummy(*args):
pass
MSG_RSP = const(0)
MSG_LOGIN = const(2)
MSG_PING = const(6)
MSG_TWEET = const(12)
MSG_NOTIFY = const(14)
MSG_BRIDGE = const(15)
MSG_HW_SYNC = const(16)
MSG_INTERNAL = const(17)
MSG_PROPERTY = const(19)
MSG_HW = const(20)
MSG_HW_LOGIN = const(29)
MSG_EVENT_LOG = const(64)
MSG_REDIRECT = const(41) # TODO: not implemented
MSG_DBG_PRINT = const(55) # TODO: not implemented
STA_SUCCESS = const(200)
STA_INVALID_TOKEN = const(9)
DISCONNECTED = const(0)
CONNECTING = const(1)
CONNECTED = const(2)
print("""
___ __ __
/ _ )/ /_ _____ / /__
/ _ / / // / _ \/ '_/
/____/_/\_, /_//_/_/\_\
/___/ for Python v""" + __version__ + " (" + sys.platform + ")n")
class EventEmitter:
def __init__(self):
self._cbks = {}
def on(self, evt, f=None):
if f:
self._cbks[evt] = f
else:
def D(f):
self._cbks[evt] = f
return f
return D
def emit(self, evt, *a, **kv):
if evt in self._cbks:
self._cbks[evt](*a, **kv)
class BlynkProtocol(EventEmitter):
def __init__(self, auth, tmpl_id=None, fw_ver=None, heartbeat=50, buffin=1024, log=None):
EventEmitter.__init__(self)
self.heartbeat = heartbeat*1000
self.buffin = buffin
self.log = log or dummy
self.auth = auth
self.tmpl_id = tmpl_id
self.fw_ver = fw_ver
self.state = DISCONNECTED
self.connect()
def virtual_write(self, pin, *val):
self._send(MSG_HW, 'vw', pin, *val)
def send_internal(self, pin, *val):
self._send(MSG_INTERNAL, pin, *val)
def set_property(self, pin, prop, *val):
self._send(MSG_PROPERTY, pin, prop, *val)
def sync_virtual(self, *pins):
self._send(MSG_HW_SYNC, 'vr', *pins)
def log_event(self, *val):
self._send(MSG_EVENT_LOG, *val)
def _send(self, cmd, *args, **kwargs):
if 'id' in kwargs:
id = kwargs.get('id')
else:
id = self.msg_id
self.msg_id += 1
if self.msg_id > 0xFFFF:
self.msg_id = 1
if cmd == MSG_RSP:
data = b''
dlen = args[0]
else:
data = ('�'.join(map(str, args))).encode('utf8')
dlen = len(data)
self.log('<', cmd, id, '|', *args)
msg = struct.pack("!BHH", cmd, id, dlen) + data
self.lastSend = gettime()
self._write(msg)
def connect(self):
if self.state != DISCONNECTED: return
self.msg_id = 1
(self.lastRecv, self.lastSend, self.lastPing) = (gettime(), 0, 0)
self.bin = b""
self.state = CONNECTING
self._send(MSG_HW_LOGIN, self.auth)
def disconnect(self):
if self.state == DISCONNECTED: return
self.bin = b""
self.state = DISCONNECTED
self.emit('disconnected')
def process(self, data=None):
if not (self.state == CONNECTING or self.state == CONNECTED): return
now = gettime()
if now - self.lastRecv > self.heartbeat+(self.heartbeat//2):
return self.disconnect()
if (now - self.lastPing > self.heartbeat//10 and
(now - self.lastSend > self.heartbeat or
now - self.lastRecv > self.heartbeat)):
self._send(MSG_PING)
self.lastPing = now
if data != None and len(data):
self.bin += data
while True:
if len(self.bin) < 5:
break
cmd, i, dlen = struct.unpack("!BHH", self.bin[:5])
if i == 0: return self.disconnect()
self.lastRecv = now
if cmd == MSG_RSP:
self.bin = self.bin[5:]
self.log('>', cmd, i, '|', dlen)
if self.state == CONNECTING and i == 1:
if dlen == STA_SUCCESS:
self.state = CONNECTED
dt = now - self.lastSend
info = ['ver', __version__, 'h-beat', self.heartbeat//1000, 'buff-in', self.buffin, 'dev', sys.platform+'-py']
if self.tmpl_id:
info.extend(['tmpl', self.tmpl_id])
info.extend(['fw-type', self.tmpl_id])
if self.fw_ver:
info.extend(['fw', self.fw_ver])
self._send(MSG_INTERNAL, *info)
try:
self.emit('connected', ping=dt)
except TypeError:
self.emit('connected')
else:
if dlen == STA_INVALID_TOKEN:
self.emit("invalid_auth")
print("Invalid auth token")
return self.disconnect()
else:
if dlen >= self.buffin:
print("Cmd too big: ", dlen)
return self.disconnect()
if len(self.bin) < 5+dlen:
break
data = self.bin[5:5+dlen]
self.bin = self.bin[5+dlen:]
args = list(map(lambda x: x.decode('utf8'), data.split(b'�')))
self.log('>', cmd, i, '|', ','.join(args))
if cmd == MSG_PING:
self._send(MSG_RSP, STA_SUCCESS, id=i)
elif cmd == MSG_HW or cmd == MSG_BRIDGE:
if args[0] == 'vw':
self.emit("V"+args[1], args[2:])
self.emit("V*", args[1], args[2:])
elif cmd == MSG_INTERNAL:
self.emit("internal:"+args[0], args[1:])
elif cmd == MSG_REDIRECT:
self.emit("redirect", args[0], int(args[1]))
else:
print("Unexpected command: ", cmd)
return self.disconnect()
import socket
class Blynk(BlynkProtocol):
def __init__(self, auth, **kwargs):
self.insecure = kwargs.pop('insecure', False)
self.server = kwargs.pop('server', 'blynk.cloud')
self.port = kwargs.pop('port', 80 if self.insecure else 443)
BlynkProtocol.__init__(self, auth, **kwargs)
self.on('redirect', self.redirect)
def redirect(self, server, port):
self.server = server
self.port = port
self.disconnect()
self.connect()
def connect(self):
print('Connecting to %s:%d...' % (self.server, self.port))
s = socket.socket()
s.connect(socket.getaddrinfo(self.server, self.port)[0][-1])
try:
s.setsockopt(socket.IPPROTO_TCP, socket.TCP_NODELAY, 1)
except:
pass
if self.insecure:
self.conn = s
else:
try:
import ussl
ssl_context = ussl
except ImportError:
import ssl
ssl_context = ssl.create_default_context()
self.conn = ssl_context.wrap_socket(s, server_hostname=self.server)
try:
self.conn.settimeout(SOCK_TIMEOUT)
except:
s.settimeout(SOCK_TIMEOUT)
BlynkProtocol.connect(self)
def _write(self, data):
#print('<', data)
self.conn.write(data)
# TODO: handle disconnect
def run(self):
data = b''
try:
data = self.conn.read(self.buffin)
#print('>', data)
except KeyboardInterrupt:
raise
except socket.timeout:
# No data received, call process to send ping messages when needed
pass
except: # TODO: handle disconnect
return
self.process(data)main.py MicroPython Code
This is the main.py code.
from machine import Pin, I2C
import network
import BlynkLib
import utime
import math
from mpu6050 import init_mpu6050, get_mpu6050_data

i2c = I2C(0, scl=Pin(21), sda=Pin(20), freq=400000)
init_mpu6050(i2c)

# WiFi credentials
WIFI_SSID = "Your WiFi Name"
WIFI_PASSWORD = "Your WiFi Password"

# Blynk authentication token
BLYNK_AUTH = "Blynk Authentication Token"


# Connect to WiFi network
wifi = network.WLAN(network.STA_IF)
wifi.active(True)
wifi.connect(WIFI_SSID, WIFI_PASSWORD)

# Wait for the connection to be established
while not wifi.isconnected():
    sleep(1)

# Initialize Blynk
blynk = BlynkLib.Blynk(BLYNK_AUTH)

def calculate_tilt_angles(accel_data):
    x, y, z = accel_data['x'], accel_data['y'], accel_data['z']

    tilt_x = math.atan2(y, math.sqrt(x * x + z * z)) * 180 / math.pi
    tilt_y = math.atan2(-x, math.sqrt(y * y + z * z)) * 180 / math.pi
    tilt_z = math.atan2(z, math.sqrt(x * x + y * y)) * 180 / math.pi

    return tilt_x, tilt_y, tilt_z

def complementary_filter(pitch, roll, gyro_data, dt, alpha=0.98):
    pitch += gyro_data['x'] * dt
    roll -= gyro_data['y'] * dt

    pitch = alpha * pitch + (1 - alpha) * math.atan2(gyro_data['y'], math.sqrt(gyro_data['x'] * gyro_data['x'] + gyro_data['z'] * gyro_data['z'])) * 180 / math.pi
    roll = alpha * roll + (1 - alpha) * math.atan2(-gyro_data['x'], math.sqrt(gyro_data['y'] * gyro_data['y'] + gyro_data['z'] * gyro_data['z'])) * 180 / math.pi

    return pitch, roll

pitch = 0
roll = 0
prev_time = utime.ticks_ms()

while True:
    data = get_mpu6050_data(i2c)
    curr_time = utime.ticks_ms()
    dt = (curr_time - prev_time) / 1000

    tilt_x, tilt_y, tilt_z = calculate_tilt_angles(data['accel'])
    pitch, roll = complementary_filter(pitch, roll, data['gyro'], dt)

    prev_time = curr_time

    print("Temperature: {:.2f} °C".format(data['temp']))
    print("Tilt angles: X: {:.2f}, Y: {:.2f}, Z: {:.2f} degrees".format(tilt_x, tilt_y, tilt_z))
    print("Pitch: {:.2f}, Roll: {:.2f} degrees".format(pitch, roll))
    print("Acceleration: X: {:.2f}, Y: {:.2f}, Z: {:.2f} g".format(data['accel']['x'], data['accel']['y'], data['accel']['z']))
    print("Gyroscope: X: {:.2f}, Y: {:.2f}, Z: {:.2f} °/s".format(data['gyro']['x'], data['gyro']['y'], data['gyro']['z']))

	# Send sensor data to Blynk
    blynk.virtual_write(0, (data['temp']))     # virtual pin 0 for temperature
    blynk.virtual_write(1, tilt_x)   # virtual pin 1 for Tilt angles X-axis
    blynk.virtual_write(2, tilt_y)   # virtual pin 2 for Tilt angles Y-axis
    blynk.virtual_write(3, tilt_z)   # virtual pin 3 for Tilt angles Z-axis
	# Run Blynk
    blynk.run()
	# Delay for 1 seconds
    utime.sleep(1)
MicroPython Code Explanation
In the first part of the code, we import the required libraries and initialize the I2C connection with the MPU6050 sensor.
from machine import Pin, I2C
import network
import BlynkLib
import utime
import math
from mpu6050 import init_mpu6050, get_mpu6050_data

i2c = I2C(0, scl=Pin(21), sda=Pin(20), freq=400000)
init_mpu6050(i2c)
We also define the WiFi credentials and Blynk authentication token. You need to replace your WiFi credentials and Blynk Authentication token from here.
# WiFi credentials
WIFI_SSID = "Your WiFi Name"
WIFI_PASSWORD = "Your WiFi Password"

# Blynk authentication token
BLYNK_AUTH = "Blynk Authentication Token"
Next, we connect to the WiFi network and initialize the Blynk platform.
# Connect to WiFi network
wifi = network.WLAN(network.STA_IF)
wifi.active(True)
wifi.connect(WIFI_SSID, WIFI_PASSWORD)

# Wait for the connection to be established
while not wifi.isconnected():
    sleep(1)

# Initialize Blynk
blynk = BlynkLib.Blynk(BLYNK_AUTH)
We define a function called “calculate_tilt_angles” which calculates the tilt angles of the sensor using the accelerometer data. We also define another function called “complementary_filter” which combines the accelerometer and gyroscope data to get more accurate tilt angles.
def calculate_tilt_angles(accel_data):
    x, y, z = accel_data['x'], accel_data['y'], accel_data['z']

    tilt_x = math.atan2(y, math.sqrt(x * x + z * z)) * 180 / math.pi
    tilt_y = math.atan2(-x, math.sqrt(y * y + z * z)) * 180 / math.pi
    tilt_z = math.atan2(z, math.sqrt(x * x + y * y)) * 180 / math.pi

    return tilt_x, tilt_y, tilt_z

def complementary_filter(pitch, roll, gyro_data, dt, alpha=0.98):
    pitch += gyro_data['x'] * dt
    roll -= gyro_data['y'] * dt

    pitch = alpha * pitch + (1 - alpha) * math.atan2(gyro_data['y'], math.sqrt(gyro_data['x'] * gyro_data['x'] + gyro_data['z'] * gyro_data['z'])) * 180 / math.pi
    roll = alpha * roll + (1 - alpha) * math.atan2(-gyro_data['x'], math.sqrt(gyro_data['y'] * gyro_data['y'] + gyro_data['z'] * gyro_data['z'])) * 180 / math.pi

    return pitch, roll

pitch = 0
roll = 0
prev_time = utime.ticks_ms()
In the main loop of the code, we continuously read the data from the MPU6050 sensor and calculate the tilt angles using the “calculate_tilt_angles” function. We then use the “complementary_filter” function to combine the accelerometer and gyroscope data to get more accurate tilt angles.
while True:
    data = get_mpu6050_data(i2c)
    curr_time = utime.ticks_ms()
    dt = (curr_time - prev_time) / 1000

    tilt_x, tilt_y, tilt_z = calculate_tilt_angles(data['accel'])
    pitch, roll = complementary_filter(pitch, roll, data['gyro'], dt)

    prev_time = curr_time

    print("Temperature: {:.2f} °C".format(data['temp']))
    print("Tilt angles: X: {:.2f}, Y: {:.2f}, Z: {:.2f} degrees".format(tilt_x, tilt_y, tilt_z))
    print("Pitch: {:.2f}, Roll: {:.2f} degrees".format(pitch, roll))
    print("Acceleration: X: {:.2f}, Y: {:.2f}, Z: {:.2f} g".format(data['accel']['x'], data['accel']['y'], data['accel']['z']))
    print("Gyroscope: X: {:.2f}, Y: {:.2f}, Z: {:.2f} °/s".format(data['gyro']['x'], data['gyro']['y'], data['gyro']['z']))
Then we send the sensor data to the Blynk IoT platform using the virtual write function. We use virtual pins to send the temperature, tilt angles along the x, y, and z-axis, and gyroscope data to the Blynk platform.
# Send sensor data to Blynk
    blynk.virtual_write(0, (data['temp']))     # virtual pin 0 for temperature
    blynk.virtual_write(1, tilt_x)   # virtual pin 1 for Tilt angles X-axis
    blynk.virtual_write(2, tilt_y)   # virtual pin 2 for Tilt angles Y-axis
    blynk.virtual_write(3, tilt_z)   # virtual pin 3 for Tilt angles Z-axis
Finally, we run the Blynk platform and delay for 1 second before repeating the loop.
# Run Blynk
    blynk.run()
	# Delay for 1 seconds
    utime.sleep(1)
Testing Code & Demonstration
Now save this code as main.py on the raspberry pi pico w board. Now you can click on the start/run button on Thonny IDE to run the code.
You can now test the Blynk web app. Open the web app and navigate to the project dashboard. Now you can see the MPU6050 Sensor Data gets uploaded every second.
You can also configure your mobile dashboard by following the steps provided in the video tutorial.
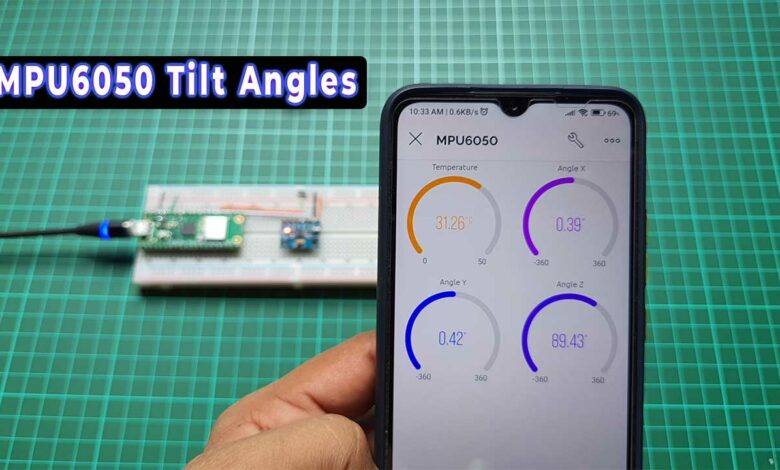
As you can see on my screen, I have opened the Blynk app on my phone. I have already created a new project and added the required widgets to display the data.
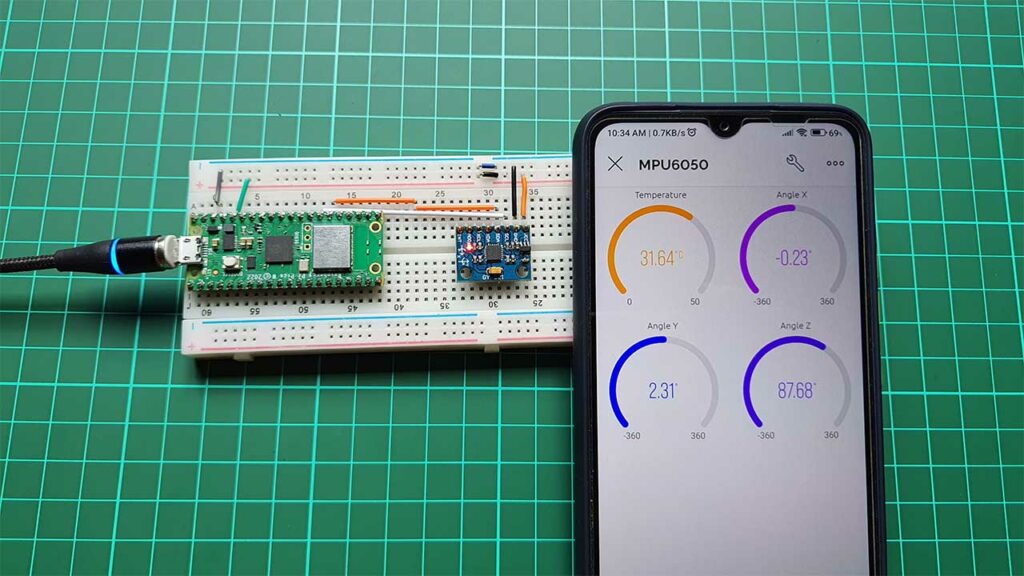
Now, when I tilt the sensor in different directions, you can see the values for the temperature, tilt angles, and gyroscope data changing in real time on the Blynk platform.
Conclusion
So this is how we can monitor tilt angles on Blynk IoT using an MPU6050 sensor with Raspberry Pi Pico and MicroPython Code. I hope you found this tutorial helpful. If you have any doubts or queries then let me know in the comment section below.