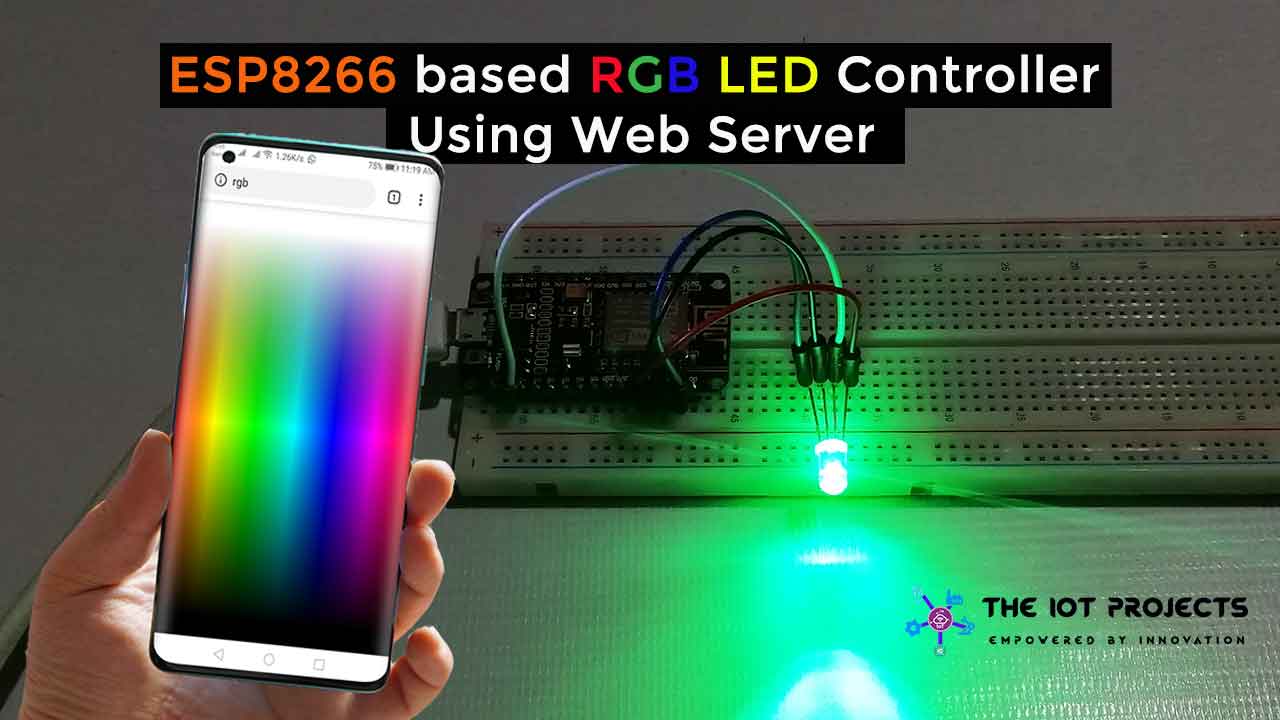
Today you will learn to make ESP8266 based RGB LED controller with a web server. Along with the source code, I’ll also provide the instructions for creating and using the project.
Actually, We are sending a “GET” request from our custom webpage that will have a color picker to send red, green, and blue values. The ESP8266 NodeMCU ESP-12E receives data and sets the color of the RGB LED based on the color picker values.

Components Required
Followings are the components required to make ESP8266 based RGB LED controller using web server.
- Breadboard – 1
- ESP8266 (NodeMCU) ESP12E Development Board- 1
- Micro USB Cable – 1
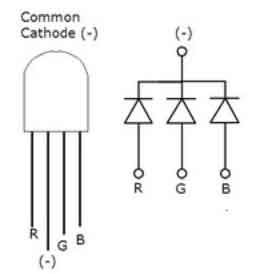
- RGB LED – As your requirements
I hope you already have all the components for the tutorial that I specified above. So let’s get started.
Circuit Diagram of ESP8266 based RGB LED Controller
Please use the following circuit diagram for reference when you are making this project. At each step, please check your wire with each step using this circuit diagram.
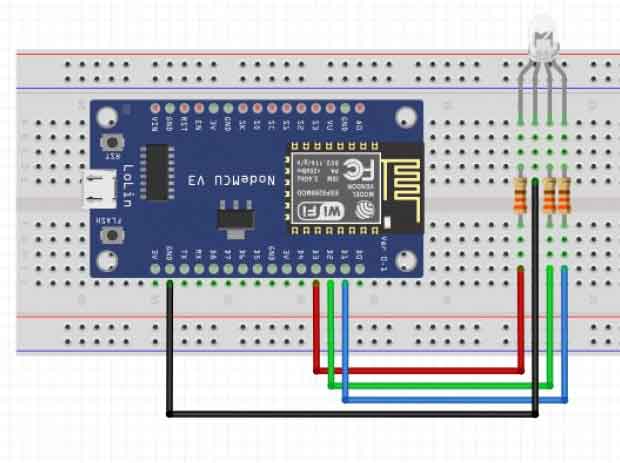
Wiring NodeMCU and RGB LED
| ESP12E NodeMCU module | RGB LED |
| D3 | R |
| GND | GND |
| D2 | G |
| D1 | B |
- First, connect the R Pin to the D3 pin on your ESP8266 via a 220Ω resistor.
- Second, connect the G Pin through the 220Ω register to the D2 pin on your ESP8266 NodeMCU.
- Third, connect the B Pin through the 220Ω resistor to the D1 pin on your ESP8266.
- Finally, (–) Connect directly (no resistors) to the GND pin on your ESP board.
We will now program the ESP12E NodeMCU module that acts as a server and accepts parameters from the URL.
ESP8266 and RGB LED Video Demonstration
Programming ESP8266 for RGB LED Controller
Here, I will present to you all the instructions and programming code for NodeMCU ESP8266 RGB LED Controller.
Similarly, I have Included all the library header files required for this project.
#include <ESP8266WiFi.h>
#include <DNSServer.h>
#include <ESP8266WebServer.h>
Actually, I am programming NodeMCU in AP Mode. Enter Access Point credentials as SSID and Password. Leave Blank in Password field to deploy an open network.
const char *ssid = "The IoT Projects";
const char *password = "";
In this session, I have defined DNS Port, RGB LED Pins, ESP8266 Soft AP IP address, and webserver port respectively.
const byte DNS_PORT = 53;
const int redLED = 0;   //D3
const int greenLED = 4; //D2
const int blueLED = 5;  //D1
IPAddress apIP(192, 168, 1, 1);
DNSServer dnsServer;
ESP8266WebServer webServer(80);
RGB LED Controller webpage designed with HTML.
String webpage = ""
"<!DOCTYPE html><html><head><title>RGB control</title><meta name='mobile-web-app-capable' content='yes' />"
"<meta name='viewport' content='width=device-width' /></head><body style='margin: 0px; padding: 0px;'>"
"<canvas id='colorspace'></canvas></body>"
"<script type='text/javascript'>"
"(function () {"
" var canvas = document.getElementById('colorspace');"
" var ctx = canvas.getContext('2d');"
" function drawCanvas() {"
" var colours = ctx.createLinearGradient(0, 0, window.innerWidth, 0);"
" for(var i=0; i <= 360; i+=10) {"
" colours.addColorStop(i/360, 'hsl(' + i + ', 100%, 50%)');"
" }"
" ctx.fillStyle = colours;"
" ctx.fillRect(0, 0, window.innerWidth, window.innerHeight);"
" var luminance = ctx.createLinearGradient(0, 0, 0, ctx.canvas.height);"
" luminance.addColorStop(0, '#ffffff');"
" luminance.addColorStop(0.05, '#ffffff');"
" luminance.addColorStop(0.5, 'rgba(0,0,0,0)');"
" luminance.addColorStop(0.95, '#000000');"
" luminance.addColorStop(1, '#000000');"
" ctx.fillStyle = luminance;"
" ctx.fillRect(0, 0, ctx.canvas.width, ctx.canvas.height);"
" }"
" var eventLocked = false;"
" function handleEvent(clientX, clientY) {"
" if(eventLocked) {"
" return;"
" }"
" function colourCorrect(v) {"
" return Math.round(1023-(v*v)/64);"
" }"
" var data = ctx.getImageData(clientX, clientY, 1, 1).data;"
" var params = ["
" 'r=' + colourCorrect(data[0]),"
" 'g=' + colourCorrect(data[1]),"
" 'b=' + colourCorrect(data[2])"
" ].join('&');"
" var req = new XMLHttpRequest();"
" req.open('POST', '?' + params, true);"
" req.send();"
" eventLocked = true;"
" req.onreadystatechange = function() {"
" if(req.readyState == 4) {"
" eventLocked = false;"
" }"
" }"
" }"
" canvas.addEventListener('click', function(event) {"
" handleEvent(event.clientX, event.clientY, true);"
" }, false);"
" canvas.addEventListener('touchmove', function(event){"
" handleEvent(event.touches[0].clientX, event.touches[0].clientY);"
"}, false);"
" function resizeCanvas() {"
" canvas.width = window.innerWidth;"
" canvas.height = window.innerHeight;"
" drawCanvas();"
" }"
" window.addEventListener('resize', resizeCanvas, false);"
" resizeCanvas();"
" drawCanvas();"
" document.ontouchmove = function(e) {e.preventDefault()};"
" })();"
"</script></html>";
This code will read RGB arguments from web server and Print value on Serial Monitor.
void handleRoot() {
// Serial.println("handle root..");
String red = webServer.arg(0);
String green = webServer.arg(1);
String blue = webServer.arg(2);
Serial.print("Red: ");
Serial.println(red.toInt());
Serial.print("Green: ");
Serial.println(green.toInt());
Serial.print("Blue: ");
Serial.println(blue.toInt());
Serial.println();
In void setup(), we will use the PinMode function for RGB LED as output arguments. Initiate WiFi AP mode, Start DNS Server, and print SSID and IP address of ESP8266. If DNS Server is started with “*” for a domain name, it will reply with provided IP to all DNS requests.
void setup() {

pinMode(redLED, OUTPUT);
pinMode(greenLED, OUTPUT);
pinMode(blueLED, OUTPUT);

analogWrite(redLED, 0);
analogWrite(greenLED, 0);
analogWrite(blueLED, 0);

delay(1000);
Serial.begin(115200);
Serial.println();

WiFi.mode(WIFI_AP);
WiFi.softAPConfig(apIP, apIP, IPAddress(255, 255, 255, 0));
WiFi.softAP(ssid);

dnsServer.start(DNS_PORT, "rgb", apIP);

webServer.on("/", handleRoot);

webServer.begin();

testRGB();
}
Here, the two functions dnsServer.processNextRequest(); and webServer.handleClient(); previously created will be executed through loop.
void loop() {

dnsServer.processNextRequest();
webServer.handleClient();
Final Code For RGB Controller with ESP8266
Following is the complete ESP8266 based RGB LED controller Arduino IDE Code. Be sure to change to WiFi AP * ssid = “The IoT Projects” and Const password * ssid = “your password“. You can write any name and password as your wish. ?
/* RGB web server with ESP8266
* analogWrite with values received from web page
*
* WiFi router that creates a fixed domain: http://rgb
* web page returns POST request with 3 RGB parameters http://192.168.1.5/
* web page inspired by https://github.com/dimsumlabs/nodemcu-httpd
*/

#include <ESP8266WiFi.h>
#include <DNSServer.h>
#include <ESP8266WebServer.h>

const char *ssid = "The IoT Projects";
const char *password = "";
const byte DNS_PORT = 53;
const int redLED = 0;   //D3
const int greenLED = 4; //D2
const int blueLED = 5;  //D1
IPAddress apIP(192, 168, 1, 5);
DNSServer dnsServer;
ESP8266WebServer webServer(80);

String webpage = ""
"<!DOCTYPE html><html><head><title>RGB control</title><meta name='mobile-web-app-capable' content='yes' />"
"<meta name='viewport' content='width=device-width' /></head><body style='margin: 0px; padding: 0px;'>"
"<canvas id='colorspace'></canvas></body>"
"<script type='text/javascript'>"
"(function () {"
" var canvas = document.getElementById('colorspace');"
" var ctx = canvas.getContext('2d');"
" function drawCanvas() {"
" var colours = ctx.createLinearGradient(0, 0, window.innerWidth, 0);"
" for(var i=0; i <= 360; i+=10) {"
" colours.addColorStop(i/360, 'hsl(' + i + ', 100%, 50%)');"
" }"
" ctx.fillStyle = colours;"
" ctx.fillRect(0, 0, window.innerWidth, window.innerHeight);"
" var luminance = ctx.createLinearGradient(0, 0, 0, ctx.canvas.height);"
" luminance.addColorStop(0, '#ffffff');"
" luminance.addColorStop(0.05, '#ffffff');"
" luminance.addColorStop(0.5, 'rgba(0,0,0,0)');"
" luminance.addColorStop(0.95, '#000000');"
" luminance.addColorStop(1, '#000000');"
" ctx.fillStyle = luminance;"
" ctx.fillRect(0, 0, ctx.canvas.width, ctx.canvas.height);"
" }"
" var eventLocked = false;"
" function handleEvent(clientX, clientY) {"
" if(eventLocked) {"
" return;"
" }"
" function colourCorrect(v) {"
" return Math.round(1023-(v*v)/64);"
" }"
" var data = ctx.getImageData(clientX, clientY, 1, 1).data;"
" var params = ["
" 'r=' + colourCorrect(data[0]),"
" 'g=' + colourCorrect(data[1]),"
" 'b=' + colourCorrect(data[2])"
" ].join('&');"
" var req = new XMLHttpRequest();"
" req.open('POST', '?' + params, true);"
" req.send();"
" eventLocked = true;"
" req.onreadystatechange = function() {"
" if(req.readyState == 4) {"
" eventLocked = false;"
" }"
" }"
" }"
" canvas.addEventListener('click', function(event) {"
" handleEvent(event.clientX, event.clientY, true);"
" }, false);"
" canvas.addEventListener('touchmove', function(event){"
" handleEvent(event.touches[0].clientX, event.touches[0].clientY);"
"}, false);"
" function resizeCanvas() {"
" canvas.width = window.innerWidth;"
" canvas.height = window.innerHeight;"
" drawCanvas();"
" }"
" window.addEventListener('resize', resizeCanvas, false);"
" resizeCanvas();"
" drawCanvas();"
" document.ontouchmove = function(e) {e.preventDefault()};"
" })();"
"</script></html>";

//////////////////////////////////////////////////////////////////////////////////////////////////

void handleRoot() {
// Serial.println("handle root..");
String red = webServer.arg(0); // read RGB arguments
String green = webServer.arg(1);
String blue = webServer.arg(2);

if((red != "") && (green != "") && (blue != ""))
{
  analogWrite(redLED, 1023 - red.toInt());
  analogWrite(greenLED, 1023 - green.toInt());
  analogWrite(blueLED, 1023 - blue.toInt());
}


Serial.print("Red: ");
Serial.println(red.toInt());
Serial.print("Green: ");
Serial.println(green.toInt());
Serial.print("Blue: ");
Serial.println(blue.toInt());
Serial.println();

webServer.send(200, "text/html", webpage);
}

//////////////////////////////////////////////////////////////////////////////////////////////////
//////////////////////////////////////////////////////////////////////////////////////////////////

void setup() {

pinMode(redLED, OUTPUT);
pinMode(greenLED, OUTPUT);
pinMode(blueLED, OUTPUT);

analogWrite(redLED, 0);
analogWrite(greenLED, 0);
analogWrite(blueLED, 0);

delay(1000);
Serial.begin(115200);
Serial.println();

WiFi.mode(WIFI_AP);
WiFi.softAPConfig(apIP, apIP, IPAddress(255, 255, 255, 0));
WiFi.softAP(ssid);

// if DNSServer is started with "*" for domain name, it will reply with provided IP to all DNS request
dnsServer.start(DNS_PORT, "rgb", apIP);

webServer.on("/", handleRoot);

webServer.begin();

testRGB();
}

//////////////////////////////////////////////////////////////////////////////////////////////////

void loop() {

dnsServer.processNextRequest();
webServer.handleClient();

}
//////////////////////////////////////////////////////////////////////////////////////////////////
//////////////////////////////////////////////////////////////////////////////////////////////////

void testRGB() { // fade in and out of Red, Green, Blue

analogWrite(redLED, 0); // R off
analogWrite(greenLED, 0); // G off
analogWrite(blueLED, 0); // B off

fade(redLED); // R
fade(greenLED); // G
fade(blueLED); // B
}

//////////////////////////////////////////////////////////////////////////////////////////////////

void fade(int pin) {

for (int u = 0; u < 1024; u++) {
analogWrite(pin, u);
delay(1);
}
for (int u = 0; u < 1024; u++) {
analogWrite(pin, 1023 - u);
delay(1);
}
}- Upload the file to your ESP8266 module. This may take up to a minute. Be patient. While you are waiting, please open your serial monitor and make sure it is set to 115200 Baud rate.
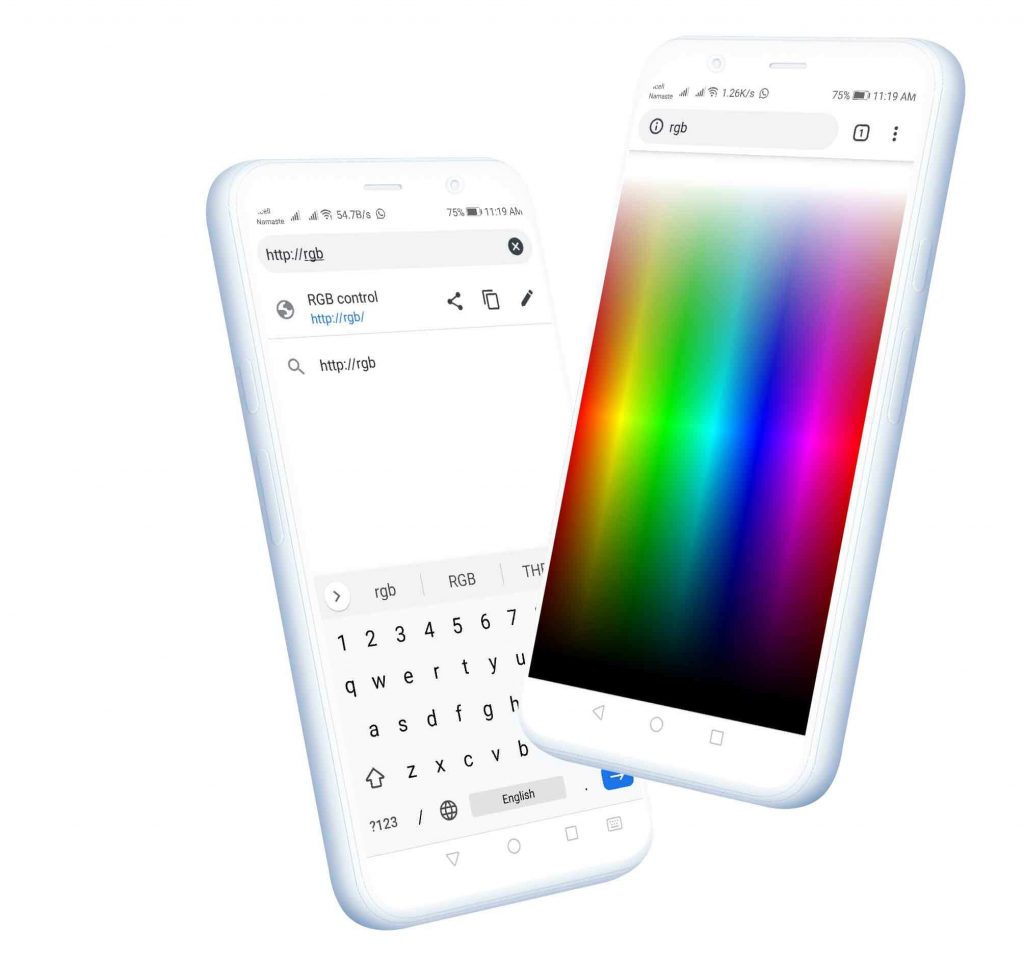
- This time we are trying something different. You should see a WiFi network called “your name”. Switch your laptop (or your phone) to this network.
- Go to http://rgb or if it doesn’t work, try http://192.168.1.5
- Choose the color in the palette and the RGB LED should try to match it.
Wrapping Up
In this tutorial, I have shown you how to make ESP8266 RGB LED Controller Web Server. I hope you enjoyed reading this article. If you have any questions, comments, or ideas? Let me know in the comment section below.
You might also like reading:
- IoT Based Voice Controlled Home Automation Using NodeMCU & Android
- ESP8266 Plot Sensor readings to Webserver in Real-Time Chart
- Contactless Smart Doorbell Using ESP8266 & Blynk
- IoT Based Patient Health Monitoring System Using ESP8266/ESP32 Web Server
- Internet Clock Using NodeMCU ESP8266 and 16×2 LCD without RTC Module
- Home Automation with MIT App Inventor and ESP8266
- RFID Based Attendance System Using NodeMCU with PHP Web App
- Dual Axis Solar Tracker Arduino Project Using LDR & Servo Motors
- Insert Data into MySQL Database with ESP8266 Development Board
- ESP8266 Data Logger to Upload Data on Webserver
- IoT Based RFID Smart Door Lock System Using NodeMCU ESp8266
- Temperature Controlled Home Automation using Arduino
- IoT Based Flood Monitoring System Using NodeMCU & Thingspeak
- Connect RFID to PHP & MySQL Database with NodeMcu ESP8266

nice work, perfect explain
I’m a light painter and I was looking for a remote control for my RGB-ORB-TOOL. This guide was really very helpful and easy to implement. Thank you!
What changes i have to made in the code for the esp32 board