If you work with electronics you definitely need some necessary equipment. like voltmeter but, what if you don’t have one? What a nightmare! But don’t worry, you can use Arduino as a digital voltmeter.
🙂 Yes, isn’t it exciting?
Introduction
So today we will learn to make a Digital Voltmeter using Arduino & 16×2 LCD and Arduino IDE. Due to covid-19, I was unable to visit the market and buy a simple voltmeter to check the voltage of a battery for some of my projects, that I have been working on. Therefore, I decided to make a simple Arduino based voltmeter project that can help you a lot in this pandemic situation. So, without doing any delay let’s get started with Voltmeter using the Arduino project.

Components Required:
Following are the components Required for making Digital Voltmeter using Arduino & 16×2 LCD at your home:
- Arduino UNO
- 16×2 I2C LCD Display
- Few Male to Female and Male to Male jumper wires
Note: For probes, we will use Male to Male jumper wires
Circuit diagram of Digital Voltmeter using Arduino
Now, assemble the circuit as shown in the circuit diagram below:
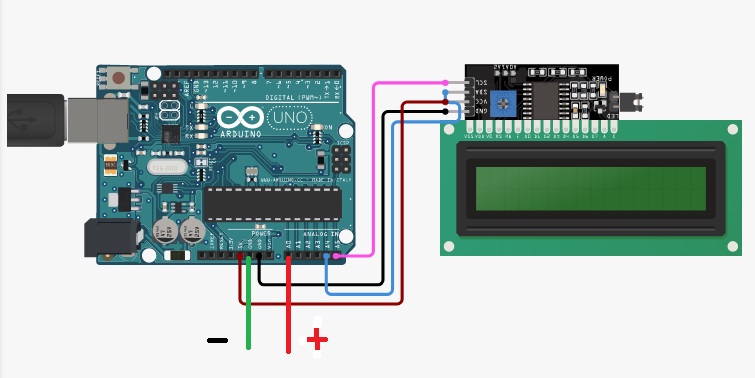
Connect Vcc and GND Pin of 16×2 I2C LCD to 5volt and GND Pin of the Arduino UNO. Now, Connect SCL and SDA Pin of I2C LCD to A5 and A4 pin respectively as shown in the above diagram. Similarly, attach two Male to Male jumper wires as a probes to GND and A0 Pin of Arduino UNO. Finally, attach the USB cable to the Arduino board and PC to upload the program code.
Program code:
Copy this program code in your Arduino IDE program. Now select your Arduino board and COM Port from the tools menu. Compile the code and upload it to Arduino.
#include <LiquidCrystal_I2C.h>
float vol = 0;
int input = 0;
LiquidCrystal_I2C lcd(0x27, 16, 2); // set the LCD address to 0x27 for a 16 chars and 2 line display
void setup() {
lcd.init(); // initialize the lcd
lcd.init();
lcd.backlight();
lcd.setCursor(1, 0);
lcd.clear();
lcd.print("Arduino");
lcd.setCursor(0, 1);
lcd.print("Voltmeter");
delay(1500);
lcd.clear();
lcd.print("By - The ");
lcd.setCursor(0, 1);
lcd.print("IoT Projects"); // Don't Forget to Subscribe on YouTube ------ The IoT Projects :)
delay(2000);
lcd.clear();
pinMode(A0, INPUT);
Serial.begin(9600); // starting the Serial Monitor
}
void loop() {
input = analogRead(A0); //analogRead function is used to recive analog data
vol = (input * 5.0) / 1024.0; //formula using for perform action
lcd.print("voltage is:");
lcd.setCursor(0, 1);
delay(100);
lcd.print(vol);
delay(1000);
lcd.clear();
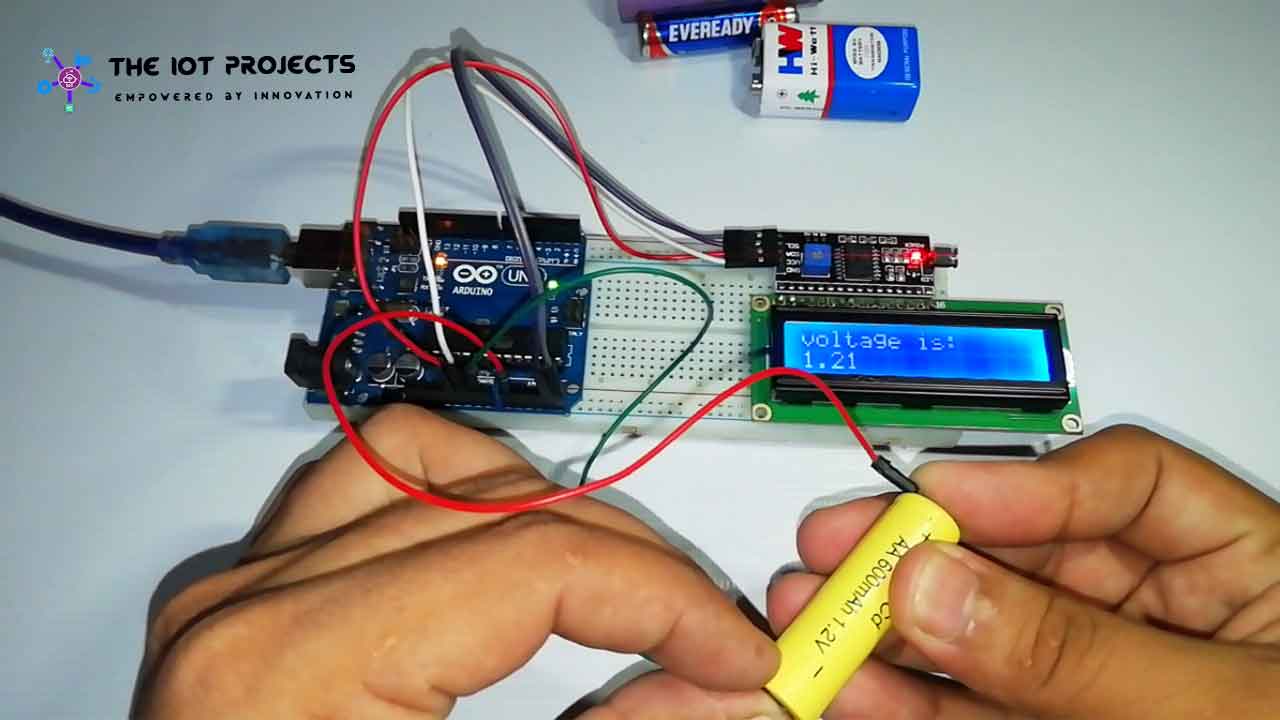
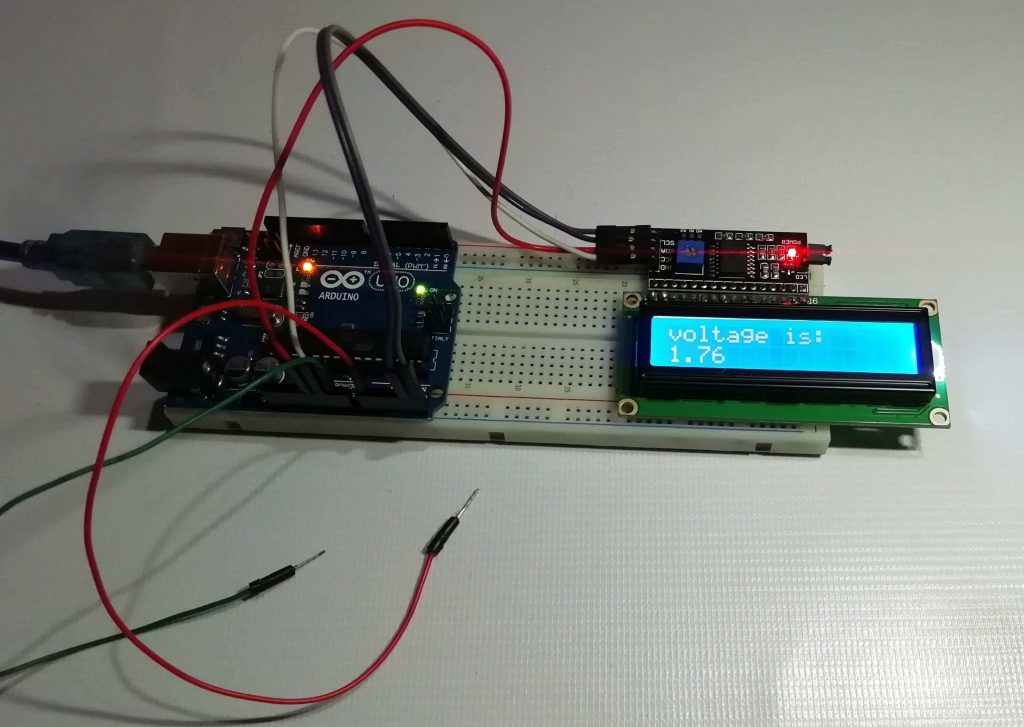
}Demonstration of Digital Voltmeter using Arduino & 16×2 LCD
Now, its time to test the project. This Arduino based digital voltmeter shows around 1.5-1.8 volts when not connected and 0 volts when probes touch each other.
I have tested the project with some dead batteries, partially charged batteries, and fully charged batteries. It works as expected but, it cannot calculate the negative voltage.
Just watch the video to Find out How to make a digital voltmeter using Arduino and 16×2 I2C LCD Display.
Conclusion
So, today we have learned to make Digital Voltmeter using Arduino & 16×2 LCD in a step by step manner. I hope this simple project will help you a lot. That’s all for today, Stay safe, stay healthy, and stay at home. See you soon.
Recommended Readings:
- Interfacing Temperature and Humidity Sensor with Arduino
- Simple Weather station using Arduino & BME280 Barometric Pressure Sensor
- Temperature Controlled Home Automation using Arduino
- Interface LDR Photo Resistor to Arduino and Control LEDs
- IoT Based LED Control using Google Firebase & ESP8266
- DIY Mobile Phone using GSM Module & Arduino with Nextion Display
- Top 10 Coolest IoT Devices of 2020


