Today’s project is all about ESP32 based Patient Health Monitoring System using MAX30100 Pulse Oximeter sensor, DS18B20 temperature sensor, and DHT22 Temperature & Humidity sensor. This system will monitor the parameters like room temperature, room Humidity, Heart Rate, Oxygen Saturation (Sp02) in blood, and body temperature of patients on the ESP32 Webserver.
Overview: ESP32 Patient Health Monitoring System
Healthcare technology is very popular in this pandemic situation because of coronavirus. Actually, health care technology is rapidly being revolutionized with the help of the Internet of Things (IoT). Monitoring the health status of a covid patient is a hard task because of our busy schedule and our daily work. Mostly, the elderly covid patients should be monitored periodically. So I thought to make an innovative system in this lockdown to automate the task. This device uses an ESP32 web server to track patient health using this monitoring system. Hence, patient health parameters such as body temperature, heart rate (BPM), blood oxygen levels (Sp02) as well as room temperature and humidity can be monitored from any device (like Smartphone, PC, Laptop, Smart TV,.) That support browsing capabilities.
In this project, we will learn how to build an ESP32 based Patient Health Monitoring System. To measure Heart Rate/Pulse (BPM) and Blood Oxygen Level (SpO2), we use the MAX30100 pulse oximeter sensor. Similarly, to measure body temperature, we use the DS18B20 temperature sensor. Meanwhile, the patient is inside the room. So we need to monitor room temperature and humidity level as well. We should keep them in a room with a certain temperature and humidity level to not feel uncomfortable. Hence, we use the DHT22 Temperature & Humidity sensor.
Additionally, we have NodeMCU based IoT Health Monitoring webserver which will monitor your patients.
Components Required
The following are the components required for making ESP32 based Patient Health Monitoring System. All the components are easily available.
| S.N | Components Name | Description | Quantity | |
|---|---|---|---|---|
| 1 | ESP32 Board | ESP32 ESP-32S Development Board | 1 | https://amzn.to/3sfU0or |
| 2 | DS18B20 Sensor | DS18B20 One-Wire Waterproof Temperature Sensor | 1 | https://amzn.to/3k5BCfB |
| 3 | DHT22 Sensor | DHT22 Digital Humidity Temperature Sensor | 1 | https://amzn.to/3fPl2hU |
| 4 | Pulse Oximeter Sensor | MAX30100 I2C Pulse Oximeter Sensor | 1 | https://amzn.to/3sjdrNc |
| 5 | Jumper Wires | Male to Male Jumper Wires | 8 | https://amzn.to/2JWSR44 |
| 6 | Breadboard | Solderless Breadboard MIni | 1 | https://amzn.to/3n33uRT |
Circuit Diagram: ESP32 based Patient Health Monitoring System
Now let us design IoT Based Patient Health Monitoring with ESP32 Web Server. So the circuit diagram for interfacing MAX30100, DHT22 & DS18B20 with ESP32 is given below.
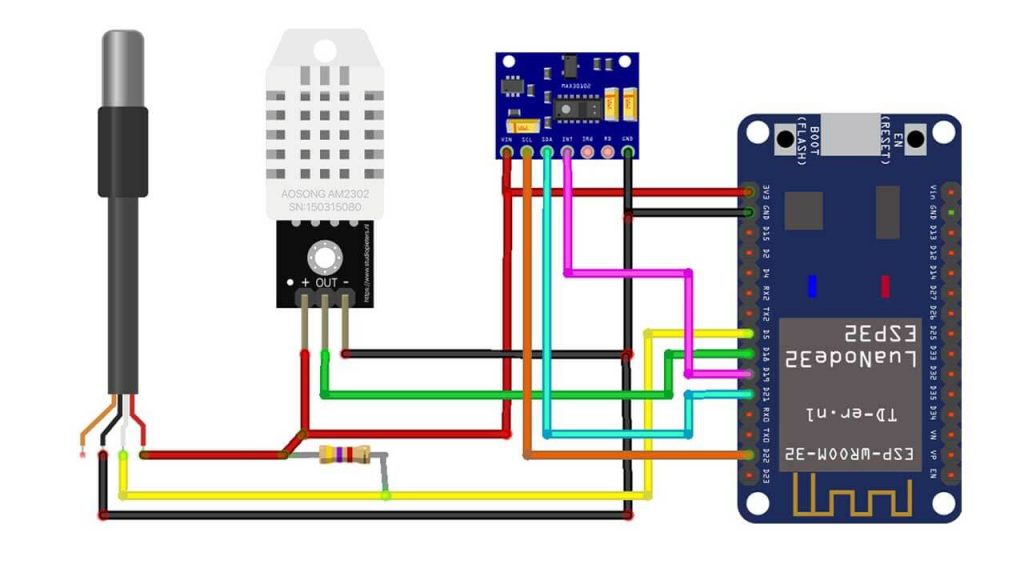
Circuit Diagram of IoT Based Patient Health Monitoring using ESP32
| MAX30100 Pins | ESP32 Pins |
| SDA | GPIO21 |
| SCL | GPIO22 |
| INT | GPIO19 |
| Vcc | 3.3V |
| GND | GND |
| DS18B20 Pins | ESP332 Pins |
| Vcc | 3.3V |
| GND | GND |
| Signal | GPIO5 |
| DHT22 Pins | ESP32 PIns |
| Vcc | 3.3V |
| GND | GND |
| Signal | GPIO18 |
PCB Design & Assembly
This circuit requires a custom PCB because the circuit assembled on a breadboard looks messy and isn’t portable too. So, I have designed a custom PCB for this project.
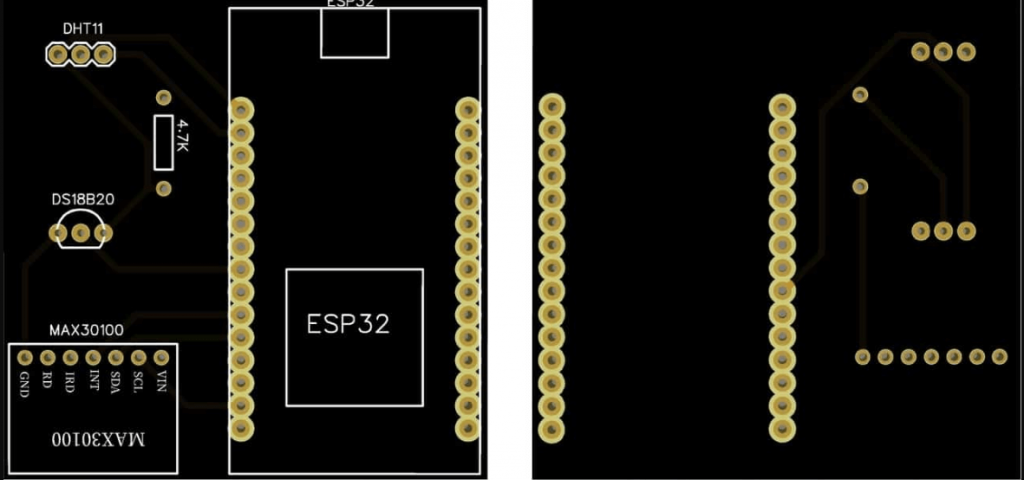
The Gerber file for the PCB is given below. You can download the Gerber file and order the PCB online from NextPCB. Download: Gerber File for IoT Based Patient Health Monitoring from the button below.
Now you can visit https://www.nextpcb.com/ and order the PCB. NextPCB is one of the biggest PCB manufacturer companies in China. They offer very good quality PCB at a reasonable price. The PCB quality and finishing are better than all other PCB Manufacturers.
Source Code/Program Explanation
The Program code for the ESP32 based Patient health monitoring system starts by including the following libraries: WiFi.h and WebServer.h library are used for connecting the ESP32 board to the Wi-Fi network and setting up a webserver. Wire.h library is for communicating any I2C device not just the MAX30100 Pulse Oximeter sensor. MAX30100_PulseOximeter.h for reading BPM and Sp02 from the oximeter sensor. OneWire.h and DallasTemperature.h library for reading data from the DS18B20 temperature sensor. Finally, DHT.h for grabbing Humidity and Temperature from DHT11/DHT22 sensor.
#include <WiFi.h>
#include <WebServer.h>
#include <Wire.h>
#include "MAX30100_PulseOximeter.h"
#include <OneWire.h>
#include <DallasTemperature.h>
#include "DHT.h"
Here we defined the DHT sensor type, its signal pin interfaced with NodeMCU. Similarly, Dallas Temperature DS18B20 sensor pin and reporting period of 1000ms for MAX30100 sensor is also defined.
#define DHTTYPE DHT22
#define DHTPIN 18
#define DS18B20 5
#define REPORTING_PERIOD_MS     1000
Five different variables (temperature, humidity, BPM, SpO2, and bodytemperature) are also defined.
float temperature, humidity, BPM, SpO2, bodytemperature;
Change your WiFi Network Credentials like WiFi SSID and Password here.
/*Put your SSID & Password*/
const char* ssid = "Alsan Air WiFi 1";  // Enter SSID here
const char* password = "";  //Enter Password here
Initialize DHT sensor, Pulse Oximeter sensor, and DS18B20 Dallas Temperature sensor.
DHT dht(DHTPIN, DHTTYPE);;
PulseOximeter pox;
uint32_t tsLastReport = 0;
OneWire oneWire(DS18B20);
DallasTemperature sensors(&oneWire);
Start the webserver on ESP32 module on port 80.
WebServer server(80);
Begin serial debugging at a baud rate of 115200. Define ESP32 pin (GPIO 19) as output. Test the DHT 22 sensor and connect your microcontroller to the Wi-Fi network. After a successful connection, it will provide your IP address. Finally, Start the HTTP server and Initialize the MAX30100 sensor for testing and print results on the serial monitor.
Serial.begin(115200);
  pinMode(19, OUTPUT);
  delay(100);
  Serial.println(F("DHTxx test!"));
  dht.begin();
  Serial.println("Connecting to ");
  Serial.println(ssid);

  //connect to your local wi-fi network
  WiFi.begin(ssid, password);

  //check wi-fi is connected to wi-fi network
  while (WiFi.status() != WL_CONNECTED) {
  delay(1000);
  Serial.print(".");
  }
  Serial.println("");
  Serial.println("WiFi connected..!");
  Serial.print("Got IP: ");  Serial.println(WiFi.localIP());

  server.on("/", handle_OnConnect);
  server.onNotFound(handle_NotFound);

  server.begin();
  Serial.println("HTTP server started");

  Serial.print("Initializing pulse oximeter..");

  if (!pox.begin()) {
    Serial.println("FAILED");
    for (;;);
  } else {
    Serial.println("SUCCESS");
    pox.setOnBeatDetectedCallback(onBeatDetected);
  }

   pox.setIRLedCurrent(MAX30100_LED_CURR_7_6MA);

  // Register a callback for the beat detection

}
Request sensor readings from all the sensors using ESP32 and print those five parameters (temperature, humidity, BPM, Sp02, and body temperature) on the serial monitor.
server.handleClient();
  pox.update();
  sensors.requestTemperatures();
  float t = dht.readTemperature();
  String Temperature_Value = String(t);
  float h = dht.readHumidity();
  String Humidity_Value = String(h);
  temperature = t;
  humidity = h;
  BPM = pox.getHeartRate();
  SpO2 = pox.getSpO2();
  bodytemperature = sensors.getTempCByIndex(0);


  if (millis() - tsLastReport > REPORTING_PERIOD_MS)
  {
    Serial.print("Room Temperature: ");
    Serial.print(t);
    Serial.println("°C");

    Serial.print("Room Humidity: ");
    Serial.print(h);
    Serial.println("%");

    Serial.print("BPM: ");
    Serial.println(BPM);

    Serial.print("SpO2: ");
    Serial.print(SpO2);
    Serial.println("%");

    Serial.print("Body Temperature: ");
    Serial.print(bodytemperature);
    Serial.println("°C");

    Serial.println("*********************************");
    Serial.println();

    tsLastReport = millis();
  }

}
If there is a successful connection, we can send these parameters to the ESP32 local webserver.
void handle_OnConnect() {

  server.send(200, "text/html", SendHTML(temperature, humidity, BPM, SpO2, bodytemperature));
}

void handle_NotFound(){
  server.send(404, "text/plain", "Not found");
}
Design Web Page with HTML and CSS
We start the html code using an html string variable to display patient health monitoring parameters on the webpage dynamically
String SendHTML(float temperature, float humidity, float BPM, float SpO2, float bodytemperature) {
  String html = "<!DOCTYPE html>";
Here, the html web page is made responsive in any web browser. Next, we have some CSS to style the web page’s appearance.
html += "<html>";
html += "<head>";
html += "<title>Patient Health Monitoring</title>";
html += "<meta name='viewport' content='width=device-width, initial-scale=1.0'>";
html += "<link rel='stylesheet' href='https://cdnjs.cloudflare.com/ajax/libs/font-awesome/5.7.2/css/all.min.css'>";
html += "<link rel='stylesheet' type='text/css' href='styles.css'>";
html += "<style>";
html += "body { background-color: #fff; font-family: sans-serif; color: #333333; font: 14px Helvetica, sans-serif box-sizing: border-box;}";
html += "#page { margin: 20px; background-color: #fff;}";
html += ".container { height: inherit; padding-bottom: 20px;}";
html += ".header { padding: 20px;}";
html += ".header h1 { padding-bottom: 0.3em; color: #008080; font-size: 45px; font-weight: bold; font-family: Garmond, 'sans-serif'; text-align: center;}";
html += "h2 { padding-bottom: 0.2em; border-bottom: 1px solid #eee; margin: 2px; text-align: left;}";
html += ".header h3 { font-weight: bold; font-family: Arial, 'sans-serif'; font-size: 17px; color: #b6b6b6; text-align: center;}";
html += ".box-full { padding: 20px; border 1px solid #ddd; border-radius: 1em 1em 1em 1em; box-shadow: 1px 7px 7px 1px rgba(0,0,0,0.4); background: #fff; margin: 20px; width: 300px;}";
html += "@media (max-width: 494px) { #page { width: inherit; margin: 5px auto; } #content { padding: 1px;} .box-full { margin: 8px 8px 12px 8px; padding: 10px; width: inherit;; float: none; } }";
html += "@media (min-width: 494px) and (max-width: 980px) { #page { width: 465px; margin 0 auto; } .box-full { width: 380px; } }";
html += "@media (min-width: 980px) { #page { width: 930px; margin: auto; } }";
html += ".sensor { margin: 12px 0px; font-size: 2.5rem;}";
html += ".sensor-labels { font-size: 1rem; vertical-align: middle; padding-bottom: 15px;}";
html += ".units { font-size: 1.2rem;}";
html += "hr { height: 1px; color: #eee; background-color: #eee; border: none;}";
html += "</style>";
Ajax code makes our webpage dynamic. We don’t need to refresh the page to update data on a webserver. In every second new data is upload to the webserver.
//Ajax Code Start
  html += "<script>n";
  html += "setInterval(loadDoc,1000);n";
  html += "function loadDoc() {n";
  html += "var xhttp = new XMLHttpRequest();n";
  html += "xhttp.onreadystatechange = function() {n";
  html += "if (this.readyState == 4 && this.status == 200) {n";
  html += "document.body.innerHTML =this.responseText}n";
  html += "};n";
  html += "xhttp.open("GET", "/", true);n";
  html += "xhttp.send();n";
  html += "}n";
  html += "</script>n";
  //Ajax Code END
Next, heading of the web page is set with some styles that suits our application.
html += "</head>";
html += "<body>";
html += "<div id='page'>";
html += "<div class='header'>";
html += "<h1>Health Monitoring System</h1>";
html += "<h3><a href='https://iotprojectsideas.com'>https://theiotprojects.com</a></h3>";
html += "</div>";
html += "<div id='content' align='center'>";
html += "<div class='box-full' align='left'>";
html += "<h2>Sensors Readings</h2>";
html += "<div class='sensors-container'>";
Different Icon are used for defining the parameters and style the Web Page to Look More Professional.
//For Temperature
html += "<div class='sensors'>";
html += "<p class='sensor'>";
html += "<i class='fas fa-thermometer-half' style='color:#0275d8'></i>";
html += "<span class='sensor-labels'> Room Temperature </span>";
html += (int)temperature;
html += "<sup class='units'>°C</sup>";
html += "</p>";
html += "<hr>";
html += "</div>";

//For Humidity
html += "<div class='sensors'>";
html += "<p class='sensor'>";
html += "<i class='fas fa-tint' style='color:#5bc0de'></i>";
html += "<span class='sensor-labels'> Room Humidity </span>";
html += (int)humidity;
html += "<sup class='units'>%</sup>";
html += "</p>";
html += "<hr>";

//For Heart Rate
html += "<p class='sensor'>";
html += "<i class='fas fa-heartbeat' style='color:#cc3300'></i>";
html += "<span class='sensor-labels'> Heart Rate </span>";
html += (int)BPM;
html += "<sup class='units'>BPM</sup>";
html += "</p>";
html += "<hr>";

//For Sp02
html += "<p class='sensor'>";
html += "<i class='fas fa-burn' style='color:#f7347a'></i>";
html += "<span class='sensor-labels'> Sp02 </span>";
html += (int)SpO2;
html += "<sup class='units'>%</sup>";
html += "</p>";
html += "<hr>";

//For Body Temperature
html += "<p class='sensor'>";
html += "<i class='fas fa-thermometer-full' style='color:#d9534f'></i>";
html += "<span class='sensor-labels'> Body Temperature </span>";
html += (int)bodytemperature;
html += "<sup class='units'>°C</sup>";
html += "</p>";
html += "</div>";
html += "</div>";
html += "</div>";
html += "</div>";
html += "</div>";
html += "</body>";
html += "</html>";
return html;
}
The Program/Source Code for ESP32 based Patient Health Monitoring Web Server is provided below. To run this program code in your Arduino IDE, you need to install all the required libraries to your Arduino IDE.
ESP32 based Patient Health Monitoring System Program Code
Before Uploading the Code, don’t forget to change the Wi-Fi Network SSID & Password.
// IoT Based Patient Health Monitoring on ESP32 Web Server
#include <WiFi.h>
#include <WebServer.h>
#include <Wire.h>
#include "MAX30100_PulseOximeter.h"
#include <OneWire.h>
#include <DallasTemperature.h>
#include "DHT.h"

#define DHTTYPE DHT22
#define DHTPIN 18
#define DS18B20 5
#define REPORTING_PERIOD_MS     1000

float temperature, humidity, BPM, SpO2, bodytemperature;

/*Put your SSID & Password*/
const char* ssid = "Alsan Air WiFi 1";  // Enter SSID here
const char* password = "";  //Enter Password here

DHT dht(DHTPIN, DHTTYPE);;
PulseOximeter pox;
uint32_t tsLastReport = 0;
OneWire oneWire(DS18B20);
DallasTemperature sensors(&oneWire);


WebServer server(80);

void onBeatDetected()
{
  Serial.println("Beat!");
}

void setup() {
  Serial.begin(115200);
  pinMode(19, OUTPUT);
  delay(100);
  Serial.println(F("DHTxx test!"));
  dht.begin();
  Serial.println("Connecting to ");
  Serial.println(ssid);

  //connect to your local wi-fi network
  WiFi.begin(ssid, password);

  //check wi-fi is connected to wi-fi network
  while (WiFi.status() != WL_CONNECTED) {
  delay(1000);
  Serial.print(".");
  }
  Serial.println("");
  Serial.println("WiFi connected..!");
  Serial.print("Got IP: ");  Serial.println(WiFi.localIP());

  server.on("/", handle_OnConnect);
  server.onNotFound(handle_NotFound);

  server.begin();
  Serial.println("HTTP server started");

  Serial.print("Initializing pulse oximeter..");

  if (!pox.begin()) {
    Serial.println("FAILED");
    for (;;);
  } else {
    Serial.println("SUCCESS");
    pox.setOnBeatDetectedCallback(onBeatDetected);
  }

   pox.setIRLedCurrent(MAX30100_LED_CURR_7_6MA);

  // Register a callback for the beat detection

}
void loop() {
  server.handleClient();
  pox.update();
  sensors.requestTemperatures();
  float t = dht.readTemperature();
  String Temperature_Value = String(t);
  float h = dht.readHumidity();
  String Humidity_Value = String(h);
  temperature = t;
  humidity = h;
  BPM = pox.getHeartRate();
  SpO2 = pox.getSpO2();
  bodytemperature = sensors.getTempCByIndex(0);


  if (millis() - tsLastReport > REPORTING_PERIOD_MS)
  {
    Serial.print("Room Temperature: ");
    Serial.print(t);
    Serial.println("°C");

    Serial.print("Room Humidity: ");
    Serial.print(h);
    Serial.println("%");

    Serial.print("BPM: ");
    Serial.println(BPM);

    Serial.print("SpO2: ");
    Serial.print(SpO2);
    Serial.println("%");

    Serial.print("Body Temperature: ");
    Serial.print(bodytemperature);
    Serial.println("°C");

    Serial.println("*********************************");
    Serial.println();

    tsLastReport = millis();
  }

}

void handle_OnConnect() {

  server.send(200, "text/html", SendHTML(temperature, humidity, BPM, SpO2, bodytemperature));
}

void handle_NotFound(){
  server.send(404, "text/plain", "Not found");
}

  String SendHTML(float temperature, float humidity, float BPM, float SpO2, float bodytemperature) {
  String html = "<!DOCTYPE html>";
html += "<html>";
html += "<head>";
html += "<title>Patient Health Monitoring</title>";
html += "<meta name='viewport' content='width=device-width, initial-scale=1.0'>";
html += "<link rel='stylesheet' href='https://cdnjs.cloudflare.com/ajax/libs/font-awesome/5.7.2/css/all.min.css'>";
html += "<link rel='stylesheet' type='text/css' href='styles.css'>";
html += "<style>";
html += "body { background-color: #fff; font-family: sans-serif; color: #333333; font: 14px Helvetica, sans-serif box-sizing: border-box;}";
html += "#page { margin: 20px; background-color: #fff;}";
html += ".container { height: inherit; padding-bottom: 20px;}";
html += ".header { padding: 20px;}";
html += ".header h1 { padding-bottom: 0.3em; color: #008080; font-size: 45px; font-weight: bold; font-family: Garmond, 'sans-serif'; text-align: center;}";
html += "h2 { padding-bottom: 0.2em; border-bottom: 1px solid #eee; margin: 2px; text-align: left;}";
html += ".header h3 { font-weight: bold; font-family: Arial, 'sans-serif'; font-size: 17px; color: #b6b6b6; text-align: center;}";
html += ".box-full { padding: 20px; border 1px solid #ddd; border-radius: 1em 1em 1em 1em; box-shadow: 1px 7px 7px 1px rgba(0,0,0,0.4); background: #fff; margin: 20px; width: 300px;}";
html += "@media (max-width: 494px) { #page { width: inherit; margin: 5px auto; } #content { padding: 1px;} .box-full { margin: 8px 8px 12px 8px; padding: 10px; width: inherit;; float: none; } }";
html += "@media (min-width: 494px) and (max-width: 980px) { #page { width: 465px; margin 0 auto; } .box-full { width: 380px; } }";
html += "@media (min-width: 980px) { #page { width: 930px; margin: auto; } }";
html += ".sensor { margin: 12px 0px; font-size: 2.5rem;}";
html += ".sensor-labels { font-size: 1rem; vertical-align: middle; padding-bottom: 15px;}";
html += ".units { font-size: 1.2rem;}";
html += "hr { height: 1px; color: #eee; background-color: #eee; border: none;}";
html += "</style>";

//Ajax Code Start
  html += "<script>n";
  html += "setInterval(loadDoc,1000);n";
  html += "function loadDoc() {n";
  html += "var xhttp = new XMLHttpRequest();n";
  html += "xhttp.onreadystatechange = function() {n";
  html += "if (this.readyState == 4 && this.status == 200) {n";
  html += "document.body.innerHTML =this.responseText}n";
  html += "};n";
  html += "xhttp.open("GET", "/", true);n";
  html += "xhttp.send();n";
  html += "}n";
  html += "</script>n";
  //Ajax Code END

html += "</head>";
html += "<body>";
html += "<div id='page'>";
html += "<div class='header'>";
html += "<h1>Health Monitoring System</h1>";
html += "<h3><a href='https://iotprojectsideas.com'>https://theiotprojects.com</a></h3>";
html += "</div>";
html += "<div id='content' align='center'>";
html += "<div class='box-full' align='left'>";
html += "<h2>Sensors Readings</h2>";
html += "<div class='sensors-container'>";

//For Temperature
html += "<div class='sensors'>";
html += "<p class='sensor'>";
html += "<i class='fas fa-thermometer-half' style='color:#0275d8'></i>";
html += "<span class='sensor-labels'> Room Temperature </span>";
html += (int)temperature;
html += "<sup class='units'>°C</sup>";
html += "</p>";
html += "<hr>";
html += "</div>";

//For Humidity
html += "<div class='sensors'>";
html += "<p class='sensor'>";
html += "<i class='fas fa-tint' style='color:#5bc0de'></i>";
html += "<span class='sensor-labels'> Room Humidity </span>";
html += (int)humidity;
html += "<sup class='units'>%</sup>";
html += "</p>";
html += "<hr>";

//For Heart Rate
html += "<p class='sensor'>";
html += "<i class='fas fa-heartbeat' style='color:#cc3300'></i>";
html += "<span class='sensor-labels'> Heart Rate </span>";
html += (int)BPM;
html += "<sup class='units'>BPM</sup>";
html += "</p>";
html += "<hr>";

//For Sp02
html += "<p class='sensor'>";
html += "<i class='fas fa-burn' style='color:#f7347a'></i>";
html += "<span class='sensor-labels'> Sp02 </span>";
html += (int)SpO2;
html += "<sup class='units'>%</sup>";
html += "</p>";
html += "<hr>";

//For Body Temperature
html += "<p class='sensor'>";
html += "<i class='fas fa-thermometer-full' style='color:#d9534f'></i>";
html += "<span class='sensor-labels'> Body Temperature </span>";
html += (int)bodytemperature;
html += "<sup class='units'>°C</sup>";
html += "</p>";
html += "</div>";
html += "</div>";
html += "</div>";
html += "</div>";
html += "</div>";
html += "</body>";
html += "</html>";
return html;
}
Our Pervious projects:
- IoT Based Pulse Oximeter Using ESP8266 & Blynk
- MAX30100 Pulse Oximeter Webserver using NodeMCU ESP8266
- Pulse Oximeter using Arduino & MAX30100
- Send DS18B20 Temperature data over BLE using NRF24L01 & Arduino
Project Demonstration
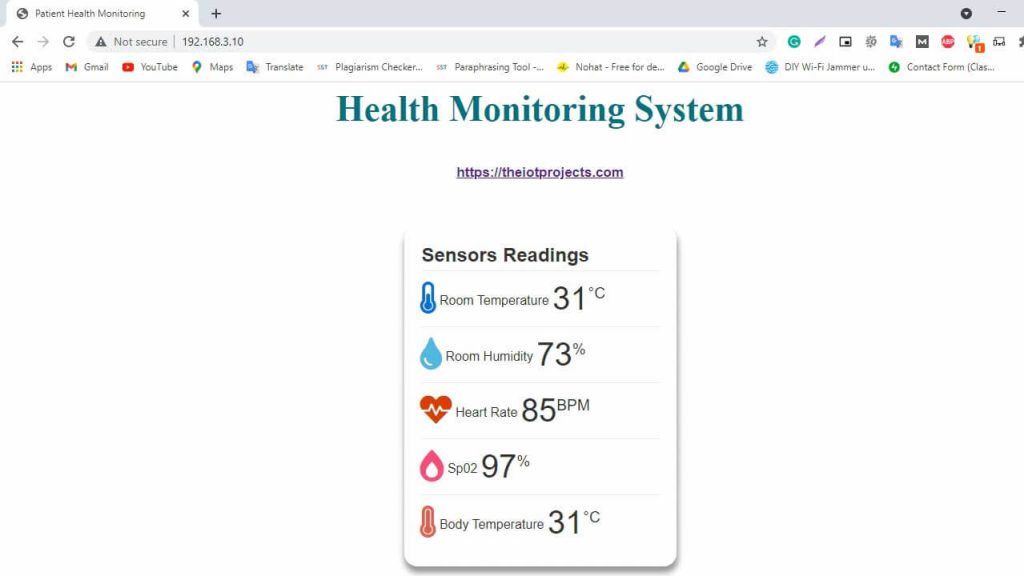
Once the code is uploaded to your ESP32 development board, you can open the serial monitor to see the program into action. The ESP32 will connect to your Wi-Fi Network. Once connected, it will display the ESP32 IP Address.
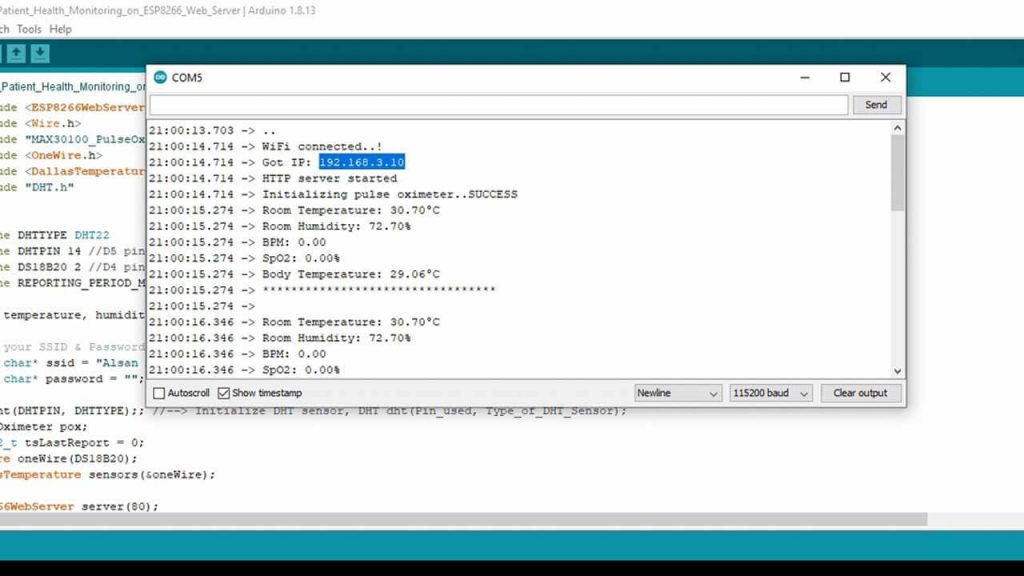
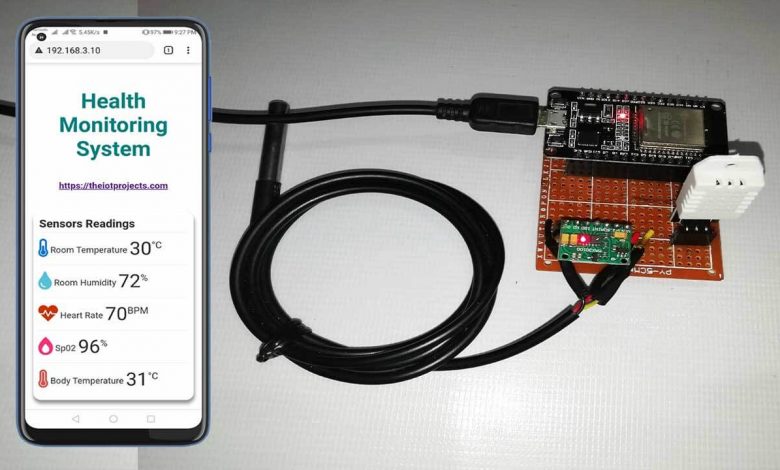
Now, copy the ESP32 IP Address and paste it on your Web Browser. It will display the room temperature, room humidity, Heart Rate, Blood Oxygen Level, and body temperature, etc., as shown in the images below.
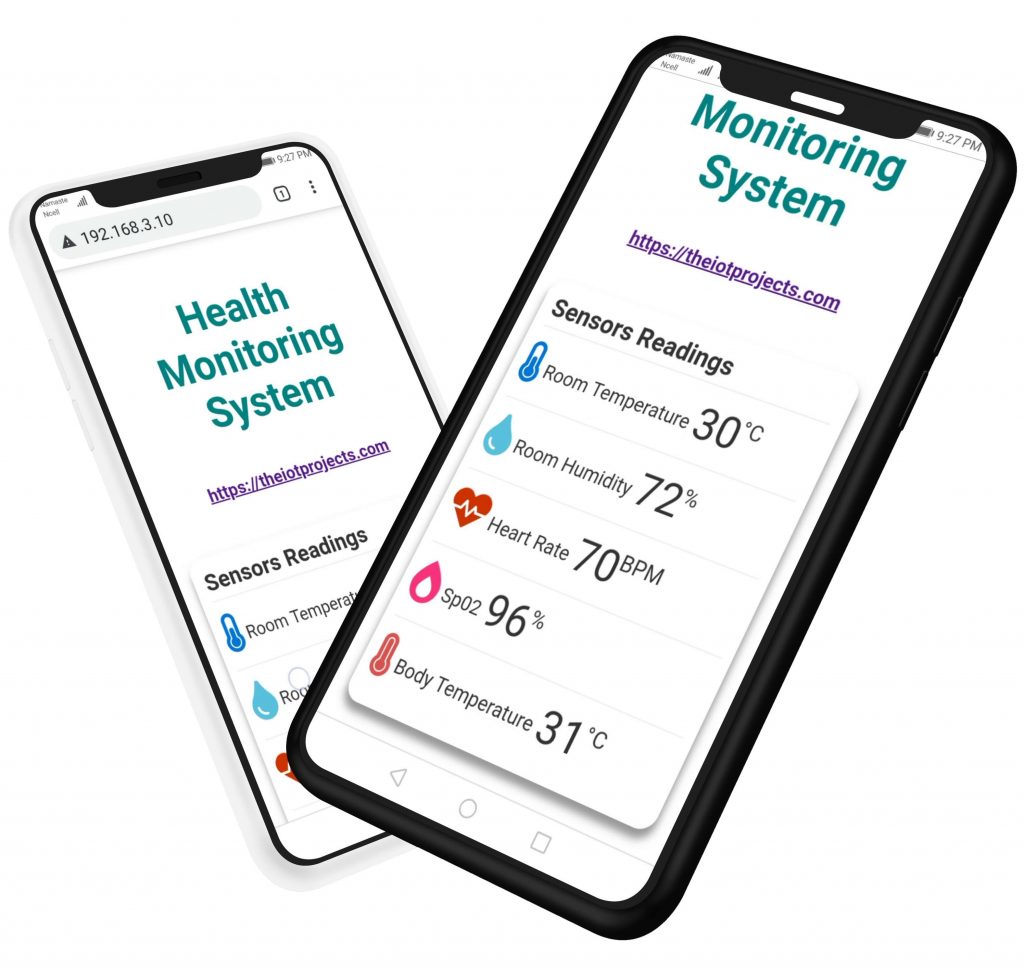
Similarly, you can monitor your patient’s health from any device that features browsing capability. The below image is the view of the Patient Health Status on Android SmartPhone. You simply need to copy the IP Address and paste it on the browser of any device.
Video Tutorial & Guide
Conclusion
This tutorial shows you how to make a local webserver Based Patient Health Monitoring System Using ESP32 board. I hope this tutorial was interesting to you. If you need any type of help related to this project, then let me know in the comment section below.

Hello sir even after uploading the code the pulse oximeter is not working can you help me i have tried a lot of times but still not working. I need your help urgently. Thanks
is the error resolved? if yes pls can u help me for solving the same error which i m facing, u can whatsapp me on 7757801028
Hello sir need help in the project the pulse oximeter is not giving any values even after i have reuploaded the codes many times when i open the serial monitor also i am not getting anything pls help me urgently. Thank you.
I am also facing the same problem if you have find any solution of this then kindly let me know
Do you get answer for this?
IM facinng this error in my arduino ide
Traceback (most recent call last):
File “esptool.py”, line 3682, in
File “esptool.py”, line 3675, in _main
File “esptool.py”, line 3329, in main
File “esptool.py”, line 263, in __init__
File “site-packages\serial\__init__.py”, line 88, in serial_for_url
File “site-packages\serial\serialwin32.py”, line 62, in open
serial.serialutil.SerialException: could not open port ‘COM7’: WindowsError(121, ‘The semaphore timeout period has expired.’)
Failed to execute script esptool
Failed uploading: uploading error: exit status 0xffffffff