- Overview: MAX30100 ESP8266 Web Server
- Components Required
Overview: MAX30100 ESP8266 Web Server
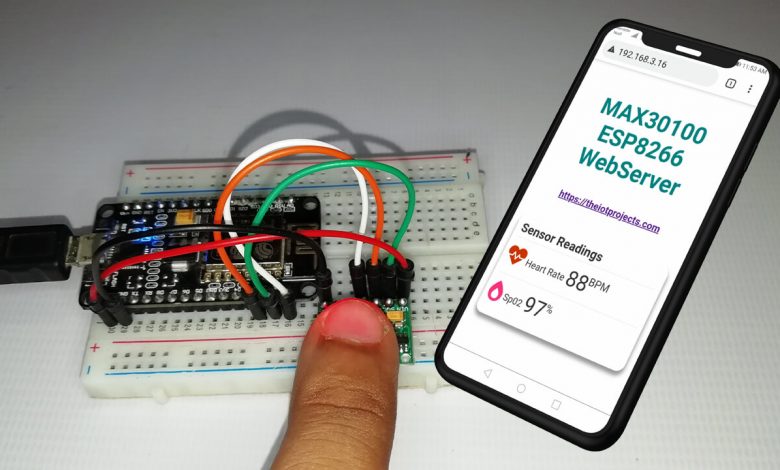
In this project, you will learn to make MAX30100 Pulse Oximeter Webserver using NodeMCU ESP8266. In our previous project, we have made an IoT based Pulse oximeter in which Pulse rate and Sp02 level are shown in OLED Display and Blynk Application. But in today’s project, we will monitor Heart Rate and oxygen saturation (Sp02) values on the ESP8266 NodeMCU Web Server. You can monitor those values from any device which has wifi support and browsing capabilities.
In today’s project, you will learn:
- What is the MAX30100 sensor and how it works?
- How to interface the MAX30100 Pulse Oximeter sensor with ESP8266?
- Program ESP8266 board using Arduino IDE.
- Create a beautiful local webserver to display BPM and Sp02 parameters.
Components Required
To make an ESP8266 based MAX30100 Pulse oximeter, you will need the NodeMCU ESP8266 Development board. A MAX30100 Pulse oximeter sensor, few jumper cables, and a breadboard. You can buy all these components from the Amazon link provided below.
| S.N | Components Name | Description | Quantity | |
|---|---|---|---|---|
| 1 | NodeMCU | ESP8266 12E Board | 1 | https://amzn.to/3mTuL95 |
| 2 | MAX30100 Oximeter Sensor | MAX30100 Heart Rate Oximeter Sensor Arduino Module | 1 | https://amzn.to/3hdjkt2 |
| 3 | Jumper Wires | Jumper Cables breadboard friendly | 5 | https://amzn.to/3vw9ZAt |
| 4 | Breadboard | Mini Breadboard | 1 | https://amzn.to/2NP2UKL |
Working of MAX30100 Pulse Oximeter Sensor
The sensor has two LEDs, one emitting red light, the other emitting infrared light. Infrared light is required for pulse rate. But, Both red light and infrared light are required for measuring Sp02 levels in the blood.
When the heart pumps the blood, the oxygen level is increased because there is more blood. But, when the heart rests, there is a decrease in oxygenated blood. Hence, the pulse rate is determined by getting the time between the rise and fall of oxygenated blood.
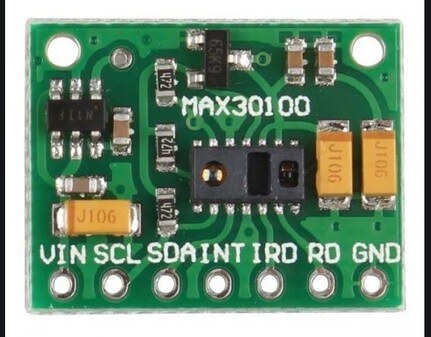
The oxygenated blood absorbs more infrared light and passes more red light. But, deoxygenated blood absorbs red light and passes more infrared light. Basically, the MAX30100 sensor reads the absorption levels for both light sources and stores them in a buffer that can be read via I2C pins.
Interfacing MAX30100 with ESP8266 NodeMCU
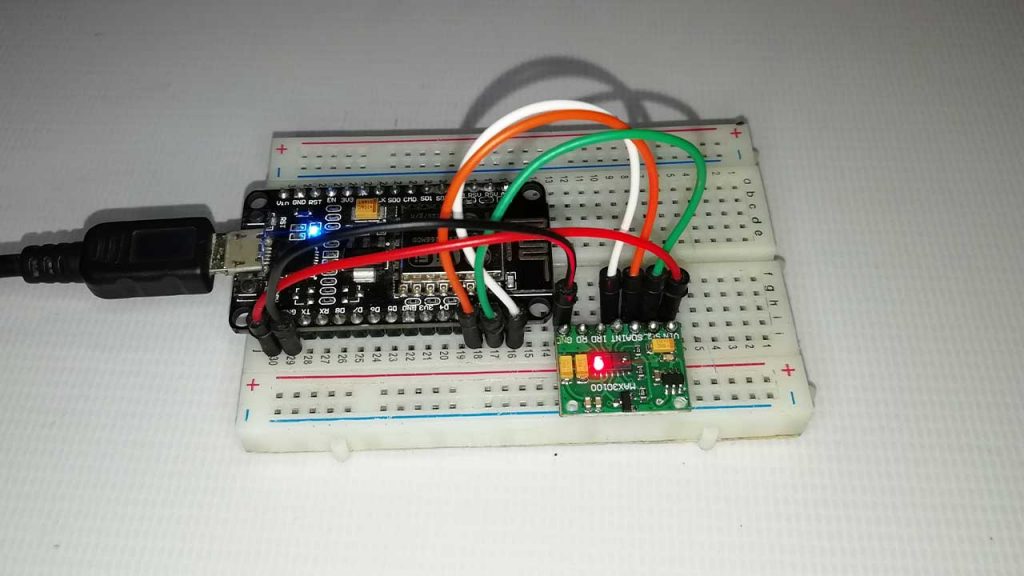
The Circuit assembly for MAX30100 Pulse Oximeter Webserver using NodeMCU is very simple. The MAX30100 Oximeter Sensor works with the I2C bus. So, Interface the I2C pins (SCL &SDA) oximeter modules with D1 and D2 pins of NodeMCU. Connect the INT pin to the NodeMCU D0 pin. Similarly, provide 3.3V power to the VCC and Ground the GND pin. Basically, you can follow the circuit diagram to make your connections.

PCB Designing for MAX30100 Pulse Oximeter
The PCB for MAX30100 ESP8266 Web Server has been designed in the previous post. the same PCB will work for this project. Here, you can see how the PCB looks like.
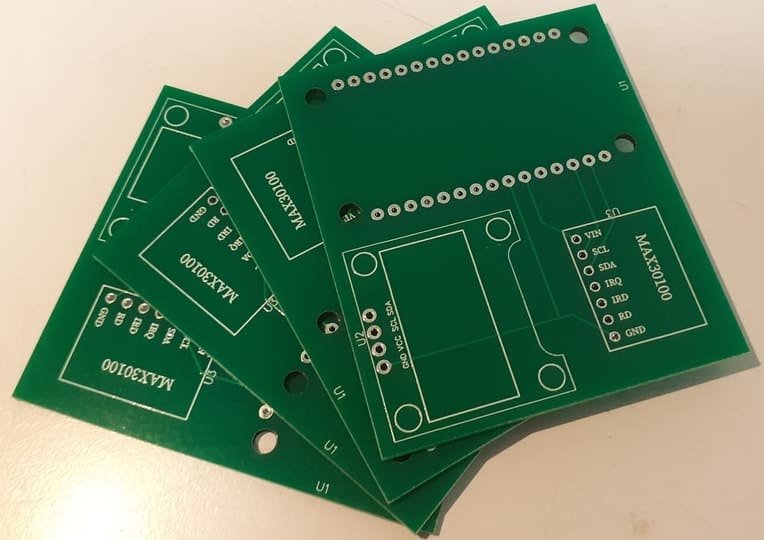
The Gerber file for the PCB is given below. You can download the Gerber file and order the PCB online from PCBWay.
PCB Ordering & Assembly
Now you can visit https://www.PCBWay.com/ and order the PCB. It is one of the biggest PCB manufacturer companies in China. They offer very good quality PCB at a reasonable price.

PCBWay offers Only $5 for 10 PCBs and a total of $30 dollars for 20 PCBs Assembly. Apart from this PCBWay offers a wide variety of services including Aluminum PCB, Rigid-Flex, Metal Core, Flexible, High Frequency, High-TG, Thick-Copper, HDI, and LED PCBs. The sign-up process takes about a minute and gets $5 as a signup bonus. So, what are you waiting for? get your first prototype order for free.
Preparing Arduino IDE For NodeMCU ESP8266
Actually, We’ll program the ESP8266 board using the Arduino IDE. So, make sure you have the ESP8266 add-on installed.
Installing MAX30100_PulseOximeter & ESP8266 Webserver Libraries
To install the library, First, download them and install them from the library manager. ELse, navigate to the Sketch > Include Library > Manage Libraries… Wait some time for Arduino IDE to update the list of installed libraries.
Now in the search field search for “MAX30100” and install the library as shown in the image below.
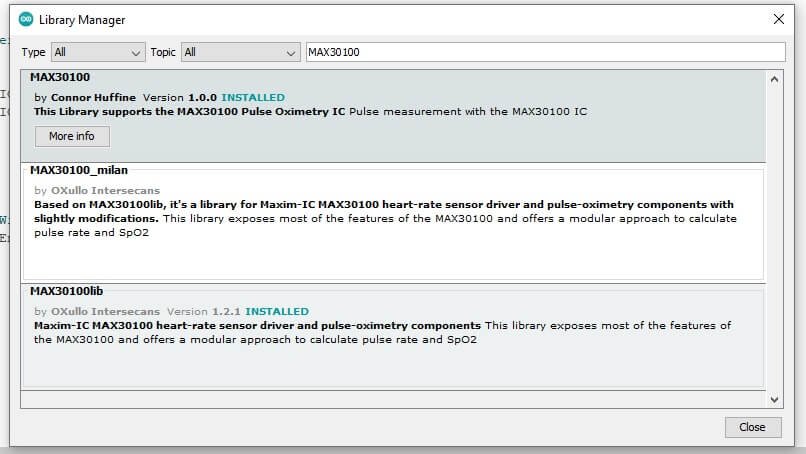
Similarly, search for “ESP8266WebServer” and install that library as well.
Source Code/Program
This is the final source code for the ESP8266 NodeMCU based MAX30100 web server project. You just need to replace the WiFi network credentials and upload it by selecting the correct board and its COM port.
/*Put your SSID & Password*/
const char* ssid = "xxxxxxx";  // Enter SSID here
const char* password = "xxxxxxx";  //Enter Password here
//MAX30100 ESP8266 WebServer
#include <ESP8266WebServer.h>
#include <Wire.h>
#include "MAX30100_PulseOximeter.h"


#define REPORTING_PERIOD_MS     1000

float BPM, SpO2;

/*Put your SSID & Password*/
const char* ssid = "xxxxxxx";  // Enter SSID here
const char* password = "xxxxxxx";  //Enter Password here

PulseOximeter pox;
uint32_t tsLastReport = 0;

ESP8266WebServer server(80);

void setup() {
  Serial.begin(115200);
  pinMode(16, OUTPUT);
  delay(100);

  Serial.println("Connecting to ");
  Serial.println(ssid);

  //connect to your local wi-fi network
  WiFi.begin(ssid, password);

  //check wi-fi is connected to wi-fi network
  while (WiFi.status() != WL_CONNECTED) {
    delay(1000);
    Serial.print(".");
  }
  Serial.println("");
  Serial.println("WiFi connected..!");
  Serial.print("Got IP: ");  Serial.println(WiFi.localIP());

  server.on("/", handle_OnConnect);
  server.onNotFound(handle_NotFound);

  server.begin();
  Serial.println("HTTP server started");

  Serial.print("Initializing pulse oximeter..");

  if (!pox.begin()) {
    Serial.println("FAILED");
    for (;;);
  } else {
    Serial.println("SUCCESS");

  }
}
void loop() {
  server.handleClient();
  pox.update();
  if (millis() - tsLastReport > REPORTING_PERIOD_MS) {

    BPM = pox.getHeartRate();
    SpO2 = pox.getSpO2();

    Serial.print("BPM: ");
    Serial.println(BPM);

    Serial.print("SpO2: ");
    Serial.print(SpO2);
    Serial.println("%");

    Serial.println("*********************************");
    Serial.println();
    tsLastReport = millis();
  }


}

void handle_OnConnect() {

  server.send(200, "text/html", SendHTML(BPM, SpO2));
}

void handle_NotFound() {
  server.send(404, "text/plain", "Not found");
}

String SendHTML(float BPM, float SpO2) {
  String ptr = "<!DOCTYPE html>";
  ptr += "<html>";
  ptr += "<head>";
  ptr += "<title>ESP8266 WebServer</title>";
  ptr += "<meta name='viewport' content='width=device-width, initial-scale=1.0'>";
  ptr += "<link rel='stylesheet' href='https://cdnjs.cloudflare.com/ajax/libs/font-awesome/5.7.2/css/all.min.css'>";
  ptr += "<link rel='stylesheet' type='text/css' href='styles.css'>";
  ptr += "<style>";
  ptr += "body { background-color: #fff; font-family: sans-serif; color: #333333; font: 14px Helvetica, sans-serif box-sizing: border-box;}";
  ptr += "#page { margin: 20px; background-color: #fff;}";
  ptr += ".container { height: inherit; padding-bottom: 20px;}";
  ptr += ".header { padding: 20px;}";
  ptr += ".header h1 { padding-bottom: 0.3em; color: #008080; font-size: 45px; font-weight: bold; font-family: Garmond, 'sans-serif'; text-align: center;}";
  ptr += "h2 { padding-bottom: 0.2em; border-bottom: 1px solid #eee; margin: 2px; text-align: left;}";
  ptr += ".header h3 { font-weight: bold; font-family: Arial, 'sans-serif'; font-size: 17px; color: #b6b6b6; text-align: center;}";
  ptr += ".box-full { padding: 20px; border 1px solid #ddd; border-radius: 1em 1em 1em 1em; box-shadow: 1px 7px 7px 1px rgba(0,0,0,0.4); background: #fff; margin: 20px; width: 300px;}";
  ptr += "@media (max-width: 494px) { #page { width: inherit; margin: 5px auto; } #content { padding: 1px;} .box-full { margin: 8px 8px 12px 8px; padding: 10px; width: inherit;; float: none; } }";
  ptr += "@media (min-width: 494px) and (max-width: 980px) { #page { width: 465px; margin 0 auto; } .box-full { width: 380px; } }";
  ptr += "@media (min-width: 980px) { #page { width: 930px; margin: auto; } }";
  ptr += ".sensor { margin: 12px 0px; font-size: 2.5rem;}";
  ptr += ".sensor-labels { font-size: 1rem; vertical-align: middle; padding-bottom: 15px;}";
  ptr += ".units { font-size: 1.2rem;}";
  ptr += "hr { height: 1px; color: #eee; background-color: #eee; border: none;}";
  ptr += "</style>";

  //Ajax Code Start
  ptr += "<script>n";
  ptr += "setInterval(loadDoc,1000);n";
  ptr += "function loadDoc() {n";
  ptr += "var xhttp = new XMLHttpRequest();n";
  ptr += "xhttp.onreadystatechange = function() {n";
  ptr += "if (this.readyState == 4 && this.status == 200) {n";
  ptr += "document.body.innerHTML =this.responseText}n";
  ptr += "};n";
  ptr += "xhttp.open("GET", "/", true);n";
  ptr += "xhttp.send();n";
  ptr += "}n";
  ptr += "</script>n";
  //Ajax Code END

  ptr += "</head>";
  ptr += "<body>";
  ptr += "<div id='page'>";
  ptr += "<div class='header'>";
  ptr += "<h1>MAX30100 ESP8266 WebServer</h1>";
  ptr += "<h3><a href='https://iotprojectsideas.com'>https://theiotprojects.com</a></h3>";
  ptr += "</div>";
  ptr += "<div id='content' align='center'>";
  ptr += "<div class='box-full' align='left'>";
  ptr += "<h2>Sensor Readings</h2>";
  ptr += "<div class='sensors-container'>";

  //For Heart Rate
  ptr += "<p class='sensor'>";
  ptr += "<i class='fas fa-heartbeat' style='color:#cc3300'></i>";
  ptr += "<span class='sensor-labels'> Heart Rate </span>";
  ptr += (int)BPM;
  ptr += "<sup class='units'>BPM</sup>";
  ptr += "</p>";
  ptr += "<hr>";

  //For Sp02
  ptr += "<p class='sensor'>";
  ptr += "<i class='fas fa-burn' style='color:#f7347a'></i>";
  ptr += "<span class='sensor-labels'> Sp02 </span>";
  ptr += (int)SpO2;
  ptr += "<sup class='units'>%</sup>";
  ptr += "</p>";

  ptr += "</div>";
  ptr += "</div>";
  ptr += "</div>";
  ptr += "</div>";
  ptr += "</div>";
  ptr += "</body>";
  ptr += "</html>";
  return ptr;
}
Testing MAX30100 Pulse Oximeter Web Server
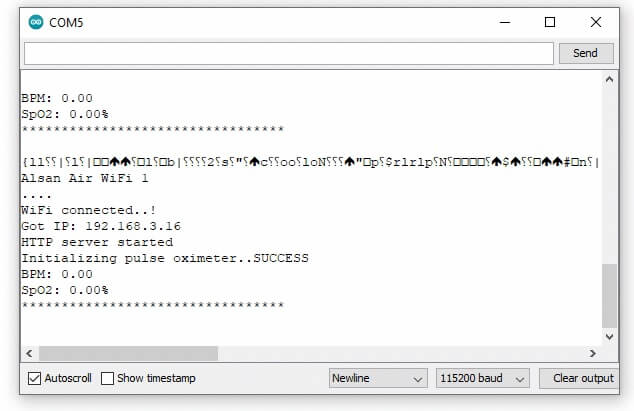
After successful upload of the ESP8266 MAX30100 WebServer program code. So now it’s time to test the project. Just open the Serial Monitor and press the RST button on the NodeMCU board. Now, NodeMCU will be connected to your Wi-Fi network and then your IP address will be printed on the serial monitor.
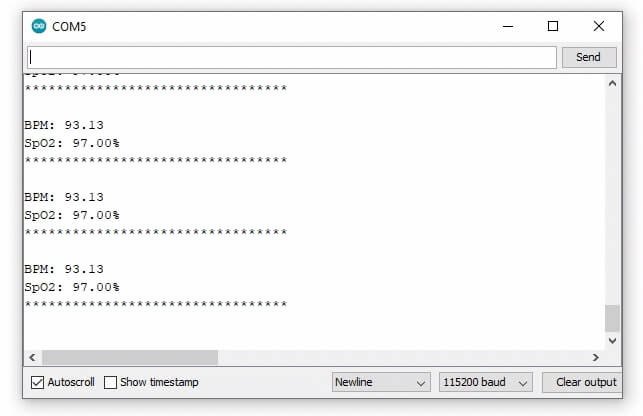
Similarly, the HTTP server will start responding. We have integrated Asynchronous Javascript And XML (AJAX) Code. So that we can request data from the server asynchronously (in the background) without refreshing the page. You just place your finger on the sensor and it will display the values of your pulse rate and the oxygen level in your body.
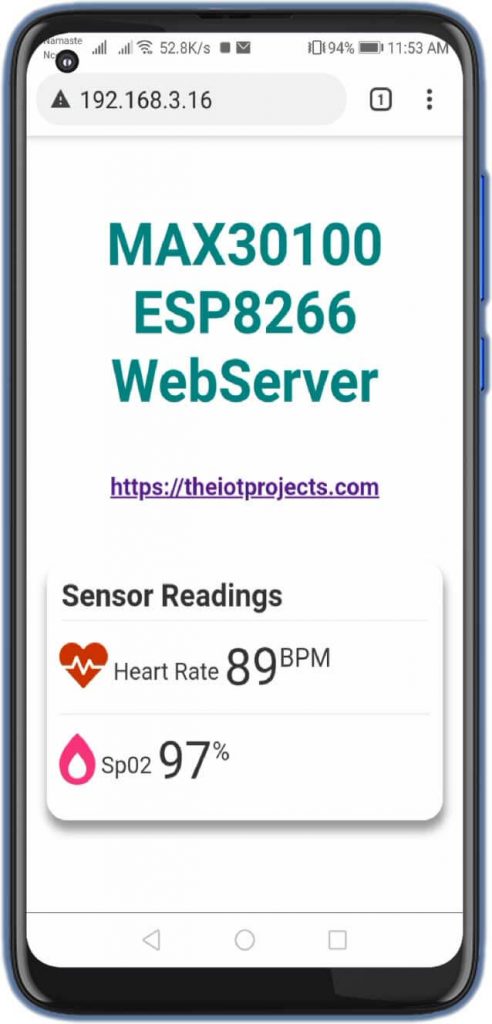
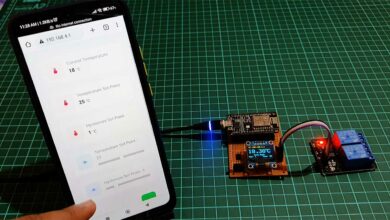
Basically, you can view these parameters on a smartphone using any of the existing web browsers. Enter the IP address shown in the serial monitor. In my case, it’s 192.168.3.16 you may have different. Now you can monitor BPM and Sp02 values from any smartphone or PC connected to the same Wi-Fi. These parameters are updated every second by performing the silent GET request on the server and update the parameters on the page with AJAX.
Video Tutorial & Guide
Wrapping Up
This is all about building MAX30100 Pulse Oximeter Webserver using NodeMCU ESP8266. I hope you like this short tutorial. It’s always free to comment, so comment your queries.


I have copy the code above, and run it on :
NODEMCU ESP2866, and MAX30100, but measurement of pulse always 0%.
how to solve it ?
Hi, I tried your code but when it comes to the Initializing part of the oximeter it says failed. How do I fix this.
After 2 hours of trial and error, it finally worked for me !
heres my email favourapps17@gmail.com
can you help me, actually it just giving no readings it’s always 0
C:\Users\Lenovo\Documents\Arduino\pulseoximterchatgpt\pulseoximterchatgpt.ino:4:10: fatal error: MAX30100_PulseOximeter.h: No such file or directory
4 | #include “MAX30100_PulseOximeter.h”
| ^~~~~~~~~~~~~~~~~~~~~~~~~~
compilation terminated.
exit status 1
Compilation error: MAX30100_PulseOximeter.h: No such file or directory the following message is being showed even if i have installed the libraries. I have installed max30100 by connor huffine and also esp8266webserver by by Avision software please help