Bitcoin $ Price Tracker Using ESP8266 & MAX7219
How to Track Bitcoin $ Price using ESP8266 WiFi Module
Overview: Bitcoin $ Price Tracker with ESP8266
In this project, we will build a Bitcoin Price Tracker Using ESP8266 & MAX7219 dot matrix LED display. In this video, we will be going through the steps to build a simple but effective Bitcoin price tracker that displays the current Bitcoin price in US dollars on a MAX7219 LED display. With this DIY Bitcoin price tracker, you can keep track of the current BTC/USD value anytime, anywhere.
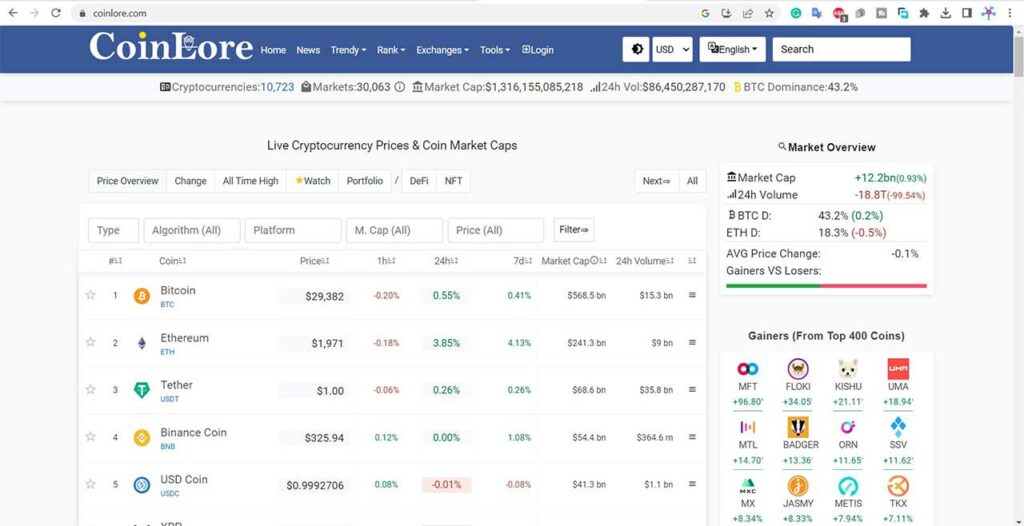
We will be using the free APIs of Coinlore. which offers over 10,000 coins and over 400 exchanges and does not require API keys or impose speed limits. Although it is recommended to make one request per second. Once the ESP8266 fetches the BTC price, it can store this information in its memory and display it on the LED matrix.
Components Required
The first step is to gather all the necessary materials. You will need: ESP8266 NodeMCU, MAX7219 Dot Matrix LED Display, Breadboard, Jumper wires, USB cable for power, Computer with Arduino IDE installed, and Access to a stable internet connection. You can easily purchase components from below:
| S.N | COMPONENTS NAME | QUANTITY | PURCHASE LINKS |
|---|---|---|---|
| 1 | NodeMCU ESP8266 Board | 1 | Amazon | AliExpress |
| 2 | MAX7219 Dot Matrix LED Display | 1 | Amazon | AliExpress |
| 3 | Breadboard | 1 | Amazon | AliExpress |
| 4 | 5V 2A Power Supply | 1 | Amazon | AliExpress |
| 5 | Jumper Cables | 5 | Amazon | AliExpress |
Wiring the MAX7219 Display with ESP8266
The MAX7219 Dot Matrix LED Display is a powerful display driver that can control up to 64 LEDs. To wire up the display to the ESP8266 NodeMCU, we will need to connect the following pins:
- VCC to 3.3V
- GND to GND
- DIN to D7
- CS to D6
- CLK to D5
Make sure that all connections are secure and in the right place.
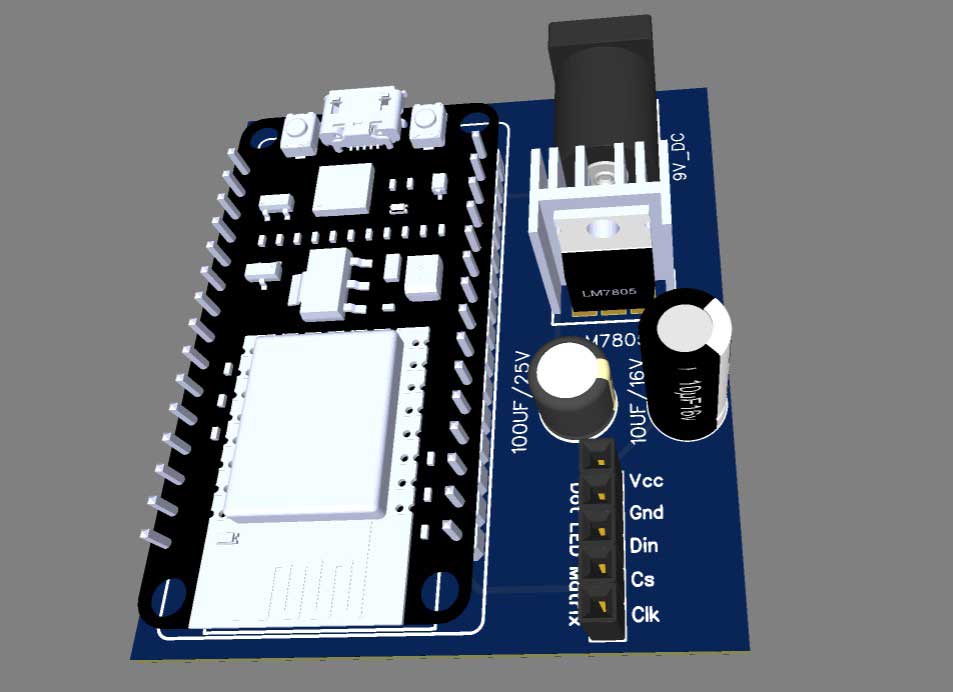
Project PCB Gerber File & PCB Ordering Online
If you don’t want to assemble the circuit on a zero PCB and you want PCB for the project, then here is the PCB for you. The PCB Board for this project looks something like below.
The Gerber File for the PCB is given below. You can simply download the Gerber File and order the PCB from PCBWay.com.
Now you can visit the PCBWay official website by clicking here: PCBWay.com. So you will be directed to the PCBWay website.
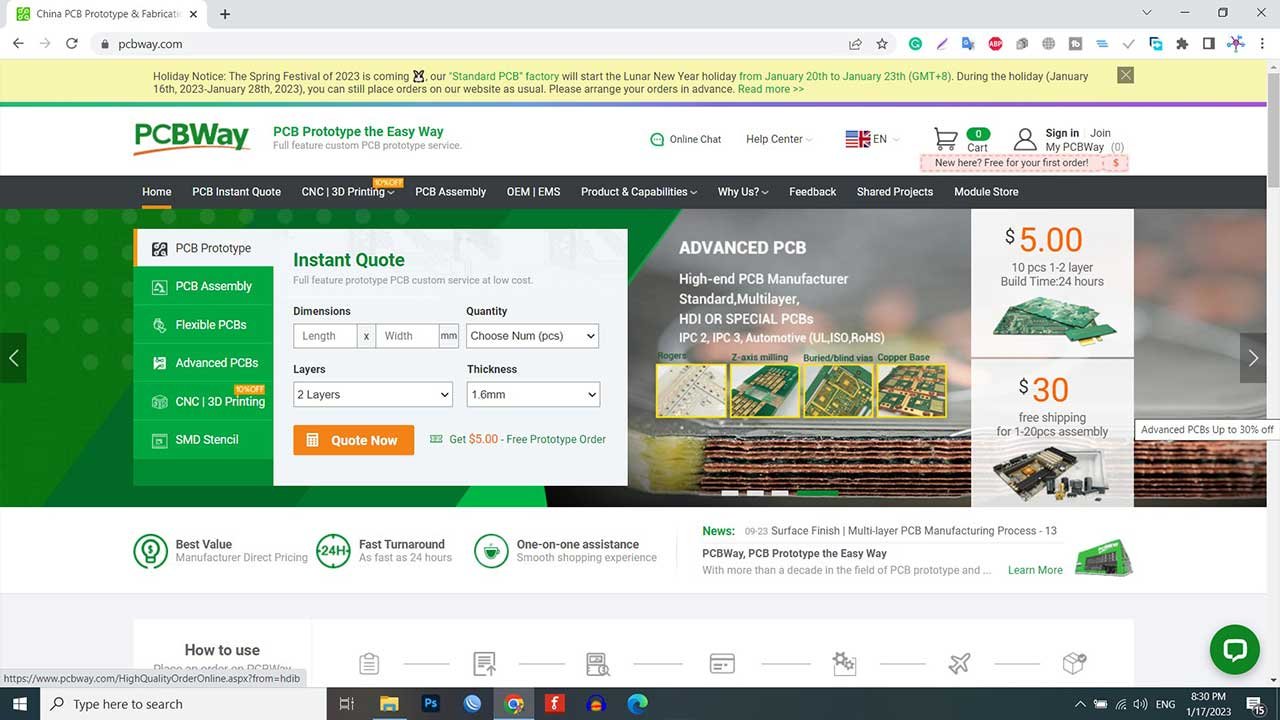
You can now upload the Gerber File to the Website and place an order. The PCB quality is superb & high standard. That is why most people trust PCBWay for PCB & PCBA Services. PCBWay is a leading manufacturer of high-quality PCBs and offers a wide range of services, including PCB fabrication, assembly, and components sourcing.
Setting up the Arduino IDE
To program the ESP8266 NodeMCU, we need to download and install the Arduino IDE. Once installed, we must configure it to work with the ESP8266 NodeMCU. To do this, we need to add the ESP8266 board manager to the Arduino IDE.
To add the ESP8266 board manager, open the Arduino IDE and go to File > Preferences. In the Preferences window, enter the following URL in the Additional Boards Manager URLs field:
http://arduino.esp8266.com/stable/package_esp8266com_index.json
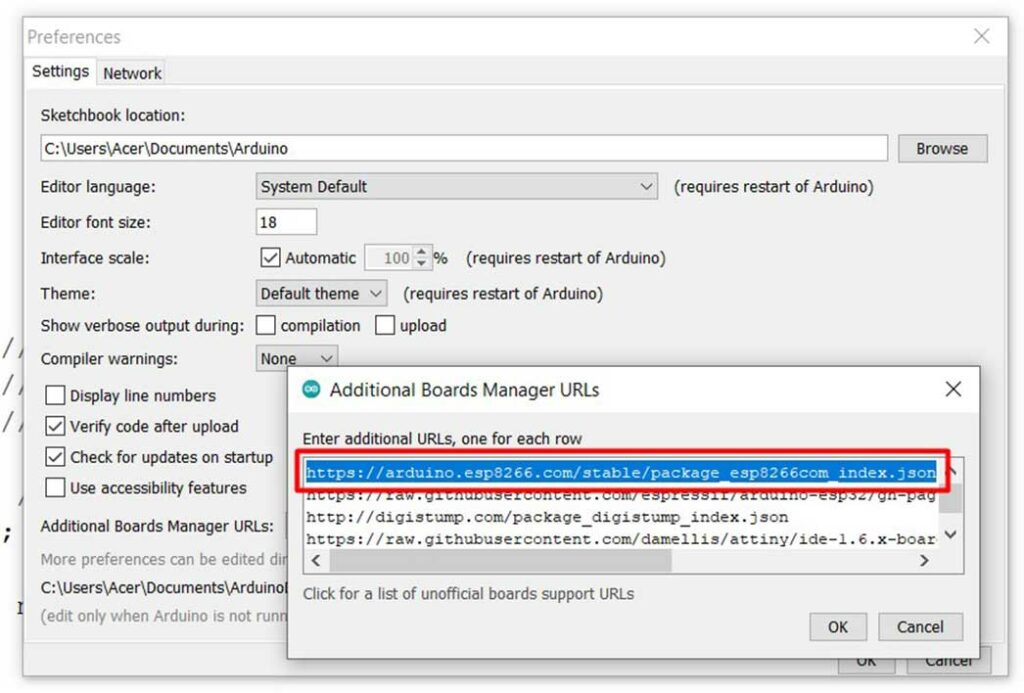
Click OK to save the changes.
Now, go to Tools > Board > Boards Manager. Search for “esp8266” and click on “Install“. Once installed, select the ESP8266 NodeMCU board from the Tools > Board menu.
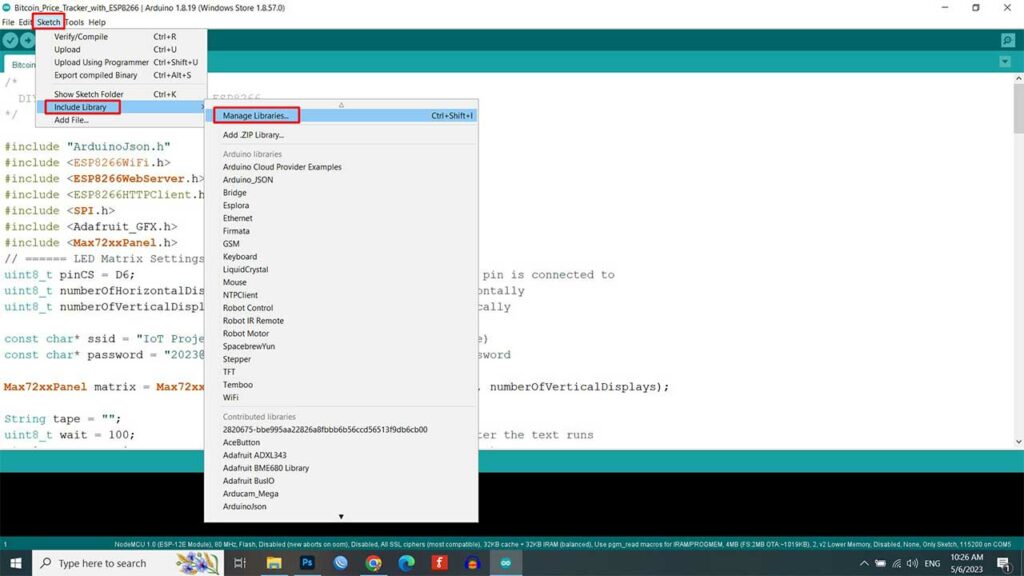
Installing the Required Libraries
We will be using three libraries in this project, “ArduinoJson“, “Adafruit_GFX” and “Max72xxPanel“. To install these libraries, go to Sketch > Include Library > Manage Libraries. Search for “ArduinoJson” and click on “Install” to install libraries. Similarly do the same for the “Adafruit_GFX” and “Max72xxPanel” libraries.
Program Source Code
We are now ready to write the code for the Bitcoin price tracker. Open a new sketch in the Arduino IDE and paste the following code from our website.
/*
DIY Bitcoin Tracker(BTC) on ESP8266
*/
#include "ArduinoJson.h"
#include <ESP8266WiFi.h>
#include <ESP8266WebServer.h>
#include <ESP8266HTTPClient.h>
#include <SPI.h>
#include <Adafruit_GFX.h>
#include <Max72xxPanel.h>
// ====== LED Matrix Settings ======
uint8_t pinCS = D6; // Specify which pin the CS pin is connected to
uint8_t numberOfHorizontalDisplays = 1; // Number of matrices horizontally
uint8_t numberOfVerticalDisplays = 4; // Number of matrices vertically
const char* ssid = "Alsan WiFi"; // your network SSID (name)
const char* password = "2055@IoTProjects"; // your network password
Max72xxPanel matrix = Max72xxPanel(pinCS, numberOfHorizontalDisplays, numberOfVerticalDisplays);
String tape = "";
uint8_t wait = 100;          // interval, the smaller number the faster the text runs
uint8_t spacer = 1;          // Gap between characters (number of dots)
uint8_t width = 5 + spacer;  // Font width is 5px
uint8_t mode = 3;            // 1 - scroll, 2 - static value, 3 - scroll + static value
bool flag_cripto = false;    // flag of successful receipt of BTC value
ESP8266WebServer HTTP(80);
void setup() {
Serial.begin(9600);
// ====== Setting up the matrix
matrix.setIntensity(0); // Set brightness from 0 to 15
matrix.setRotation(1); // Text direction 1,2,3,4
// ====== Introductory text ====
text_my("BTC-$");
// ==== Initialize WIFI ======
Serial.println();
Serial.println("Configuring access point...");
WiFi.begin(ssid, password);
Serial.println("Connecting...");
while (WiFi.status() != WL_CONNECTED)
{
delay(500);
Serial.print(".");
}
Serial.println("");
Serial.println("WiFi connected");
Serial.println("IP address: ");
Serial.println(WiFi.localIP());
// ===== get the value of BTC =====
getcrypto();
}
void loop() {
static uint32_t st_tmr2;
if (millis() - st_tmr2 > 90000) {
flag_cripto = false;
getcrypto();
st_tmr2 = millis();
}
if (flag_cripto) {
if (mode == 1 || mode == 3) {
String scrol_tape = "BTC " + (String)tape + " $";
scrol_text_my(scrol_tape);
}
if (mode == 2 || mode == 3) {
text_my(tape);
delay(10000);
}
}
}
// ======= Scroll text output ==========
void scrol_text_my(String tape_my) {
for (uint8_t i = 0; i < width * tape_my.length() + matrix.width() - spacer; i++) {
matrix.fillScreen(LOW);
uint8_t letter = i / width; // number of the symbol displayed on the matrix
int x = (matrix.width() - 1) - i % width;
int y = (matrix.height() - 8) / 2; // center text vertically
while (x + width - spacer >= 0 && letter >= 0) {
if (letter < tape_my.length()) {
matrix.drawChar(x, y, tape_my[letter], HIGH, LOW, 1);
}
letter--;
x -= width;
}
matrix.write(); // output the values to the matrix
delay(wait);
}
}
// =============== Text output ===============
void text_my(String tape_my) {
uint8_t x = (matrix.width() - (tape_my.length() * width)) / 2; //center alignment X
uint8_t y = (matrix.height() - 8) / 2; //center alignment Y
matrix.fillScreen(LOW);
for (uint8_t i = 0; i < tape_my.length(); i++) {
//uint8_t letter = i;
matrix.drawChar(x, y, tape_my[i], HIGH, LOW, 1);
x += width;
}
matrix.write(); // sending data to the display
}
void getcrypto() {
String payload = ""; // request json string
std::unique_ptr<BearSSL::WiFiClientSecure> client(new BearSSL::WiFiClientSecure);
client->setInsecure();
HTTPClient https;
String string_url;
string_url = "https://api.coinlore.net/api/ticker/?id=90";
if (https.begin(*client, string_url)) {
if (https.GET()) {
int httpCode = https.GET();
//Serial.println(httpCode);
if (httpCode > 0) {
if (httpCode == HTTP_CODE_OK) {
payload = https.getString();
payload.replace("[", "");
}
} else {
//Serial.printf("[HTTPS] GET... failed, error: %snr", https.errorToString(httpCode).c_str());
}
https.end();
} else {
flag_cripto = true;
https.end();
}
} else {
//Serial.printf("[HTTPS] Unable to connectnr");
flag_cripto = true;
}
if (!flag_cripto) {
StaticJsonDocument<700> parsed; //Memory pool
// Deserialize the JSON document
DeserializationError error = deserializeJson(parsed, payload);
// Check if parsing succeeds.
if (error) {
Serial.print(F("deserializeJson() failed: "));
Serial.println(error.f_str());
return;
} else { //Output if there are no errors
//int price_usd = parsed["price_usd"].as<int>(); //Get value
tape = (String)price_usd;
flag_cripto = true;
Serial.println(tape);
}
}
}You need to change your WiFi SSID and Password from here. The Tracker will automatically connect to your network and fetch Bitcoin price data from the internet.
Source Code/Program Explanation
I am using the free APIs of Coinlore. Coinlore provides a free API for cryptocurrencies that does not require API keys and is publicly available. The service is an independent data aggregator with over 10,000 coins and over 400 exchanges. The plus point of using Coinlore is there are no speed limits, but it is recommended to make 1 request per second.
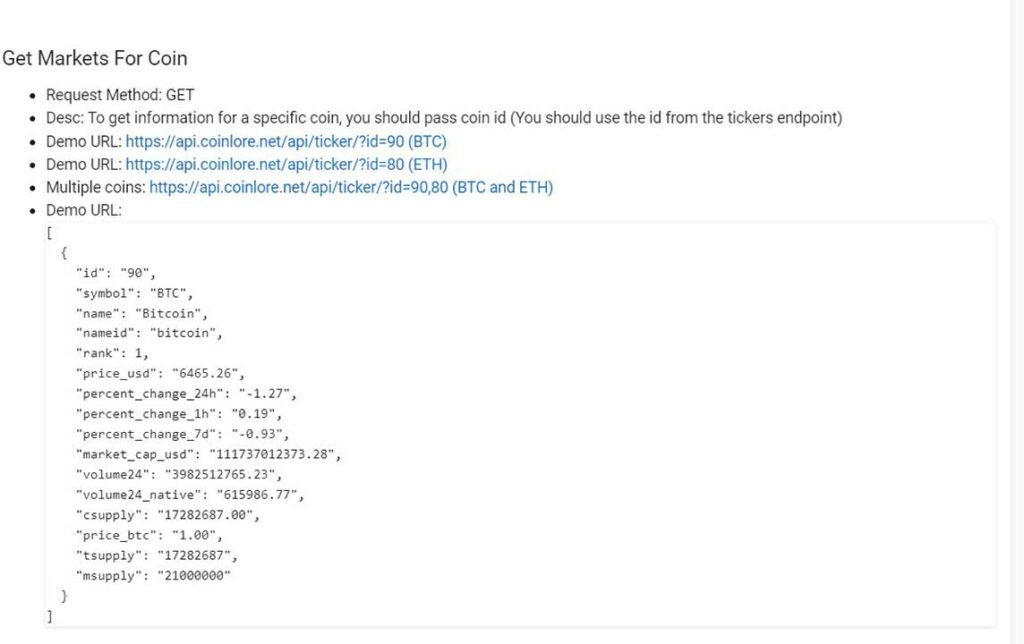
The request looks like this: https://api.coinlore.net/api/ticker/?id=90 ( for BTC ),
Where ID is the digital currency number. You can find out the list of available coins at: https://api.coinlore.net/api/tickers/
List of IDs of several digital currencies:
- 90 – Bitcoin.
- 80 – Ethereum.
- 518 – Tether.
- 2 – Dogecoin.
- 1 – Litecoin.
- 33422 – Wrapped Bitcoin.
- 118 – Ethereum Classic.
The full list can be found here: at https://api.coinlore.net/api/tickers/
You can make additional settings in the code, which will help you customize the Tracker for you.
String tape = ""; uint8_t wait = 100; // interval, the smaller number the faster the text runs uint8_t spacer = 1; // Gap between characters (number of dots) uint8_t width = 5 + spacer; // Font width is 5px uint8_t mode = 3; // 1 - scroll, 2 - static value, 3 - scroll + static value bool flag_cripto = false; // flag of successful receipt of BTC value
The variable mode = 3 is responsible for the mode of displaying the value of the cryptocurrency on the matrix:
- Constantly scrolls the text.
- Shows a static number without scrolling.
- Scrolls and then shows the static cost number.
The value wait = 100 allows you to adjust the speed of text movement in the scroll mode. The smaller the value, the faster the text will move across the matrix.
The code is well commented, if you need to make other settings, it’s not difficult to figure it out.
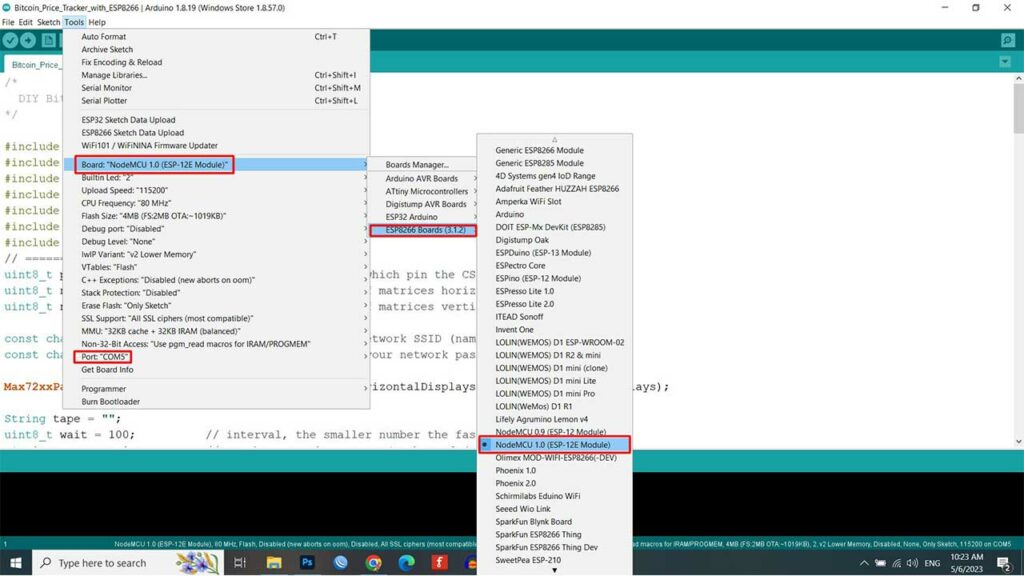
Now upload the code to your ESP8266 NodeMCU Board by selecting Correct Board and COM Port from the Tools menu.
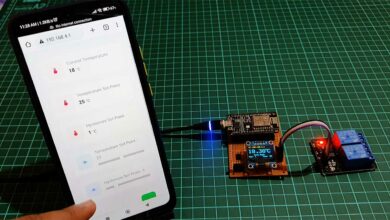
Testing the Bitcoin $ Price Tracker
Once the code is uploaded, the LED matrix display should start showing the Bitcoin price in real time.
To test the Bitcoin Price Tracker, you can open a web browser and visit any website that provides real-time Bitcoin prices. The LED matrix display should update the price accordingly.
- Smart Notice Board with ESP8266 & Dot Matrix LED Display
- Smart Activity Tracker using MPU6050 and Arduino
- Audio Spectrum Visualizer Using Arduino Matrix Display
Conclusion
That’s it! You have successfully created a Bitcoin $ Price Tracker Using ESP8266 & MAX7219 Dot Matrix LED Display. This project can be expanded further by adding features such as price alerts, historical data analysis, and more.
Thank you for exploring this tutorial. If you have any questions or comments, please feel free to leave them in the comments section below.


как быть с этой областью ?
tape = (String)price_usd;
‘price_usd’ was not declared in this scope
у меня ошибка, помоги пожалуйста
Gonna build it, just to see what happens when we cross from 99999 to 100000 USD(t) 😀
I think we can adjust the font size for the matrix somewhere, right?