Dual Axis Solar Tracker Arduino Project Using LDR & Servo Motors
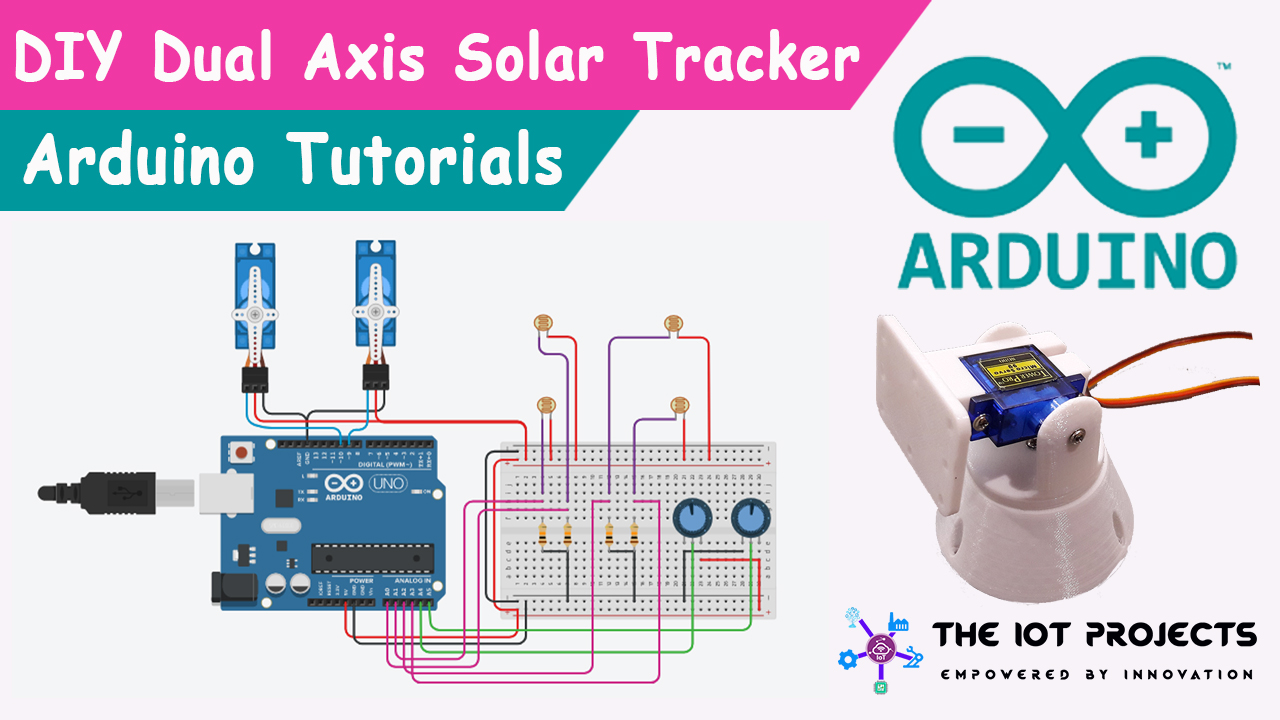
Hello and Welcome to The IoT Projects. In this article, you will learn to make a Dual Axis Solar Tracker Arduino Project Using LDR and Servo Motors in Step by Step manner. In this project, we are going to use some Light Sensitive Sensors like (LDR) to track the sunlight and direct the solar panels towards the areas that Increase their efficiency. I have divided the article into 7 segments:
- Components required for this project
- Working Principle of LDR Sensor
- Project Simulation: Dual Axis Solar Tracker Arduino Project Using LDR & Servo Motors
- Tinkercad Dual Axis Solar Tracker Arduino Simulation file
- Interfacing Dual Axis Solar Tracker Arduino Project Using LDR & Servo Motors
- Programming Arduino for Dual Axis Solar Tracker Project
- Final Program code/sketch
- Connecting all the parts together
- Video Tutorials
- Conclusion
Components required for this project
The following list is the list of all the components that are required for this project:
| S.N | Components Name | Description | Quantity | |
|---|---|---|---|---|
| 1 | Arduino UNO | ARDUINO UNO R3 | 1 | https://amzn.to/2L0iZf2 |
| 2 | Servo Motor | Micro Servo - SG90 | 2 | https://amzn.to/2NRXXAy |
| LDR | LDR ( Photoresistor) Sensor | 4 | https://amzn.to/3kiHz8r | |
| 3 | Resistors | 10k-ohm resistors | 4 | https://amzn.to/2NTPtsF |
| 4 | Breadboard | Mini Breadboard | 1 | https://amzn.to/2NP2UKL |
| 5 | 3D body parts | 3D body parts Design | 1 | https://www.thingiverse.com/thing:2467743 |
| 6 | Potentiometer | 10k Potentiometer | 2 | https://amzn.to/2MgRMWz |
Our Popular Arduino Based Projects:
Interfacing Temperature and Humidity Sensor with Arduino
DIY Mobile Phone using GSM Module & Arduino with Nextion Display
Simple Weather station using Arduino & BME280 Barometric Pressure Sensor
RFID Based Attendance System Using NodeMCU with PHP Web App
Capacitive Soil Moisture Sensor with OLED Display & Arduino
Working Principle of LDR Sensor
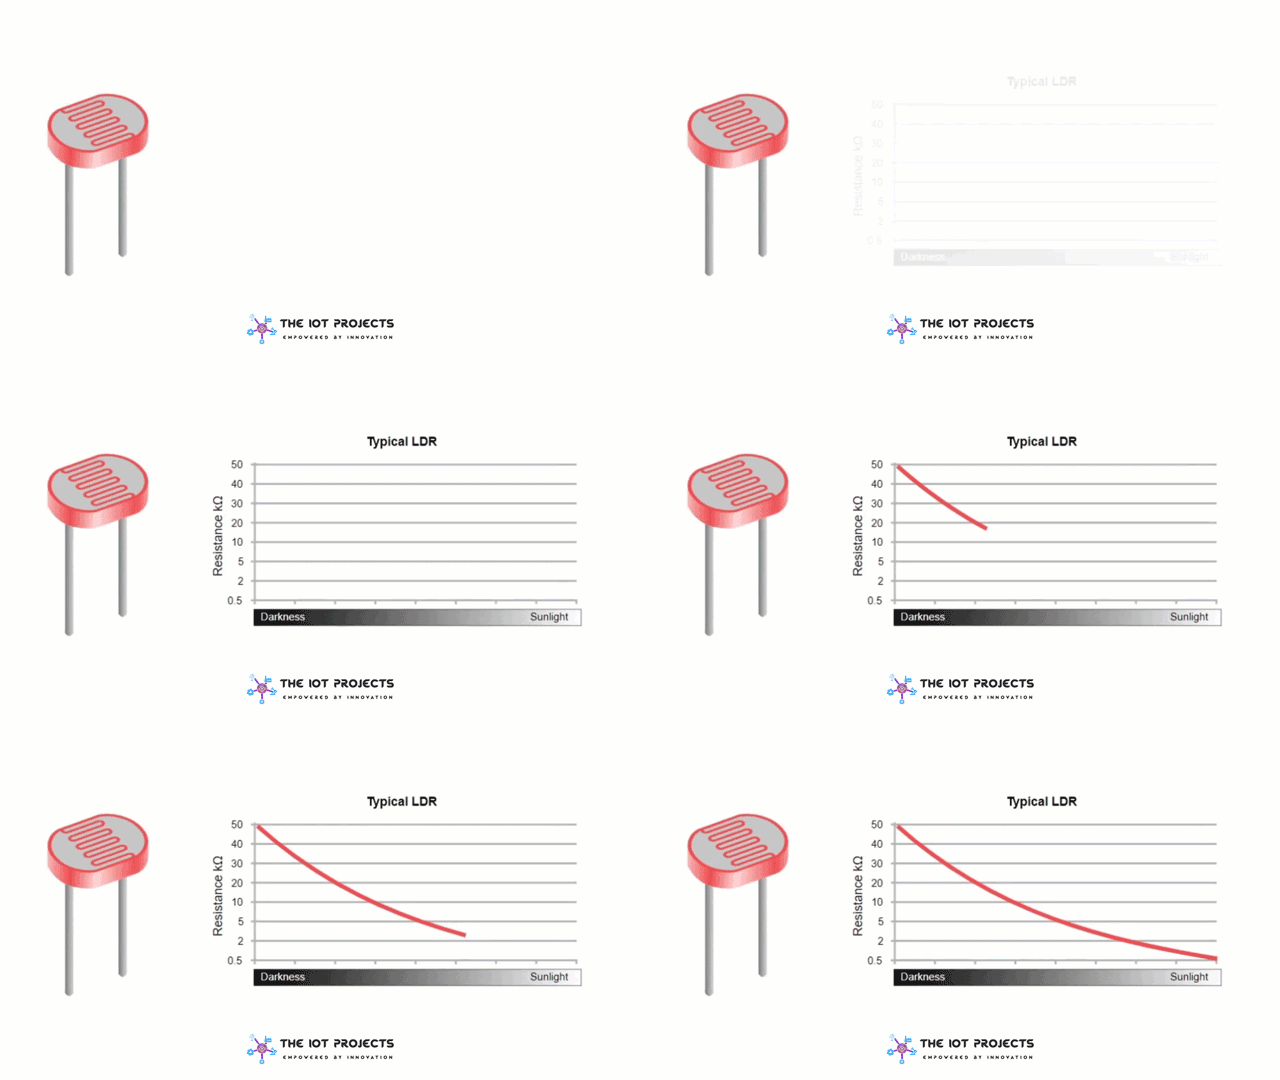
Here, LDR Works as a light detector. It is also known as a photoresistor. Actually, It is a light Sensitive device. As shown in the graph, the resistance decreases as light falls on it. In this project, we are using 4 LDRs to detect Sunlight. And when they send a signal to the Arduino, It will guide two Servo Motors to better place the solar panel to maximize its efficiency.
Project Simulation: Dual Axis Solar Tracker Arduino Project Using LDR & Servo Motors
Here, we will show you a complete overview of this project. Later on, we will discuss its wiring system. But, now we will stimulate this project.
When we power on the Arduino all the sensors and servo motors are in the action. As you can see in the above image. Usually, when we increase the light intensity on the LDR Sensor, the signal is sent to the Arduino. And Hence it guides the two servo motors to better place the solar panel. To increase its efficiency. Actually, you can see here as we increase or decrease the light intensity Servo Motors are into their actions.
Using these two potentiometers you can control the speed of Servo Motors as well. We will talk about it later in the programming section.
Tinkercad Dual Axis Solar Tracker Arduino Simulation file
Interfacing Dual Axis Solar Tracker Arduino Project Using LDR & Servo Motors
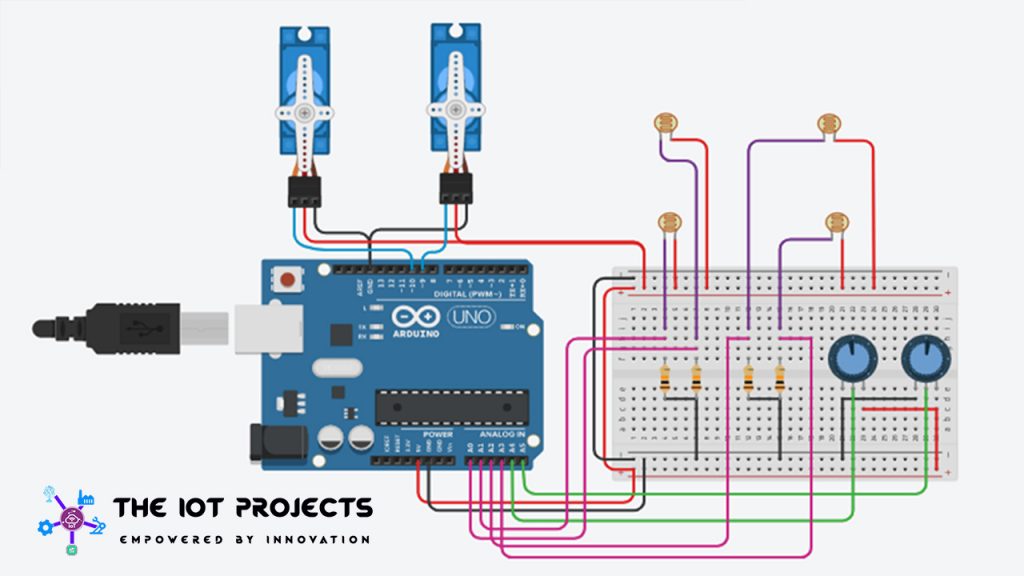
- Connect the 5 volt pin from the Arduino to the Lower horizontal row of the breadboard.
- Similarly, connect the GND pin from the Arduino to a second lower horizontal row of the breadboard.
- Extend the 5 volt and GND Rows to the upper horizontal rows of the breadboard respectively.
- Now connect the power pins of both Vertical and Horizontal servo motors to the 5 volts.
- Similarly, Connect the GND pin of the Both Horizontal and Vertical Servo motor to the Ground.
- Now, connect the Signal pin of the Vertical Servo Motor to the Digital Pin No. 10 of the Arduino.
- Again, connect the Signal pin of the horizontal Servo Motor to the Digital Pin No. 9 of the Arduino.
- Connect one terminal of both potentiometers to the Ground and the Other end terminals of both potentiometers to the VCC 5 volt.
- Now, connect all LDRs from one terminal to the 5-volt and other terminals to the Ground Through 10k-ohm resistors.
- Let’s connect the wiper pin of the potentiometer-1 one to the Analog Pin A4 and A5 to another wiper pin of Potentiometer-2.
- Connect bottom left LDR voltage Divider point to A1 pin of Arduino.
- Again, Connect Top Left LDR voltage Divider Point to A0 pin of the Arduino.
- Similarly, Top Right LDR Voltage Divider Point to the A2 pin.
- Finally, Connect the Bottom Right Voltage Divider Point of LDR to the A3 pin of the Arduino.
Programming Arduino for Dual Axis Solar Tracker Project
#Include is used to include a servo header library file.
#include <Servo.h> Configuration for Horizontal servo.
The Servo Horizontal is set to 180 degrees.
Servo Horizontal Limit When Signal is High is set to 175 degrees.
Again, Servo Horizontal Limit when the Signal value is low is set to 5 degrees.
Servo horizontal; // horizontal servo
int servoh = 180;
int servohLimitHigh = 175;
int servohLimitLow = 5;
// 65 degrees MAX
This is the Servo Configuration for Vertical
The Servo Vertical is set to 45 degrees.
Servo Vertical Limit When Signal is High is set to 60 degrees.
Also, Servo Vertical Limit when the Signal value is low is set to 1 degree.
Servo vertical; // vertical servo
int servov = 45;
int servovLimitHigh = 60;
int servovLimitLow = 1;
LDR Pin Connections
ldrlt is for Top Left
ldrrt is for Top Right
ldrld is for Down Left
ldrrd is for Down Right
// LDR pin connections
// name = analogpin;
int ldrlt = A0; //LDR top left - BOTTOM LEFT <--- BDG
int ldrrt = A3; //LDR top rigt - BOTTOM RIGHT
int ldrld = A1; //LDR down left - TOP LEFT
int ldrrd = A3; //ldr down rigt - TOP RIGHT
On void setup, we have attached the vertical and Horizontal servo signal pin. and the servo rotation for the horizontal is set to 180 degrees. and similarly, the vertical servo is set to 45 degrees. we have also set a delay of 2.5 seconds.
void setup(){
horizontal.attach(9);
vertical.attach(10);
horizontal.write(180);
vertical.write(45);
delay(2500);
}
In the Void loop() Function, we read the value for the analog pin of the Arduino connected to LDRs. and then calculate the average of vertical and horizontal.
void loop() {
int lt = analogRead(ldrlt); // top left
int rt = analogRead(ldrrt); // top right
int ld = analogRead(ldrld); // down left
int rd = analogRead(ldrrd); // down right
int dtime = 10; int tol = 90; // dtime=diffirence time, tol=toleransi
int avt = (lt + rt) / 2; // average value top
int avd = (ld + rd) / 2; // average value down
int avl = (lt + ld) / 2; // average value left
int avr = (rt + rd) / 2; // average value right
int dvert = avt - avd; // check the diffirence of up and down
int dhoriz = avl - avr;// check the diffirence og left and rigt
IF and IF-ELSE statements are defined to loop the program and calculate the average values of the respective LDR’s. Finally, this code helps to change the degree of the servo motor. So that it can be more effective.
if (-1*tol > dvert || dvert > tol)
 {
 if (avt > avd)
 {
 servov = ++servov;
 if (servov > servovLimitHigh)
 {servov = servovLimitHigh;}
 }
 else if (avt < avd)
 {servov= --servov;
 if (servov < servovLimitLow)
 { servov = servovLimitLow;}
 }
 vertical.write(servov);
 }
if (-1*tol > dhoriz || dhoriz > tol) // check if the diffirence is in the tolerance else change horizontal angle
 {
 if (avl > avr)
 {
 servoh = --servoh;
 if (servoh < servohLimitLow)
 {
 servoh = servohLimitLow;
 }
 }
 else if (avl < avr)
 {
 servoh = ++servoh;
 if (servoh > servohLimitHigh)
 {
 servoh = servohLimitHigh;
 }
 }
 else if (avl = avr)
 {
 delay(5000);
 }
 horizontal.write(servoh);
 }
At last, we have added the delay of (dtime).
delay(dtime);

}
Now, compile the program and upload it to your Arduino board.
Our IoT Based Projects Resources:
ESP8266 based Coronavirus Tracker for your country
NodeMCU ESP8266 Monitoring DHT11/DHT22 Temperature and Humidity with Local Web Server
Home Automation with ESP8266 Web Server & Relay Module Control Appliances from Local Network
Interfacing DHT11 Humidity and Temperature Sensor with Arduino & LCD
IoT Based Flood Monitoring System Using NodeMCU & Thingspeak
Final Program code/sketch
#include <Servo.h>


Servo horizontal; // horizontal servo
int servoh = 180;
int servohLimitHigh = 175;
int servohLimitLow = 5;
// 65 degrees MAX

Servo vertical; // vertical servo
int servov = 45;
int servovLimitHigh = 60;
int servovLimitLow = 1;

// LDR pin connections
// name = analogpin;
int ldrlt = A0; //LDR top left - BOTTOM LEFT <--- BDG
int ldrrt = A3; //LDR top rigt - BOTTOM RIGHT
int ldrld = A1; //LDR down left - TOP LEFT
int ldrrd = A3; //ldr down rigt - TOP RIGHT

void setup(){
horizontal.attach(9);
vertical.attach(10);
horizontal.write(180);
vertical.write(45);
delay(2500);
}
void loop() {
int lt = analogRead(ldrlt); // top left
int rt = analogRead(ldrrt); // top right
int ld = analogRead(ldrld); // down left
int rd = analogRead(ldrrd); // down right
int dtime = 10; int tol = 90; // dtime=diffirence time, tol=toleransi
int avt = (lt + rt) / 2; // average value top
int avd = (ld + rd) / 2; // average value down
int avl = (lt + ld) / 2; // average value left
int avr = (rt + rd) / 2; // average value right
int dvert = avt - avd; // check the diffirence of up and down
int dhoriz = avl - avr;// check the diffirence og left and rigt

if (-1*tol > dvert || dvert > tol)
 {
 if (avt > avd)
 {
 servov = ++servov;
 if (servov > servovLimitHigh)
 {servov = servovLimitHigh;}
 }
 else if (avt < avd)
 {servov= --servov;
 if (servov < servovLimitLow)
 { servov = servovLimitLow;}
 }
 vertical.write(servov);
 }
if (-1*tol > dhoriz || dhoriz > tol) // check if the diffirence is in the tolerance else change horizontal angle
 {
 if (avl > avr)
 {
 servoh = --servoh;
 if (servoh < servohLimitLow)
 {
 servoh = servohLimitLow;
 }
 }
 else if (avl < avr)
 {
 servoh = ++servoh;
 if (servoh > servohLimitHigh)
 {
 servoh = servohLimitHigh;
 }
 }
 else if (avl = avr)
 {
 delay(5000);
 }
 horizontal.write(servoh);
 }

 delay(dtime);

}
Connecting all the parts together
Video Tutorials
Conclusion
Finally, we have completed Interfacing Dual Axis Solar Tracker Arduino Project Using LDR & Servo Motors. Now, you can use this Project to track the solar panel and increase its efficiency by 40%. We hope you found this project useful! Drop a comment below if you have any doubts or queries. We’ll do our best to answer your questions.

Where’s the command of potentiometer in code?
code not required for potentiometer
Congrats by the didatic
Is the pin ldrrt correct? (A3)
int ldrlt = A0; //LDR top left – BOTTOM LEFT
Nice but the code doesn’t work
Have you tested? What’s wrong with you?
Can I have the code for potenciometer?
The potentiometer is optional so I removed it.
Hello bro
int ldrlt = A0; //LDR top left – BOTTOM LEFT <— BDG
int ldrrt = A3; //LDR top rigt – BOTTOM RIGHT
int ldrld = A1; //LDR down left – TOP LEFT
int ldrrd = A3; //ldr down rigt – TOP RIGHT
it can be wrong?
there have A3 for BOTTOM RIGHT and TOP RIGHT
int ldrlt = A0; //LDR top left – BOTTOM LEFT
int ldrrt = A2; //LDR top rigt – BOTTOM RIGHT
int ldrld = A1; //LDR down left – TOP LEFT
int ldrrd = A3; //ldr down rigt – TOP RIGHT
Change ldrrt to A2 it was a spelling mistake
the code doesnt work where is the right code
What is the significance of Tolerance Value which is taken in the code?
i.e int tol = 90;
Hi Alsan, I’m trying to build the project myself and would like to implement the potentiometers as well to control the servo speed. Can you please send me the code?
Ya , me too
code doesnt work
Send me potentiometer code bro
what software did you use to design your part for your 3d printer
Tinkercad web application
can you give the 3d model file or link
if (-1*tol > dvert || dvert > tol)
this program line can expalin it please because i confuse that line
and one more question if I use other micro-controller like ESP32 we change libraries ?
wtf tol come from?
Could you send me proutes isis edition because i can’t understand the connection in breadboard
CAN U PROVIDE ME THE 3D MODEL DESIGN?
can you recieve it? if you can please send me i need this so much. thank you gmail: deneybin@gmail.com
Sir, what is the purpose of potentiometer?
Just to control the speed of servo. You can skip those.
Do you still have the code with the potentiometers included ? I would really appreciate it.
You did great job! Thank you so much! Have a good day!
thank you for the code , but can you please provide me with potentiometer coding
Can you please upload the 3d file ?
hi, can i have the 3d printed model in tinkercad for this model please?
Plz show the flow chart of this program (dual axis solar tracker)
Is there an updated code?
how to slow down the servo movement?
Hello did the code worked for you if so can you send it to me
Pin mode was not declared in setup
Here is the compiled code
#include
Servo horizontal; // horizontal servo
int servoh = 180;
int servohLimitHigh = 175;
int servohLimitLow = 5;
// 65 degrees MAX
const int ldrlt = A0;
const int ldrrt = A1;
const int ldrld = A2;
const int ldrrd = A3;
Servo vertical; // vertical servo
int servov = 45;
int servovLimitHigh = 60;
int servovLimitLow = 1;
void setup(){
horizontal.attach(9);
vertical.attach(10);
horizontal.write(180);
vertical.write(45);
delay(2500);
pinMode(A0,INPUT);
pinMode(A1,INPUT);
pinMode(A2,INPUT);
pinMode(A3,INPUT);
}
void loop() {
int lt = analogRead(ldrlt); // top left
int rt = analogRead(ldrrt); // top right
int ld = analogRead(ldrld); // down left
int rd = analogRead(ldrrd); // down right
int dtime = 10; int tol = 90; // dtime=diffirence time, tol=toleransi
int avt = (lt + rt) / 2; // average value top
int avd = (ld + rd) / 2; // average value down
int avl = (lt + ld) / 2; // average value left
int avr = (rt + rd) / 2; // average value right
int dvert = avt – avd; // check the diffirence of up and down
int dhoriz = avl – avr;// check the diffirence og left and rigt
if (-1*tol > dvert || dvert > tol) // check if the diffirence is in the tolerance else change vertical angle
{
if (avt > avd)
{
servov = ++servov;
if (servov > servovLimitHigh)
{servov = servovLimitHigh;}
}
else if (avt < avd)
{servov= –servov;
if (servov dhoriz || dhoriz > tol) // check if the diffirence is in the tolerance else change horizontal angle
{
if (avl > avr)
{
servoh = –servoh;
if (servoh < servohLimitLow)
{
servoh = servohLimitLow;
}
}
else if (avl servohLimitHigh)
{
servoh = servohLimitHigh;
}
}
else if (avl = avr)
{
delay(5000);
}
horizontal.write(servoh);
}
delay(dtime);
}
It doesnt work…
it does work I tested
What program do you use for the Arduino simulation please.
What do you mean by tolerance , servo limit high and servo limit?
Sir where is the link to download 3d model file
Pin Mode / Output for Servos not declared
The sensitivity is too inaccurate the 4 LDR, for example if light hits the top right and bottom right no correction to the light source the stepper motor version – code is better because all 4 values are compared here, but it works, more suitable as a gimbal or as source code for robot projects Greetings from Vienna
Hi Richard, if i use a stepper motor in this project rather than servo, do i need a different code or the same servo code can rotate the stepper motor?
could you explain more how the stepper motor here is better than servo motor?
Please provide 3d model file
Are the 3D printer files avaliable for the frame?
is it possible to use a continuous servo in place of the horizontal servo and if so what code would i need to make that work?
Hi,
Can i have solid works file please ?
Thanks
Fred
Hi,
Can i have solid works file please ?
or an example
Thanks
Fred
why is tolerance taken to be 90
The following link contains the step file for the design (this was solely designed by me, there won’t be any copyright problems)
https://drive.google.com/drive/folders/11bgx8GemS1Lao_6q3d36TPSNl2Rj9VNZ?usp=sharing