Connect RFID to PHP & MySQL Database with NodeMcu ESP8266
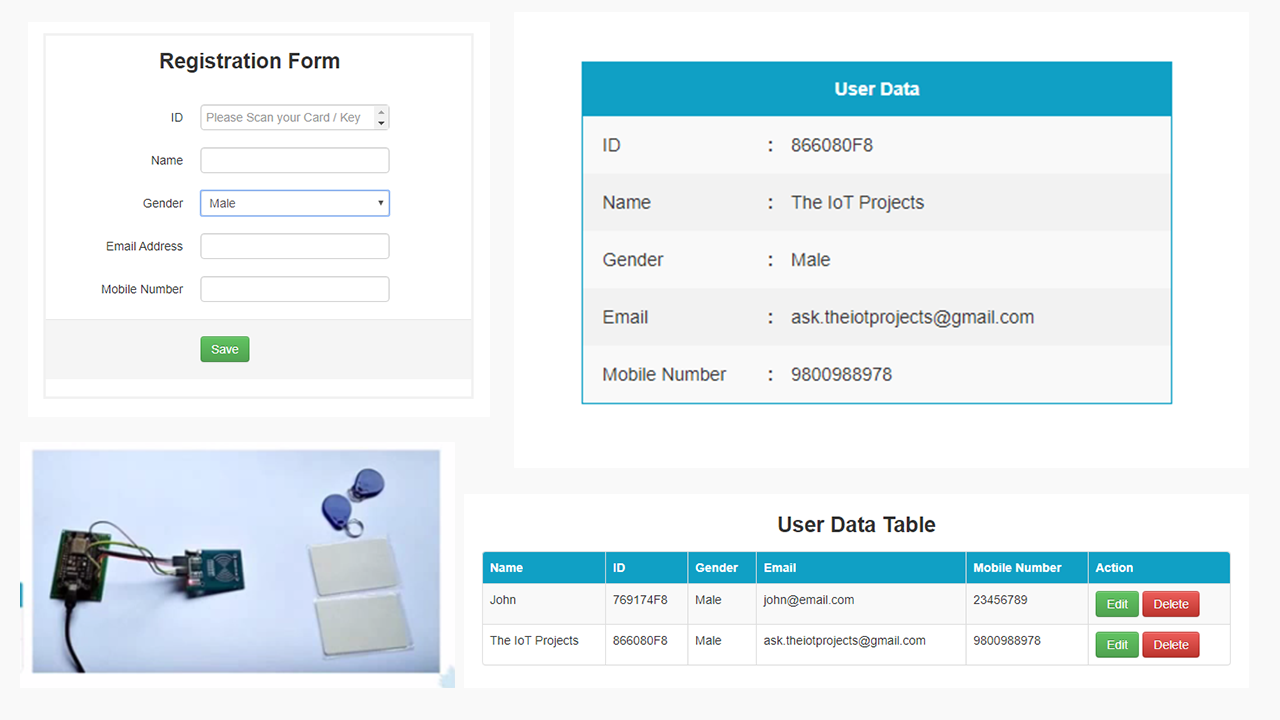
In this tutorial, we will learn how to Connect RFID to PHP & MySQL Database with NodeMcu ESP8266. Here I have interfaced RFID-RC522 Module with NodeMcu ESP8266 and then I’m sending data of RFID to MySQL Database. Actually, we are just reading the serial data coming from NodeMcu ESP8266 and then publishing that to MySQL Database through python code. Unlike others, This project is Protable because we can access data from any device connected to the Internet. Basically, this project can store the Credentials of Students or employes.
Hardware Components Required
The components required to make project can be bought through the link provided below:
| S.N | Components Name | Description | Quantity | |
|---|---|---|---|---|
| 1 | NodeMCU | ESP8266 12E Board | 1 | https://amzn.to/3mTuL95 |
| 2 | RFID Module | RFID-RC522 Module | 1 | https://amzn.to/3pOPpb4 |
| 3 | Jumper Wires | Male to Male Jumper Wires | 4 | https://amzn.to/2JWSR44 |
| 4 | Breadboard | Solderless Breadboard MIni | 1 | https://amzn.to/3n33uRT |
Software Required with Download Links
Now before getting started with this project, let’s learn What is RFID? with its specifications and Features.
We Have Few More IoT Based Projects Resources:
RFID Based Attendance System Using NodeMCU with PHP Web App
IoT Based RFID Smart Door Lock System Using NodeMCU ESp8266
ESP8266 based IoT Health Care Panic Alarm for Elderly Folks
ESP8266 Plot Sensor readings to Webserver in Real-Time Chart
RFID RC522 Module
t first, let’s learn a little bit about RFID. RFID is the short form of Radio Frequency Identification. RFID modules use electromagnetic fields for transferring data between the card and the reader. Different RFID tags are attached to objects like Keychain, cards, etc. and whenever we place that object in front of the RFID reader, the reader reads that tags. The next benefit of RFID is that it doesn’t require to be in a straight line to get detected. Unlike a barcode, in RFID there’s no such restriction. So, here are some features of RFID RC522.
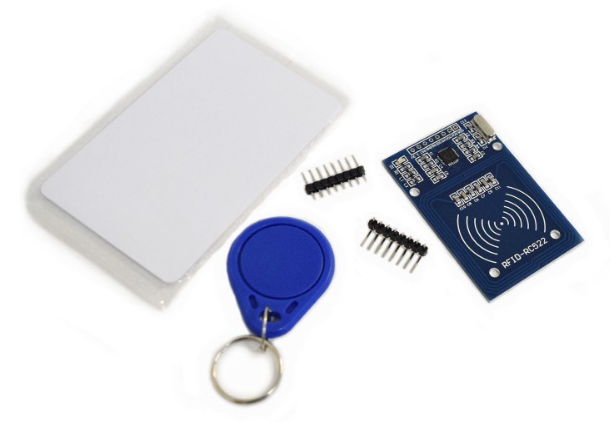
Features:
– Module Name: MF522-ED
– Working current:13—26mA/ DC 3.3V
– Standby current:10-13mA/DC 3.3V
– Sleeping current:<80uA
– Peak current:<30mA
– Working frequency:13.56MHz
– Card reading distance :0~60mm(mifare1 card)
– Protocol:SPI
–Data communication speed:Maximum 10Mbit/s
–Card types supported:mifare1 S50、mifare1 S70、 Mifare UltraLight、mifare Pro、 mifare Desfire
–Dimension:40mm×60mm
–Working temperature:-20—80 degree
–Storage temperature:-40—85 degree
–Humidity:relevant humidity 5%—95%
–Max SPI speed: 10Mbit/s
Specifications & Pin Details
The simple specifications of RC522 module from left to right first pins are as follows:
Pin Name Details
1. 3.3V +3.3V Power Supply
2. RST Reset
3. GND Ground Pin
4. IRO Not Connected
5. MISO Serial Communication
6. MOSI Serial Communication
7. SCK TX/RX with ESP8266
8. SDA TX/RX with ESP8266
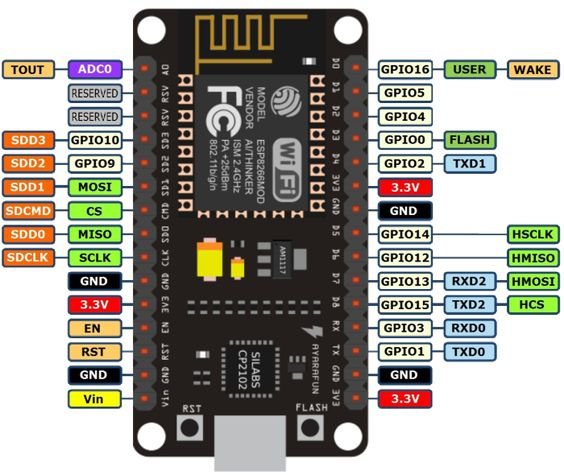
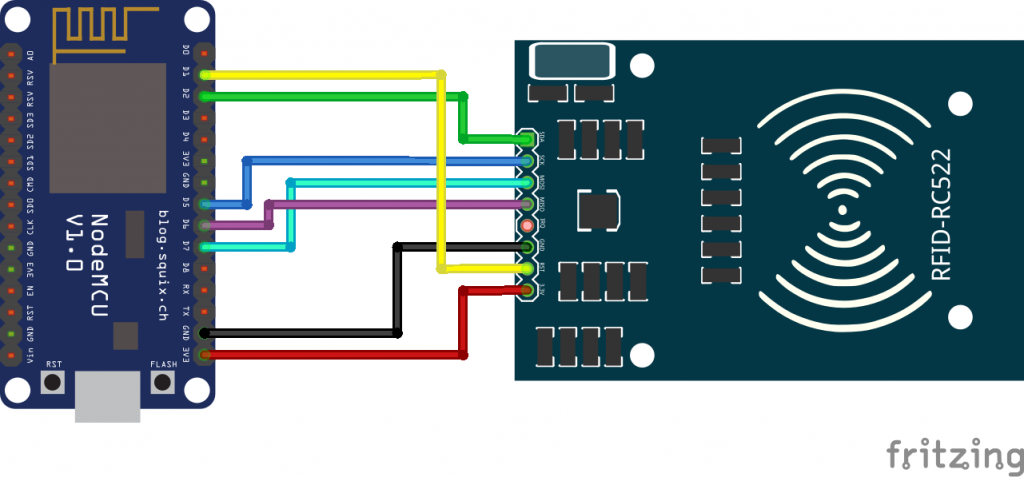
Interfacing RFID RC522 with NodeMcu ESP8266 Module
NodeMCU ESP8266/ESP12E RFID MFRC522 / RC522
D2 <———-> SDA/SS
D5 <———-> SCK
D7 <———-> MOSI
D6 <———-> MISO
GND <———-> GND
D1 <———-> RST
3V/3V3 <———-> 3.3V
Installation of XAMPP server:
Actually, we can Deploy PHP Web App on Hosting Server. But, you will need Public IP from Your Broadband connections to send data to the hosting server.
However, we are using the XAMPP server it can be used both in Windows and Linux. Basically, Ubuntu users use LAMP it’s better than XAMPP. But, I am using Windows so I am going to use the XAMPP server. So you can download the XAMPP server from this link.
Deploying our PHP Web App
- Start your Mysql and Apache from XAMPP Control Panel.
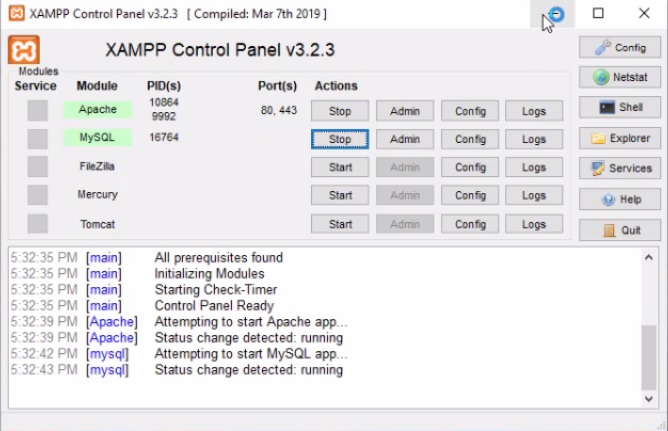
- Copy-paste the RFID PHP Source Code folder provided in your htdocs folder.
- Create a new Database named RFID in your PHPMyAdmin.
- Import the nodemcu_rfid_iot_projects.sql file. If you do not know how to import an SQL file in PHPMyAdmin, simply click on your database, click “Import -> Choose File -> Click nodemcu_rfid_iot_projects.sql -> Open -> Go”
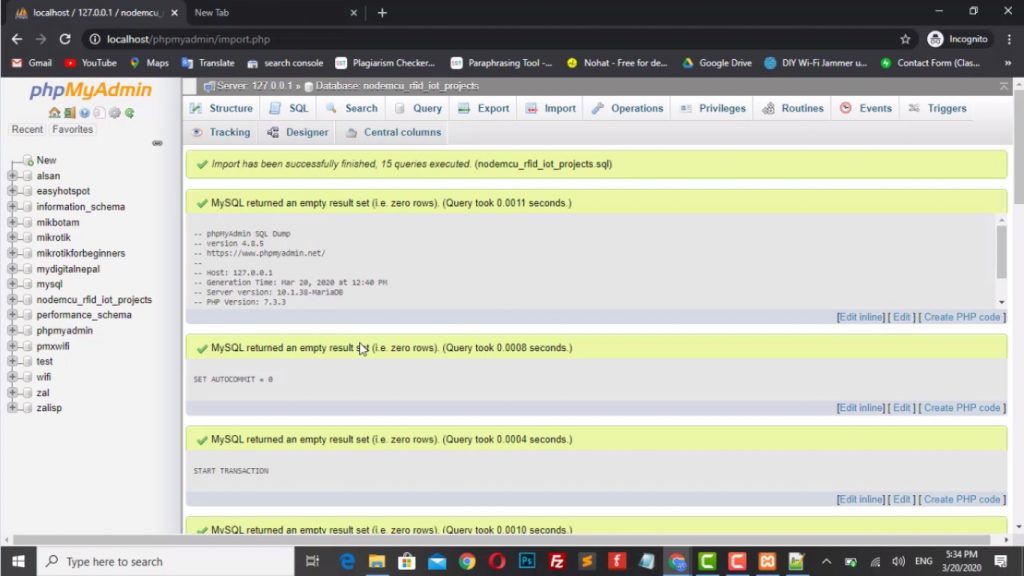
If you have done the steps above properly, you should be able to open the URL and see a PHP Web Apps.
Also Read: DIY Dual Axis Solar Tracker using Arduino
Setting up Arduino IDE for ESP8266 Board
We need to add the esp8266 board to our Arduino IDE. Open up your IDE then go to “File -> Preferences” or simply hit “Ctrl + comma”.
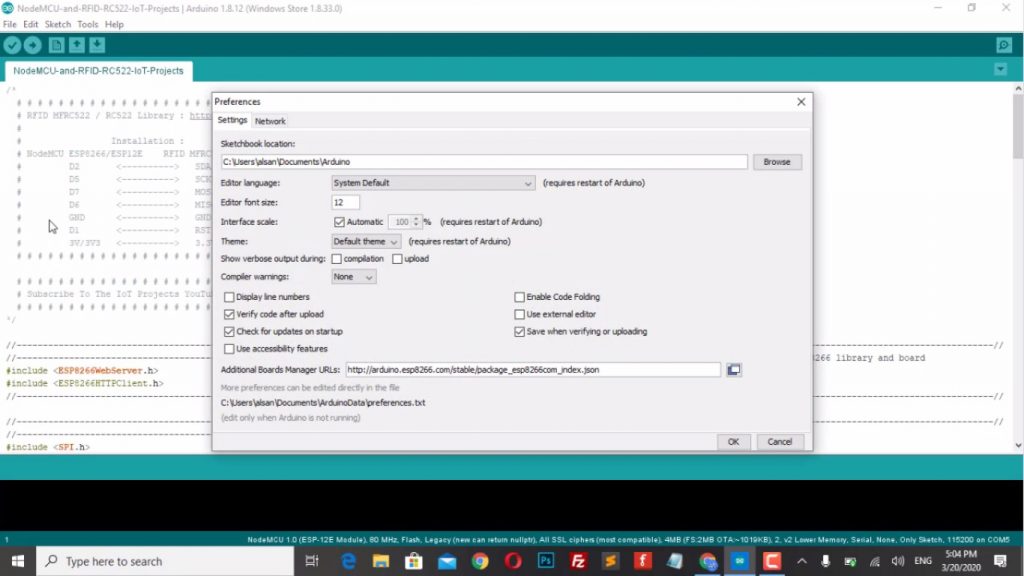
Paste http://arduino.esp8266.com/stable/package_esp8266com_index.json in additional board manager URLs.
Go to “Tools -> Board -> Boards Manager” search and install esp8266.
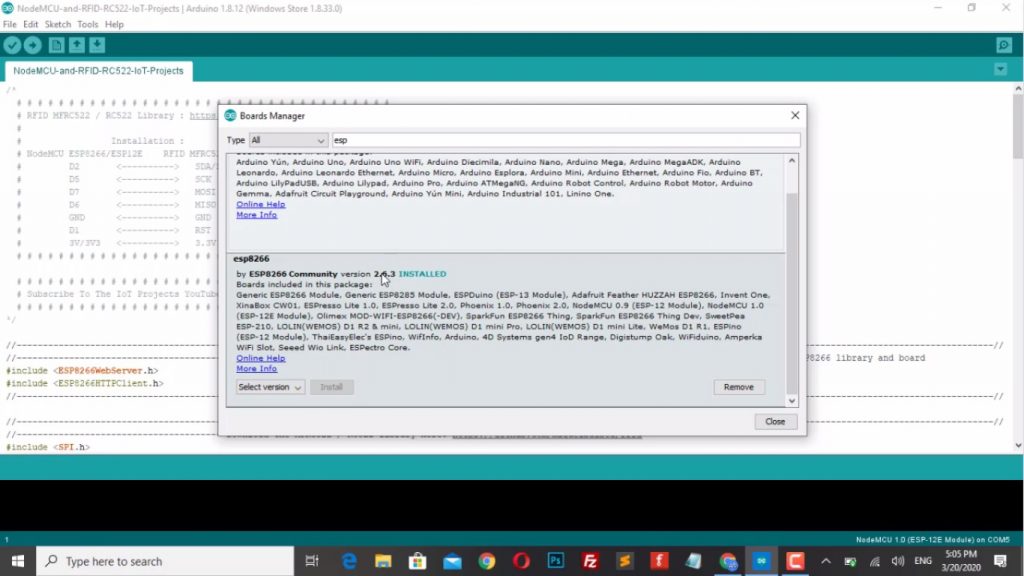
Selecting Port and Board
Go to Tools -> Port and select the COM Port of your NodeMCU. If you are not sure what port your NodeMcu is plugged in, go to Device Manager -> Ports (COM & LPT).
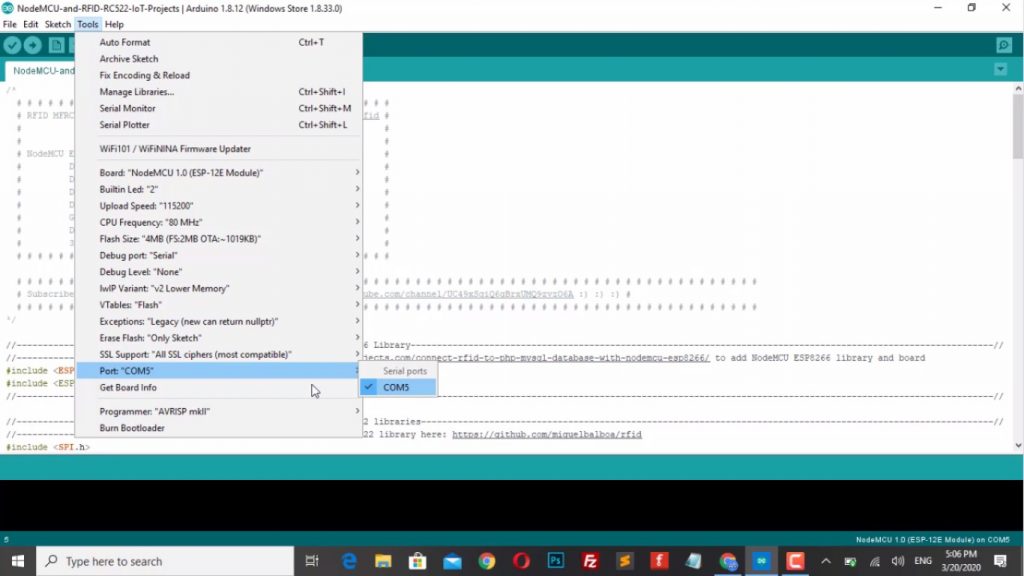
Now select NodeMcu 1.0 (ESP-12E Module) by clicking Tools -> Board. Scroll down until you find it.
Install the MFRC522 library to your Arduino Libraries folder – Download RFID Library
More Interesting Projects:
Home Automation with ESP8266 Web Server & Relay Module Control Appliances from Local Network
IoT Web Controlled Smart Notice Board using NodeMCU ESP8266
Capacitive Soil Moisture Sensor with OLED Display & Arduino
Program/Sketch Code
/*
  # # # # # # # # # # # # # # # # # # # # # # # # # # # # # # # # # # # #
  # RFID MFRC522 / RC522 Library : https://github.com/miguelbalboa/rfid #
  #                                                                     #
  #                 Installation :                                      #
  # NodeMCU ESP8266/ESP12E    RFID MFRC522 / RC522                      #
  #         D2       <---------->   SDA/SS                              #
  #         D5       <---------->   SCK                                 #
  #         D7       <---------->   MOSI                                #
  #         D6       <---------->   MISO                                #
  #         GND      <---------->   GND                                 #
  #         D1       <---------->   RST                                 #
  #         3V/3V3   <---------->   3.3V                                #
  # # # # # # # # # # # # # # # # # # # # # # # # # # # # # # # # # # # #

  # # # # # # # # # # # # # # # # # # # # # # # # # # # # # # # # # # # # # # # # # # # # # # # # # # # # # # # # # # # # # # # # # # # # # # #
  # Subscribe To The IoT Projects YouTube Channel : https://www.youtube.com/channel/UC49xSqiQ6gBrxUMQ9zvzO6A :) :) :) #
  # # # # # # # # # # # # # # # # # # # # # # # # # # # # # # # # # # # # # # # # # # # # # # # # # # # # # # # # # # # # # # # # # # # # # # #
*/

//----------------------------------------Include the NodeMCU ESP8266 Library---------------------------------------------------------------------------------------------------------------//
//----------------------------------------see here: https://teiotprojects.com/connect-rfid-to-php-mysql-database-with-nodemcu-esp8266/ to add NodeMCU ESP8266 library and board
#include <ESP8266WebServer.h>
#include <ESP8266HTTPClient.h>
//------------------------------------------------------------------------------------------------------------------------------------------------------------------------------------------//

//----------------------------------------Include the SPI and MFRC522 libraries-------------------------------------------------------------------------------------------------------------//
//----------------------------------------Download the MFRC522 / RC522 library here: https://github.com/miguelbalboa/rfid
#include <SPI.h>
#include <MFRC522.h>
//------------------------------------------------------------------------------------------------------------------------------------------------------------------------------------------//

#define SS_PIN D2  //--> SDA / SS is connected to pinout D2
#define RST_PIN D1  //--> RST is connected to pinout D1
MFRC522 mfrc522(SS_PIN, RST_PIN);  //--> Create MFRC522 instance.

#define ON_Board_LED 2  //--> Defining an On Board LED, used for indicators when the process of connecting to a wifi router

//----------------------------------------SSID and Password of your WiFi router-------------------------------------------------------------------------------------------------------------//
const char* ssid = "Alsan Air WiFi 4";
const char* password = "11122235122@kap1";
//------------------------------------------------------------------------------------------------------------------------------------------------------------------------------------------//

ESP8266WebServer server(80);  //--> Server on port 80

int readsuccess;
byte readcard[4];
char str[32] = "";
String StrUID;

//-----------------------------------------------------------------------------------------------SETUP--------------------------------------------------------------------------------------//
void setup() {
  Serial.begin(115200); //--> Initialize serial communications with the PC
  SPI.begin();      //--> Init SPI bus
  mfrc522.PCD_Init(); //--> Init MFRC522 card

  delay(500);

  WiFi.begin(ssid, password); //--> Connect to your WiFi router
  Serial.println("");

  pinMode(ON_Board_LED, OUTPUT);
  digitalWrite(ON_Board_LED, HIGH); //--> Turn off Led On Board

  //----------------------------------------Wait for connection
  Serial.print("Connecting");
  while (WiFi.status() != WL_CONNECTED) {
    Serial.print(".");
    //----------------------------------------Make the On Board Flashing LED on the process of connecting to the wifi router.
    digitalWrite(ON_Board_LED, LOW);
    delay(250);
    digitalWrite(ON_Board_LED, HIGH);
    delay(250);
  }
  digitalWrite(ON_Board_LED, HIGH); //--> Turn off the On Board LED when it is connected to the wifi router.
  //----------------------------------------If successfully connected to the wifi router, the IP Address that will be visited is displayed in the serial monitor
  Serial.println("");
  Serial.print("Successfully connected to : ");
  Serial.println(ssid);
  Serial.print("IP address: ");
  Serial.println(WiFi.localIP());

  Serial.println("Please tag a card or keychain to see the UID !");
  Serial.println("");
}
//------------------------------------------------------------------------------------------------------------------------------------------------------------------------------------------//

//-----------------------------------------------------------------------------------------------LOOP---------------------------------------------------------------------------------------//
void loop() {
  // put your main code here, to run repeatedly
  readsuccess = getid();

  if (readsuccess) {
    digitalWrite(ON_Board_LED, LOW);
    HTTPClient http;    //Declare object of class HTTPClient

    String UIDresultSend, postData;
    UIDresultSend = StrUID;

    //Post Data
    postData = "UIDresult=" + UIDresultSend;

    http.begin("http://192.168.1.8/NodeMCU-and-RFID-RC522-IoT-Projects/getUID.php");  //Specify request destination
    http.addHeader("Content-Type", "application/x-www-form-urlencoded"); //Specify content-type header

    int httpCode = http.POST(postData);   //Send the request
    String payload = http.getString();    //Get the response payload

    Serial.println(UIDresultSend);
    Serial.println(httpCode);   //Print HTTP return code
    Serial.println(payload);    //Print request response payload

    http.end();  //Close connection
    delay(1000);
    digitalWrite(ON_Board_LED, HIGH);
  }
}
//------------------------------------------------------------------------------------------------------------------------------------------------------------------------------------------//

//----------------------------------------Procedure for reading and obtaining a UID from a card or keychain---------------------------------------------------------------------------------//
int getid() {
  if (!mfrc522.PICC_IsNewCardPresent()) {
    return 0;
  }
  if (!mfrc522.PICC_ReadCardSerial()) {
    return 0;
  }


  Serial.print("THE UID OF THE SCANNED CARD IS : ");

  for (int i = 0; i < 4; i++) {
    readcard[i] = mfrc522.uid.uidByte[i]; //storing the UID of the tag in readcard
    array_to_string(readcard, 4, str);
    StrUID = str;
  }
  mfrc522.PICC_HaltA();
  return 1;
}
//------------------------------------------------------------------------------------------------------------------------------------------------------------------------------------------//

//----------------------------------------Procedure to change the result of reading an array UID into a string------------------------------------------------------------------------------//
void array_to_string(byte array[], unsigned int len, char buffer[]) {
  for (unsigned int i = 0; i < len; i++)
  {
    byte nib1 = (array[i] >> 4) & 0x0F;
    byte nib2 = (array[i] >> 0) & 0x0F;
    buffer[i * 2 + 0] = nib1  < 0xA ? '0' + nib1  : 'A' + nib1  - 0xA;
    buffer[i * 2 + 1] = nib2  < 0xA ? '0' + nib2  : 'A' + nib2  - 0xA;
  }
  buffer[len * 2] = '';
}
//------------------------------------------------------------------------------------------------------------------------------------------------------------------------------------------//
Video Tutorials
Conclusion
Finally, we have Connect RFID to PHP & MySQL Database with NodeMcu ESP8266. Now, you can use this Project to save user credentials on PHP Web App. Whenever you scan the RFID Card the user Credentials will be displayed on the Web App. We hope you found this IoT project useful! Drop a comment below if you have any doubts or queries. We’ll do our best to answer your questions.

Did you use any libraries like bootstrap or others and what programming language did you use for designing the web page interface? One last question, is this web application accessible across all operating system?
This is a web app designed using PHP which includes html and css as well. This web app can be hosted on a cloud services and can be easily access from anywhere in the world.
Notice: Undefined index: UIDresult in C:\xampp\htdocs\NodeMCU-and-RFID-RC522-IoT-Projects\getUID.php on line 2
Can you help me, i cannt acces it when the url is
“http://192.168.1.108/NodeMCU-and-RFID-RC522-IoT-Projects/getUID.php”
and before that, icannt acces it too (This site can’t be reached
iotrfid.theiotprojects.com’s server IP address could not be found.)
“http://iotrfid.theiotprojects.com/”
did you solved? Notice: Undefined index: UIDresult in C:\xampp\htdocs\NodeMCU-and-RFID-RC522-IoT-Projects\getUID.php on line 2
SQLSTATE[HY000] [1045] Access denied for user ‘theiotprojects’@’localhost’ (using password: YES)
i have this error
can someone help ?
would you please show us how to save the records of the scanned RFID please ?
Hi
Thanks a lot.
did you have solve it??
Hello, My name is Jean Aime from Rwanda, about this IoT project, is very useful and helpful to improve. My relevant question is how can I get it (Download) for locally purpose. Thanks
Check the Software Required with Download Links under the PHP web app.
did you solved? plz
Connect RFID to PHP & MySQL without NodeMcu ESP8266
give the progrmme on php
can you give us your contact info. need 5 mins of guidance. will be grateful if given.
call to ‘HTTPClient::begin’ declared with attribute error: obsolete API, use ::begin(WiFiClient, url) Can u help me
u need declare http.begin(AccesoWifi,”http://xxx.xxx.xxx.xxx:80/rf/index.php”);
can u elaborate this? tq
Nice demo and tutorial, thank you.
DON’T USE THIS OPERATIVELY.
Inserting parameters of a post request into a PHP executable enables code injection and is considered a severe security breach (https://owasp.org/www-community/attacks/Code_Injection), easily allowing attackers to execute any code on your server.
Please note a little glitch in the tutorial. Alsan instructs to create a new database named “RFID” but the PHP code is referring a database “nodemcu_rfid_iot_projects”.
You may either rename your database or change line 4 of database.php to
private static $dbName = ‘RFID’ ;
call to ‘HTTPClient::begin’ declared with attribute error: obsolete API, use ::begin(WiFiClient, url) Can u help me
Go to privileges and remove password for root user for localhost. Change the user name to root in database.php file and keep the password field empty.
Downgrade the ESP board library to 2.6.3
Downgrade your ESP board version to 2.6.3
hi i have change my domain on line
http.begin(“http://mydomain.com/node/getUID.php”); //Specify request destination
but unable to get rfid data.
is their anything else to be done for domain access
Open your serial monitor and check whether it’s connecting to wifi or not and it’s showing in serial monitor when you read a rfid card.
I am able to connect on local server. but when change to domain the tag is not rading.
on serial monitor garbage value is showing on touching rfid.
This project won’t work on web hosting. But, Works on a local webserver. You need to port forward your public IP address in the wifi router if you want to send data outside the network.
Hello,
Thank you for this greate Tutorial!
I’ve have a problem with saving changes of user data.
When i press save, the changes are loss and shows the old credentials again.
How can i solve this?
Kind regards
Thomas
Did you figure out why it was a not saving changes? I can’t register new users either.
Having the same issue. were you able to resolve?
Have you solved this please?
Have you solved this please?
I think the “user data edit tb.php”is the wrong file, can you update? because when i “edit” its not working at all
Warning: file_put_contents(UIDContainer.php): failed to open stream: Permission denied in /opt/lampp/htdocs/CBU/RFID_PHP/user data.php on line 3
Declare const char* serverName = “url”;
After “HTTPClient http; //Declare object of class HTTPClient”
Add “WiFiClient client;”
Then change >>>> http.begin(url);
To >>>> http.begin(client, serverName);
I have local server on my Linux Mint in Local NET. I have something strange. In IDE card is scaned OK, but with code 200. On site – none. I don’t known why. I change paths, create database with my login, pass and still nothing. Its verry weard.
NOTICE to ALL who have error call to ‘HTTPClient::begin’ declared with attribute error: obsolete API, use ::begin(WiFiClient, url). In Arduino IDE, in board manager, you must change version of esp8266 from 3.0 to 2.5.2 and recompile code
Hello
Effortlessly do the same project using ethernet shield w5100.
NodeMCU-and-RFID-RC522-IoT-Projects:30:10: fatal error: RC522.h: No such file or directory
30 | #include
| ^~~~~~~~~
compilation terminated.
exit status 1
RC522.h: No such file or directory
Http commands are not working. Can we have the updated sketch
Is there a way we can use EM18 Reader module instead of RFID MFRC522 for same purpose? If there is please help!!!!
Good day please how can I add login page to the php files so that anyone with password and user name can get access to the page
I have a problem. The code runs, but does not connect with the app and in the serial monitor it reads my card uid but also displays the value -1. What would be the problem?
C:\Users\golde\OneDrive\Documents\Arduino\student_management\student_management.ino: In function ‘void loop()’:
C:\Users\golde\OneDrive\Documents\Arduino\student_management\student_management.ino:108:15: error: call to ‘HTTPClient::begin’ declared with attribute error: obsolete API, use ::begin(WiFiClient, url)
108 | http.begin(“http://192.168.1.69/NodeMCU-and-RFID-RC522-IoT-Projects/getUID.php”); //Specify request destination
| ~~~~~~~~~~^~~~~~~~~~~~~~~~~~~~~~~~~~~~~~~~~~~~~~~~~~~~~~~~~~~~~~~~~~~~~~~~~~~~~~
exit status 1
Compilation error: call to ‘HTTPClient::begin’ declared with attribute error: obsolete API, use ::begin(WiFiClient, url)
Traceback (most recent call last):
File “C:\Users\SOHAIL\AppData\Local\Arduino15\packages\esp8266\hardware\esp8266\2.6.3/tools/upload.py”, line 65, in
esptool.main(cmdline)
File “C:/Users/SOHAIL/AppData/Local/Arduino15/packages/esp8266/hardware/esp8266/2.6.3/tools/esptool\esptool.py”, line 2890, in main
esp.connect(args.before)
File “C:/Users/SOHAIL/AppData/Local/Arduino15/packages/esp8266/hardware/esp8266/2.6.3/tools/esptool\esptool.py”, line 483, in connect
raise FatalError(‘Failed to connect to %s: %s’ % (self.CHIP_NAME, last_error))
esptool.FatalError: Failed to connect to ESP8266: Timed out waiting for packet header
Failed uploading: uploading error: exit status 1
how to fix it please help me
When the server uses a https certificate you need some slight changes to it
// put your main code here, to run repeatedly
readsuccess = getid();
if (readsuccess) {
digitalWrite(ON_Board_LED, LOW);
HTTPClient http; //Declare object of class HTTPClient
String UIDresultSend, postData;
UIDresultSend = StrUID;
//Post Data
postData = “UIDresult=” + UIDresultSend;// + “,” + WiFi.localIP();
const char* serverName = “https://xyz.com/Server/ServerInsertRFDI.php”; \\\ or where your php script may be
WiFiClientSecure client; // this is needed when https
client.setInsecure(); // this is needed to bypass the certificate, but may leave this connection vulnerable
http.begin(client, serverName);
http.addHeader(“Content-Type”, “application/x-www-form-urlencoded”); //Specify content-type header
int httpCode = http.POST(postData); //Send the request
String payload = http.getString(); //Get the response payload
Serial.println(“”);
Serial.print(“====Server: “);
Serial.println(serverName);
Serial.print(“====UIDresultSend: “);
Serial.println(UIDresultSend);
Serial.print(“****postData: “);
Serial.println(postData);
Serial.print(“****httpCode: “);
Serial.println(httpCode); //Print HTTP return code
Serial.print(“****payload: “);
Serial.println(payload); //Print request response payload
Serial.println(“****”);
http.end(); //Close connection
delay(1000);
digitalWrite(ON_Board_LED, HIGH);
}
}
hi i came acrose your website and i will need your help. i am building a codeigniter application that has attendance modules so i will like to intergrate the scan login system from a hardware and get the data into my application. can you please contact me so that we can see how to get this. i will really apreciate. thanks waiting on your reply. i live in finland
RFID card is not scanning using ESP8266EX with library ESP8266 2.6.3 and MFRC522 1.3.2
hi i’m new to adruino stuffs and i’m trying to do this project and i follow every step but i’m having a problem in scanning rfid, it cannot detect my tag , i think my serial port is the problem, i got no response even though ikeep tapping my rfid tag, can anyone pleasae help me😭😭😭😭😭😭😭😭😭
If anyone have who tried to this project in esp32 board. I think This project design only for esp8266 board. I have done everything and edited files but failed to read the rfid tag data using esp32…..
SS_pin 4 // SDA pin D4
RST_pin 5 //Reset pin D5
any one can help me ?
mail: amarsocialmarket@gmail.com
How do I connect arduino sketch to cloud services for instance Microsoft Azure?
HI,
I have this issue with the TAG ID not reflecting in UIDContainer.php or getUID.php. The serial terminal updates response 200 & both the nodemcu & PC (XAMPP) are on the same network. Any suggestions as to how can I fix this?
awesome