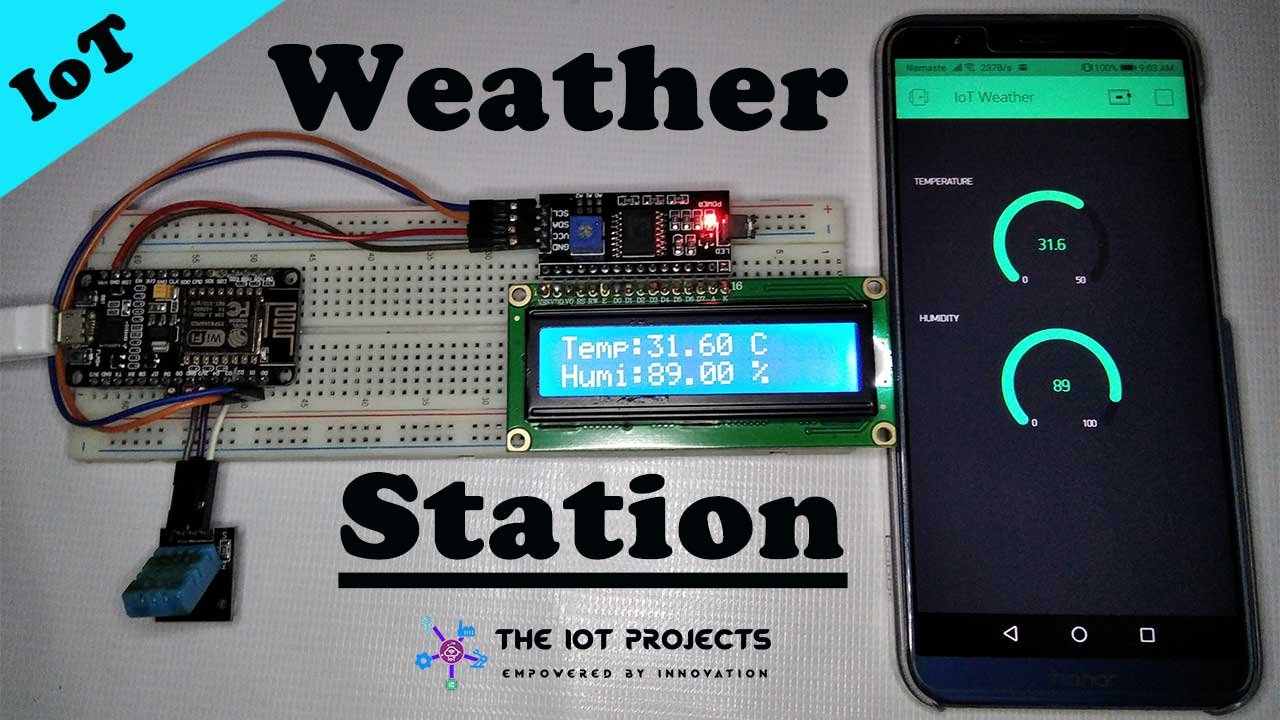
In this session, I will show you how to make a simple IoT weather station using NodeMCU and DHT11 sensor. So, without doing any delay let’s get started.
Components Required
let’s start with everything that we need for this project. First of all, we need something to measure the temperature and Humidity, for that perfect match is the DHT11 sensor. You can also use DHT22 but it’s a bit expansive compared to DHT11 senor. Next, we need a microcontroller board, but we cannot use any regular Arduino Microcontroller board. So, we will use NodeMCU ESP8266, which is based on the ESP-12E chip and has onboard WiFi capabilities. This is what we are looking for in this project because we are working on IoT.
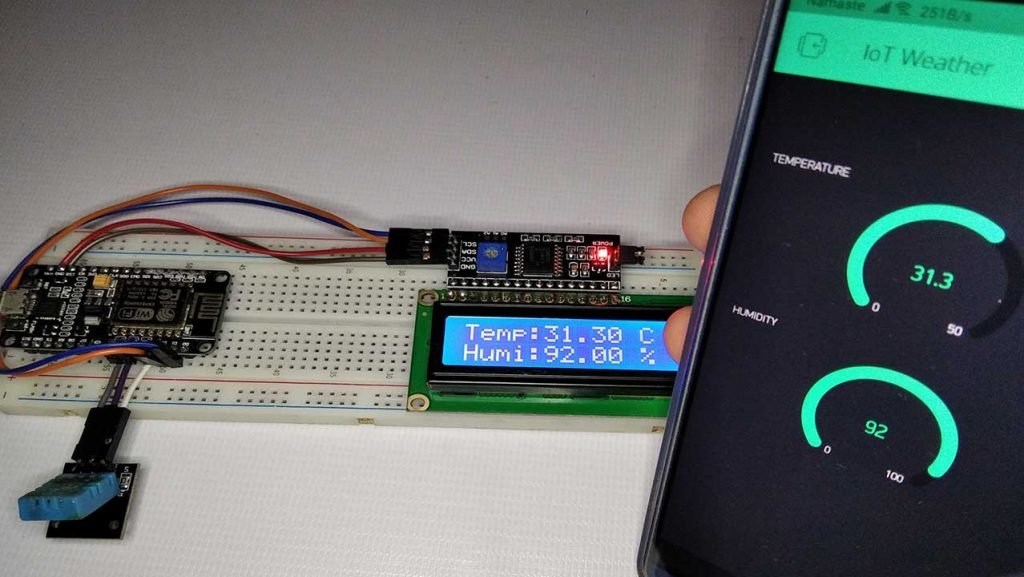
Lastly, we need a 16×2 LCD Display with an I2C interface, for displaying the weather status like Temperature and Humidity. We already made a Tutorial on the same topic but, to make it more interesting. Today, We will add IoT features using the Blynk Application. We will be using the Blynk App along with its library to even display the Temperature and Humidity on your smartphone too.
Pretty long explanation right? Check the following list: These are the components required for IoT based Weather station using a DHT11 sensor project.
- NodeMCU ESP8266 12E development Module
- DHT11 Temperature and Humidity Sensor
- 16×2 LCD Display with I2C interface
- Breadboard
- Jumper wires
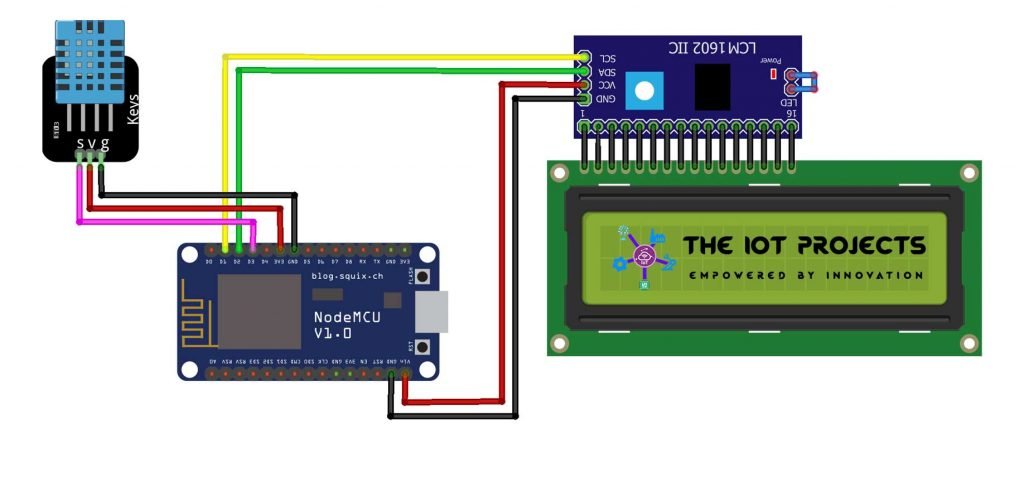
Circuit Diagram
Now, All you have to do is to make the connection as per the schematic diagram.
Once all the connections are done, you can upload the code to the microcontroller. But, before that, we need to set up the blynk application.
Configure Blynk App for IoT Weather Station
First of all, Go to App Store/Play Store on your smartphone. Download and login to the blynk app using your email address. Now, create a new project. For that provide project name, select NodeMCU board and select connection type as WiFi. After which you will see a popup that says an authentication token was sent to your email address. which we will use later on programming.

Now, select (+) plus icon and add two “Gauges”. After you add two gauges tap on it and name it as Humidity and you can even change the level. Now select the input pin as a virtual pin and select the pin no as V5. Then choose a refresh rate of 1second for each gauge.
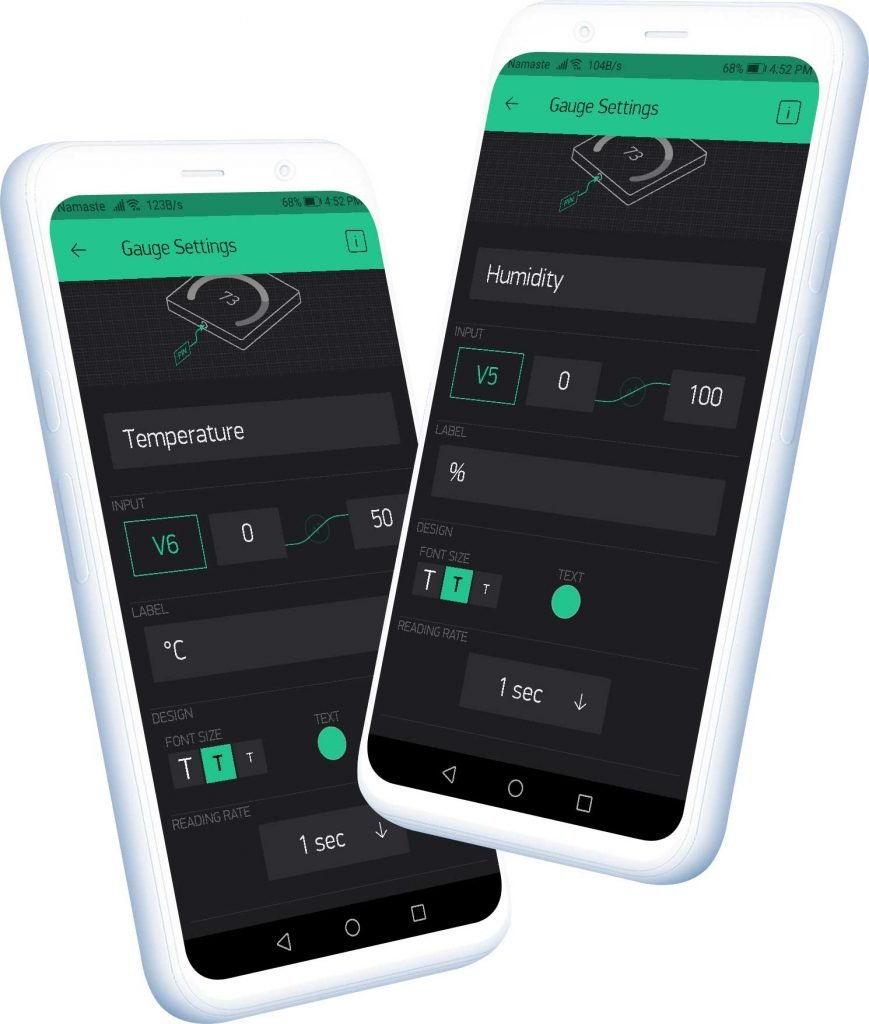
Similarly, repeat the process for other gauges, but now for Temperature select the virtual pin as V6. Also, keep the refresh rate to 1 second. Once, it is complete it’s time for programming NodeMCU.
Programming Code
The following is the code for IoT Weather station using DHT11 Sensor. You can copy the codes and paste it on your Arduino IDE. But, before uploading the code to your NodeMCU Following Library files and some changes are required.
Download All the required library from below.
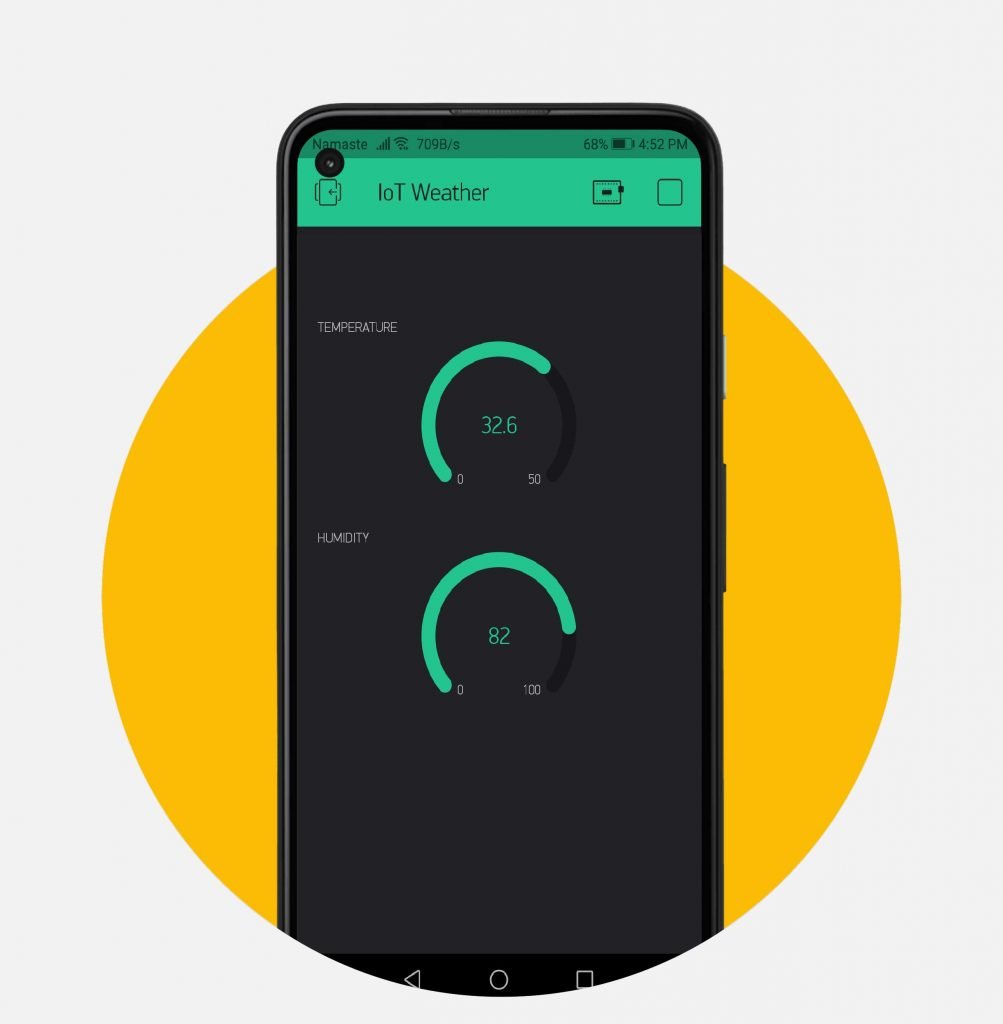
Change the WiFi credentials and the Authentication token that you have received on your email address. After that just choose your NodeMCU 12-E board from the tools menu. and also choose your COM port. Now, upload the code to your microcontroller board. After successfully upload the project is complete.
/*
 * For this example you'll need the following library:
 * 1) Adafruit DHT sensor library: https://github.com/adafruit/DHT-sensor-library
 *
 * 2) Arduino-LiquidCrystal-I2C-library: https://github.com/fdebrabander/Arduino-LiquidCrystal-I2C-library
 *
 * 3) Blynk Library: https://github.com/blynkkk/blynk-library
 *
 * Conncetions:
 * D1 -> SCL of I2C LCD
 * D2 -> SDA of I2C LCD
 * D3 -> Out of DHT11/22
 *
 */

#define BLYNK_PRINT Serial
#include <SPI.h>
#include <ESP8266WiFi.h>
#include <BlynkSimpleEsp8266.h>
#include <DHT.h>
#include <Wire.h>
#include <LiquidCrystal_I2C.h>

char auth[] = "fGv3hZt9CKtF53GDB-dQuvfKXGTSs9-k"; //Enter the Auth code which was send by Blink

char ssid[] = "AP@net";  //Enter your WIFI Name
char pass[] = "";  //Enter your WIFI Password

#define DHTPIN D3          // Digital pin 3
#define DHTTYPE DHT11
//#define DHTTYPE DHT22

DHT dht(DHTPIN, DHTTYPE);
LiquidCrystal_I2C lcd(0x27, 16, 2);

void setup()
{
  Serial.begin(9600);
  Blynk.begin(auth, ssid, pass);
  dht.begin();
  lcd.begin();
  lcd.backlight();
  lcd.setCursor(0, 0);
  lcd.print("Temp:");
  lcd.setCursor(11, 0);
  lcd.print("C");

  lcd.setCursor(0, 1);
  lcd.print("Humi:");
  lcd.setCursor(11, 1);
  lcd.print("%");
}

void loop()
{
  Sensor();
  Blynk.run(); // Initiates Blynk
}

void Sensor()
{
  float h = dht.readHumidity();
  float t = dht.readTemperature(); // or dht.readTemperature(true) for Fahrenheit

  if (isnan(h) || isnan(t)) {
    Serial.println("Failed to read from DHT sensor!");
    return;
  }
  Blynk.virtualWrite(V5, h);  //V5 is for Humidity
  Blynk.virtualWrite(V6, t);  //V6 is for Temperature
  lcd.setCursor(5, 0);
  lcd.print(t);
  lcd.setCursor(5, 1);
  lcd.print(h);
  delay(1000);
}
Video Demonstration of IOT Weather station using DHT11 Sensor
Here, is a complete video demonstration of IoT based Mini Weather Station using NodeMCU and DHT11 Sensor. I hope you will enjoy watching this video. If you did, then don’t forget to hit that like button. Share it with your friends and subscribe to this channel for more awesome content like this.
Conclusion:
So, that’s pretty much for this session. I hope you enjoyed making this IoT weather station using the DHT11 sensor project. If you did, don’t forget to share these articles with your friends. If you have any doubts regarding this weather station project then do let me know them in the comment section below.
Recommended Projects:
- Simple Weather station using Arduino & BME280 Barometric Pressure Sensor
- BME280 Based Mini Weather Station using ESP8266/ESP32
- Interface DHT11 Sensor with Arduino and LCD
- DHT11 Temperature and Humidity Sensor with Arduino
- NodeMCU ESP8266 Monitoring DHT11/DHT22 Temperature and Humidity with Local Web Server
- ESP8266 Data Logger to Upload Data on Webserver