Secure HTTPS Requests to URL Using NodeMCU ESP8266

Fetching or posting data over the Internet is one of the main core functions of the IoT device. Doing so over HTTP is better implemented in NodeMCU ESP8366 Arduino libraries, but makes things more difficult for HTTPS requests. In this post, I will talk about the most common approaches used by the community and will show you the method to make Secure HTTPS Requests to URL Using NodeMCU ESP8266. No special certificates or fingerprints are required to manually code the program using this method.
HTTPS is a method of requesting HTTP over a TLS (formerly SSL) connection. By doing so, the data sent between and behind your computer and server is encrypted and secure. The good news is that this protocol can be used in conjunction with the ESP8266 WiFiClientSecure class. The bad news is those common methods have some major disadvantages.
First I will discuss the two most common methods, and next, I will describe the generic solutions to their problems.
What are CA certificates?
Before diving into the details I will briefly describe the basic principles of secure HTTPS requests in general terms.
Generally, there is a certificate for each website. This certificate is issued by someone called the Certification Authority (CA). Each CA certificate can be issued by another CA which invites the so-called certificate chain. In the picture, the chain certificates are long, but in reality, the length of the chain can be anything.
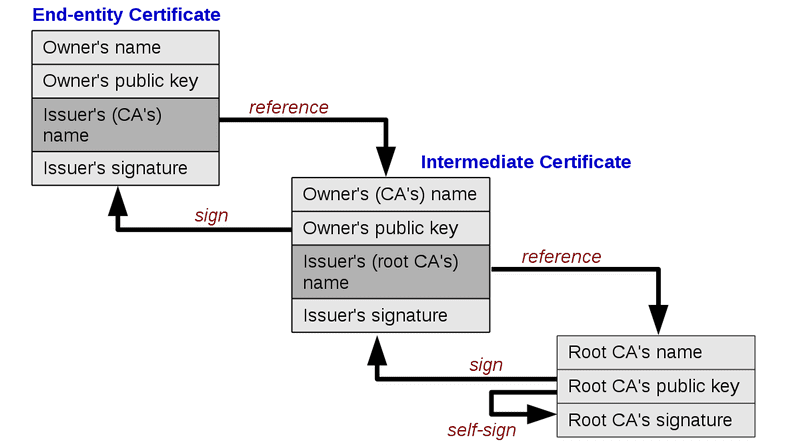
The top-level certificate is called the root certificate. This certificate is self-signed, which means it can be trusted naturally. This is because only a few organizations can issue root certificates, and these are believed not to provide fake or incorrect certificates.
When you request an HTTPS for a website from your browser, the browser looks at the certificate for the website and verifies that the authentication is actually issued by its parent. This can be done because each certificate is signed with the private key of the upstream certificate. Details for dummies in public and private key functions can be found here.
When it is verified that the certificate is actually issued by a trusted root CA issuer, it is verified that the domain in the certificate is the same as the actual domain. If this is true, we know who the server claims to be, and a secure connection can be started.
Also Read: ESP8266 Data Logger to Upload Data on Webserver
These trusted root certificates are actually stored as part of your browser to validate all other certificates. Each OS or browser sets about 10-200 basic certificates a little differently, which it knows can be trusted. This is called a certificate store, and this is what I will implement in this project with ESP8266. But first, let’s start with the two most popular approaches.
HTTPS Requests to URL Using Fingerprints – secure but annoying
The method proposed in the official NodeMCU ESP8266 Arduino document is to extract the fingerprint of the site’s certificate and store it in the code. A fingerprint is a hash of a certificate. Because it is highly unlikely that a second certificate exists with the same hash, we know that the website can be trusted if the hash is stored with us.
const char* host = "https://api.github.com";
const char* fingerpr = "CF 05 98 89 CA FF 8E D8 5E 5C E0 C2 E4 F7 E6 C3 C7 50 DD 5C";

WiFiClientSecure client;
client.connect(host, httpsPort);

if (client.verify(fingerpr, host))
{
    http.begin(client, host);

    String payload;
    if (http.GET() == HTTP_CODE_OK)
        payload = http.getString();
}
else
{
  Serial.println("certificate doesn't match");
}
This approach is simple because the certificate chain does not need to be certified, but for me, there are two main issues:
- NodeMCU ESP8266 is required to extract fingerprints and manually connect to each page.
- The bigger issue is that these fingerprints change once a year when the certificate expires. This means that your program can break at any time and you need to manually update the fingerprint on the code.
HTTPS Requests to URL Using client.setInsecure() – easy but unsafe
You could argue that secure connections to your app are overkill. I may be the first person that I want as practical a solution as possible. Imagine what you want to do with your ESP8266 is to bring the weather from the internet and show it off somehow. Personally I don’t mind doing it unsafely because there are no real risks.
But imagine that the ESP8266 is controlling the lock on your door or the 3D printer can give heat and catch fire. Or think of a case where you are transferring personal information or from some site or API. It is better to be safe than sorry in these cases, and the method should not be used in this section. Anyway, I’ll show it here:
const char* host = "https://api.github.com";

WiFiClientSecure client;
client.setInsecure(); //the magic line, use with caution
client.connect(host, httpsPort);

http.begin(client, host);

String payload;
if (http.GET() == HTTP_CODE_OK)
    payload = http.getString();
So basically all you need to do is add the client.setinsecure () to your code and it starts the connection without verifying the certificate.
HTTPS Requests to URL with the IoT framework
With that out, we finally get to the implementation I choose instead of the ESP8266 IoT Framework that is placed in the Fetch class.
const char* host = "https://api.github.com";

String payload;
if (fetch.GET(host) == HTTP_CODE_OK)
    payload = http.getString();

fetch.clean();
Sounds easy enough doesn’t it? So what happens behind the scenes?
You are learning to make Secure HTTPS Requests to URL Using ESP8266. Usually the same thing in the same browser. ESP8266 has a complete repository of all reliable root certificates in PROGMEM memory. At this point, the flash memory takes about ~ 170 KB, which is easily remembered in my case. This certificate is generated automatically in the creation of the store software, no manual steps are required. This also means that you can make secure HTTPS requests to any URL with ESP8266 (so you can configure or change the URL after creation).
You may think so, but hey! These certificates also expire. And this is true. The only difference with fingerprints is that the validity of root certificates is very long, and can be more than 20 years. While for some services the fingerprint may change every few months.
As a starting point, I found an excellent but hidden example in ESP8266 Arduino Repo. This example includes a Python script that retrieves all certificates from the Mozilla Original Certificate Store and stores them as files. These files will then be uploaded to SPIFFS and used during HTTPS requests. I optimized this example to be able to store certificates instead of PROGMEM.
Generating a certificate store
When the request starts, the certStore class will compare the certificate issuer’s hash with all the hashes of the original certificates stored. If there is a match, the authenticity of the domain and other assets will be checked and the connection will be initiated.
In the default Arduino instance, these hashes for stored certificates are generated in the certStore class. It seems more logical to me to do this directly in Python script to save computer time on ESP8266, so that’s where I moved it. In addition, I customized the certificate system class (GitHub) to read information from my PROGMEM variable, not from my system program.
The final Python script to generate the certificate store is provided below.
from __future__ import print_function
import csv
import os
import sys
from asn1crypto.x509 import Certificate
import hashlib

from subprocess import Popen, PIPE, call, check_output
try:
    from urllib.request import urlopen
except:
    from urllib2 import urlopen
try:
    from StringIO import StringIO
except:
    from io import StringIO

#path to openssl
openssl = "C:msys32usrbinopenssl"

f = open("src/generated/certificates.h", "w", encoding="utf8")

f.write("#ifndef CERT_H" + "n")
f.write("#define CERT_H" + "nn")
f.write("#include <Arduino.h>" + "nn")

# Mozilla's URL for the CSV file with included PEM certs
mozurl = "https://ccadb-public.secure.force.com/"
mozurl += "mozilla/IncludedCACertificateReportPEMCSV"

# Load the names[] and pems[] array from the URL
names = []
pems = []
dates = []
response = urlopen(mozurl)
csvData = response.read()
if sys.version_info[0] > 2:
    csvData = csvData.decode('utf-8')
csvFile = StringIO(csvData)
csvReader = csv.reader(csvFile)
for row in csvReader:
    names.append(row[0]+":"+row[1]+":"+row[2])
    pems.append(row[30])
    dates.append(row[8])
del names[0] # Remove headers
del pems[0] # Remove headers
del dates[0] # Remove headers

derFiles = []
totalbytes = 0
idx = 0
# Process the text PEM using openssl into DER files
sizes=[]
for i in range(0, len(pems)):
    certName = "ca_%03d.der" % (idx);
    thisPem = pems[i].replace("'", "")
    print(dates[i] + " -> " + certName)
    f.write(("//" + dates[i] + " " + names[i] + "n"))

    ssl = Popen([openssl,'x509','-inform','PEM','-outform','DER','-out', certName],
                 shell = False, stdin = PIPE)
    pipe = ssl.stdin
    pipe.write(thisPem.encode('utf-8'))
    pipe.close()
    ssl.wait()
    if os.path.exists(certName):
        derFiles.append(certName)

        der = open(certName,'rb')

        bytestr = der.read();
        sizes.append(len(bytestr))
        cert = Certificate.load(bytestr)
        idxHash = hashlib.sha256(cert.issuer.dump()).digest()

        # for each certificate store the binary data as a byte array
        f.write("const uint8_t cert_" + str(idx) + "[] PROGMEM = {")
        for j in range(0, len(bytestr)):
            totalbytes+=1
            f.write(hex(bytestr[j]))
            if j<len(bytestr)-1:
                f.write(", ")
        f.write("};n")

        # for each hashed certificate issuer, store the binary data as a byte array
        f.write("const uint8_t idx_" + str(idx) + "[] PROGMEM = {")
        for j in range(0, len(idxHash)):
            totalbytes+=1
            f.write(hex(idxHash[j]))
            if j<len(idxHash)-1:
                f.write(", ")
        f.write("};nn")

        der.close()
        idx = idx + 1

f.write("//global variables for certificates using " + str(totalbytes) + " bytesn")
f.write("const uint16_t numberOfCertificates PROGMEM = " + str(idx) + ";nn")

# store a vector with the length in bytes for each certificate
f.write("const uint16_t certSizes[] PROGMEM = {")
for i in range(0, idx):
    f.write(str(sizes[i]))
    if i<idx-1:
        f.write(", ")
f.write("};nn")

# store a vector with pointers to all certificates
f.write("const uint8_t* const certificates[] PROGMEM = {")
for i in range(0, idx):
    f.write("cert_" + str(i))
    os.unlink(derFiles[i])
    if i<idx-1:
        f.write(", ")
f.write("};nn")

# store a vector with pointers to all certificate issuer hashes
f.write("const uint8_t* const indices[] PROGMEM = {")
for i in range(0, idx):
    f.write("idx_" + str(i))
    if i<idx-1:
        f.write(", ")
f.write("};nn#endif" + "n")

f.close()
Existing header file certificates.h is saved and included in the application. The Python Script is hooked in PlatformIO so that each build can be implemented automatically, with a new version of the Certificate included automatically.
HTTPS Requests to URL Using ESP8266 Source Code
This post was a short-level review of what snippets of code were included. The full application for the ESP8266 IoT Framework can be found on GitHub. Documents for the fetch class can be found here.
Conclusion
In this tutorial, I have shown you how to make Secure HTTPS Requests to URL Using NodeMCU ESP8266. Now you can modify this project and make HTTPS POST or HTTPS GET Request to any URL. I hope you enjoyed reading this article. If you have any questions, comments, or ideas? Let me know in the comment section below.
You might also like reading:
- RFID Based Attendance System Using NodeMCU with PHP Web App
- BME280 Based Mini Weather Station using ESP8266/ESP32
- IoT Based Patient Health Monitoring System Using ESP8266/ESP32 Web Server
- Capacitive Soil Moisture Sensor with OLED Display & Arduino
- Internet Clock Using NodeMCU ESP8266 and 16×2 LCD without RTC Module
- ESP8266 Plot Sensor readings to Webserver in Real-Time Chart
- Simple Weather station using Arduino & BME280 Barometric Pressure Sensor
- Connect RFID to PHP & MySQL Database with NodeMcu ESP8266
- NodeMCU ESP8266 Monitoring DHT11/DHT22 Temperature and Humidity with Local Web Server
- Home Automation with MIT App Inventor and ESP8266