Electronic Voting Machine Using Arduino & LCD Display
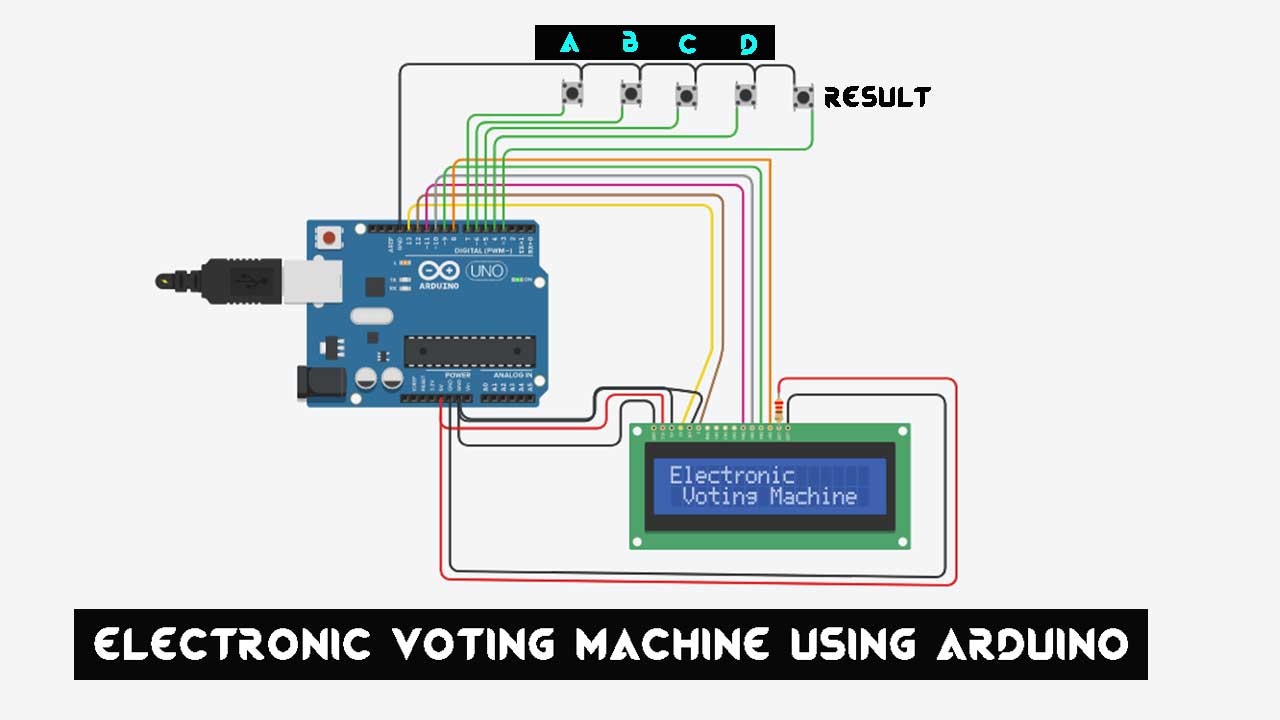
Today we will make a smart electronic voting machine using Arduino. The basic idea behind this project is to build an electronic voting machine that will help to eliminate the manipulation of the manual voting system and remove previous versions of electronic voting. This Digital voting system is simple portable, cheap, and very effective.
The system is provided with an “N” number of buttons where “N” is the number of a political party/Candidate. Here, voters will be allowed to proceed to choose their preferred candidate from the panel of buttons. We have an LCD to display the voting for the satisfaction of the voters. Finally, the results can be calculated automatically simply by pressing the result button.
Video Demonstration
Components Required for Electronic Voting Machine
Here is the list of all the components that are required to complete a smart electronic voting machine using Arduino.
- Arduino UNO
- 16×2 LCD Display
- Push Buttons
- Jumper Wires
- Breadboard
We have a few more Arduino based projects that you may like:
Digital Voting Machine Block Diagram with Arduino
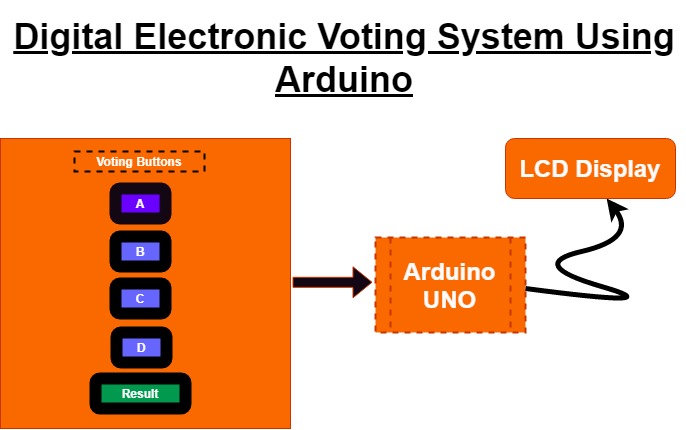
In this smart electronic voting machine project, for the demonstration, we have used four push Buttons for four different candidates taking part in the election. However, you can increase the number of candidates as per your requirements. Actually, When a voter presses any four buttons, the value of the vote will increase each time. After completing the entire voting process, the result button can be pressed to display the result in an LCD Screen.
Features of Arduino based Electronic Voting Machine
- Allow voters to vote for their favorite candidates by pressing a button.
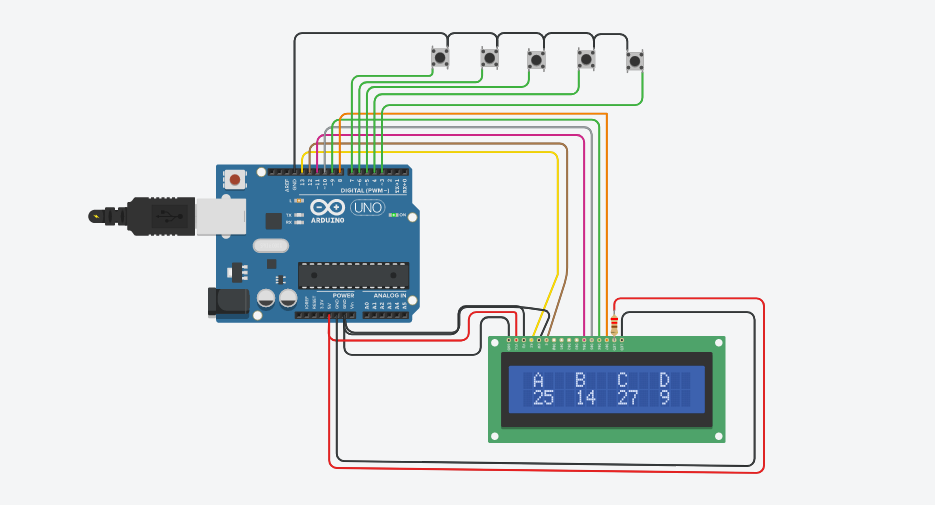
- Display Real-Time data on LCD Screen.
- After completing the entire voting process, display the final result by pressing the result button.
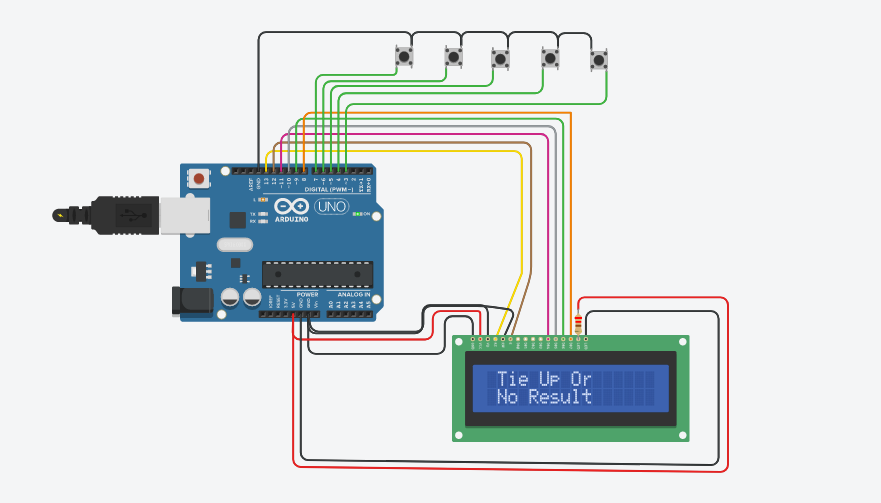
- Display tie-up or No results in a draw condition.
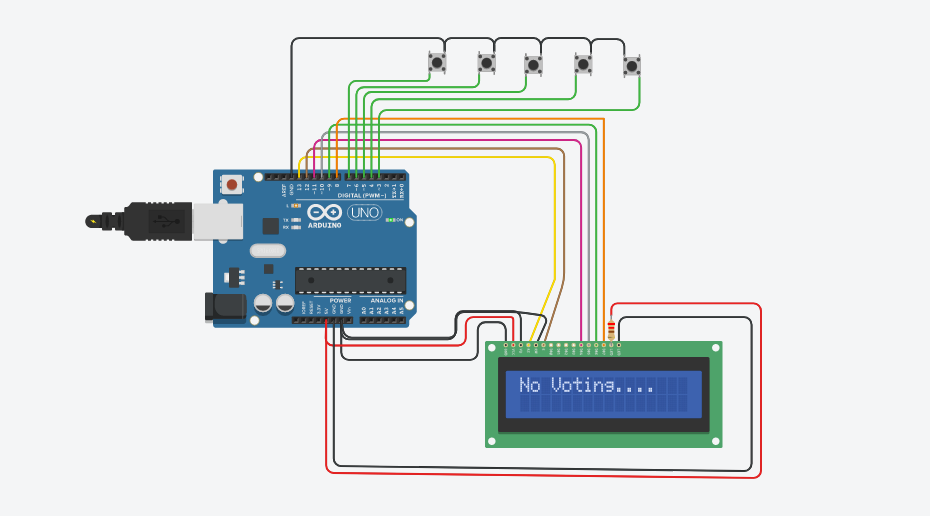
- Displays No Voting when the result button is pressed without voting any candidates.
Schematic Diagram
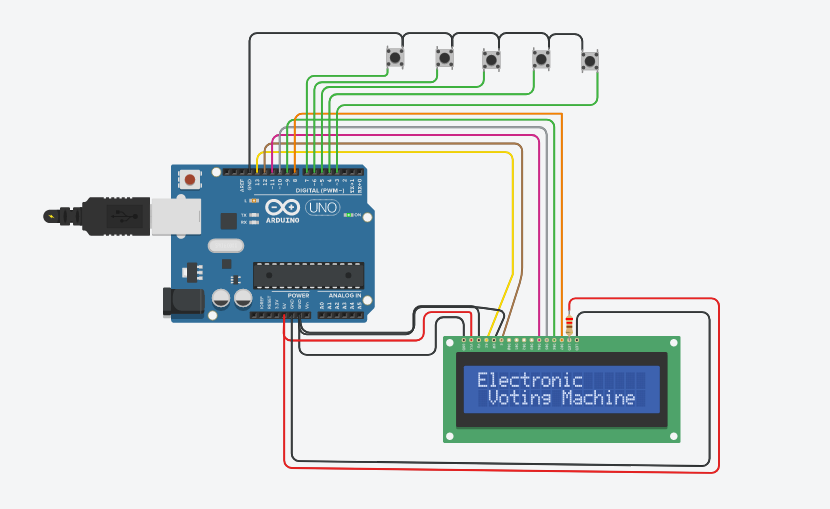
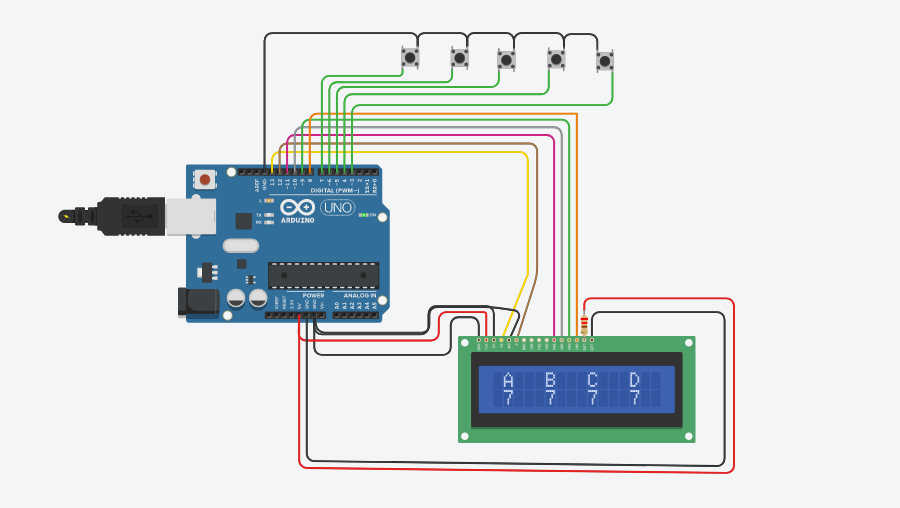
The circuit diagram of the digital voting machine using Arduino LCD and buttons is very simple and easy to understand. You can assemble the circuit diagram as below figure. However, the following table will help you to connect and interface all the components to the Arduino.
| 16×2 LCD Pins | Arduino Pins |
|---|---|
| VSS | GND |
| VDD | 5v |
| Vo | GND |
| RS | 13 |
| RW | GND |
| EN | 12 |
| D4 | 11 |
| D5 | 10 |
| D6 | 9 |
| D7 | 8 |
| A | 5V |
| K | GND |
| Button Pins | Arduino Pins |
| Button 1 | 7 |
| Button 2 | 6 |
| Button 3 | 5 |
| Button 4 | 4 |
| Button 5 | 3 |
| Buttons other Terminal | GND |
I hope with the help of circuit diagram and above table, you have assembled your circuit. Now let’s move on to the programming part. Here we are going to program Arduino UNO board with the help of Arduino IDE. But, before that let’s see a project demonstration.
Digital Voting Machine Demonstration
Here Arduino UNO is the heart and brain of an electronic voting system. Arduino controls the entire voting process, such as reading buttons, increasing the vote value, generating results, and sending votes and results to an LCD display.
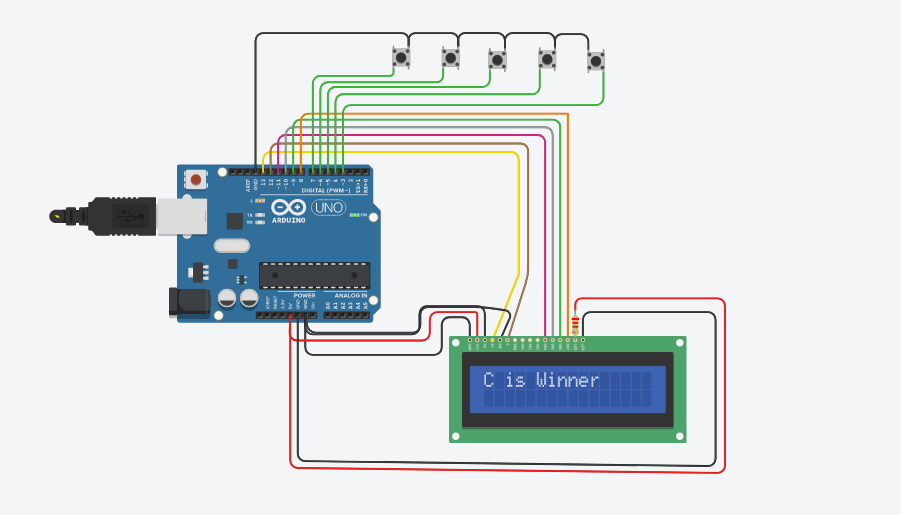
Here we have added five buttons that are assigned to Party/Candidate A, Party/Candidate B, Party/Candidate C, Party/Candidate D, and the final button is used to calculate or display the results.
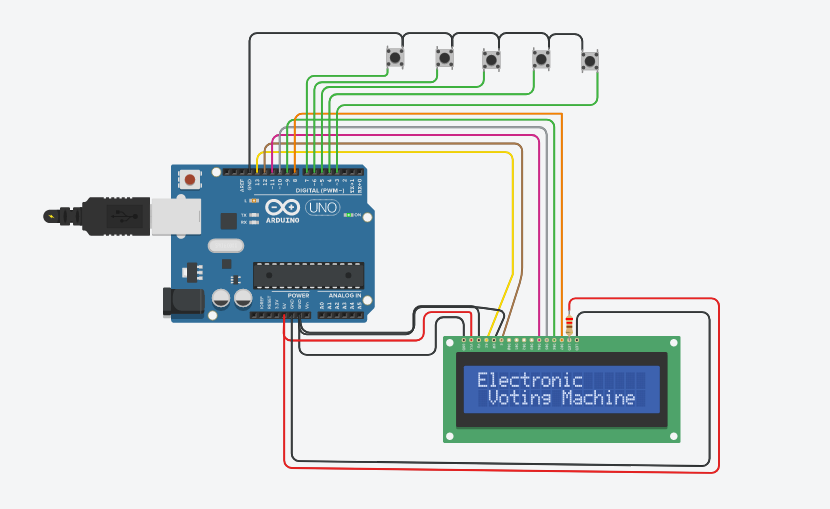
Below images shows clearly shows the story of working on this project.
Program Code Explaination
First of all I included LCD header library file and define pins for LCD and Buttons.
#include<LiquidCrystal.h>
LiquidCrystal lcd(13, 12, 11, 10, 9, 8);
#define S1 7
#define S2 6
#define S3 5
#define S4 4
#define S5 3
Initialize some variables and pin for taking candidate’s voting input from buttons.
int vote1 = 0;
int vote2 = 0;
int vote3 = 0;
int vote4 = 0;
We initialize the LCD and give directions to input-output pins.
  lcd.begin(16, 2);
  lcd.print("Electronic ");
  lcd.setCursor(0, 1);
  lcd.print(" Voting Machine ");
With the delay of 4 seconds make pullup in the input pin by software.
delay(4000);
pinMode(S1, INPUT);
  pinMode(S2, INPUT);
  pinMode(S3, INPUT);
  pinMode(S4, INPUT);
  pinMode(S5, INPUT);
In the code below we have used the digital read function to read the button pressed.
  digitalWrite(S1, HIGH);
  digitalWrite(S2, HIGH);
  digitalWrite(S3, HIGH);
  digitalWrite(S4, HIGH);
  digitalWrite(S5, HIGH);
And then displaying voting on the LCD with the Party/Candidate Name.
lcd.setCursor(1, 0);
  lcd.print("A");
  lcd.setCursor(5, 0);
  lcd.print("B");
  lcd.setCursor(9, 0);
  lcd.print("C");
  lcd.setCursor(13, 0);
  lcd.print("D");
Now count the number of votes obtained by each party/candidate, compare the result among other parties/candidates and announce the winner when the result button is pressed.
if (digitalRead(S1) == 0)
    vote1++;
  while (digitalRead(S1) == 0);
  if (digitalRead(S2) == 0)
    vote2++;
  while (digitalRead(S2) == 0);
  if (digitalRead(S3) == 0)
    vote3++;
  while (digitalRead(S3) == 0);
  if (digitalRead(S4) == 0)
    vote4++;
  while (digitalRead(S4) == 0);
  if (digitalRead(S5) == 0)
  {
    int vote = vote1 + vote2 + vote3 + vote4;
    if (vote)
    {
      if ((vote1 > vote2 && vote1 > vote3 && vote1 > vote4))
      {
        lcd.clear();
        lcd.print("A is Winner");
        delay(3000);
        lcd.clear();
      }
      else if ((vote2 > vote1 && vote2 > vote3 && vote2 > vote4))
      {
        lcd.clear();
        lcd.print("B is Winner");
        delay(3000);
        lcd.clear();
      }
      else if ((vote3 > vote1 && vote3 > vote2 && vote3 > vote4))
      {
        lcd.clear();
        lcd.print("C is Winner");
        delay(3000);
        lcd.clear();
      }
      else if (vote4 > vote1 && vote4 > vote2 && vote4 > vote3)
      {
        lcd.setCursor(0, 0);
        lcd.clear();
        lcd.print("D is Winner");
        delay(3000);
        lcd.clear();
      }

      else if (vote4 > vote1 && vote4 > vote2 && vote4 > vote3)
      {
        lcd.setCursor(0, 0);
        lcd.clear();
        lcd.print("D is Winner");
        delay(3000);
        lcd.clear();
      }

      else
      {
        lcd.clear();
        lcd.print(" Tie Up Or ");
        lcd.setCursor(0, 1);
        lcd.print(" No Result ");
        delay(3000);
        lcd.clear();
      }

    }
    else
    {
      lcd.clear();
      lcd.print("No Voting....");
      delay(3000);
      lcd.clear();
    }
    vote1 = 0; vote2 = 0; vote3 = 0; vote4 = 0, vote = 0;
    lcd.clear();
  }
Are you interested in IoT based Arduino Projects? Few of them are here:
Final Program Sketch
#include<LiquidCrystal.h>
LiquidCrystal lcd(13, 12, 11, 10, 9, 8);

#define S1 7
#define S2 6
#define S3 5
#define S4 4
#define S5 3
int vote1 = 0;
int vote2 = 0;
int vote3 = 0;
int vote4 = 0;
void setup()
{
  pinMode(S1, INPUT);
  pinMode(S2, INPUT);
  pinMode(S3, INPUT);
  pinMode(S4, INPUT);
  pinMode(S5, INPUT);
  lcd.begin(16, 2);
  lcd.print("Electronic ");
  lcd.setCursor(0, 1);
  lcd.print(" Voting Machine ");
  delay(4000);
  digitalWrite(S1, HIGH);
  digitalWrite(S2, HIGH);
  digitalWrite(S3, HIGH);
  digitalWrite(S4, HIGH);
  digitalWrite(S5, HIGH);
  lcd.clear();
  lcd.setCursor(1, 0);
  lcd.print("A");
  lcd.setCursor(5, 0);
  lcd.print("B");
  lcd.setCursor(9, 0);
  lcd.print("C");
  lcd.setCursor(13, 0);
  lcd.print("D");
}
void loop()
{
  lcd.setCursor(1, 0);
  lcd.print("A");
  lcd.setCursor(1, 1);
  lcd.print(vote1);
  lcd.setCursor(5, 0);
  lcd.print("B");
  lcd.setCursor(5, 1);
  lcd.print(vote2);
  lcd.setCursor(9, 0);
  lcd.print("C");
  lcd.setCursor(9, 1);
  lcd.print(vote3);
  lcd.setCursor(13, 0);
  lcd.print("D");
  lcd.setCursor(13, 1);
  lcd.print(vote4);
  if (digitalRead(S1) == 0)
    vote1++;
  while (digitalRead(S1) == 0);
  if (digitalRead(S2) == 0)
    vote2++;
  while (digitalRead(S2) == 0);
  if (digitalRead(S3) == 0)
    vote3++;
  while (digitalRead(S3) == 0);
  if (digitalRead(S4) == 0)
    vote4++;
  while (digitalRead(S4) == 0);
  if (digitalRead(S5) == 0)
  {
    int vote = vote1 + vote2 + vote3 + vote4;
    if (vote)
    {
      if ((vote1 > vote2 && vote1 > vote3 && vote1 > vote4))
      {
        lcd.clear();
        lcd.print("A is Winner");
        delay(3000);
        lcd.clear();
      }
      else if ((vote2 > vote1 && vote2 > vote3 && vote2 > vote4))
      {
        lcd.clear();
        lcd.print("B is Winner");
        delay(3000);
        lcd.clear();
      }
      else if ((vote3 > vote1 && vote3 > vote2 && vote3 > vote4))
      {
        lcd.clear();
        lcd.print("C is Winner");
        delay(3000);
        lcd.clear();
      }
      else if (vote4 > vote1 && vote4 > vote2 && vote4 > vote3)
      {
        lcd.setCursor(0, 0);
        lcd.clear();
        lcd.print("D is Winner");
        delay(3000);
        lcd.clear();
      }

      else if (vote4 > vote1 && vote4 > vote2 && vote4 > vote3)
      {
        lcd.setCursor(0, 0);
        lcd.clear();
        lcd.print("D is Winner");
        delay(3000);
        lcd.clear();
      }

      else
      {
        lcd.clear();
        lcd.print(" Tie Up Or ");
        lcd.setCursor(0, 1);
        lcd.print(" No Result ");
        delay(3000);
        lcd.clear();
      }

    }
    else
    {
      lcd.clear();
      lcd.print("No Voting....");
      delay(3000);
      lcd.clear();
    }
    vote1 = 0; vote2 = 0; vote3 = 0; vote4 = 0, vote = 0;
    lcd.clear();
  }
}
Now copy this sketch codes and paste on your Arduino IDE. You can make your necessary changes like Party/Candidate Name. Now Choose your Arduino UNO board and Port. Just hit that compile button to check if anything wrong in the sketch. Finally, upload the code to the Arduino and enjoy your Modern Digital Voting Machine using Arduino UNO. You may like our previous projects:
Wrapping Up
Finally, I have completed the Smart Electronic Voting Machine Using Arduino LCD and Buttons. I hope you found this project useful! Drop a comment below if you have any doubts or queries. I will do my best to answer your questions. Stay Happy! Stay safe


Wonderful project
Please how can I get in contact with you
Sir i want this project documentation report with pdf