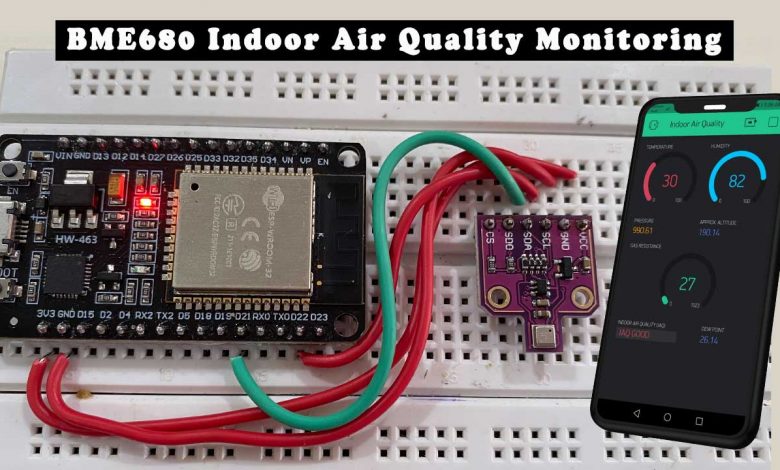
Overview: BME680 Indoor Air Quality Monitoring
Today, in this session, we are going to build IoT Based BME680 Indoor Air Quality Monitoring system using ESP32. The BME680 is an environmental Digital Sensor that measures Gas (VOC) & IAQ, Pressure, Humidity, Temperature, Altitude, and, using some mathematical calculations, we can derive the Dew point. This guide will teach you to interfere BME680 sensor with the ESP32 development board and program using Arduino IDE to monitor its parameters on the Blynk Application. This BME680 environmental sensor can communicate with microcontrollers using both I2C or SPI communication protocols.
By the end of this tutorial, you will interface the BME680 sensor with the ESP32 board, install the required libraries, and program the ESP32 development board. Furthermore, we will design a blynk app dashboard to remotely monitor the BME680 sensor data from anywhere in the world using smartphones.
Components Required
These are the components required for making the BME680 Indoor Air Quality Monitoring System using ESP32.
| S.N | Components Name | Quantity | |
|---|---|---|---|
| 1 | ESP32 Board | 1 | https://amzn.to/2SDuwFh |
| 2 | BME680 Environmental Sensor | 1 | https://amzn.to/2R7LhXZ |
| 3 | Jumper Wires | 4 | https://amzn.to/3vw9ZAt |
| 4 | Breadboard | 1 | https://amzn.to/2NP2UKL |
You can get all the parts for your projects at the best price on Amazon
BME680 Sensor Measures
As I already mentioned above, The BME680 is a five in one Environmental digital sensor that measures:
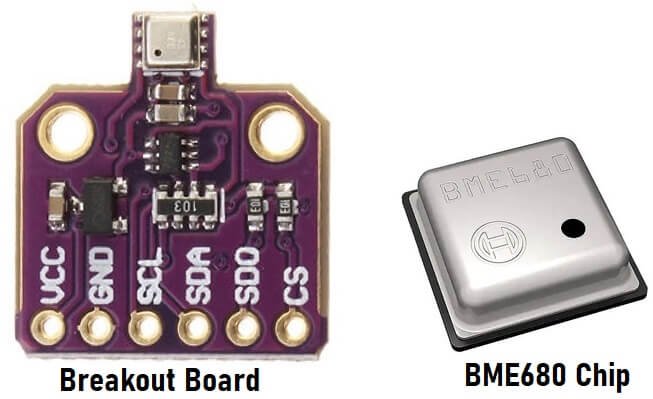
- Gas: Volatile Organic Compounds (VOC) like ethanol and carbon monoxide
- Temperature
- Humidity
- Barometric pressure &
- Altitude
Accuracy of BME680 Sensor
The following table shows the Accuracy and operation range of the temperature, humidity, pressure, altitude, and gas sensors of the BME680 Environmental Sensor:
| Sensor | Accuracy | Operation Range |
| Temperature | +/- 1.0ºC | -40 to 85 ºC |
| Humidity | +/- 3% | 0 to 100 % |
| Pressure | +/- 1 hPa | 300 to 1100 hPa |
| Altitude | +/- 1 M | 0 – 30,000ft |
BME680 sensor Pinout
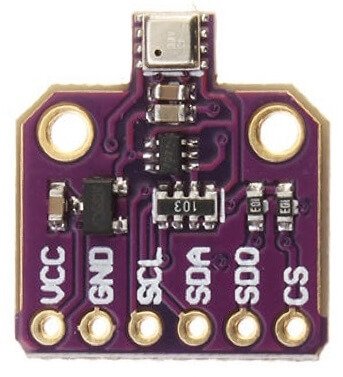
The following table is the BME680 sensor Pinout table:
| VCC | Powers the sensor |
| GND | Ground Pin |
| SCL | SCL pin for I2C communicationSCK pin for SPI communication |
| SDA | SDA pin for I2C communicationSDI (MOSI) pin for SPI communication |
| SDO | SDO (MISO) pin for SPI communication |
| CS | Chip select pin for SPI communication |
Circuit Diagram: ESP32 & BME680 Indoor Air Quality Monitoring System
The BME680 Environmental Sensor can communicate using I2C or SPI communication protocols. So, In this IoT Based BME680 Indoor Air Quality Monitoring system using ESP32 Project. We will learn the wiring for the I2C communication protocol.
Following is the schematic diagram to wire the BME680 to the ESP32 using the default I2C pins.
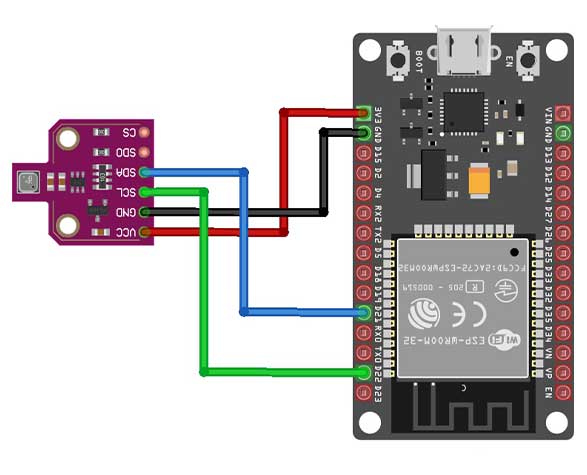
ESP32 with BME680 using I2C
| BME680 | ESP32 |
| SCL | D22 |
| SDA | D21 |
| VCC | 3.3V |
| GND | GND |
I have assembled the circuit on breadboard but you can order a custom PCB from PCBWay.com
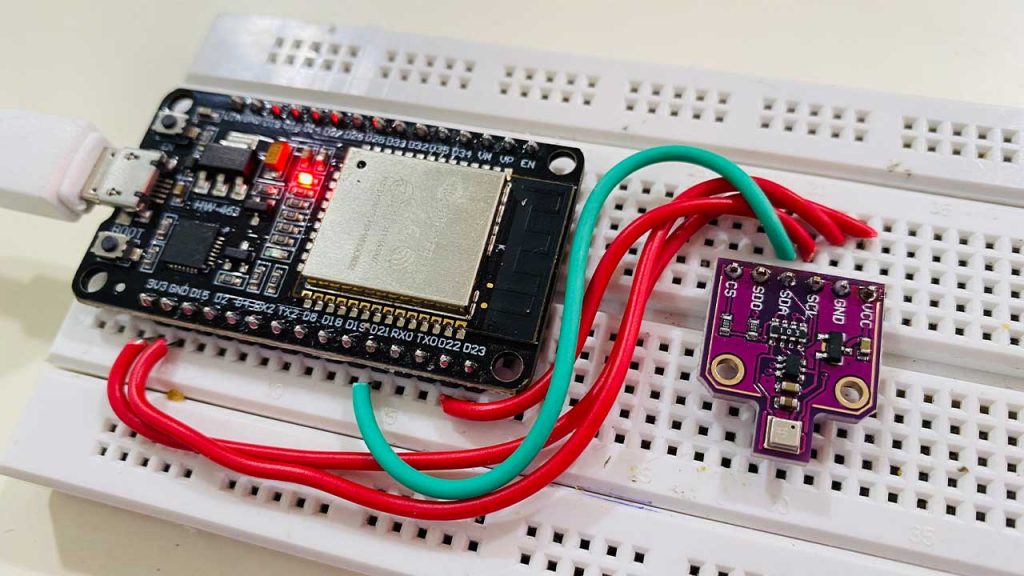
The PCBWay Company sponsored this tutorial. PCBWay is quite professional in PCB manufacturing. You can try their services at extremely low prices. Only $5 for 10 PCBs and $30 in total for 20 PCBs assembly. Besides this, the new members also get a $5 sign-up bonus. That means the new users can order 10 PCBs for free.
Blynk App configuration for BME680 IAQ Monitoring
I have done many projects related to IoT with the Blynk application and designed many apps before. In this session, I am designing IoT based Indoor Air Quality Monitoring App. So, make sure you download and install the Blynk app from Playstore/Appstore.
- First, open the blynk application.
- Click on to create a new project and enter the project name as “Indoor Air Quality”. Instead, you can type any name. You can change the name later.
- Click on Choice Tools and select ESP32.
- Make sure we set the connection type to Wi-Fi.
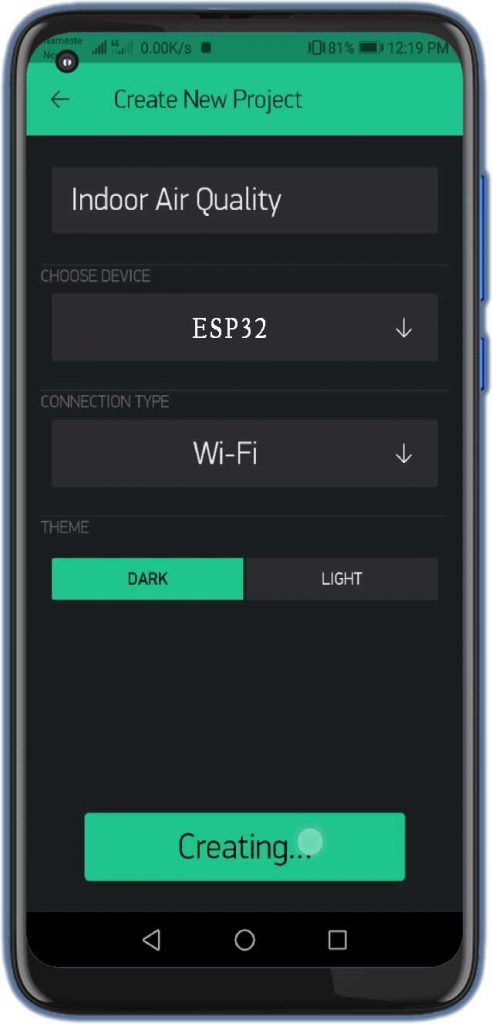
- Finally, click on the create button, a verification token will be sent to your email ID, which will be used in the Program CODE.
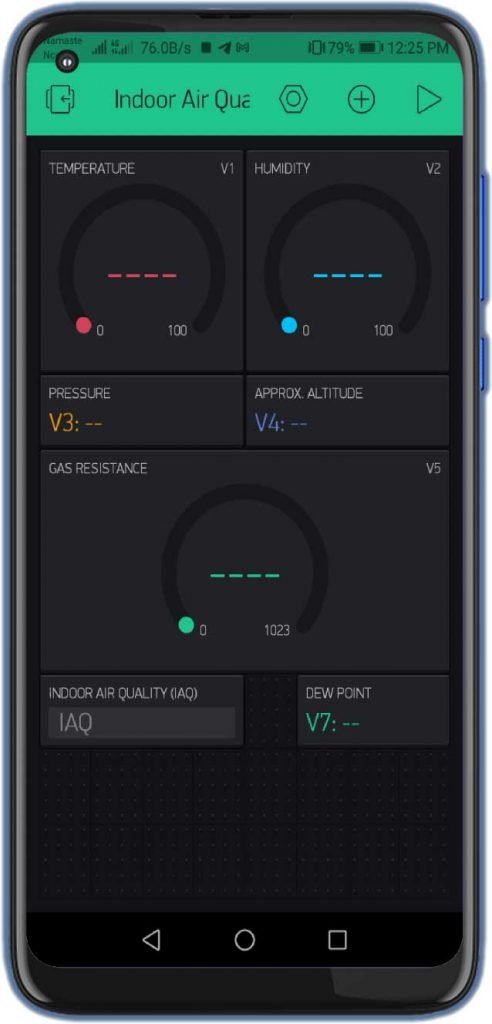
- Click + icon on the screen and search for the Gauge widget, add 3 of them, and search for the value display Widget. Add 3 of them to your Blynk App dashboard. Last, add a text display widget and configure them as shown in the image below. Now the application for IoT Indoor Air Quality Monitoring is ready to use.
Preparing Arduino IDE For BME680
Actually, We’ll program the ESP32 board using the Arduino IDE. So, make sure you have the ESP32 add-on installed.
Basically, to compile this program we also need to install the Adafruit BME680 library and the Adafruit Unified Sensor library.
Installing the BME680 Library
To get readings from the BME680 Environmental sensor module we’ll use the Adafruit_BME680 library. Actually, the following are steps to install the library in your Arduino IDE:

Open your Arduino IDE and go to Sketch > Include Library > and Manage Libraries. Now the Library Manager should open. Here, search for “adafruit bme680” on the Search box and click on install to install the library.
Installing the Adafruit_Sensor Library
Actually, to use the BME680 library, we also need to install the Adafruit_Sensor library. Follow the same steps mentioned above to install the library in your Arduino IDE:

Go to Sketch > Include Library > Manage Libraries and then type “Adafruit Unified Sensor” in the search box. Scroll to find the library. Now, you click on the install button and install it.
Note: After installing the libraries, restart your Arduino IDE.
Program Code Explanation
First, the code starts by including the required libraries: Wire.h Library to use the I2C communication protocol. SPI.h Library to use SPI communication protocol instead of I2C. Second, Adafruit_Sensor and Adafruit_BME680 libraries read data from BME680 sensors. Similarly, BlynkSimpleEsp32.h to communicate between ESP32 and Blynk IoT Cloud.
Install BlynkSimpleEsp32.h library from here: Installing BlynkSimpleEsp32.h library on Arduino IDE
#include <WiFi.h>
#include <BlynkSimpleEsp32.h>
#include <Wire.h>
#include <Adafruit_Sensor.h>
#include "Adafruit_BME680.h"
Replace the following field with your Blynk Authentication token and Wi-Fi Network credentials
char auth[] = " xxx-xxxx-xxx";
char ssid[] = "xxx-xxxx-xxx";
char pass[] = "xxx-xxxx-xxx";
In the void BME680(), we’ll get readings from the BME680 sensor. First, tell the sensor to start reading data and store them on variables. Do some calculations and send those reading to Blynk IoT Cloud through virtual pin as defined.
Finally, After adding the following code, we can get the readings as follows:
- bme.readTemperature: provides a temperature reading
- bme.readPressure: provides a pressure reading
- bme.readHumidity: provides humidity reading
- bme.gas_resistance: provides gas resistance
- bme.readAltitude: provides altitude value.
- DewPointFast(Temperature, Humidity) calculates dew point.
void bme680()
{
  Temperature = bme.readTemperature();
  Blynk.virtualWrite(V1, Temperature);

  Humidity = bme.readHumidity();
  Blynk.virtualWrite(V2, Humidity);

  Pressure = bme.readPressure() / 100.0F;
  Blynk.virtualWrite(V3, Pressure);

  Altitude = bme.readAltitude(SEALEVELPRESSURE_HPA);
  Blynk.virtualWrite(V4, Altitude);

  Gas = (bme.gas_resistance / 1000.0);
  Blynk.virtualWrite(V5, Gas);

  if ((Gas > 0)  && (Gas  <= 50)) {
    Blynk.virtualWrite(V6, "IAQ GOOD");
  }
  if ((Gas > 51)  && (Gas  <= 100)) {
    Blynk.virtualWrite(V6, "IAQ Average");
  }
  if ((Gas > 101)  && (Gas  <= 150)) {
    Blynk.virtualWrite(V6, "IAQ Little Bad");
  }
  if ((Gas > 151)  && (Gas  <= 200)) {
    Blynk.virtualWrite(V6, "IAQ Bad");
  }
  if ((Gas > 201)  && (Gas  <= 300)) {
    Blynk.virtualWrite(V6, "IAQ Worse");
  }
  if ((Gas > 301)  && (Gas  <= 500)) {
    Blynk.virtualWrite(V6, "IAQ Very Bad");
  }

  double DewPoint = DewPointFast(Temperature, Humidity);
  Blynk.virtualWrite(V7, DewPoint);
}
Final Program/Source code
#include <WiFi.h>
#include <BlynkSimpleEsp32.h>
#include <Wire.h>
#include <Adafruit_Sensor.h>
#include "Adafruit_BME680.h"

#define SEALEVELPRESSURE_HPA (1013.25)

Adafruit_BME680 bme;

float Temperature;
float Humidity;
float Pressure;
float Gas;
float Altitude;
float DewPont;

BlynkTimer timer;

char auth[] = " xxx-xxxx-xxx";
char ssid[] = "xxx-xxxx-xxx";
char pass[] = "xxx-xxxx-xxx";

void setup()
{
  Blynk.begin(auth, ssid, pass);
  bme.begin(0x76);

  // Set up oversampling and filter initialization
  bme.setTemperatureOversampling(BME680_OS_8X);
  bme.setHumidityOversampling(BME680_OS_2X);
  bme.setPressureOversampling(BME680_OS_4X);
  bme.setIIRFilterSize(BME680_FILTER_SIZE_3);
  bme.setGasHeater(320, 150); // 320*C for 150 ms

  timer.setInterval(2000L, bme680);
}

void bme680()
{
  Temperature = bme.readTemperature();
  Blynk.virtualWrite(V1, Temperature);

  Humidity = bme.readHumidity();
  Blynk.virtualWrite(V2, Humidity);

  Pressure = bme.readPressure() / 100.0F;
  Blynk.virtualWrite(V3, Pressure);

  Altitude = bme.readAltitude(SEALEVELPRESSURE_HPA);
  Blynk.virtualWrite(V4, Altitude);

  Gas = (bme.gas_resistance / 1000.0);
  Blynk.virtualWrite(V5, Gas);

  if ((Gas > 0)  && (Gas  <= 50)) {
    Blynk.virtualWrite(V6, "IAQ GOOD");
  }
  if ((Gas > 51)  && (Gas  <= 100)) {
    Blynk.virtualWrite(V6, "IAQ Average");
  }
  if ((Gas > 101)  && (Gas  <= 150)) {
    Blynk.virtualWrite(V6, "IAQ Little Bad");
  }
  if ((Gas > 151)  && (Gas  <= 200)) {
    Blynk.virtualWrite(V6, "IAQ Bad");
  }
  if ((Gas > 201)  && (Gas  <= 300)) {
    Blynk.virtualWrite(V6, "IAQ Worse");
  }
  if ((Gas > 301)  && (Gas  <= 500)) {
    Blynk.virtualWrite(V6, "IAQ Very Bad");
  }

  double DewPoint = DewPointFast(Temperature, Humidity);
  Blynk.virtualWrite(V7, DewPoint);
}

void loop()
{
  Blynk.run();
  timer.run();
}
// DewPoint Calculation
double DewPointFast(double celsius, double Humidity)
{
  double a = 17.271;
  double b = 237.7;
  double temp = (a * celsius) / (b + celsius) + log(Humidity * 0.01);
  double Td = (b * temp) / (a - temp);
  return Td;
}
Finally, copy the above program code on your Arduino IDE. Now compile the code and upload it to the ESP32 board by selecting the correct board and correct port.
Open the blynk App to see the real-time data on your smartphone.
Demonstration: IoT Based BME680 Indoor Air Quality Monitoring system using ESP32
Run freshly configured blynk app dashboard. Now, you will get access to the cloud server with the latest BME680 sensor reading. You can access this data from any network on your smartphone from anywhere in the world.
Note: I updated the readings every second. You can customize it according to your requirements.
Video Tutorial & Guide
Wrapping Up
This tutorial shows you the IoT Based BME680 Indoor Air Quality Monitoring system using ESP32. This project is very helpful for monitoring our internal (home) environment wirelessly. I hope you enjoyed reading this article. If you have questions or ideas? Let me know in the comment section below.
Recommended Readings: