Overview: BME680 Environment Monitoring System
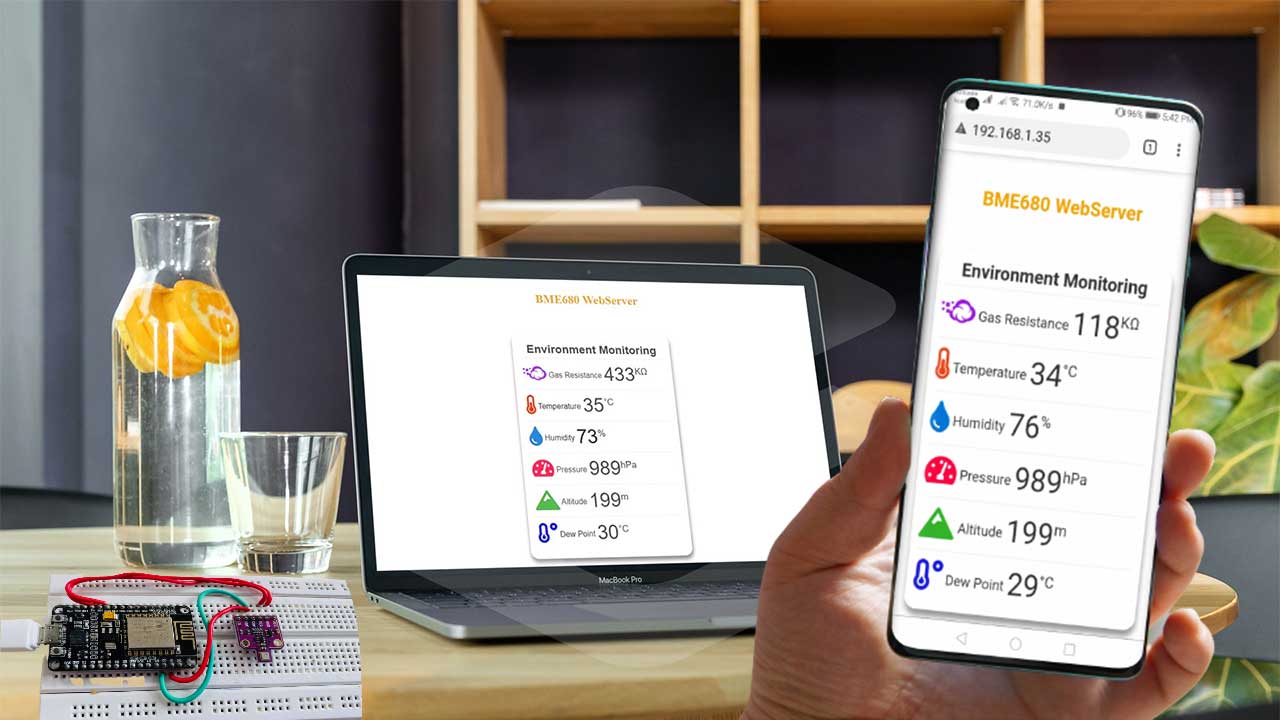
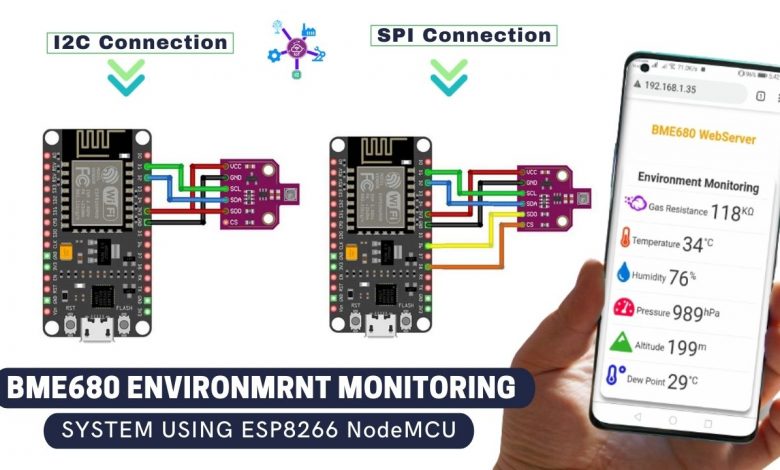
Today, in this session, we are going to build BME680 based Environment Monitoring System using ESP8266. The BME680 is an environmental Digital Sensor that measures Gas, Pressure, Humidity, Temperature, and Altitude. In this guide, you will learn to interfere BME680 sensor with the ESP8266 NodeMCU development board and program using Arduino IDE. This environmental sensor can communicate with microcontrollers using both I2C or SPI communication protocols.
- Overview: BME680 Environment Monitoring System
- Components Required
- Introduction to BME680 Environmental Sensor
- Circuit Diagram of BME680 Environment Monitoring System
- Preparing Arduino IDE For BME680
- Program Code Explanation
- Final Program Code for BME680 Monitoring
- Demonstration: BME680 Environment Monitoring System with ESP8266
- Wrapping Up
By the end of this tutorial, you will be able to interface the BME680 sensor with the ESP8266 board, install required libraries, and program the ESP8266 development board. Furthermore, we will build a local webserver to monitor the BME680 sensor data remotely from a smartphone or PC.
Recommended Readings: Interface BME680 Environmental Sensor with Arduino
Indoor Air Quality Monitoring with BME680 & ESP8266 Webserver
Components Required
These are the components required for making BME680 Environment Monitoring System using ESP8266.
| S.N | Components Name | Quantity | |
|---|---|---|---|
| 1 | NodeMCU ESP8266 12E Board | 1 | https://amzn.to/3mTuL95 |
| 2 | BME680 Environmental Sensor | 1 | https://amzn.to/2R7LhXZ |
| 3 | Jumper Wires | 5 | https://amzn.to/3vw9ZAt |
| 4 | Breadboard | 1 | https://amzn.to/2NP2UKL |
You can get all the parts for your projects at the best price on Amazon.
Introduction to BME680 Environmental Sensor
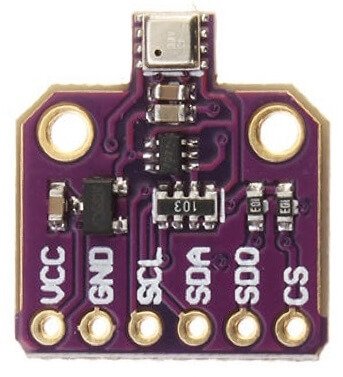
The BME680 is an Environmental sensor that has the capabilities to measure gas (VOCs), pressure, humidity, temperature, and even altitude. The gas sensor on BME680 can detect a wide range of gases, such as volatile organic compounds (VOCs). So the BME680 sensor can be used to control the indoor quality of air.
BME680 Sensor Measures
As I already mentioned above, The BME680 is a five in one Environmental digital sensor that measures:
- Gas: Volatile Organic Compounds (VOC) like ethanol and carbon monoxide
- Temperature
- Humidity
- Barometric pressure
- Altitude
Accuracy of BME680 Sensor
The following table shows the Accuracy and operation range of the temperature, humidity, pressure, altitude, and gas sensors of the BME680 Environmental Sensor:
| Sensor | Accuracy | Operation Range |
| Temperature | +/- 1.0ºC | -40 to 85 ºC |
| Humidity | +/- 3% | 0 to 100 % |
| Pressure | +/- 1 hPa | 300 to 1100 hPa |
| Altitude | +/- 1 M | 0 – 30,000ft |
The Gas Sensor used on BME680
For this BME680 Environment Monitoring System using the ESP8266 project. We have used the BME680 sensor. That includes a MOX (metal-oxide) sensor that detects VOCs in the air.
The MOX sensor is made up of a sensitive layer of the metal-oxide surface. It detects VOCs by absorbing oxygen molecules in its sensitive layer.
Basically, when the sensor is exposed to low gases, oxygen molecules react and increase conductivity across the surface. BME680 sensor provides resistance values as a raw signal. These values changes because of differences in VOC concentrations:
- Low resistance means A high concentration of VOCs
- High resistance means Low concentration of VOCs
BME680 Pinout
The following table is the BME680 sensor Pinout table:
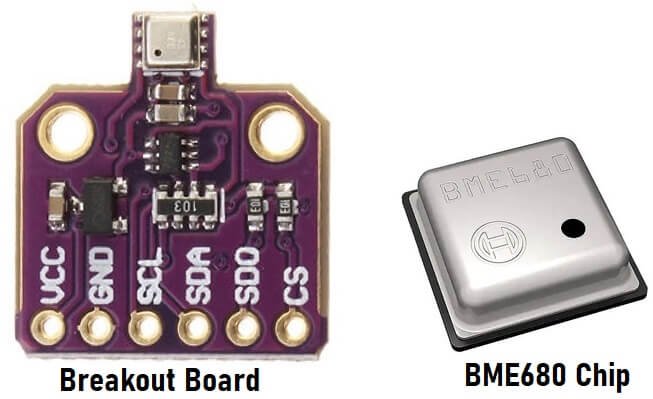
| VCC | Powers the sensor |
| GND | Ground Pin |
| SCL | SCL pin for I2C communication SCK pin for SPI communication |
| SDA | SDA pin for I2C communication SDI (MOSI) pin for SPI communication |
| SDO | SDO (MISO) pin for SPI communication |
| CS | Chip select pin for SPI communication |
Circuit Diagram of BME680 Environment Monitoring System
The BME680 Environmental Sensor can communicate using I2C or SPI communication protocols. So, In this BME680 Environment Monitoring System using the ESP8266 Project. we will learn the wiring for both I2C and SPI communication protocol.
ESP8266 with BME680 using I2C
Following is the schematic diagram to wire the BME680 to the ESP8266 NodeMCU using the default I2C pins.
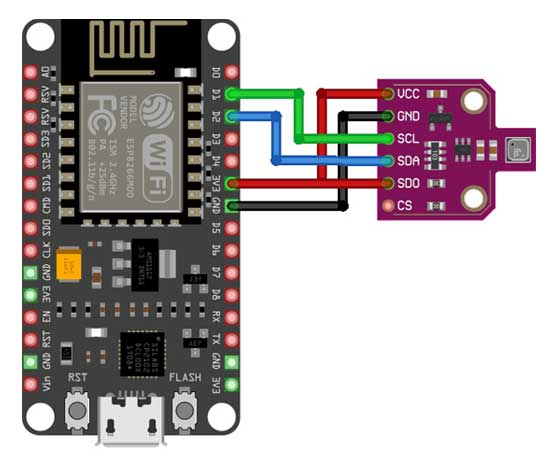
| BME680 | ESP8266 NodeMCU |
| SCL | GPIO 05 (D1) |
| SDA | GPIO 04 (D2) |
ESP8266 with BME680 using SPI
Alternatively, you can use the SPI communication protocol instead. In that case, the following schematic diagram will help you to wire the BME680 to the ESP8266 using the default SPI pins.
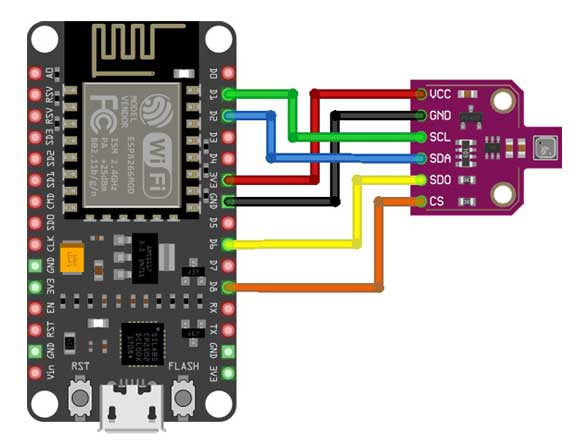
| BME680 | ESP8266 NodeMCU |
| SCL (SCK SPI Clock) | GPIO 05 (D1) |
| SDA (SDI MOSI) | GPIO 04 (D2) |
| SDO (MISO) | GPIO 12 (D6) |
| CS (Chip Select) | GPIO 15 (D8) |
PCB Designing for BME680 & ESP8266
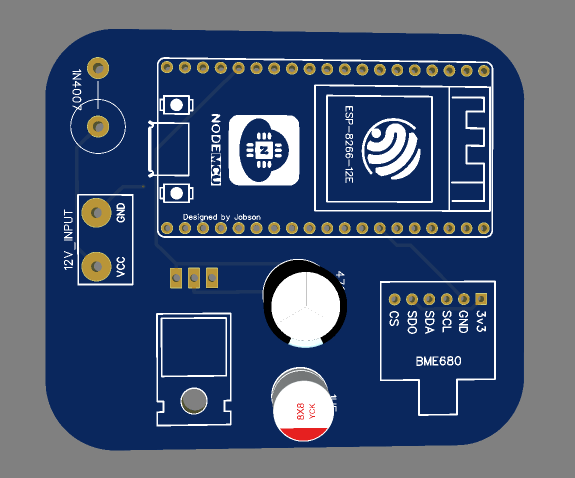
This custom PCB is designed in PCB making tool EasyEDA. Here, you can see the View of the PCB. The Gerber file for the PCB is given below. You can download the Gerber file and order the PCB online from SeeedStudio.
PCB Ordering & Assembly
Now you can visit https://seeedstudio.com/fusion_pcb.html/ and order your custom PCB at a reasonable price.
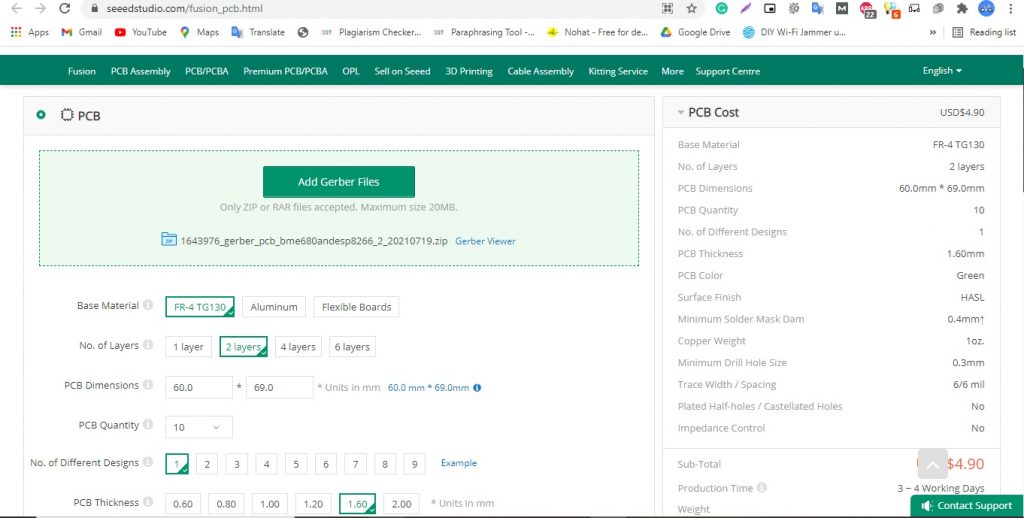
SeeedStudio Provides one-stop prototype services for PCB (printed circuit board), PCBA (PCB assembly) and other electronics and mechanically customized services such as CNC milling, 3D printing and PCB layout services. Seed Fusion promises mature PCB fabrication with low cost, fast manufacturing time and 100% quality guarantee. This is why Seeed is trusted by millions of electronic engineers, hobbyists and manufacturers around the world.
Preparing Arduino IDE For BME680
Actually, We’ll program the ESP8266 board using Arduino IDE. So, make sure you have the ESP8266 add-on installed.
Basically, to compile this program we also need to install the Adafruit BME680 library and the Adafruit Unified Sensor library.
Installing the BME680 Library
To get readings from the BME680 Environmental sensor module we’ll use the Adafruit_BME680 library. Actually, following are steps to install the library in your Arduino IDE:
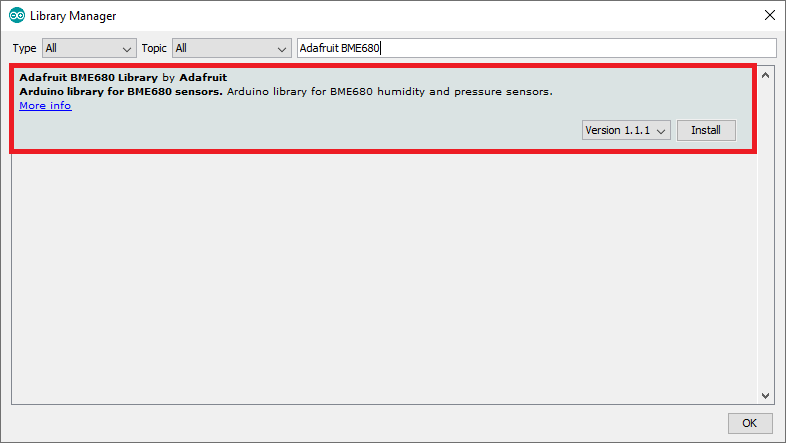
Open your Arduino IDE and go to Sketch > Include Library > and Manage Libraries. Now the Library Manager should open. Here, search for “adafruit bme680 ” on the Search box and click on install to install the library.
Installing the Adafruit_Sensor Library
Actually, to use the BME680 library, we also need to install the Adafruit_Sensor library. Follow the same steps mentioned above to install the library in your Arduino IDE:
Go to Sketch > Include Library > Manage Libraries and then type “Adafruit Unified Sensor” in the search box. Scroll all the way down to find the library. Now, you click on the install button and install it.
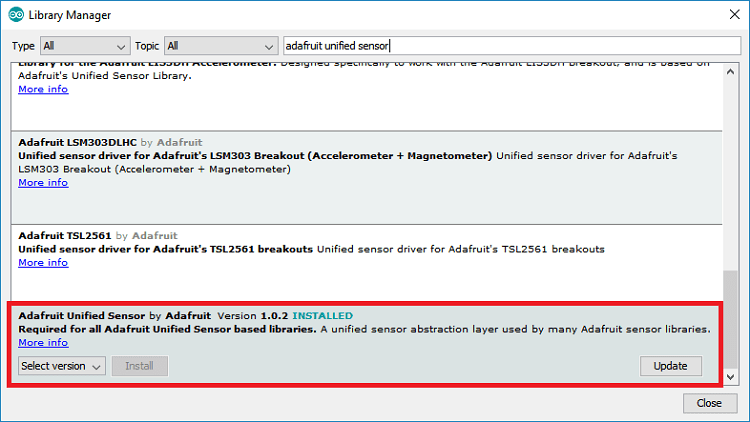
Note: After installing the libraries, restart your Arduino IDE.
Program Code Explanation
Firstly, the code starts by including the required libraries: Wire.h Library to use the I2C communication protocol. SPI.h Library to use SPI communication protocol instead of I2C. Secondly, Adafruit_Sensor and Adafruit_BME680 libraries to read data from BME680 sensors. Similarly, ESP8266WebServer.h to create a webserver on the NodeMCU ESP8266 board.
Install ESPAsyncWebServer library from here: Installing ESP8266 Webserver library on Arduino IDE
#include <Wire.h>
#include <SPI.h>
#include <Adafruit_Sensor.h>
#include "Adafruit_BME680.h"
#include <ESP8266WiFi.h>
#include <ESP8266WebServer.h>
Replace the following field with your WiFi Network credentials
// Replace with your network credentials
const char* ssid = "xxxxx-xxxx-xxxx";  // Enter SSID here
const char* password = "xxxxxxxxxxxxxx";  //Enter Password here
Basically, for demonstration purposes, I have used the I2C communication protocol with sensors. Anyway, the code is ready if you want to use SPI as well. You need to uncomment the following lines of code that define the SPI PIN for BME680.
Adafruit_BME680 bme; // I2C
//Adafruit_BME680 bme(BME_CS); // hardware SPI
//Adafruit_BME680 bme(BME_CS, BME_MOSI, BME_MISO, BME_SCK);

//Uncomment if using SPI
/*#define BME_SCK 13
#define BME_MISO 12
#define BME_MOSI 11
#define BME_CS 10*/
Started ESP8266WebServer on port 80. Also, variables are declared for storing environmental paramerters like Temperature, Humidity, Pressure, Gas Resistance, Altitude, and Dew point.
ESP8266WebServer server(80);
float temperature;
float humidity;
float pressure;
float gasResistance;
float altitude;
float dewPont;
In the setup() part we start a serial communication.
Serial.begin(115200);
  delay(100);
Initialize the BME680 Environmental sensor. Then Connect to your local wi-fi network and print the IP address on serial monitor.
  while (!Serial);
  Serial.println(F("BME680 test"));

  if (!bme.begin()) {
    Serial.println("Could not find a valid BME680 sensor, check wiring!");
    while (1);
  }

Serial.println("Connecting to ");
  Serial.println(ssid);

  //Connect to your local wi-fi network
  WiFi.begin(ssid, password);

  //check wi-fi is connected to wi-fi network
  while (WiFi.status() != WL_CONNECTED) {
    delay(1000);
    Serial.print(".");
  }
  Serial.println("");
  Serial.println("WiFi connected..!");
  Serial.print("Got IP: ");  Serial.println(WiFi.localIP());
In the loop(), we’ll call the server.handleclient and handle_OnConnect user defined function to get readings from the BME680 sensor.
void loop() {
  server.handleClient();


}

void handle_OnConnect() {

  temperature = bme.readTemperature();
  humidity = bme.readHumidity();
  pressure = bme.readPressure() / 100.0F;
  gasResistance = bme.gas_resistance / 1000.0;
  altitude = bme.readAltitude(SEALEVELPRESSURE_HPA);
  double dewPoint = dewPointFast(temperature, humidity);


  server.send(200, "text/html", SendHTML(temperature, humidity, pressure, gasResistance, altitude, dewPoint));
}
Finally, After adding the following code, we can get the readings as follows:
- bme.readTemperature: provides a temperature reading
- bme.readPressure: provides a pressure reading
- bme.reaHhumidity: provides humidity reading
- bme.gas_resistance: provides gas resistance
- bme.readAltitude(SEALEVELPRESSURE_HPA): provides approx. altitude.
This Ajax code helps to send data from NodeMCU to the webserver in background without refreshing the page.
//Ajax Code Start
  html += "<script>n";
  html += "setInterval(loadDoc,1000);n";
  html += "function loadDoc() {n";
  html += "var xhttp = new XMLHttpRequest();n";
  html += "xhttp.onreadystatechange = function() {n";
  html += "if (this.readyState == 4 && this.status == 200) {n";
  html += "document.body.innerHTML =this.responseText}n";
  html += "};n";
  html += "xhttp.open("GET", "/", true);n";
  html += "xhttp.send();n";
  html += "}n";
  html += "</script>n";
  //Ajax Code END
Designing Webserver for BME680 Monitoring System using ESP8266
The following code creates a beautiful webserver on ESP8266 for EME680 sensor to monitor its value remotely.
String SendHTML(float temperature, float humidity, float pressure, float gasResistance, float altitude, float dewPoint) {
String html = "<!DOCTYPE html>";
html += "<html>";
html += "<head>";
html += "<title>BME680 Webserver</title>";
html += "<meta name='viewport' content='width=device-width, initial-scale=1.0'>";
html += "<link rel='stylesheet' href='https://cdnjs.cloudflare.com/ajax/libs/font-awesome/5.7.2/css/all.min.css'>";
html += "<link rel='stylesheet' type='text/css' href='styles.css'>";
html += "<style>";
html += "body { background-color: #fff; font-family: sans-serif; color: #333333; font: 12px Helvetica, sans-serif box-sizing: border-box;}";
html += "#page { margin: 18px; background-color: #fff;}";
html += ".container { height: inherit; padding-bottom: 18px;}";
html += ".header { padding: 18px;}";
html += ".header h1 { padding-bottom: 0.3em; color: #f4a201; font-size: 25px; font-weight: bold; font-family: Garmond, 'sans-serif'; text-align: center;}";
html += "h2 { padding-bottom: 0.2em; border-bottom: 1px solid #eee; margin: 2px; text-align: center;}";
html += ".box-full { padding: 18px; border 1px solid #ddd; border-radius: 1em 1em 1em 1em; box-shadow: 1px 7px 7px 1px rgba(0,0,0,0.4); background: #fff; margin: 18px; width: 300px;}";
html += "@media (max-width: 494px) { #page { width: inherit; margin: 5px auto; } #content { padding: 1px;} .box-full { margin: 8px 8px 12px 8px; padding: 10px; width: inherit;; float: none; } }";
html += "@media (min-width: 494px) and (max-width: 980px) { #page { width: 465px; margin 0 auto; } .box-full { width: 380px; } }";
html += "@media (min-width: 980px) { #page { width: 930px; margin: auto; } }";
html += ".sensor { margin: 10px 0px; font-size: 2.5rem;}";
html += ".sensor-labels { font-size: 1rem; vertical-align: middle; padding-bottom: 15px;}";
html += ".units { font-size: 1.2rem;}";
html += "hr { height: 1px; color: #eee; background-color: #eee; border: none;}";
html += "</style>";

//Ajax Code Start
  html += "<script>n";
  html += "setInterval(loadDoc,1000);n";
  html += "function loadDoc() {n";
  html += "var xhttp = new XMLHttpRequest();n";
  html += "xhttp.onreadystatechange = function() {n";
  html += "if (this.readyState == 4 && this.status == 200) {n";
  html += "document.body.innerHTML =this.responseText}n";
  html += "};n";
  html += "xhttp.open("GET", "/", true);n";
  html += "xhttp.send();n";
  html += "}n";
  html += "</script>n";
  //Ajax Code END

html += "</head>";
html += "<body>";
html += "<div id='page'>";
html += "<div class='header'>";
html += "<h1>BME680 WebServer</h1>";
html += "</div>";
html += "<div id='content' align='center'>";
html += "<div class='box-full' align='left'>";
html += "<h2>";
html += "Environment Monitoring ";
html += "</h2>";
html += "<div class='sensors-container'>";

//For Gas Resistance
html += "<div class='sensors'>";
html += "<p class='sensor'>";
html += "<i class='fab fa-cloudversify' style='color:#9e19e0'></i>";
html += "<span class='sensor-labels'> Gas Resistance </span>";
html += (int)gasResistance;
html += "<sup class='units'>KΩ</sup>";
html += "</p>";
html += "<hr>";
html += "</div>";

//For Temperature
html += "<div class='sensors'>";
html += "<p class='sensor'>";
html += "<i class='fas fa-thermometer-half' style='color:#eb4015'></i>";
html += "<span class='sensor-labels'> Temperature </span>";
html += (int)temperature;
html += "<sup class='units'>°C</sup>";
html += "</p>";
html += "<hr>";

//For Humidity
html += "<p class='sensor'>";
html += "<i class='fas fa-tint' style='color:#0275d8'></i>";
html += "<span class='sensor-labels'> Humidity </span>";
html += (int)humidity;
html += "<sup class='units'>%</sup>";
html += "</p>";
html += "<hr>";

//For Pressure
html += "<p class='sensor'>";
html += "<i class='fas fa-tachometer-alt' style='color:#ff0040'></i>";
html += "<span class='sensor-labels'> Pressure </span>";
html += (int)pressure;
html += "<sup class='units'>hPa</sup>";
html += "</p>";
html += "<hr>";

//For Altitude
html += "<p class='sensor'>";
html += "<i class='fas fa-mountain' style='color:#35b22d'></i>";
html += "<span class='sensor-labels'> Altitude </span>";
html += (int)altitude;
html += "<sup class='units'>m</sup>";
html += "</p>";
html += "<hr>";

//For Dew Point
html += "<p class='sensor'>";
html += "<i class='fas fa-temperature-low' style='color:#191ce3'></i>";
html += "<span class='sensor-labels'> Dew Point </span>";
html += (int)dewPoint;
html += "<sup class='units'>°C</sup>";
html += "</p>";


html += "</div>";
html += "</div>";
html += "</div>";
html += "</div>";
html += "</div>";
html += "</body>";
html += "</html>";
return html;
}
Final Program Code for BME680 Monitoring
#include <Wire.h>
#include <SPI.h>
#include <Adafruit_Sensor.h>
#include "Adafruit_BME680.h"
#include <ESP8266WiFi.h>
#include <ESP8266WebServer.h>

#define SEALEVELPRESSURE_HPA (1013.25)

Adafruit_BME680 bme; // I2C
//Adafruit_BME680 bme(BME_CS); // hardware SPI
//Adafruit_BME680 bme(BME_CS, BME_MOSI, BME_MISO, BME_SCK);

//Uncomment if using SPI
/*#define BME_SCK 13
#define BME_MISO 12
#define BME_MOSI 11
#define BME_CS 10*/

float temperature;
float humidity;
float pressure;
float gasResistance;
float altitude;
float dewPont;

// Replace with your network credentials
const char* ssid = "Alsan Air WiFi";  // Enter SSID here
const char* password = "11122235122@kapwifi";  //Enter Password here

ESP8266WebServer server(80);

void setup() {
  Serial.begin(115200);
  delay(100);

  while (!Serial);
  Serial.println(F("BME680 test"));

  if (!bme.begin()) {
    Serial.println("Could not find a valid BME680 sensor, check wiring!");
    while (1);
  }

   // Set up oversampling and filter initialization
  bme.setTemperatureOversampling(BME680_OS_8X);
  bme.setHumidityOversampling(BME680_OS_2X);
  bme.setPressureOversampling(BME680_OS_4X);
  bme.setIIRFilterSize(BME680_FILTER_SIZE_3);
  bme.setGasHeater(320, 150); // 320*C for 150 ms


  Serial.println("Connecting to ");
  Serial.println(ssid);

  //Connect to your local wi-fi network
  WiFi.begin(ssid, password);

  //check wi-fi is connected to wi-fi network
  while (WiFi.status() != WL_CONNECTED) {
    delay(1000);
    Serial.print(".");
  }
  Serial.println("");
  Serial.println("WiFi connected..!");
  Serial.print("Got IP: ");  Serial.println(WiFi.localIP());

  server.on("/", handle_OnConnect);
  server.onNotFound(handle_NotFound);

  server.begin();
  Serial.println("HTTP server started");

}
void loop() {
  server.handleClient();


}

void handle_OnConnect() {

  temperature = bme.readTemperature();
  humidity = bme.readHumidity();
  pressure = bme.readPressure() / 100.0F;
  gasResistance = bme.gas_resistance / 1000.0;
  altitude = bme.readAltitude(SEALEVELPRESSURE_HPA);
  double dewPoint = dewPointFast(temperature, humidity);


  server.send(200, "text/html", SendHTML(temperature, humidity, pressure, gasResistance, altitude, dewPoint));
}

void handle_NotFound() {
  server.send(404, "text/plain", "Not found");
}

String SendHTML(float temperature, float humidity, float pressure, float gasResistance, float altitude, float dewPoint) {
String html = "<!DOCTYPE html>";
html += "<html>";
html += "<head>";
html += "<title>BME680 Webserver</title>";
html += "<meta name='viewport' content='width=device-width, initial-scale=1.0'>";
html += "<link rel='stylesheet' href='https://cdnjs.cloudflare.com/ajax/libs/font-awesome/5.7.2/css/all.min.css'>";
html += "<link rel='stylesheet' type='text/css' href='styles.css'>";
html += "<style>";
html += "body { background-color: #fff; font-family: sans-serif; color: #333333; font: 12px Helvetica, sans-serif box-sizing: border-box;}";
html += "#page { margin: 18px; background-color: #fff;}";
html += ".container { height: inherit; padding-bottom: 18px;}";
html += ".header { padding: 18px;}";
html += ".header h1 { padding-bottom: 0.3em; color: #f4a201; font-size: 25px; font-weight: bold; font-family: Garmond, 'sans-serif'; text-align: center;}";
html += "h2 { padding-bottom: 0.2em; border-bottom: 1px solid #eee; margin: 2px; text-align: center;}";
html += ".box-full { padding: 18px; border 1px solid #ddd; border-radius: 1em 1em 1em 1em; box-shadow: 1px 7px 7px 1px rgba(0,0,0,0.4); background: #fff; margin: 18px; width: 300px;}";
html += "@media (max-width: 494px) { #page { width: inherit; margin: 5px auto; } #content { padding: 1px;} .box-full { margin: 8px 8px 12px 8px; padding: 10px; width: inherit;; float: none; } }";
html += "@media (min-width: 494px) and (max-width: 980px) { #page { width: 465px; margin 0 auto; } .box-full { width: 380px; } }";
html += "@media (min-width: 980px) { #page { width: 930px; margin: auto; } }";
html += ".sensor { margin: 10px 0px; font-size: 2.5rem;}";
html += ".sensor-labels { font-size: 1rem; vertical-align: middle; padding-bottom: 15px;}";
html += ".units { font-size: 1.2rem;}";
html += "hr { height: 1px; color: #eee; background-color: #eee; border: none;}";
html += "</style>";

//Ajax Code Start
  html += "<script>n";
  html += "setInterval(loadDoc,1000);n";
  html += "function loadDoc() {n";
  html += "var xhttp = new XMLHttpRequest();n";
  html += "xhttp.onreadystatechange = function() {n";
  html += "if (this.readyState == 4 && this.status == 200) {n";
  html += "document.body.innerHTML =this.responseText}n";
  html += "};n";
  html += "xhttp.open("GET", "/", true);n";
  html += "xhttp.send();n";
  html += "}n";
  html += "</script>n";
  //Ajax Code END

html += "</head>";
html += "<body>";
html += "<div id='page'>";
html += "<div class='header'>";
html += "<h1>BME680 WebServer</h1>";
html += "</div>";
html += "<div id='content' align='center'>";
html += "<div class='box-full' align='left'>";
html += "<h2>";
html += "Environment Monitoring ";
html += "</h2>";
html += "<div class='sensors-container'>";

//For Gas Resistance
html += "<div class='sensors'>";
html += "<p class='sensor'>";
html += "<i class='fab fa-cloudversify' style='color:#9e19e0'></i>";
html += "<span class='sensor-labels'> Gas Resistance </span>";
html += (int)gasResistance;
html += "<sup class='units'>KΩ</sup>";
html += "</p>";
html += "<hr>";
html += "</div>";

//For Temperature
html += "<div class='sensors'>";
html += "<p class='sensor'>";
html += "<i class='fas fa-thermometer-half' style='color:#eb4015'></i>";
html += "<span class='sensor-labels'> Temperature </span>";
html += (int)temperature;
html += "<sup class='units'>°C</sup>";
html += "</p>";
html += "<hr>";

//For Humidity
html += "<p class='sensor'>";
html += "<i class='fas fa-tint' style='color:#0275d8'></i>";
html += "<span class='sensor-labels'> Humidity </span>";
html += (int)humidity;
html += "<sup class='units'>%</sup>";
html += "</p>";
html += "<hr>";

//For Pressure
html += "<p class='sensor'>";
html += "<i class='fas fa-tachometer-alt' style='color:#ff0040'></i>";
html += "<span class='sensor-labels'> Pressure </span>";
html += (int)pressure;
html += "<sup class='units'>hPa</sup>";
html += "</p>";
html += "<hr>";

//For Altitude
html += "<p class='sensor'>";
html += "<i class='fas fa-mountain' style='color:#35b22d'></i>";
html += "<span class='sensor-labels'> Altitude </span>";
html += (int)altitude;
html += "<sup class='units'>m</sup>";
html += "</p>";
html += "<hr>";

//For Dew Point
html += "<p class='sensor'>";
html += "<i class='fas fa-temperature-low' style='color:#191ce3'></i>";
html += "<span class='sensor-labels'> Dew Point </span>";
html += (int)dewPoint;
html += "<sup class='units'>°C</sup>";
html += "</p>";


html += "</div>";
html += "</div>";
html += "</div>";
html += "</div>";
html += "</div>";
html += "</body>";
html += "</html>";
return html;
}
double dewPointFast(double celsius, double humidity)
{
  double a = 17.271;
  double b = 237.7;
  double temp = (a * celsius) / (b + celsius) + log(humidity * 0.01);
  double Td = (b * temp) / (a - temp);
  return Td;
}
Finally, copy the above program code on your Arduino IDE. Now select your correct board and correct port to Compile the code. After successfully compiling the above code without any errors. Upload it to your NodeMCU ESP8266 board.
Open the serial monitor at the baud rate of 115200 and press the RST button on the ESP8266 NodeMCU board to see the IP address assigned to it.
Demonstration: BME680 Environment Monitoring System with ESP8266
After uploading the code, open Serial Monitor at a baud rate of 115200 to get an ESP8266 IP address.
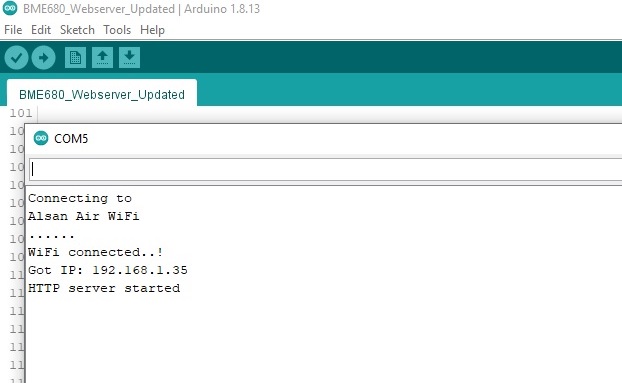
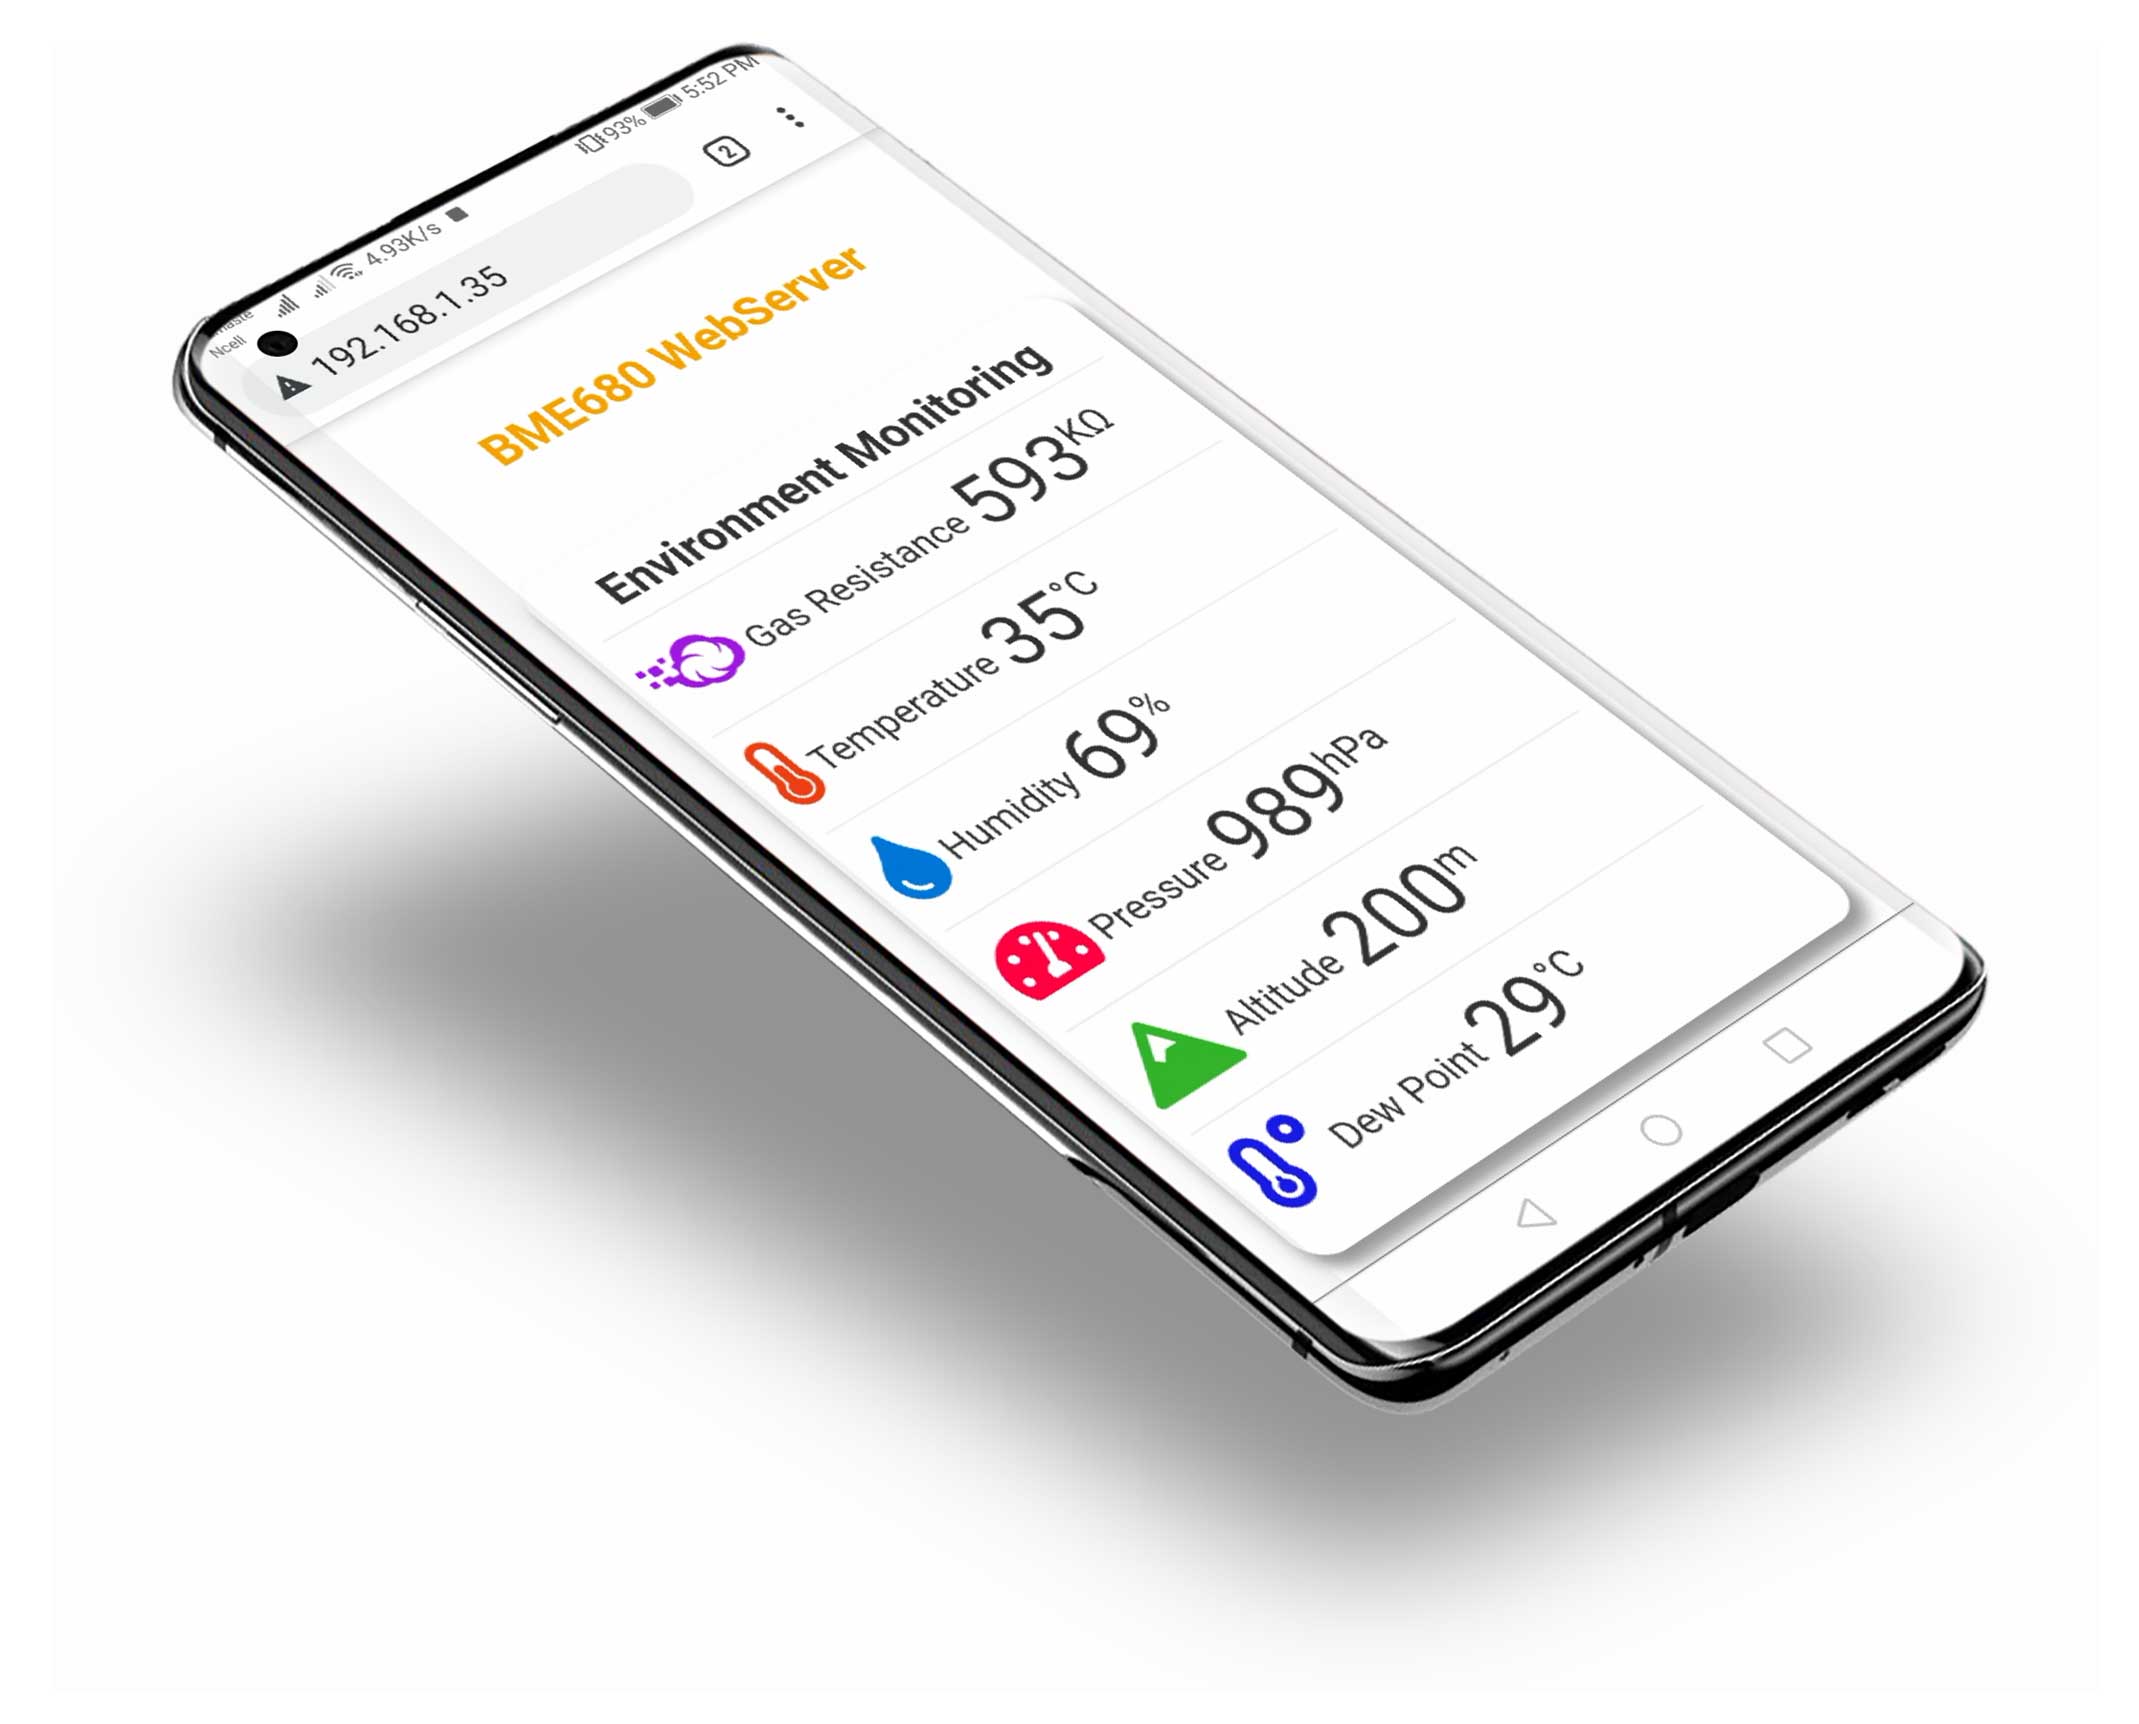
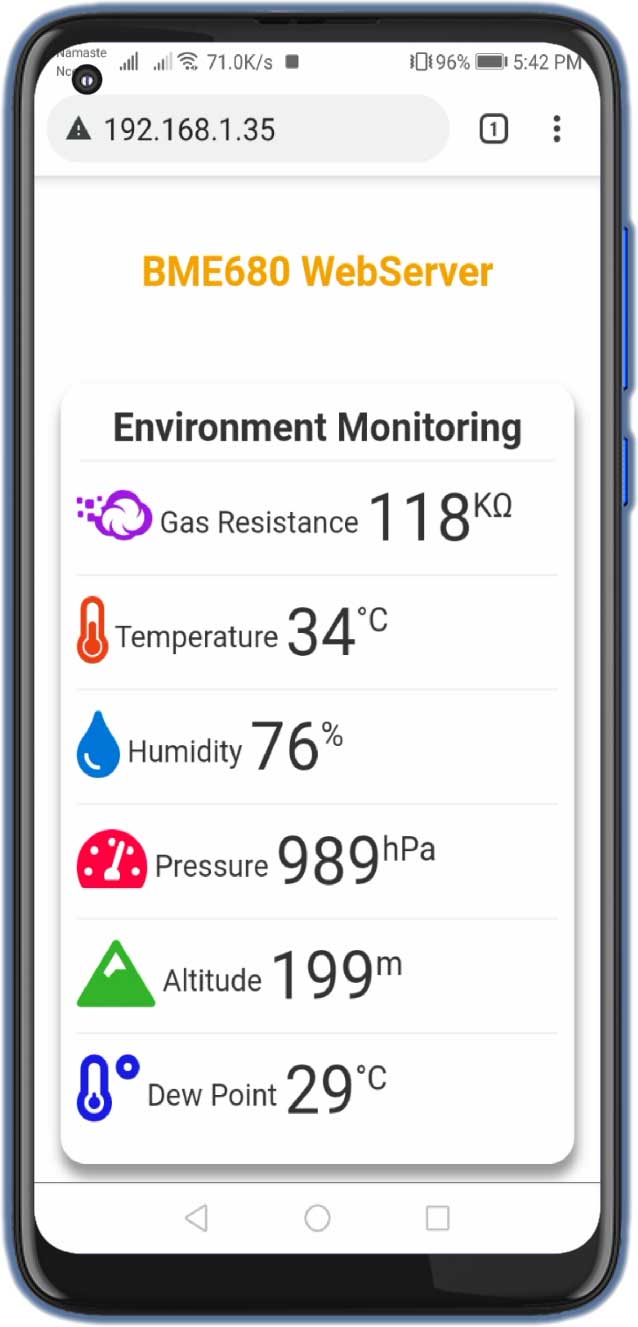
Open a browser and then type in the NodeMCU ESP8266 IP address. Mine is 192.168.1.35, your will be different according to IP assigned by your router. Actually, You will get access to the webserver with the latest BME680 sensor reading. You can access the webserver on your local network on your computer, tablet, or smartphone that features a browser.
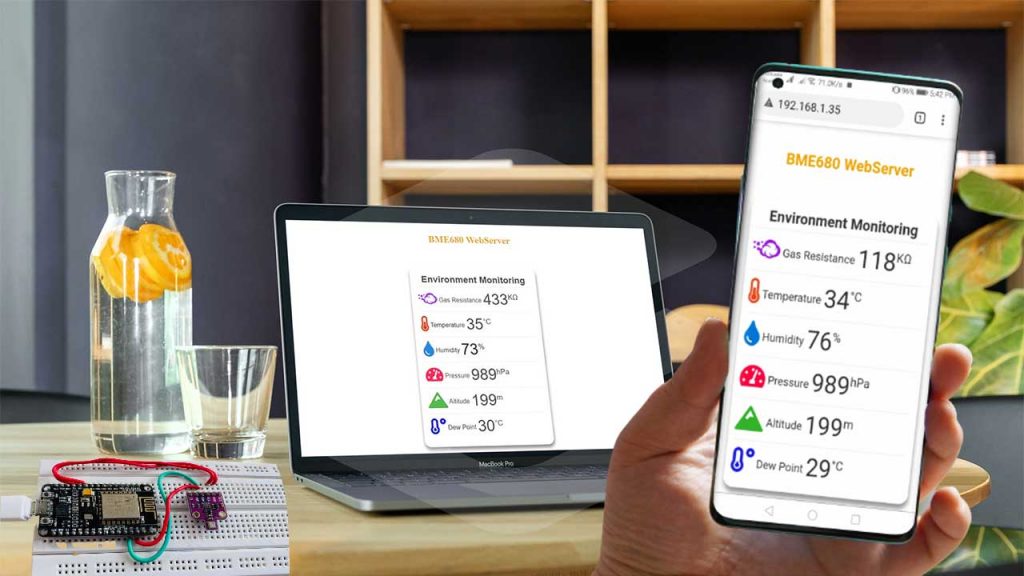
Note: The readings are updated automatically on the webserver using Ajax technology.
Wrapping Up
In this tutorial, I have shown you the BME680 Environment Monitoring System using ESP8266. This project is very helpful for monitoring our internal (home) environment wirelessly. I hope you enjoyed reading this article. If you have any questions, comments, or ideas? Let me know in the comment section below.
Recommended Readings:

