IoT Water Quality Monitoring with TDS Sensor & ESP32
TDS/EC Sensor with ESP32 for Water Quality Monitoring using Arduino IoT Cloud
Overview: IoT Based TDS/EC Meter
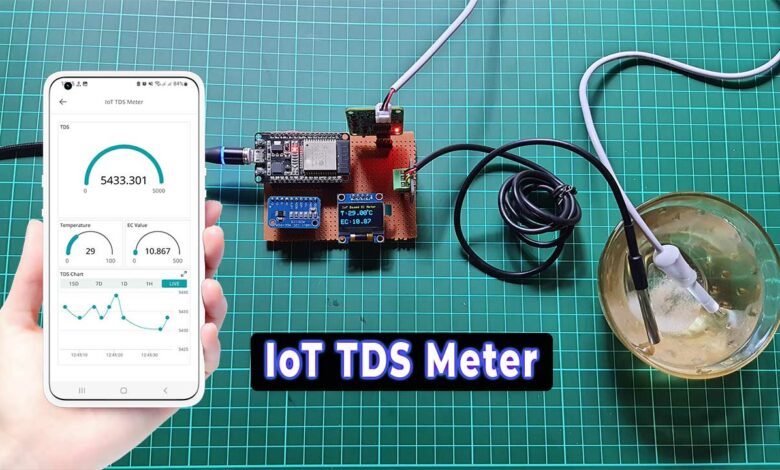
Water quality is a crucial factor in various industries and applications. Monitoring Total Dissolved Solids (TDS) levels is essential to ensure water safety and its suitability for different purposes. In this project, we will explore the development of an IoT based Water Quality Monitoring System with TDS Sensor & ESP32 using Arduino IoT Cloud. By using the power of IoT and the capabilities of the ESP32 microcontroller, we can monitor TDS levels, EC (Electrical Conductivity) Value, and Water Temperature in real time. Also, these values can be observed online from any part of the world on Arduino IoT Cloud. Furthermore, we can store these data on the cloud for analysis.
- Overview: IoT Based TDS/EC Meter
- Components Required
- Relation of TDS, EC, & Temperature in this Project
- Circuit Diagram: IoT Based Drinking Water Quality Monitoring with ESP32
- PCB Design, Gerber Files & PCB Ordering
- Setting Up Arduino IoT Cloud
- Source Code/Program
- Source Code/Program Explanation
- Uploading Source Code
- Water Quality Monitoring with ESP32 on Arduino IoT Cloud
- Conclusion
According to the World Health Organization (WHO), the EC value of water should not go beyond 400 μS/cm or 0.4mS/cm. It’s important to ensure that the EC value stays within this limit to maintain good water quality.
When it comes to drinking water, the ideal temperature is either room temperature, which is around 20°C or 68°F. But, for the best flavor, or chilled cold, which is around 6°C or 43°F, for maximum refreshment. Enjoying water at these temperatures can enhance your drinking experience.
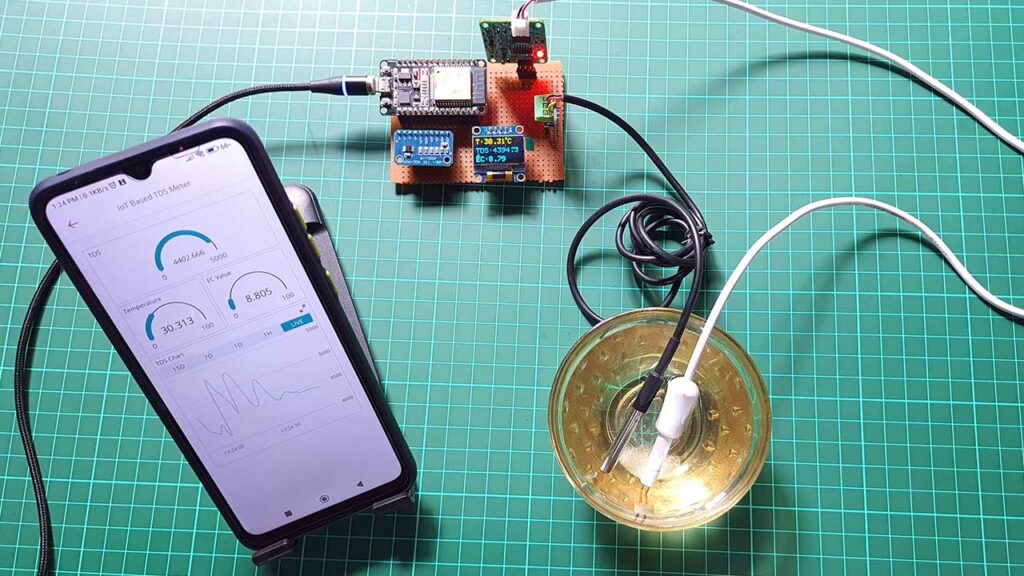
In this project, we used a TDS sensor, DS18B20 waterproof temperature sensor, and an ESP32 WiFi module to measure water quality parameters such as Total Dissolved Solids(TDS), electrical conductivity (EC), and Temperature. The measured TDS, EC, and Temperature values are displayed on a 0.96″ I2C OLED display. Additionally, the data can be monitored and visualized in graphical form on Arduino IoT Cloud. This project enables convenient monitoring and analysis of water quality in real time.
Components Required
To make an IoT based Water Quality Monitoring System with TDS Sensor & ESP32 using Arduino IoT Cloud, we need the following components. You can purchase all these components online from the given link.
| S.N | COMPONENTS NAME | QUANTITY | PURCHASE LINKS |
|---|---|---|---|
| 1 | ESP32 Dev Kit V1 | 1 | Amazon | AliExpress |
| 2 | TDS Sensor | 1 | Amazon | AliExpress |
| 3 | DS18B20 Temperature Sensor | 1 | Amazon | AliExpress |
| 4 | DS18B20 Temperature Sensor Terminal Adaptor | 1 | Amazon | AliExpress |
| 5 | ADS1115 16 bit ADC Module | 1 | Amazon | AliExpress |
| 6 | 0.96 " I2C OLED Display | 1 | Amazon | AliExpress |
| 7 | Breadboard | 1 | Amazon | AliExpress |
| 8 | Jumper Cables | 20 | Amazon | AliExpress |
*Please Note: These are affiliate links. I may make a commission if you buy the components through these links. I would appreciate your support in this way!
Relation of TDS, EC, & Temperature in this Project
In this project, TDS (Total Dissolved Solids) and EC (Electrical Conductivity) are important parameters for measuring water quality. TDS refers to the total amount of dissolved substances in water, including minerals, salts, and other particles. EC, on the other hand, measures the water’s ability to conduct electricity, which is influenced by the presence of dissolved ions.
Water temperature is also a crucial factor as it affects the conductivity and TDS readings. Changes in temperature can impact the conductivity of water, leading to variations in EC values. Therefore, temperature compensation is necessary to ensure accurate EC measurements.
Basically, by combining the readings from the TDS sensor, which detects the total dissolved solids, and the temperature sensor, the project enables monitoring of water quality. The TDS, EC, and temperature values are measured and displayed on the OLED screen, providing insights into water purity and temperature variations. This information helps in assessing water quality and making informed about its usage in various applications.
For instance, distilled water has low conductivity, while saltwater is a good conductor of electricity.
TDS/EC Sensor:
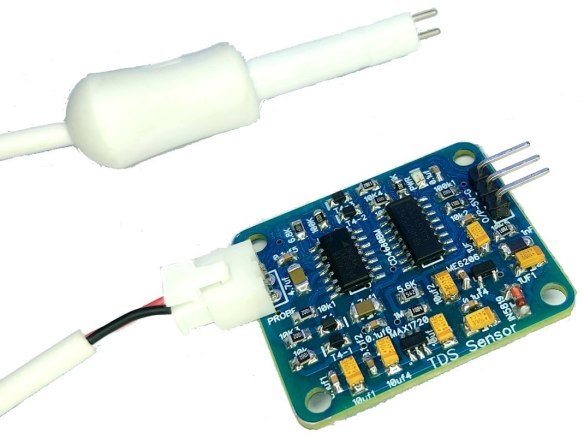
- The TDS/EC (Total Dissolved Solids/Electrical Conductivity) sensor measures the concentration of dissolved solids and the electrical conductivity of water.
- It provides valuable information about the quality and purity of the water by analyzing the level of dissolved substances.
- The sensor is crucial in assessing the suitability of water for various applications, such as drinking water, hydroponics, or industrial processes.
DS18B20 Waterproof Temperature Sensor:
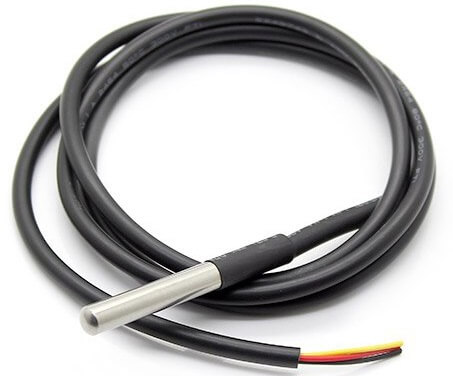
- The DS18B20 is a digital temperature sensor capable of measuring water temperature.
- It is waterproof, making it suitable for submerged or wet environments, such as water tanks or pools.
- The temperature sensor provides accurate temperature readings, which are essential for compensating for temperature variations in the TDS measurements.
ADS1115 16-bit ADC:
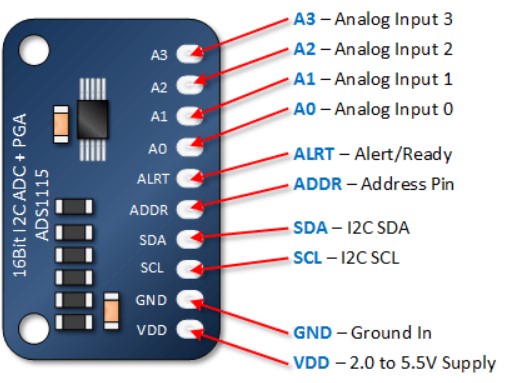
- The ADS1115 is a 16-bit Analog-to-Digital Converter (ADC) module.
- It provides a higher resolution and more precise conversion of analog signals compared to the built-in 12-bit ADC of the ESP32 microcontroller.
- The ADS1115 is used to read the voltage output from the TDS sensor, allowing for more accurate TDS measurements.
OLED Display:
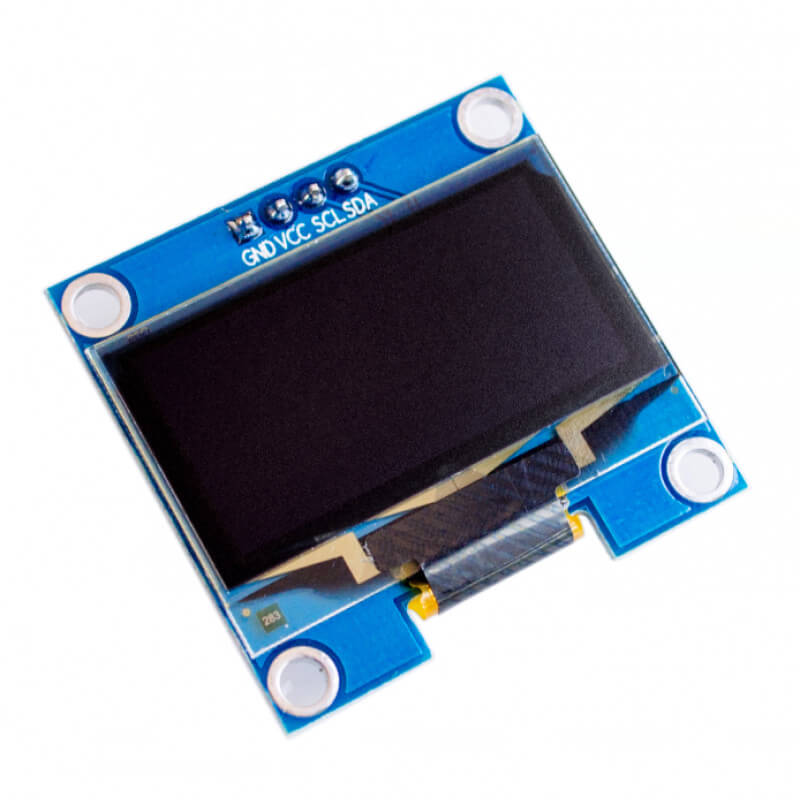
- The OLED (Organic Light-Emitting Diode) display is a compact and low-power display technology.
- It is used to provide a visual interface, displaying the TDS values, temperature readings, and other relevant information.
- The display used in the project has a resolution of 128×64 pixels and is controlled via I2C communication for easy integration with the ESP32.
These components work together to create a comprehensive water quality monitoring system. The TDS/EC sensor measures the concentration of dissolved solids and electrical conductivity, providing insights into water quality. The DS18B20 waterproof temperature sensor compensates for temperature variations, ensuring accurate TDS measurements. The ADS1115 ADC offers better precision for converting analog signals, enhancing the accuracy of TDS readings. Finally, the OLED display visually presents the TDS values and temperature readings, making it easy to monitor and assess water quality in real time.
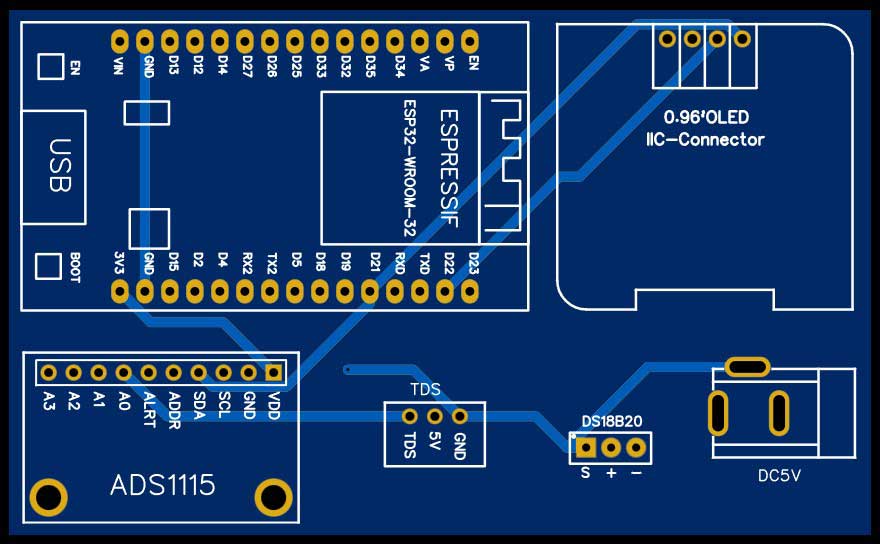
Circuit Diagram: IoT Based Drinking Water Quality Monitoring with ESP32
To interface the Analog TDS Sensor, ADS1115 ADC Module, and DS18B20 Temperature Sensor with the ESP32 board, follow these steps:
It is important to include the temperature sensor in the setup because the EC (Electrical Conductivity) values are affected by temperature variations. By compensating for temperature changes, we can obtain more accurate EC values.
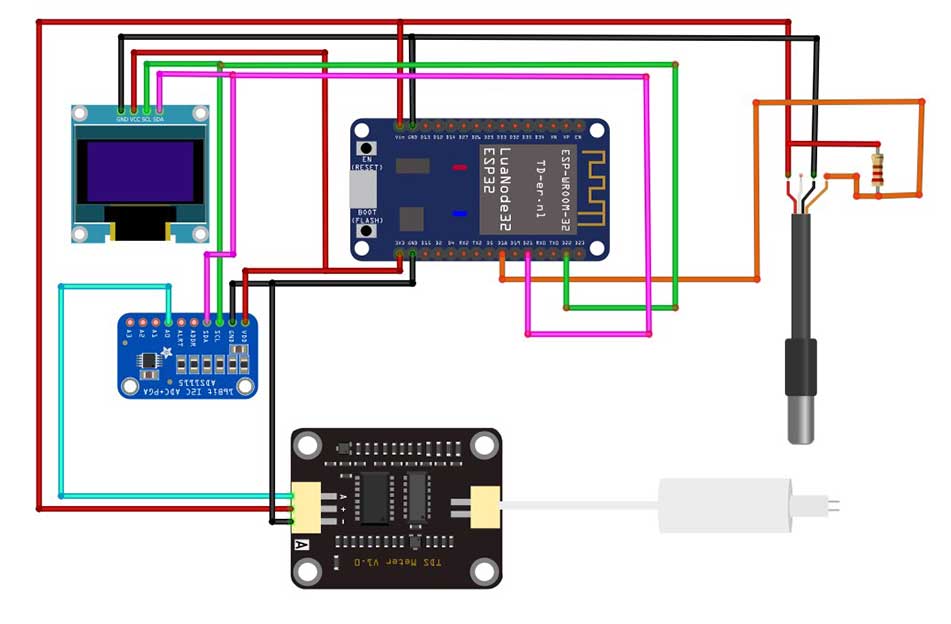
- Connect the VCC (power) and GND (ground) pins of the TDS sensor to the Vin and GND pins of the ESP32 respectively.
- Connect the ADS1115 ADC module to the ESP32 using the I2C pins: GPIO 22 (SCL) and GPIO 21 (SDA).
- Connect the analog output pin of the TDS sensor to the A0 pin of the ADS1115.
- Similarly, connect the output of the DS18B20 temperature sensor to GPIO18 of the ESP32.
- For the OLED display, connect it to the I2C pins of the ESP32.
- Provide 3.3V and GND connections to the OLED display and power the ADS1115 using its VCC and GND pins.
By following these connections, you will have the necessary setup to measure and display water quality parameters using the TDS and temperature sensors, ADC module, and OLED display.
PCB Design, Gerber Files & PCB Ordering
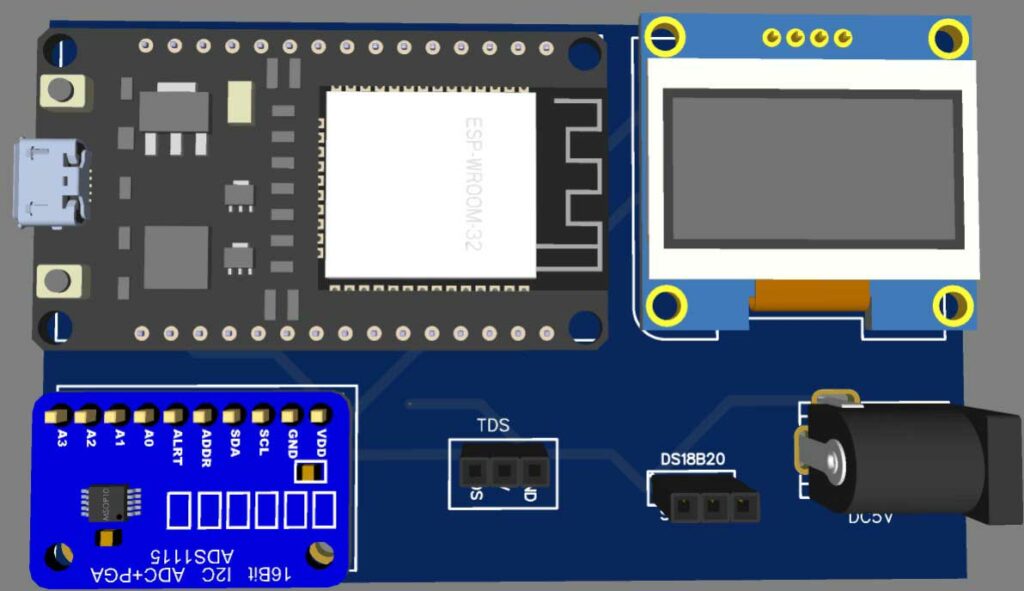
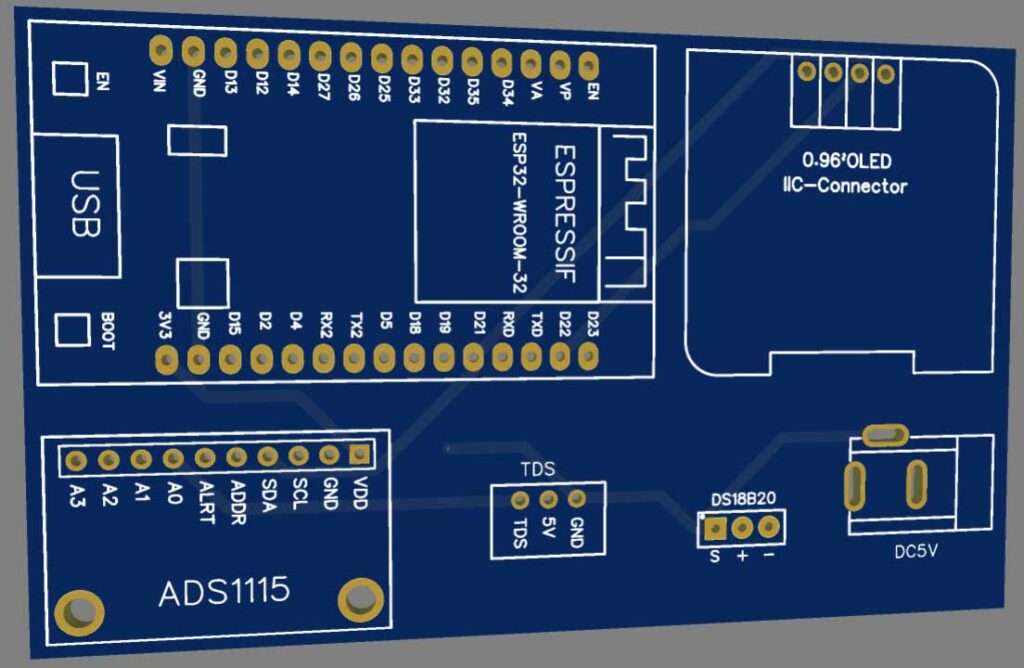
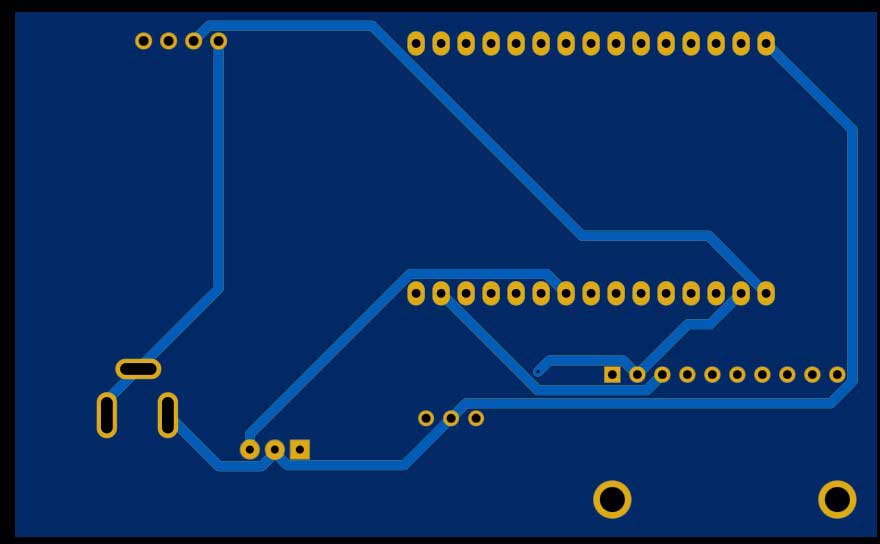
To assemble the components for testing, you can use a breadboard. However, for a more reliable and professional solution, I recommend using a custom PCB. I have already designed a custom PCB specifically for this project.
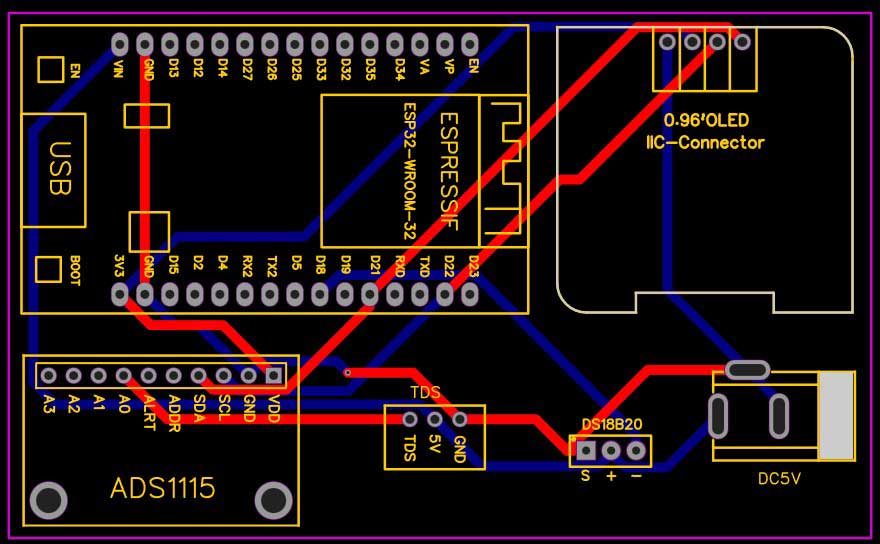
To access the Gerber file of the PCB, you can download it from the provided link.
Once you have the Gerber file, you can place an order for the PCB from PCBWay.com. PCBWay offers affordable prices and provides high-quality PCB manufacturing services. They have exciting offers such as a new user signup bonus and various coupons that you can take advantage of for your order.
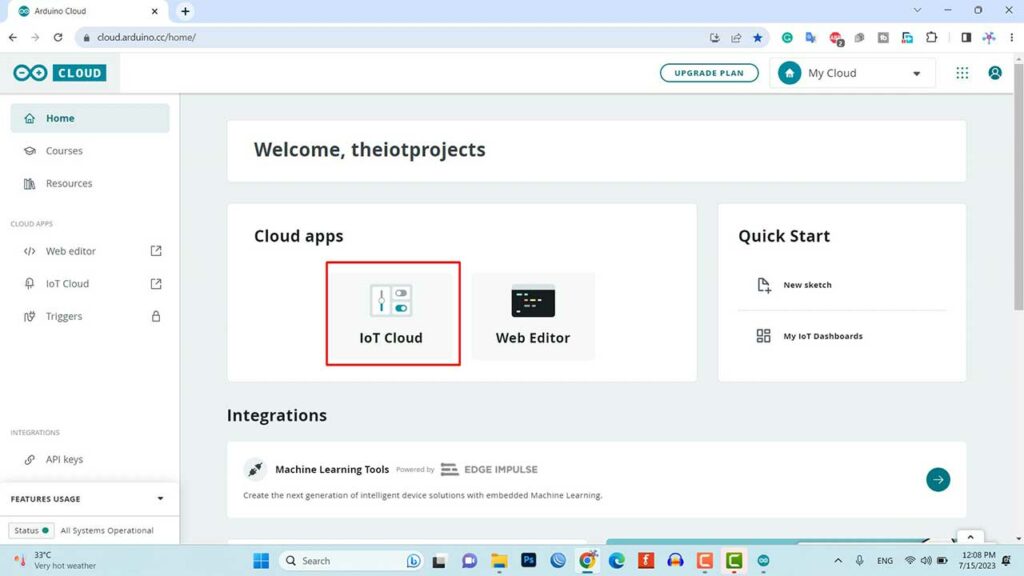
Setting Up Arduino IoT Cloud
Now it’s time to set up the Arduino IoT Cloud Dashboard. So, go to the Arduino Store. Click on IoT Cloud.
Creating Things with Variables
Then you need to create a Thing first. Click on Create Thing and Give it a name anything like “IoT TDS Meter“
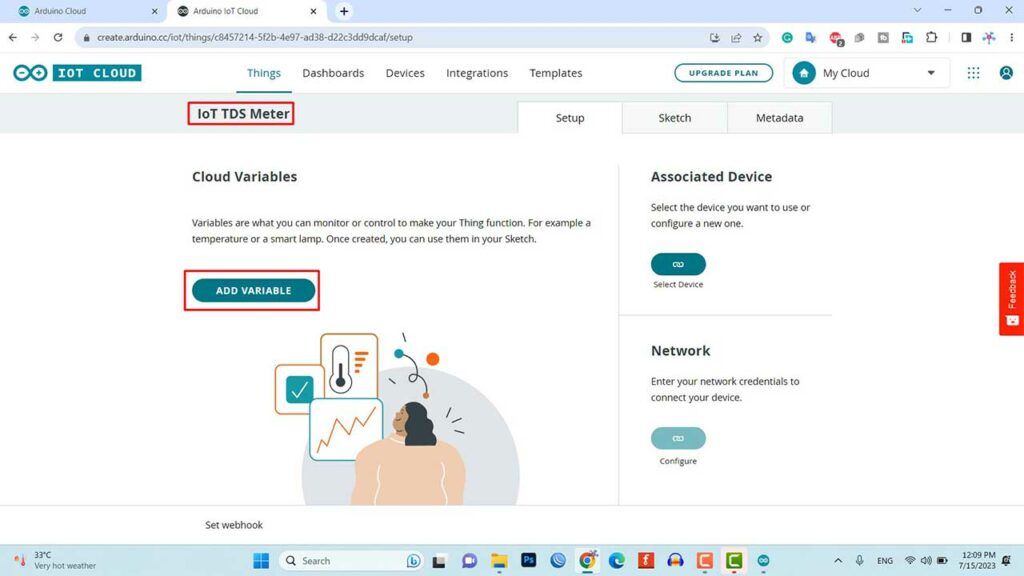
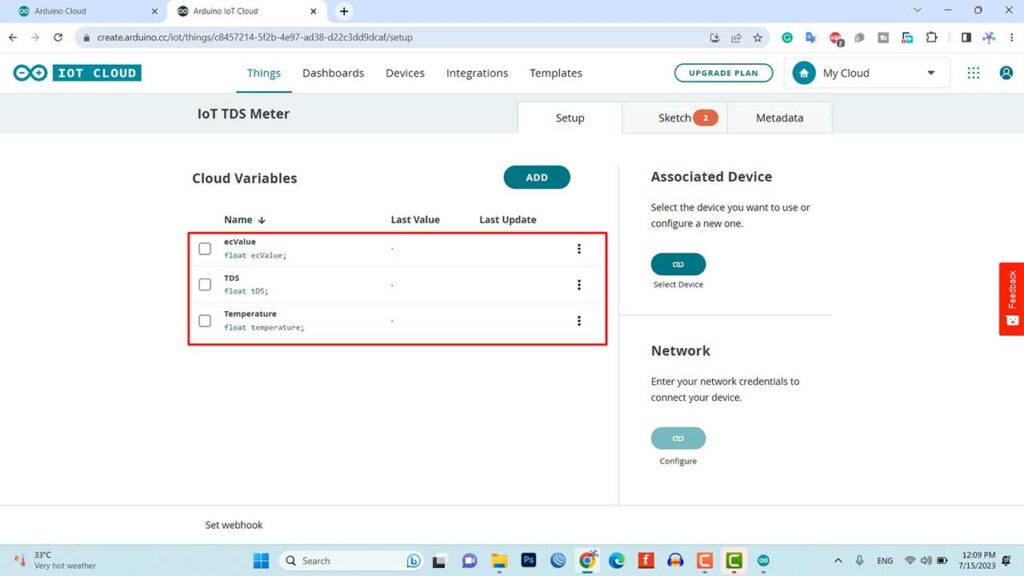
Now we need to create a variable. For that, click on add variable.
Name the variable “TDS”. In the variable type, select the floating point number. So an automatic declaration of variables will be done. Now set the variable permission to Read-only. Then click on the Add Variable button to create the variable.
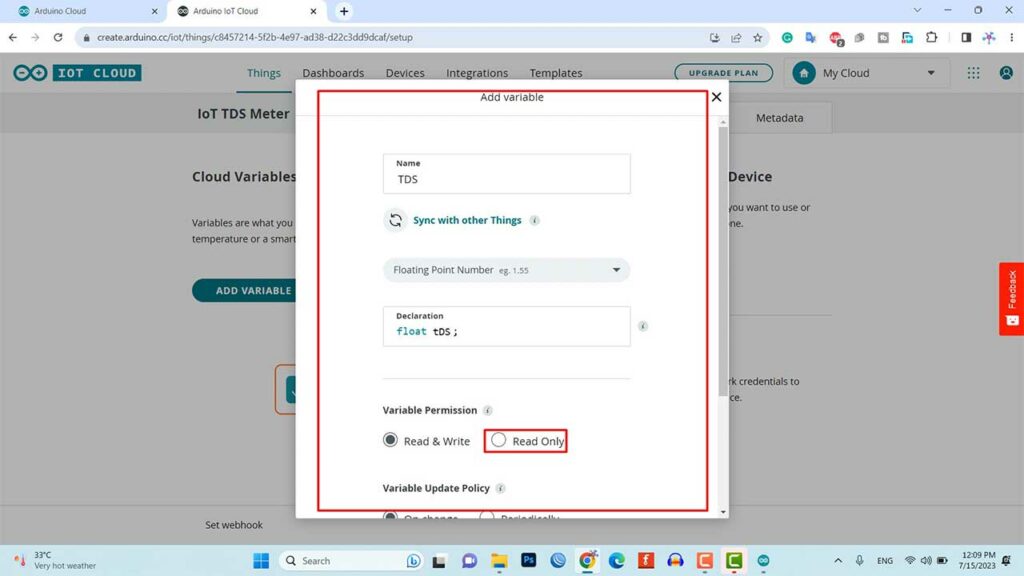
To add the next variable click on Add then Name the variable “ecValue”. In the variable type, select the floating point number. set the variable permission to Read-only. Then click on the Add Variable button to create the variable.
Finally, add a third variable “Temperature” with the same configuration as done for the other two variables.
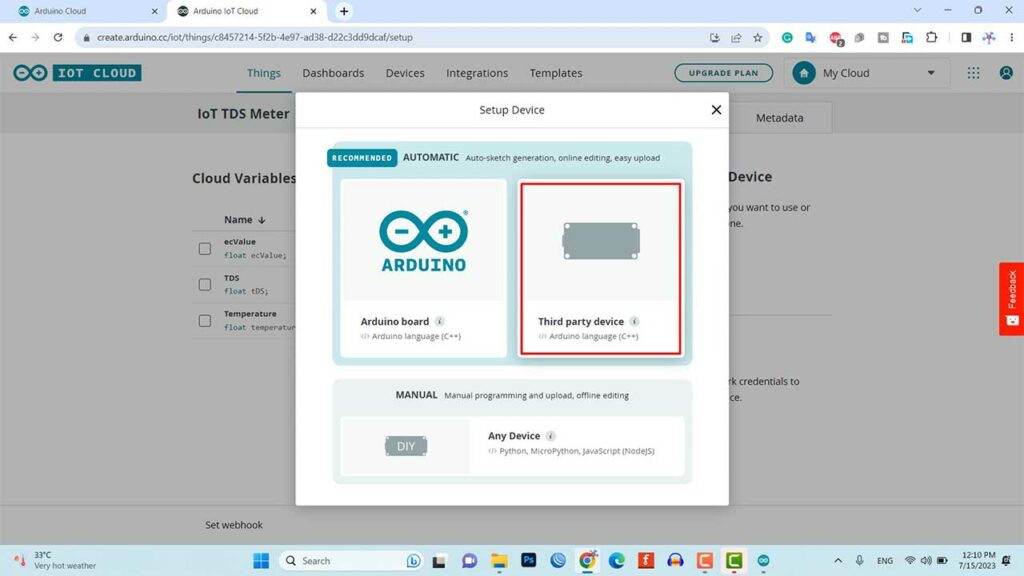
Configure Device
Now, we need to configure a device as well. For that, select the device option. From the list, select a 3rd party device.
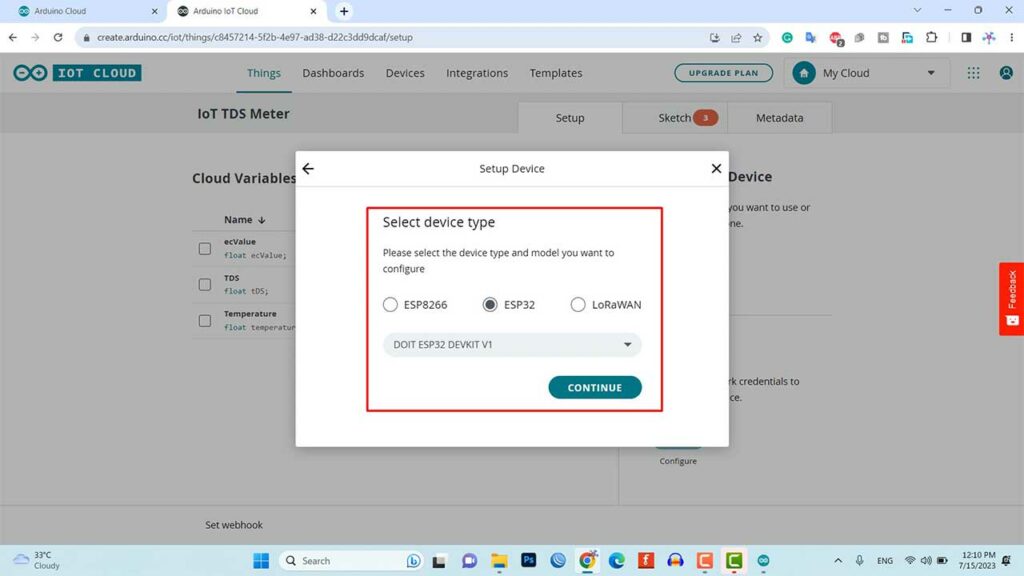
Then select ESP32. Then From this list, select DOIT ESP32 DEVKIT V1 Module.
Click to continue and give any name to the device. Give it a name like “TDSMeter” Then click next.
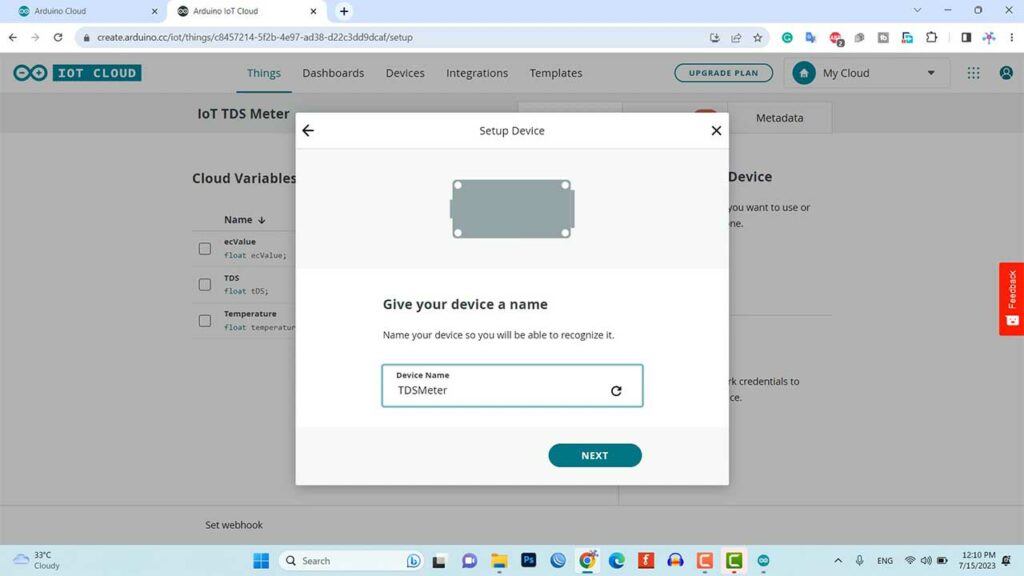
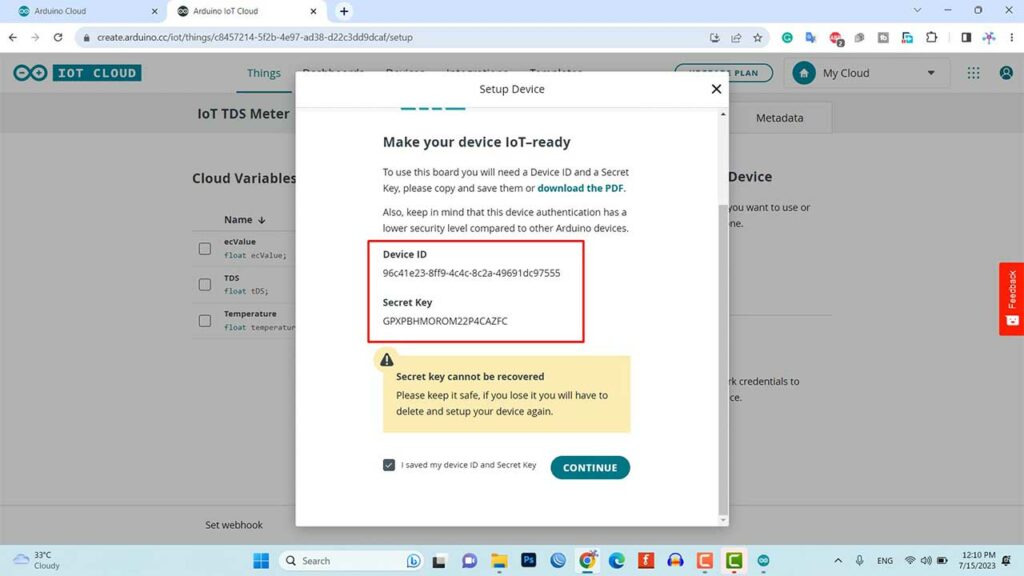
So device ID & Secret Key is created here. Save this device ID for the coding part. Or simply download this PDF File which has the information about the Secret Key. Then click on continue.
Setup Network Credentials
Now again, you need to set up the Network Credentials. So input your SSID, Password, and Secret Key that you created earlier.
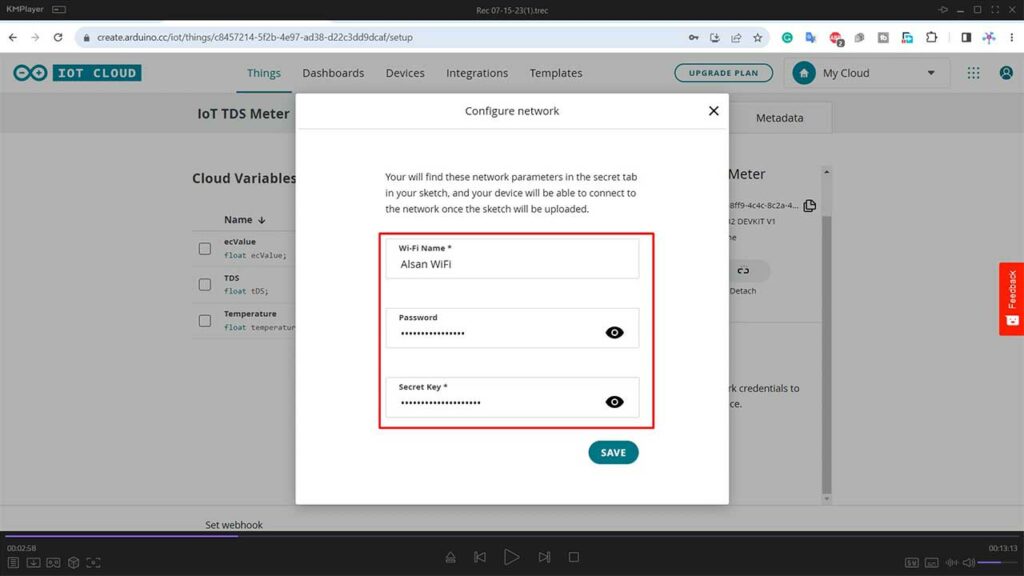
Finally, everything is set now.
Design Web and Mobile Dashboards
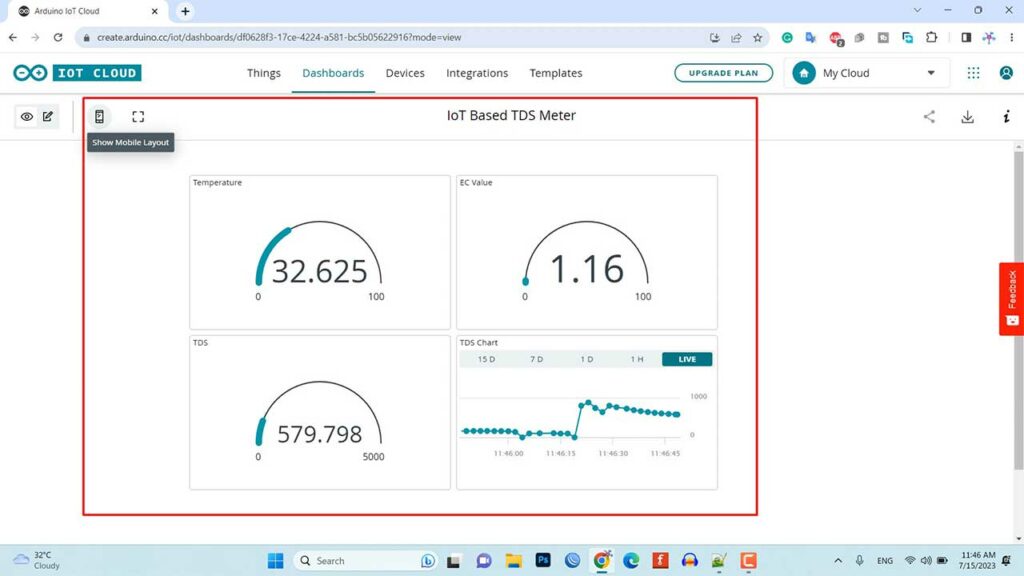
Now, Go to the dashboard. Generally, here we need to build a Web dashboard and Mobile app dashboard for monitoring TDS Value, EC value, and Water Temperature from anywhere in the world.
You can also provide a name for the dashboard. I am giving “IoT TDS Meter” as a dashboard name.
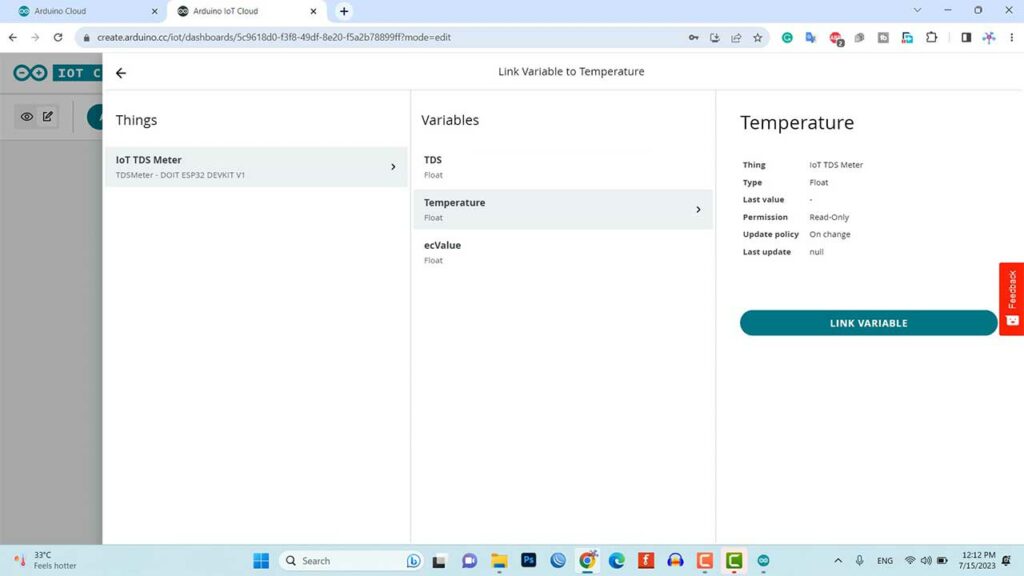
Now click on the add button then select the Gauge widget. Provide a name for the widget. I am giving “Temperature”. Also, link the same variable then click on done.
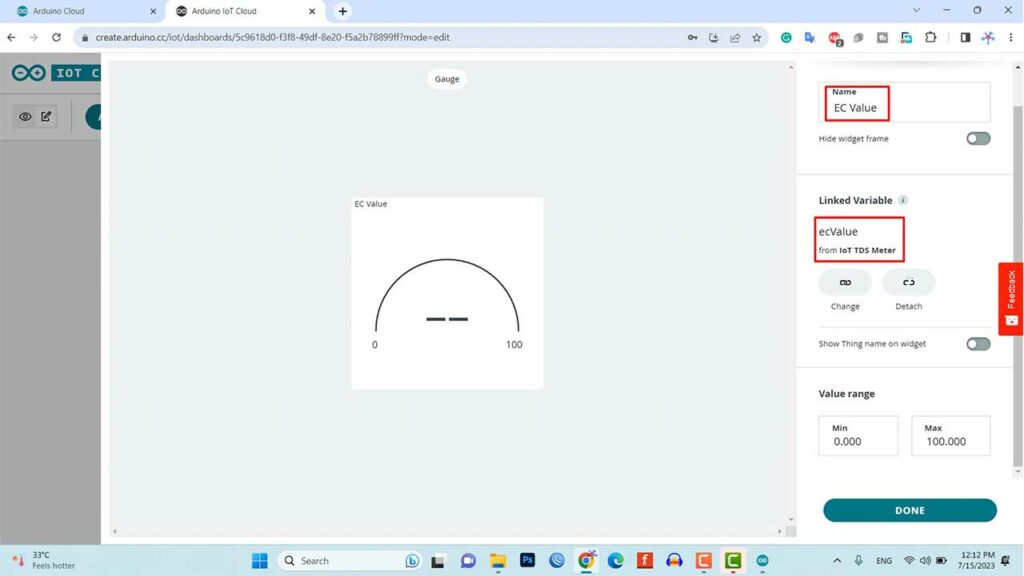
Similarly create Gauge widgets for TDS and EC Value then configure them linking with their respective variables.
Similarly, add a chart widget and link the “TDS” variable.
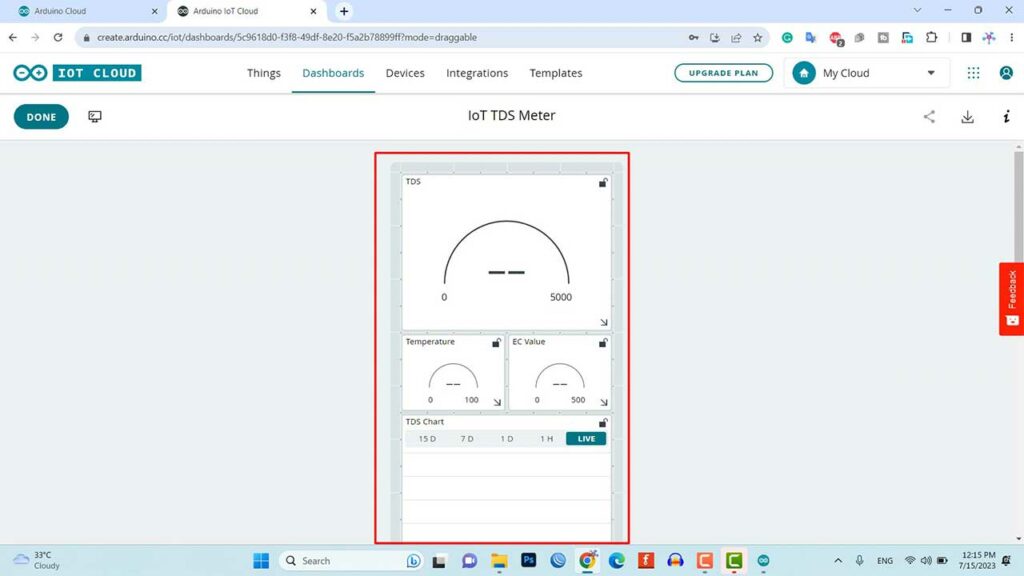
You can arrange and resize the widget as per your requirements for a web dashboard as well as a mobile dashboard as shown here.
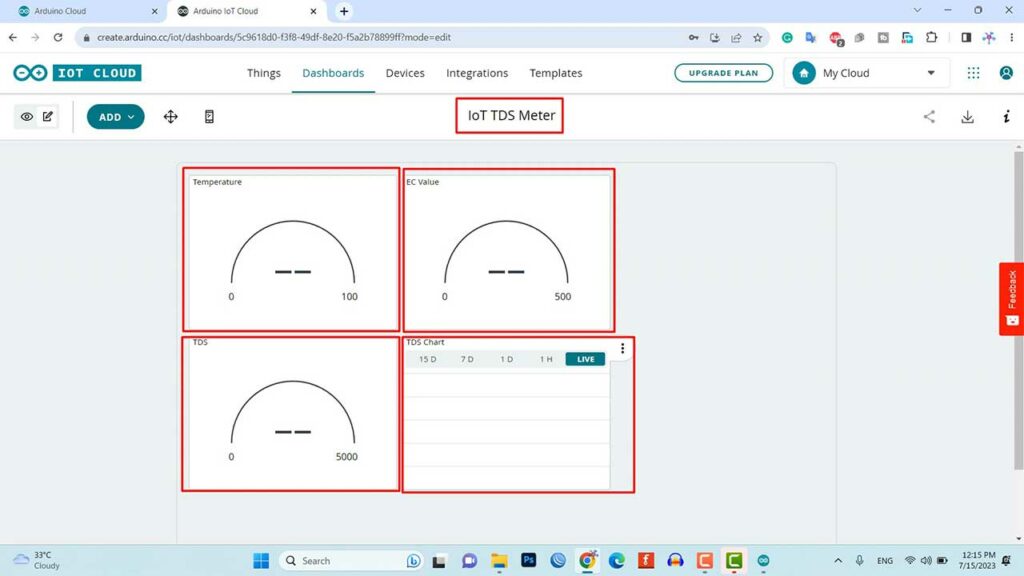
So finally, we are done with the IoT dashboard setup.
Source Code/Program
Now go to the Things Tab and click on “IoT TDS Meter” Then click on the Sketch Tab. Copy the program code from below. Then Select all codes from your Sketch and then Paste it.
/*
  Sketch generated by the Arduino IoT Cloud Thing "IoT TDS Meter"
  https://create.arduino.cc/cloud/things/a8128a86-ec66-4926-a475-baa36c16c643

  Arduino IoT Cloud Variables description

  The following variables are automatically generated and updated when changes are made to the Thing

  float ecValue;
  float tDS;
  float temperature;

  Variables which are marked as READ/WRITE in the Cloud Thing will also have functions
  which are called when their values are changed from the Dashboard.
  These functions are generated with the Thing and added at the end of this sketch.
*/

#include "thingProperties.h"
#include <Arduino.h>
#include <Wire.h>
#include <EEPROM.h>
#include <WiFi.h>
#include <OneWire.h>
#include <DallasTemperature.h>
#include <Adafruit_ADS1X15.h>
#include <DFRobot_ESP_EC.h>
#include <Adafruit_GFX.h>
#include <Adafruit_SSD1306.h>

#define SCREEN_WIDTH 128 // OLED display width, in pixels
#define SCREEN_HEIGHT 64 // OLED display height, in pixels

// Declaration for an SSD1306 display connected to I2C (SDA, SCL pins)
Adafruit_SSD1306 display(SCREEN_WIDTH, SCREEN_HEIGHT, &Wire, -1);

#define ONE_WIRE_BUS 18                // this is the gpio pin 18 on esp32.
OneWire oneWire(ONE_WIRE_BUS);
DallasTemperature sensors(&oneWire);

DFRobot_ESP_EC ec;
Adafruit_ADS1115 ads;

float voltage;

void setup() {
Serial.begin(115200);
  EEPROM.begin(32);//needed EEPROM.begin to store calibration k in eeprom
  ec.begin();
  ads.setGain(GAIN_ONE);
  ads.begin();
  sensors.begin();
  if (!display.begin(SSD1306_SWITCHCAPVCC, 0x3C)) { // Address 0x3D for 128x64
    Serial.println(F("SSD1306 allocation failed"));
    for (;;);
  }
  delay(2000);
  display.clearDisplay();


  // Defined in thingProperties.h
  initProperties();

  // Connect to Arduino IoT Cloud
  ArduinoCloud.begin(ArduinoIoTPreferredConnection);

  /*
     The following function allows you to obtain more information
     related to the state of network and IoT Cloud connection and errors
     the higher number the more granular information you’ll get.
     The default is 0 (only errors).
     Maximum is 4
 */
  setDebugMessageLevel(2);
  ArduinoCloud.printDebugInfo();
}

void loop() {
  ArduinoCloud.update();
  voltage = ads.readADC_SingleEnded(0) / 10;
  sensors.requestTemperatures();
  temperature = sensors.getTempCByIndex(0);  // read your temperature sensor to execute temperature compensation
  ecValue = ec.readEC(voltage, temperature); // convert voltage to EC with temperature compensation
  tDS = ((ecValue * 1000) / 2);

  Serial.print("Temperature:");
  Serial.print(temperature, 2);
  Serial.println("ºC");

  Serial.print("TDS:");
  Serial.print(tDS, 2);
  Serial.println("PPM");

  Serial.print("EC:");
  Serial.println(ecValue, 2);

  display.setTextSize(2);
  display.setTextColor(WHITE);
  display.setCursor(0, 2);
  display.print("T:");
  display.print(temperature, 2);
  display.drawCircle(85, 2, 2, WHITE); // put degree symbol ( ° )
  display.setCursor(90, 2);
  display.print("C");

  display.setCursor(0, 25);
  display.print("TDS:");
  display.print(tDS, 2);
  display.setCursor(100, 25);
  display.setTextSize(1);
  display.print("PPM");

 display.setTextSize(2);
  display.setCursor(0, 50);
  display.print("EC:");
  display.print(ecValue, 2);
  display.display();
  delay(1500);
  display.clearDisplay();

  ec.calibration(voltage, temperature); // calibration process by Serail CMD


}
Source Code/Program Explanation
The Program code is very easy to understand. We have used DFRobot_ESP_EC Library to calculate EC. Then from the relation, we calculated TDS Value.
According to generalhydroponics.com
To obtain an approximate sodium chloride TDS value, multiply the EC reading (in milliSiemens/cm) by 1000 and divide by 2. To get an EC value, multiply the ppm reading by 2 and divide by 1000. Thus, if your EC is 5.2:
5.2 * 1000/2= 2600 ppm.
And if your ppm is 3000:
3000 * 2/1000= 6 EC
Libraries and Definitions:
The code includes various libraries required for communication, sensor readings, and display control.
Definitions are made for the screen dimensions and the OLED display object.
#include "thingProperties.h"
#include <Arduino.h>
#include <Wire.h>
#include <EEPROM.h>
#include <WiFi.h>
#include <OneWire.h>
#include <DallasTemperature.h>
#include <Adafruit_ADS1X15.h>
#include <DFRobot_ESP_EC.h>
#include <Adafruit_GFX.h>
#include <Adafruit_SSD1306.h>
Sensor and Display Initialization:
The OLED display is set up with the specified dimensions and I2C communication.
// Declaration for an SSD1306 display connected to I2C (SDA, SCL pins)
Adafruit_SSD1306 display(SCREEN_WIDTH, SCREEN_HEIGHT, &Wire, -1);
#define SCREEN_WIDTH 128 // OLED display width, in pixels
#define SCREEN_HEIGHT 64 // OLED display height, in pixels
Pin assignments and initialization functions are performed for the TDS/EC sensor (DFRobot_ESP_EC), ADS1115 ADC (Adafruit_ADS1115), DS18B20 temperature sensor (DallasTemperature), and OLED display (Adafruit_SSD1306).
#define ONE_WIRE_BUS 18                // this is the gpio pin 18 on esp32.
OneWire oneWire(ONE_WIRE_BUS);
DallasTemperature sensors(&oneWire);

DFRobot_ESP_EC ec;
Adafruit_ADS1115 ads;

float voltage;
Setup Function:
Serial communication is initiated at a baud rate of 115200 for debugging purposes.
Serial.begin(115200);
EEPROM is initialized to store calibration values.
EEPROM.begin(32);//needed EEPROM.begin to store calibration k in eeprom
The TDS/EC sensor, ADS1115 ADC, DS18B20 temperature sensor, and OLED display are initialized.
  ec.begin();
  ads.setGain(GAIN_ONE);
  ads.begin();
  sensors.begin();
  if (!display.begin(SSD1306_SWITCHCAPVCC, 0x3C)) { // Address 0x3D for 128x64
    Serial.println(F("SSD1306 allocation failed"));
    for (;;);
  }
The Arduino IoT Cloud connection is established using the ArduinoCloud.begin() function.
ArduinoCloud.begin(ArduinoIoTPreferredConnection);
The debug message level is set to provide more detailed information about the network and IoT Cloud connection.
  /*
     The following function allows you to obtain more information
     related to the state of network and IoT Cloud connection and errors
     the higher number the more granular information you’ll get.
     The default is 0 (only errors).
     Maximum is 4
 */
  setDebugMessageLevel(2);
Debug information is printed using the ArduinoCloud.printDebugInfo() function.
ArduinoCloud.printDebugInfo();
Loop Function:
The ArduinoCloud.update() function is called to keep the connection with the IoT Cloud active.
ArduinoCloud.update();
The voltage reading from the ADS1115 ADC is divided by 10 to obtain the voltage value for the TDS/EC sensor.
voltage = ads.readADC_SingleEnded(0) / 10;
The DS18B20 temperature sensor is requested to measure the temperature.
sensors.requestTemperatures();
temperature = sensors.getTempCByIndex(0);  // read your temperature sensor to execute temperature compensation
The EC (Electrical Conductivity) value is calculated using the DFRobot_ESP_EC.readEC() function, considering the voltage and temperature values.
ecValue = ec.readEC(voltage, temperature); // convert voltage to EC with temperature compensation
The TDS (Total Dissolved Solids) value is derived from the EC value.
tDS = ((ecValue * 1000) / 2);
Serial printing is performed to display the temperature, TDS, and EC values in the Serial Monitor for debugging.
  Serial.print("Temperature:");
  Serial.print(temperature, 2);
  Serial.println("ºC");

  Serial.print("TDS:");
  Serial.print(tDS, 2);
  Serial.println("PPM");

  Serial.print("EC:");
  Serial.println(ecValue, 2);
The OLED display is configured to show the temperature, TDS, and EC values.
  display.setTextSize(2);
  display.setTextColor(WHITE);
  display.setCursor(0, 2);
  display.print("T:");
  display.print(temperature, 2);
  display.drawCircle(85, 2, 2, WHITE); // put degree symbol ( ° )
  display.setCursor(90, 2);
  display.print("C");

  display.setCursor(0, 25);
  display.print("TDS:");
  display.print(tDS, 2);
  display.setCursor(100, 25);
  display.setTextSize(1);
  display.print("PPM");

 display.setTextSize(2);
  display.setCursor(0, 50);
  display.print("EC:");
  display.print(ecValue, 2);
  display.display();
The display is updated and cleared after a delay of 1.5 seconds.
  delay(1500);
  display.clearDisplay();
The TDS/EC sensor is calibrated using the voltage and temperature values through the ec.calibration() function.
ec.calibration(voltage, temperature); // calibration process by Serail CMD
The program continuously updates the sensor readings, displays the values on the OLED screen, and communicates with the Arduino IoT Cloud for data synchronization. It provides real-time monitoring of water temperature, TDS, and EC values.
Now you can upload the code to the ESP32 WiFi Module.
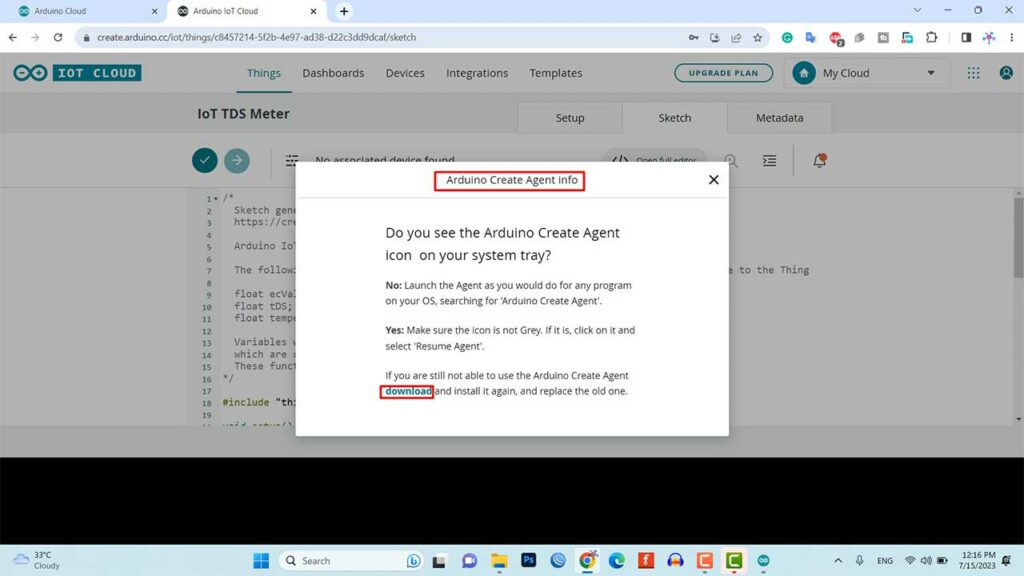
Uploading Source Code
Apart from the code part, we need to upload the code. But before that, we need to install an Agent to flash the code directly from the browser. Follow the instructions on your screen to install the agent. Once the driver is installed, the COM port will appear.
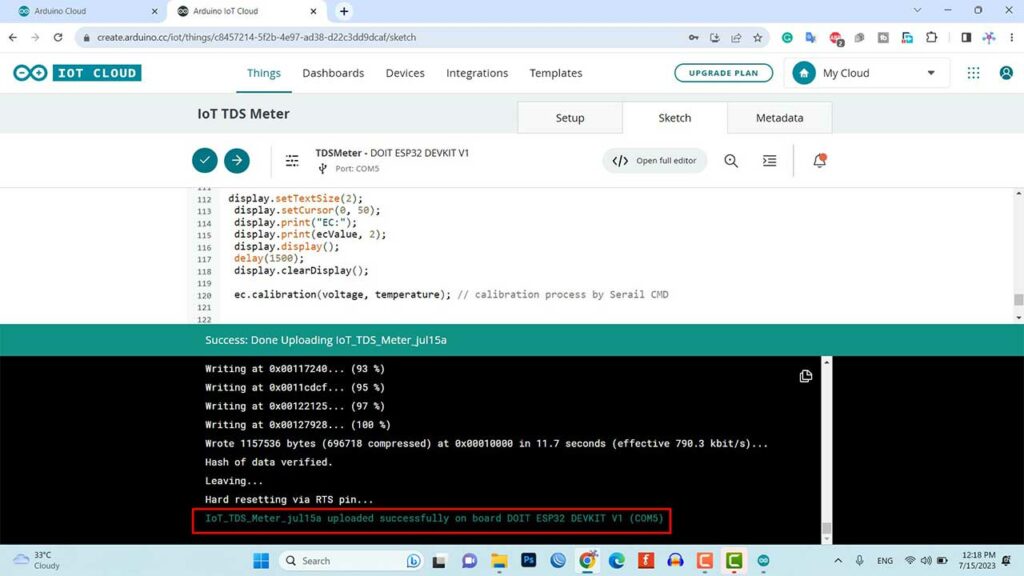
Then select the DOIT ESP32 DEVKIT V1 Board from the list and the COM port as well. Then, upload the code.
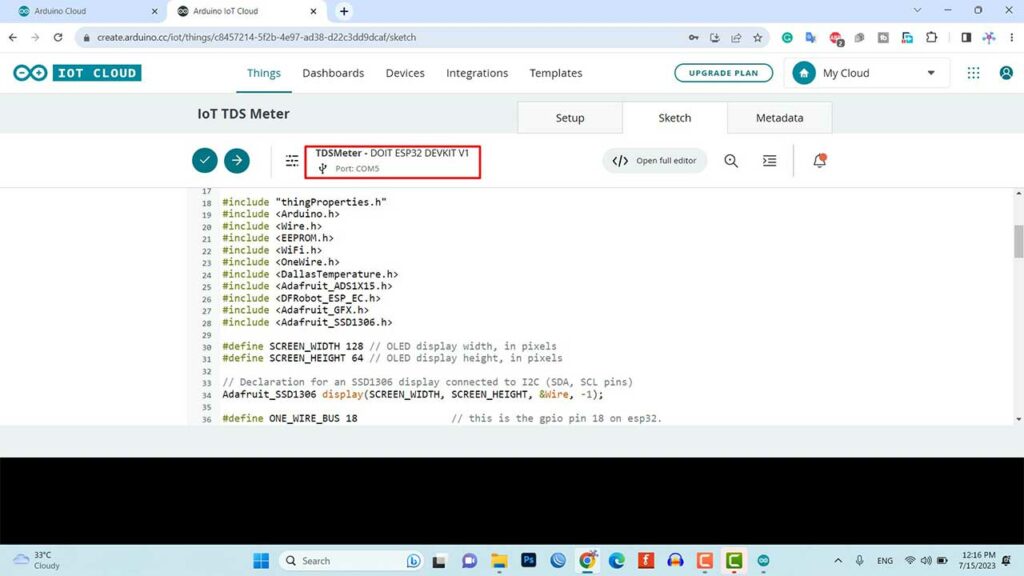
It will take some time to upload the code and when it’s done, some upload success message will appear.
Water Quality Monitoring with ESP32 on Arduino IoT Cloud
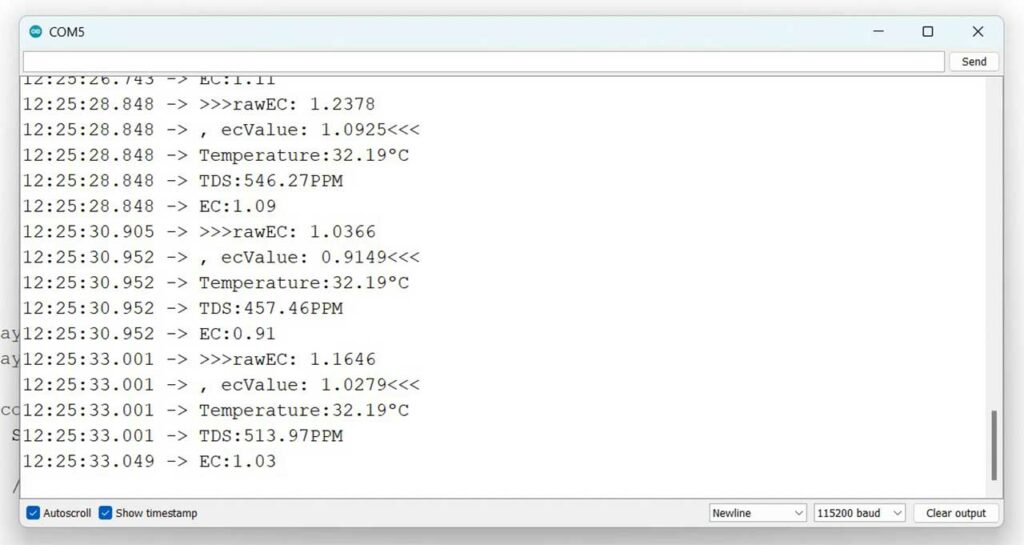
Once the code is uploaded to the ESP32 board, it will attempt to connect to the designated WiFi network. After establishing a connection, it will begin reading the TDS, EC, and temperature values from the sensor. You can monitor these values by opening the Serial Monitor.
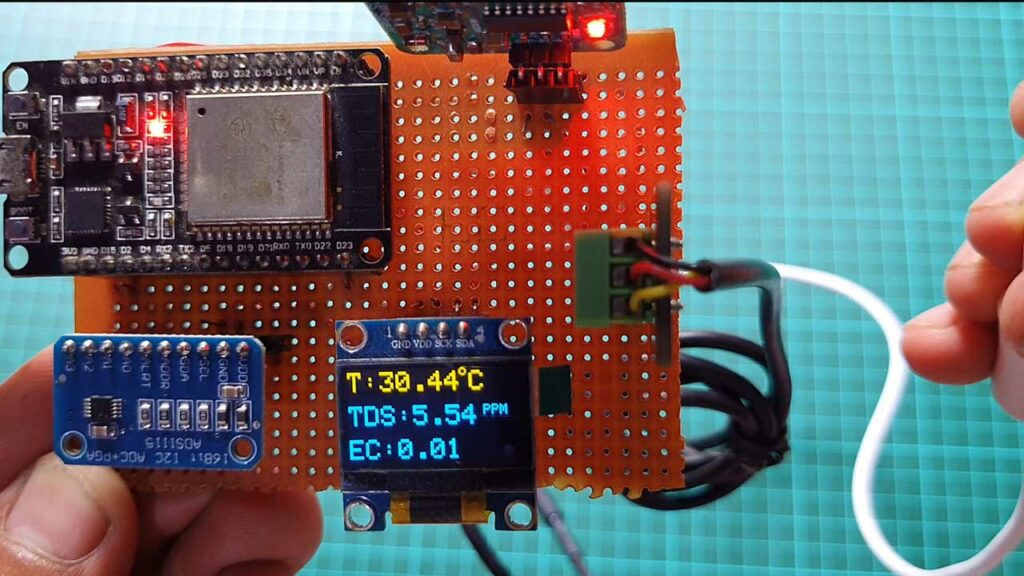
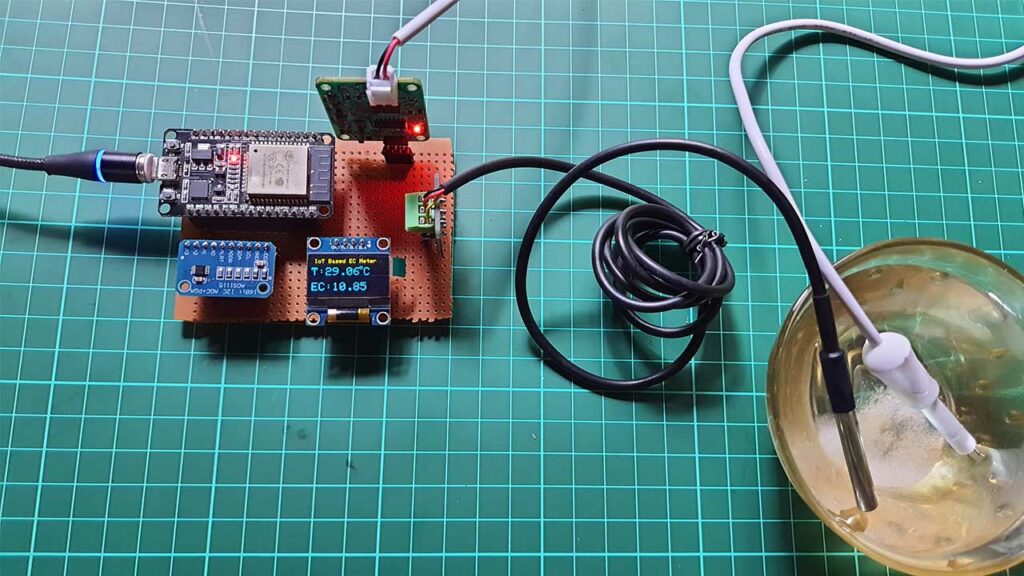
Basically, the temperature sensor is responsible for providing the water temperature. If the TDS sensor is not in contact with water and remains dry, it will display a TDS and EC value of zero. This information can be observed on the OLED screen.
When both the temperature sensor and TDS sensor are submerged in water, the OLED display will present the TDS, EC, and temperature values of the water.
It is important to note that adding more salts to water will increase its electrical conductivity, resulting in a significant rise in the water’s EC value. This indicates higher salt content in the water.
Finally, you can also monitor the same data on the Arduino IoT Cloud Web Dashboard as well as on Arduino Remote Mobile Application.
To view the data on a Mobile phone, just open the Arduino Remote App and sign in with the same Arduino IoT Cloud ID. Finally, now you can Tap on the Device and Start monitoring the Parameters Remotely from any part of the world.
Conclusion
In conclusion, this project demonstrates the monitoring of water quality using a TDS sensor, temperature sensor, and ESP32 board. Basically, by measuring parameters such as TDS, EC, and temperature, we can assess the purity and conductivity of water. The data can be conveniently displayed on an OLED screen and monitored remotely through the Arduino IoT Cloud dashboard. This project provides valuable insights into water quality and can be further enhanced for various applications related to water monitoring and analysis.
Here are the Top 5 real-world applications of water quality monitoring using TDS sensors, temperature sensors, and the ESP32 board:
- Drinking water analysis
- Aquaculture management
- Agriculture and irrigation
- Environmental monitoring
- Industrial water management
Basically, these applications involve monitoring water quality to ensure safe drinking water, maintain optimal conditions for aquatic organisms, optimize irrigation practices, assess environmental impact, and meet industrial standards.
Hi there,
I made this project and the TDS and Ec values are much higher than I am receiving from the COM-600 pen that I use.
I thing the problem starts with the value of the EC because the TDS value depends on it.
My values or TDS are 640 ppm and 1.3 millisiemens for EC at 24º water temp. The water sample measures from the COM-600 pen reads much less about 95ppm and 190us/cm.
I analysed the code and I think the issue is in the EC value obtained from the .h include from DFRobot_ESP_EC_BY_GREENPONIK.
Did you use a CALIBRATION solution?
Many EC pen EC values are incorrect, I have 3 or 4
types..
Pls buy the mid range calibration solution or make
some using PURE SALT (No iodine)
Your writing demonstrates your depth of knowledge in this area. I appreciate you sharing your knowledge.
The UbiBot LD1 Smart Leak Detector is one such gadget that offers 24/7 detection of conductive liquid leaks, double-sided leak detection, sensitive and accurate sensing, and an instant alert in the event of a leak. Visit at – https://store.ubibot.com/collections/all/products/ubibot-ld1-smart-leak-detector-ld1-a2l
While running the code, its showing Error: Verifying IOT_TDS-meter
Is the code correct or needs any edit anywhere
Hi, I created a new project/thing and entered my WiFi info and secret code. Then, as instructed, I copied the code from the “Source Code” box into the Sketch, replacing what was there. When I upload the code and then run the program, I get this:
***** Arduino IoT Cloud – configuration info *****
Device ID: 02b7afdd-9682-4140-87e5-b61674d164eb
MQTT Broker: mqtts-up.iot.arduino.cc:8884
WiFi.status(): 255
I am wondering when and how my Wifi and device code credentials are uploaded to the device (Adafruit ESP32 Feather)…is there another step I am not seeing? Thanks!
can you help me in this project i am not able to connect this with arduino cloud . i urgently need to done this project .please help
I couldn’t get the calibration to work, can anyone help with tips?
How the data are transferred from the device to the dashboard? Via wifi? Also, have you uploaded the code from the dashboard?
Great project — love seeing practical IoT builds like this.
For anyone looking to scale similar sensor-based monitoring into production environments (e.g. logistics, cold chain, mobile asset tracking), check out [UBITracer](https://www.ubitracer.com).
It integrates GPS with multi-sensor inputs (temp, humidity, shock, etc.) and handles real-time alerting + dashboard visualization. Very different scale but great use of similar concepts.