Send DS18B20 Temperature data over BLE using NRF24L01 & Arduino
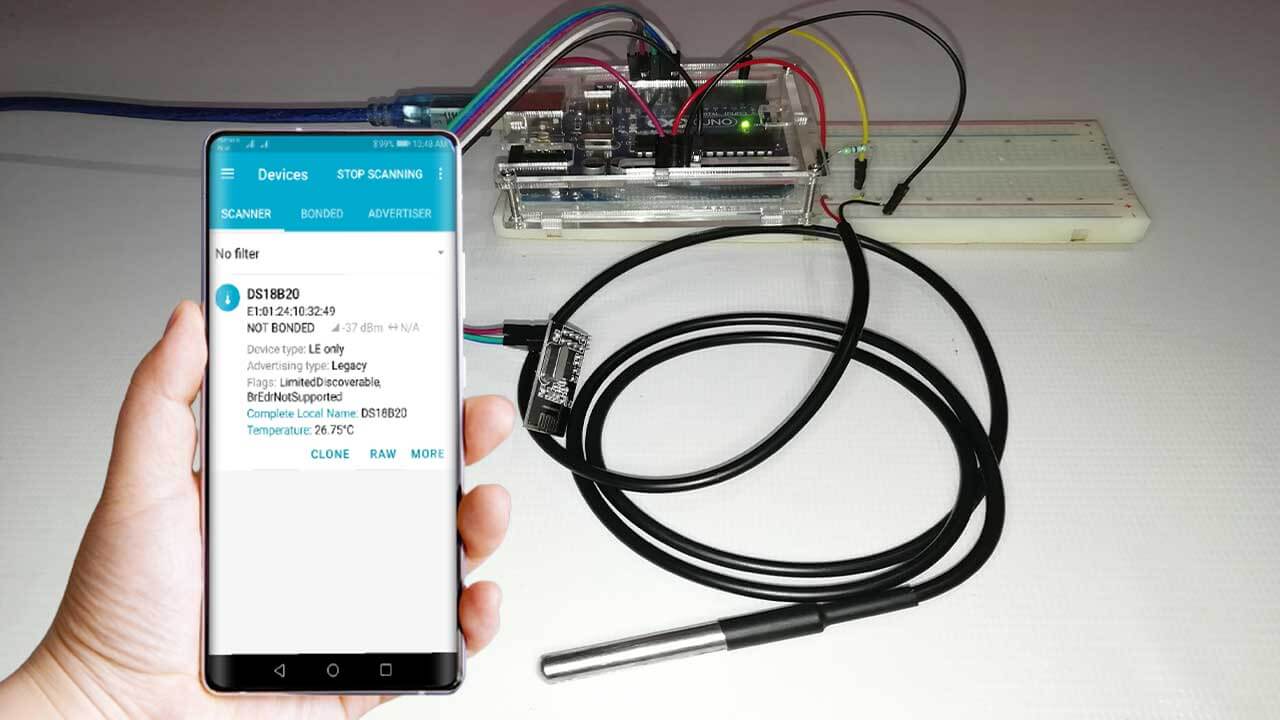
Today in this tutorial we will learn to send DS18B20 Temperature data over BLE using NRF24L01 & Arduino. At first, we will read temperature data with a DS18B20 sensor and send it to our smartphone over Bluetooth Low Energy (BLE) with NRF24L01 Module. Here, this module is acting as a BLE Module. So, without doing further delay, let’s get into this.
Before getting started, make sure that you have gone through my previous tutorial on How we used the NRF24L01 module as BLE Module.
Components Required
Anyway, today also, we are using the same NRF24L01 RF module as a BLE module for transmitting real-time DS18B20 temperature sensor data to our mobile phones. Now, to make it all work, we need the following components:
| S.N | Components Name | Description | Quantity | |
|---|---|---|---|---|
| 1 | DS18B20 | DS18B20 Waterproof Digital Temperature Sensor | 1 | https://amzn.to/3k5BCfB |
| 2 | Arduino UNO | ARDUINO UNO R3 | 1 | https://amzn.to/2L0iZf2 |
| 3 | NRF Module | NRF24L01 Module | 2 | https://amzn.to/38M3eld |
| 4 | Jumper Wires | Jumper Cables breadboard friendly | 7 | https://amzn.to/2JWSR44 |
| 5 | USB Type B Cable | USB Cord Cable for Arduino UNO | 1 | https://amzn.to/362fmNx |
NRF24L01–2.4GHz RF Transceiver Module:
This RF module is very popular among other expensive RF modules. The NRF24L01 is widely used in a variety of wireless control applications. NRF24L01 is a transceivers module, so each module can transmit and receive the data. It is very cheap and you can interface the module with any micro-controller.
Specifications:
- Low-cost single-chip 2.4GHz GFSK RF transceiver IC
- Range with Antenna: 250Kb rate (Open area) >1000 meter
- Power: Ultra-low power consumption
- Input Voltage: 3.3V
- Pins: 5V tolerant
Pinouts:
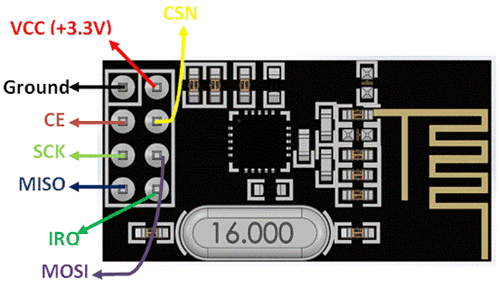
DS18B20 Waterproof Digital Temperature Sensor:
Here I am using the pre-wired and waterproofed version of the DS18B20 sensor. This sensor is handy when you need to measure temperature in wet conditions. DS18B20 can measure the temperature between -55 to 125°C (-67°F to +257°F).
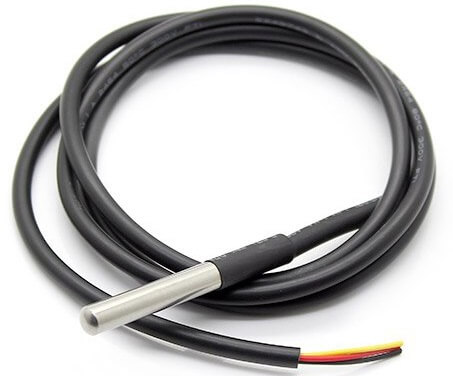
There is no signal degradation even over long distances because DS18B20 is a Digital Temperature sensor. Basically, 1-wire digital temperature sensors are fairly precise, i.e. ±0.5°C over much of the range. It can provide up to 12 bits of precision from the onboard digital-to-analog converter. It also works perfectly with any microcontroller using a single digital pin.
We need a 4.7k ohm resistor, as a pullup from the DATA to the VCC line when using the sensor.
Also Check:
- Smart Activity Tracker using MPU6050 and Arduino
- Simple Weather station using Arduino & BME280 Barometric Pressure Sensor
- LoRa Based Wireless Weather Station using Arduino & ESP32
- Fire Security System using Arduino & Flame Sensor
Circuit Diagram for Sending DS18B20 Temperature data over BLE using NRF24L01
Now, let’s wire them all together. For this, I have designed a schematic diagram. So, for the circuit part, follow the connections as mentioned below and connect them accordingly.
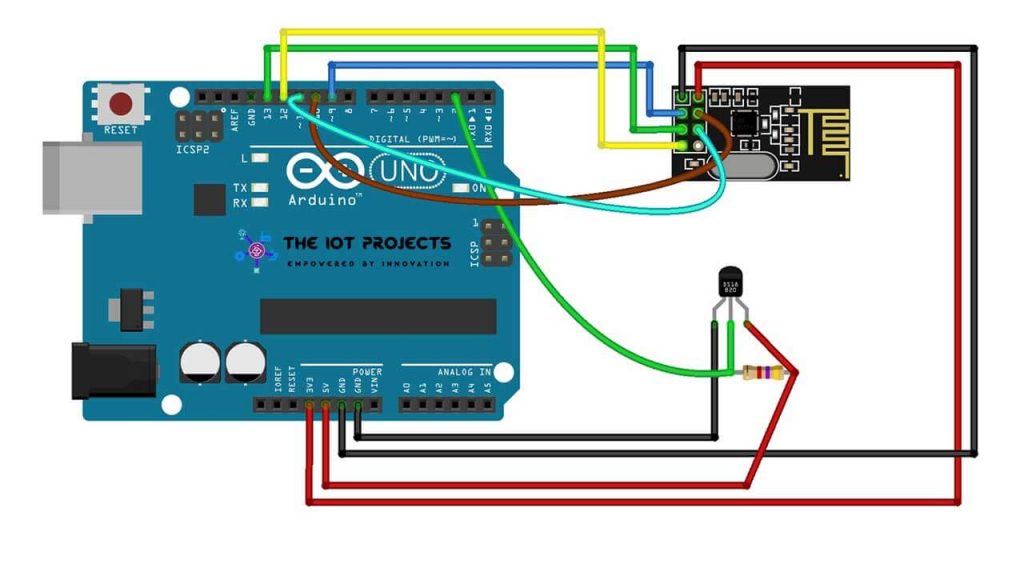
| S.N | NRF24L01 Module | Arduino UNO |
| 1 | VCC | 3.3V |
| 2 | GND | GND |
| 3 | CE | Pin 9 |
| 4 | SCN/CSN | Pin 10 |
| 5 | SCK | Pin 13 |
| 6 | MOSI | Pin 11 |
| 7 | MISO | Pin 12 |
| S.N | DS18B20 Sensor | Arduino UNO |
| 1 | VCC | 5V |
| 2 | GND | GND |
| 3 | Data | D2 |
| 4 | 4.7k ohm resistor | Between Data and VCC |
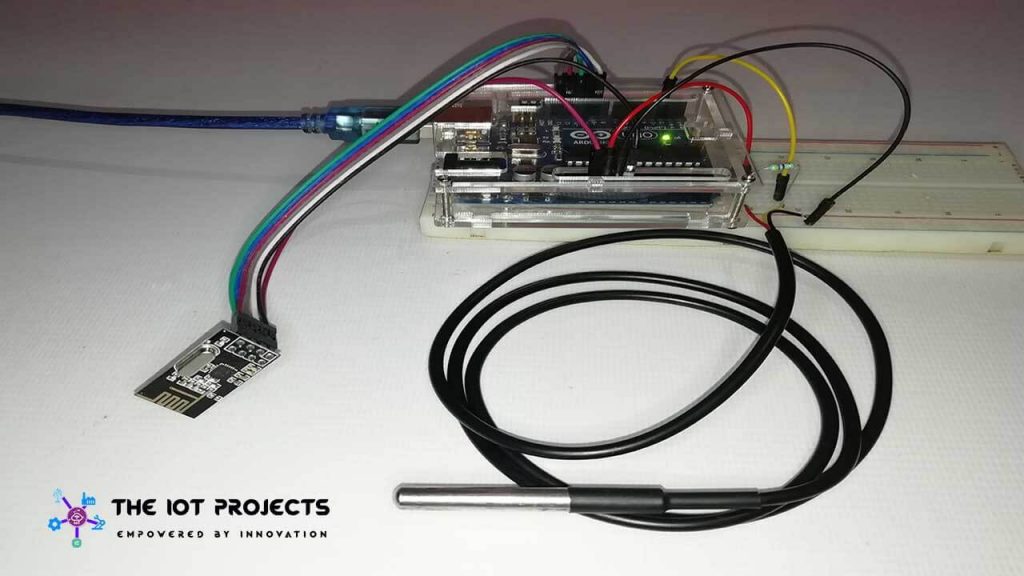
Program Code for Sending Temperature data over BLE
The following is the program code to Send DS18B20 Temperature data over BLE using NRF24L01 & Arduino. You can copy the source code from the below: Make sure you have all these libraries installed on your Arduino IDE. If not, install them one by one from the library manager.
#include <BTLE.h>
#include <SPI.h>
#include <RF24.h>
#include <OneWire.h>
#include <DallasTemperature.h>
 RF24 radio(9,10);
 BTLE btle(&radio);
 // Data wire is plugged into port 2 on the Arduino
 define ONE_WIRE_BUS 2
 // Setup a oneWire instance to communicate with any OneWire devices (not just Maxim/Dallas temperature ICs)
 OneWire oneWire(ONE_WIRE_BUS);
 // Pass our oneWire reference to Dallas Temperature.
 DallasTemperature sensors(&oneWire);
 /*
 The setup function. We only start the sensors here
 */
 void setup() {
 Serial.begin(9600);
 while (!Serial) { }
 Serial.println("BTLE Dallas Temperature sender");
 // 8 chars max
 btle.begin("DS18B20");
 // Start up the library
 sensors.begin();
 }
 void loop(void) {
 // call sensors.requestTemperatures() to issue a global temperature
   // request to all devices on the bus
   Serial.print("Requesting temperatures…");
   sensors.requestTemperatures(); // Send the command to get temperatures
   Serial.println("DONE");
   // After we got the temperatures, we can print them here.
   // We use the function ByIndex, and as an example get the temperature from the first sensor only.
   float tempC = sensors.getTempCByIndex(0);
 // Check if reading was successful
   if(tempC != DEVICE_DISCONNECTED_C)
   {
     Serial.print("Temperature for the device 1 (index 0) is: ");
     Serial.println(tempC);
   }
   else
   {
     Serial.println("Error: Could not read temperature data");
   }
 nrf_service_data buf;
   buf.service_uuid = NRF_TEMPERATURE_SERVICE_UUID;
   buf.value = BTLE::to_nRF_Float(tempC);
 if(!btle.advertise(0x16, &buf, sizeof(buf))) {
     Serial.println("BTLE advertisement failure");
   }
   btle.hopChannel();
 delay(1000);
 }
Program Code Explanation
Here we have created a radio instance with CE and CSN pin as 9 and 10 pins of the Arduino. We also created BTLE Instance using the following code.
RF24 radio(9,10);
 BTLE btle(&radio);
We have defined the DS18B20 temperature sensor data pin connected to Digital Pin 2 of the Arduino. Then, the OneWire instance and DallasTemperature reference passed using OneWire is also setup.
// Data wire is plugged into port 2 on the Arduino
 define ONE_WIRE_BUS 2
 // Setup a oneWire instance to communicate with any OneWire devices (not just Maxim/Dallas temperature ICs)
 OneWire oneWire(ONE_WIRE_BUS);
 // Pass our oneWire reference to Dallas Temperature.
 DallasTemperature sensors(&oneWire);
In a setup part, we started the serial monitor and printed information on it. Here we have started our BTLE service with the name “DS18B20”. Then started DS18B20 temperature sensor as well.
Serial.begin(9600);
   while (!Serial) { }
   Serial.println("BTLE Dallas Temperature sender");
 // 8 chars max
   btle.begin("DS18B20");
   // Start up the library
   sensors.begin();
In a loop part, we printed “Requesting Temperature Information” on the serial monitor, the command to get temperature is also set.
// call sensors.requestTemperatures() to issue a global temperature
   // request to all devices on the bus
   Serial.print("Requesting temperatures…");
   sensors.requestTemperatures(); // Send the command to get temperatures
   Serial.println("DONE");
The float variable “tempC” is created, which also helps to check the DS18B20 sensor if it is working.
float tempC = sensors.getTempCByIndex(0);
 // Check if reading was successful
   if(tempC != DEVICE_DISCONNECTED_C)
   {
     Serial.print("Temperature for the device 1 (index 0) is: ");
     Serial.println(tempC);
   }
   else
   {
     Serial.println("Error: Could not read temperature data");
   }
Finally, we created a buf variable of type NRF Service Data. The value of the buf variable is set by the float variable “tempC” of NRF float type.
nrf_service_data buf;
   buf.service_uuid = NRF_TEMPERATURE_SERVICE_UUID;
   buf.value = BTLE::to_nRF_Float(tempC);
The following code will advertise our temperature data. If the advertisement fails, then it prints the fail info to the serial monitor.
if(!btle.advertise(0x16, &buf, sizeof(buf))) {
     Serial.println("BTLE advertisement failure");
Now, it will hop to the next channel with a delay of 1 second.
btle.hopChannel();
 delay(1000);v
Uploading Arduino Code
Let’s upload the code to our Arduino board. First, select the correct Arduino board and its COM port from the tools menu. After successful upload, our device is ready to send DS18B20 temperature sensor data to our smartphone over BLE using the NRF24L01 module.
Send DS18B20 Temperature data to Smartphone over BLE using NRF24L01
Now, let us move to our mobile phone.
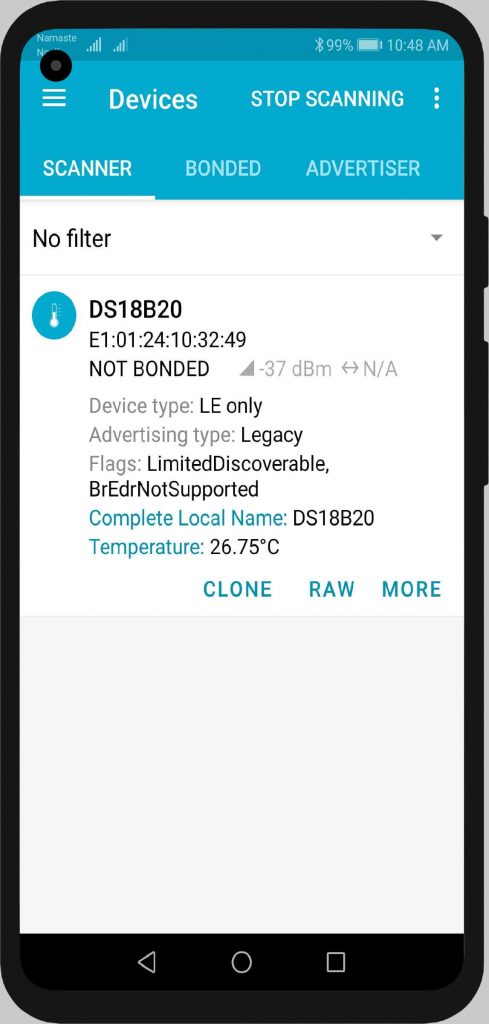
- Open the NRF Connect for Mobile application.
- Allow the permission to enable Bluetooth.
- Then click on start scan to find your device.
- If you can’t see your device, refresh the page again.
- Here we can see the DS18B20 Device.
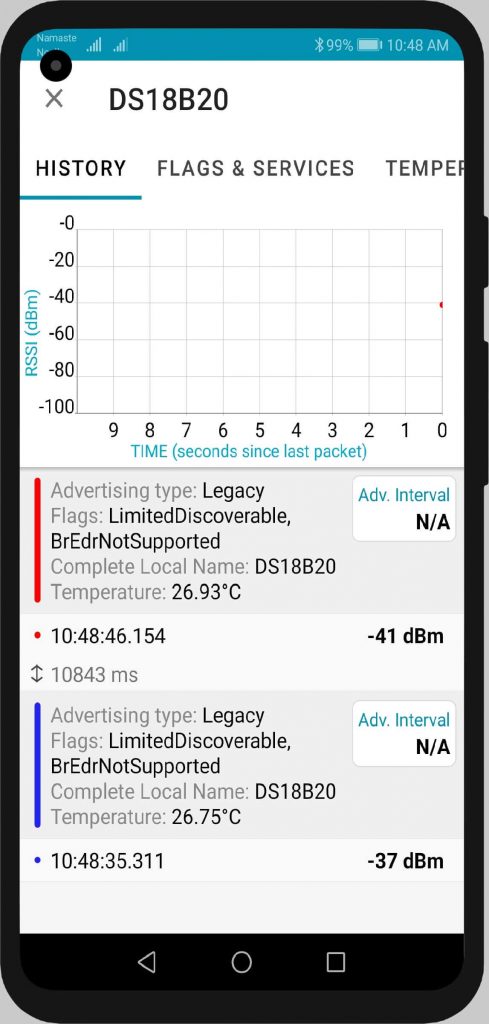
- Click on the device name to expand it.
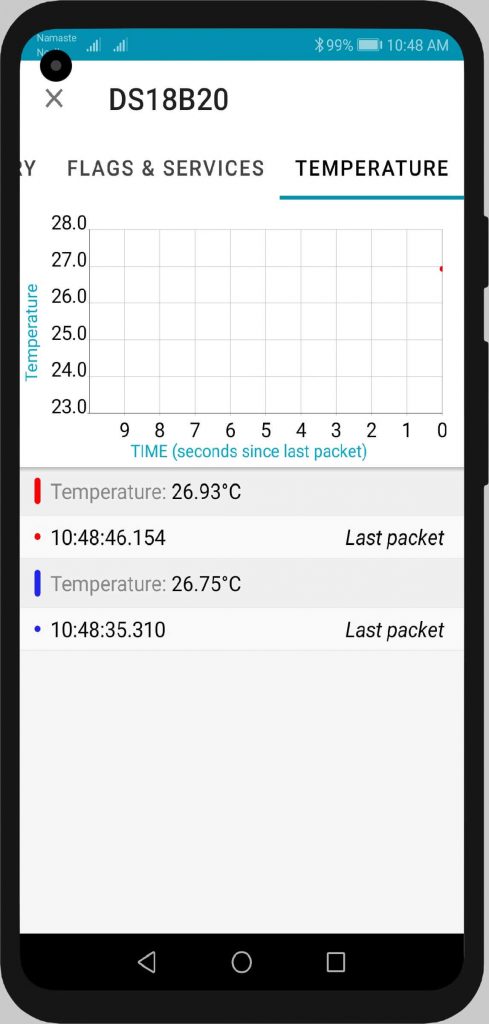
- You can see the temperature data.
- Click on more to explore more data.
As expected, everything working fine, which means our BLE module and Temperature sensor are working properly.
Video Tutorial
Conclusion
So this is how we Send DS18B20 Temperature data over BLE using NRF24L01 & Arduino. I hope you guys love this tutorial. If you did, then give me a share. Comment down below if you have any queries related to this project.

Thank you for the video. I need it now. I did everything as in the video. But it gives the error “‘DEVICE_DISCONNECTED_C’ was not declared in this scope”. Help how to fix this?
Again, another fine article with great documentation and directions. I connected the D18B20 and it worked perfectly. You are a great instructor. I’m guessing a professor or an Electrical Engineer. Whatever you are, keep up the good work.