IoT Smart RFID Door Lock System Using NodeMCU ESP8266
IoT Based Smart Door Lock System with NodeMCU
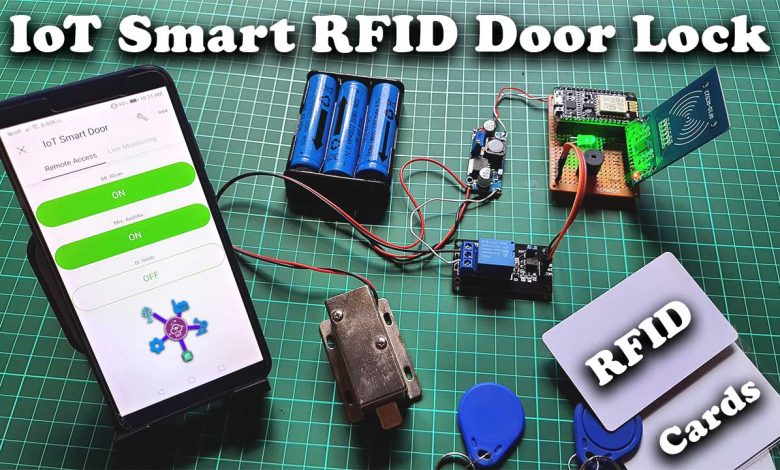
Today in this project you will learn how to make IoT smart RFID door lock system using NodeMCU ESP8266, RFID MF-RC-522 Module, a Relay, Solenoid lock, and Blynk IoT platform. With the help of this project, you can remotely monitor your door lock from anywhere in the world using your phone. (Both iPhone and Android Devices).
Overview: IoT Smart Door Lock
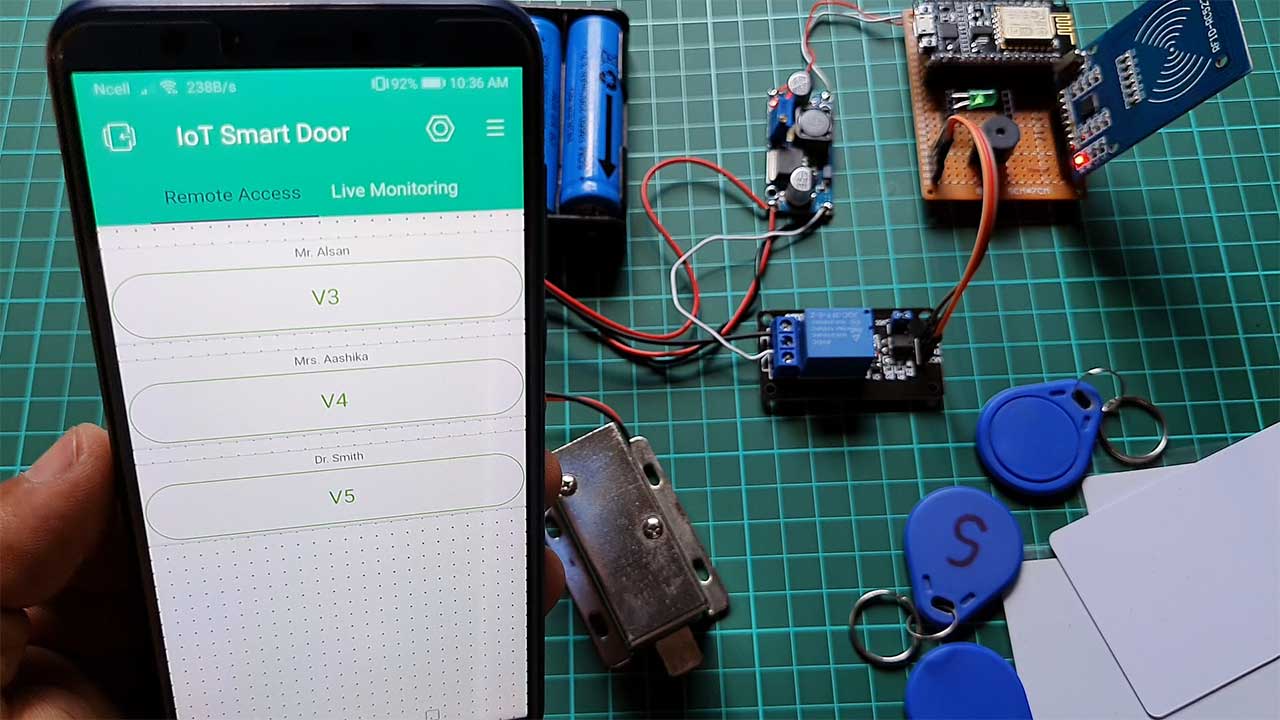
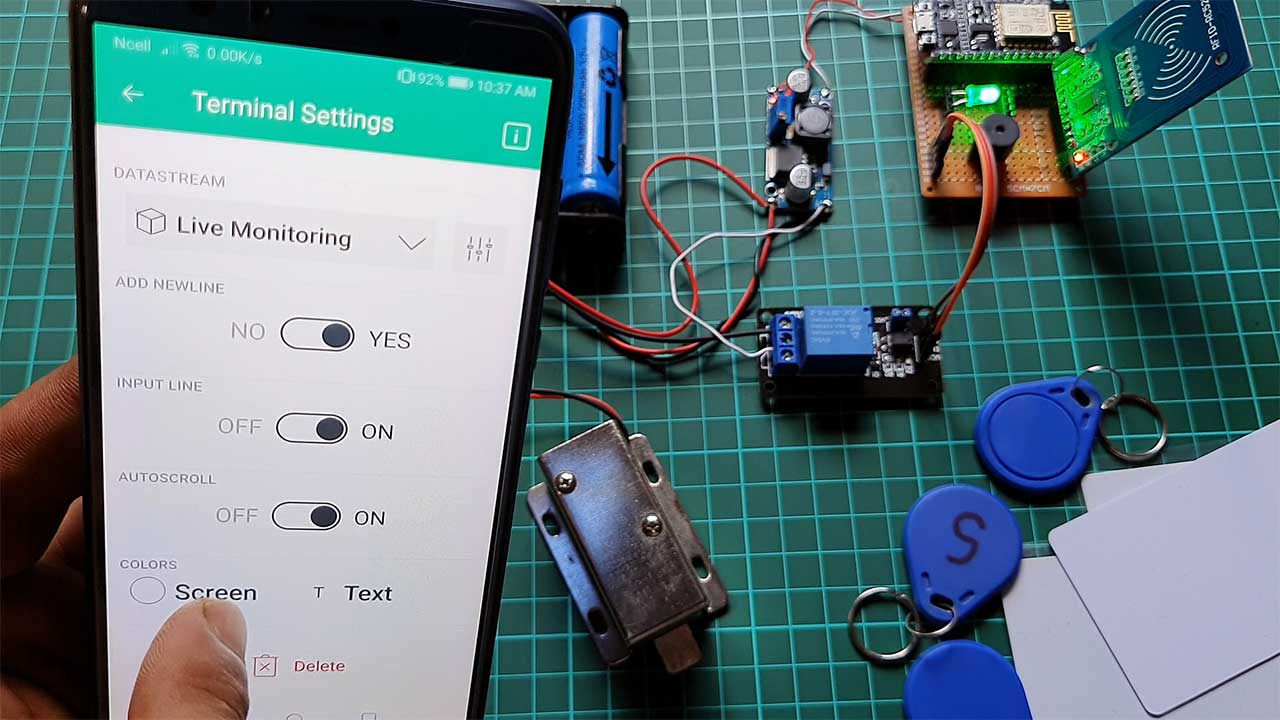
First of all, let’s see the overview of this project. In the Blynk IoT App, I have added two tabs. Usually, one is for remote access controls and the other for Live Monitoring. Each time user swipes a card a message is received. The remote access control tab is used for remote access control.
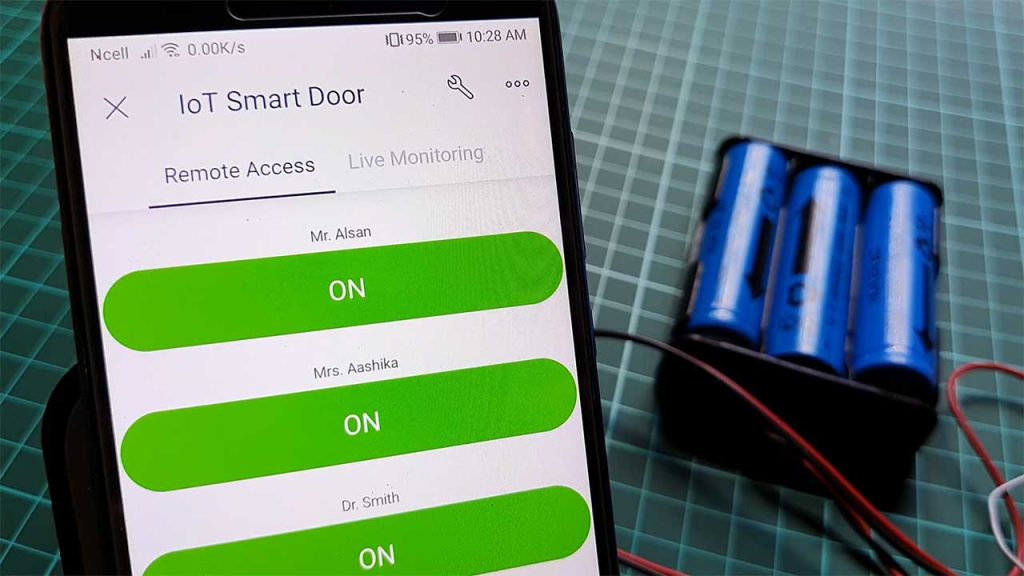
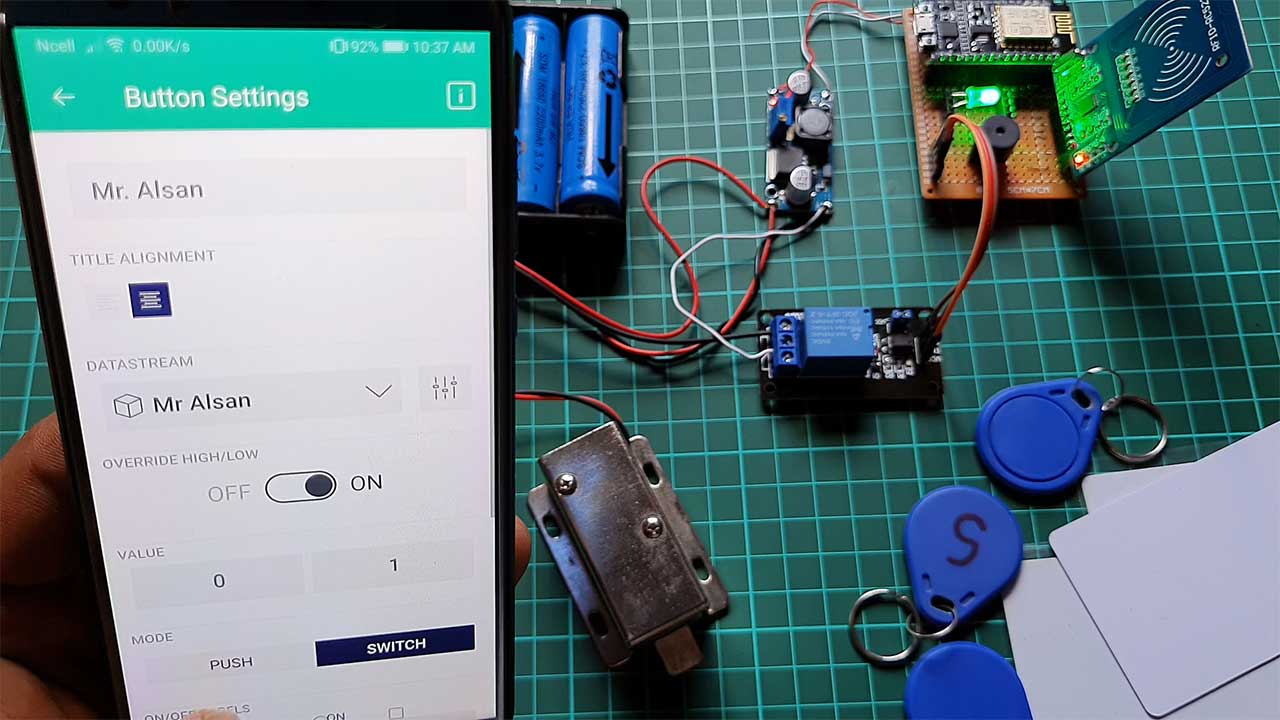
As you can see in the above image all the buttons are turned on. which means the admin has given access to all three users. If the buttons are turned off then users won’t be able to open the door lock.
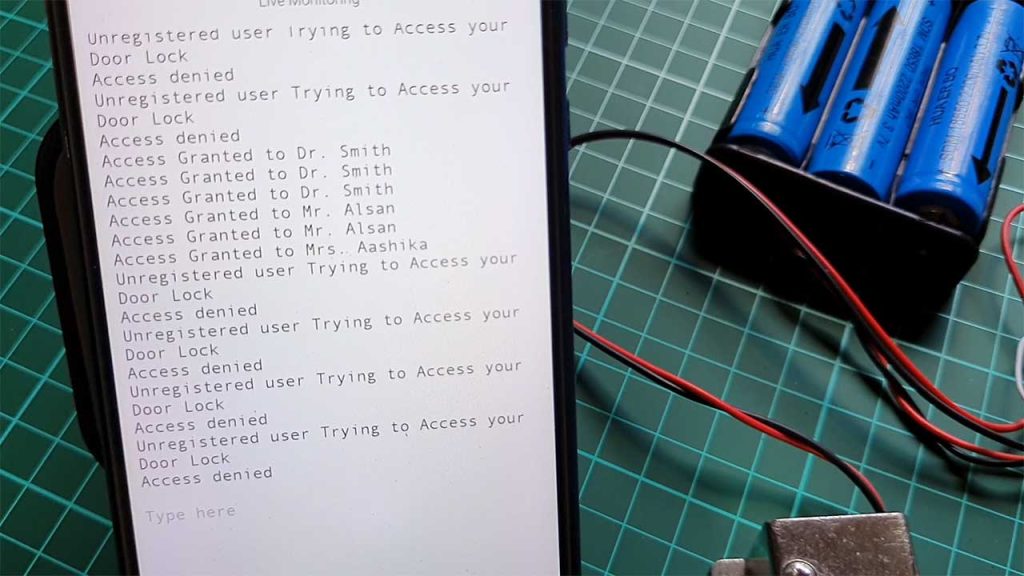
Features of IoT based RFID smart door lock system
- Blinking LED as WiFi response.
- Buzzer for an alert system
- Authorize and Deauthorized Users from anywhere in the world.
- Over The Air Configuration Update
- Easily Reconfigure WiFi Credentials Stored in EEPROM without hardcoding.
- Live Monitor Your Door Lock From anywhere in the world.
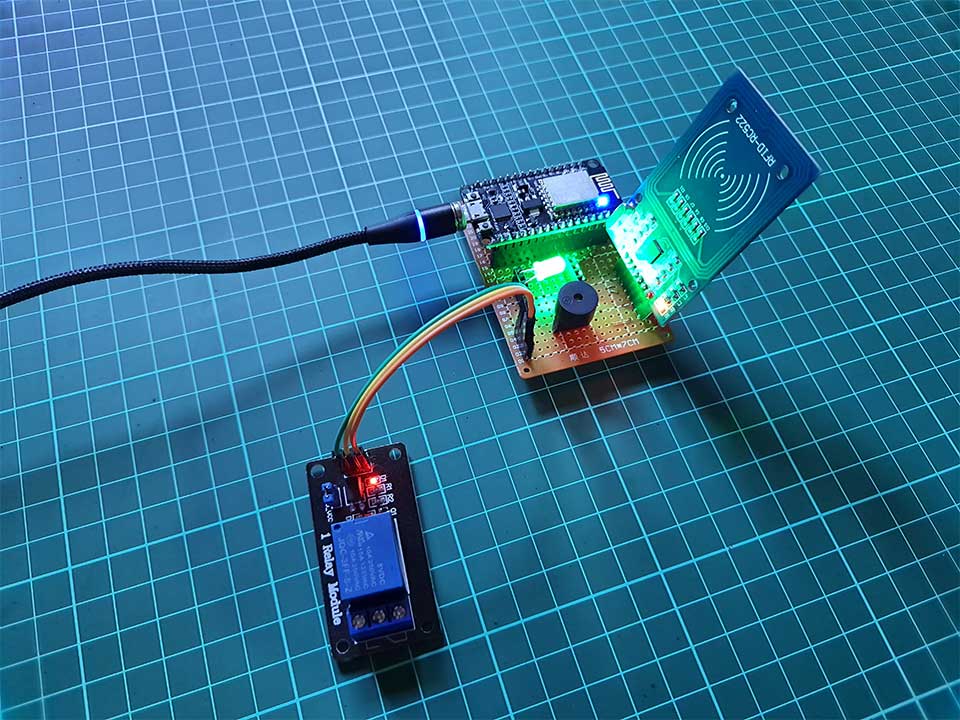
This project also has a Green LED. It helps to indicate WiFi connection and Blynk IoT server connection. It blinks while data is sent successfully to the server. Similarly, a Buzzer is also added to alert when unauthorized access is detected. To open the door lock, permission should be granted by the admin.
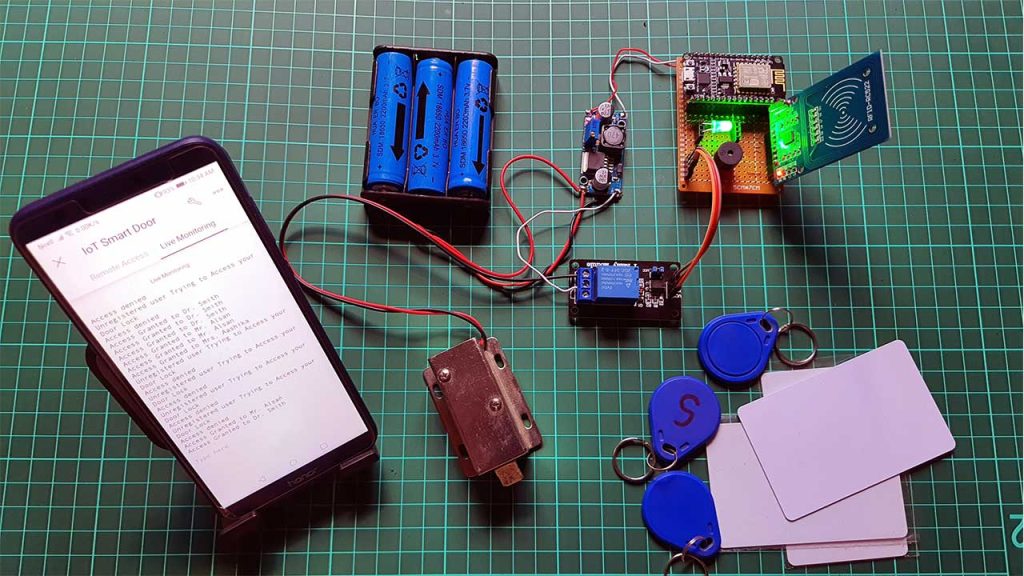
As you can see in the above image, only authorized users can unlock the door lock.
Reconfigure Smart Door Lock
This project has integrated Reconfiguring Device features. Hence, You can easily discover your device and enter your New WiFi SSID, & Password Wirelessly using your smartphone. Now, you can connect this device to any WiFi network without programming the board.
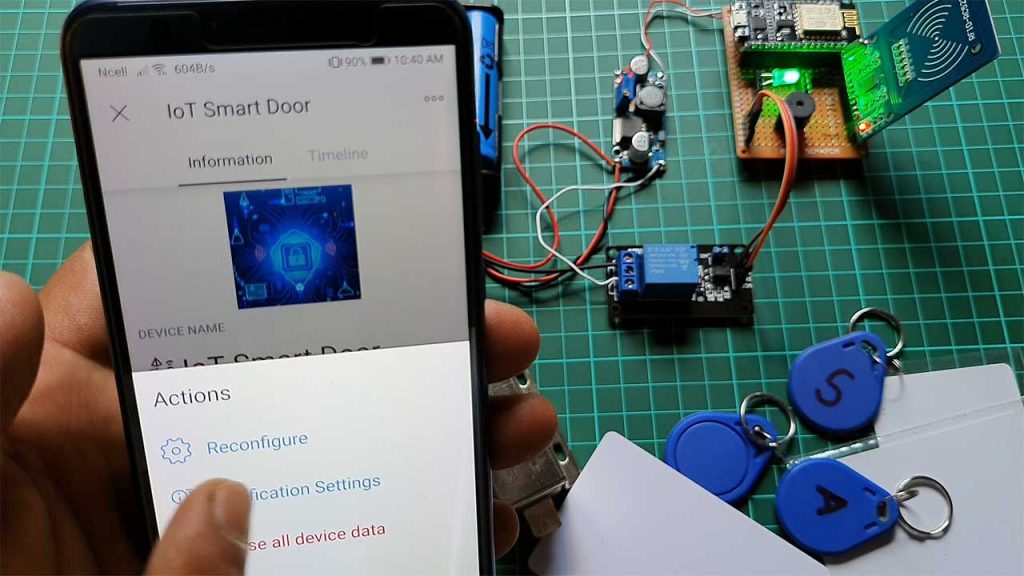
You can also press and hold the flash button for 10 seconds on the NodeMCU ESP8266 board to erase the WiFi credentials stored in EEPROM. Sometimes a condition may evolve in your project that you should intentionally erase the WiFi Credentials. Hence, In that case, you can use this button. It switches NodeMCU to AP mode and allows you to discover your device in Blynk IoT. Where you can configure your WiFi SSID & Password.

Note: For MF-RC522 RFID module technical specification and Pinouts go through these posts.
- MFRC522 Module with NodeMCU in IoT
- RFID Based Solenoid Door lock using Arduino
- RFID Master Card Door Lock System using Arduino
- Fingerprint Door Lock System using Arduino and Smartphone
- RFID Based Attendance System Using NodeMCU with PHP Web App
Components Required
The components and tools used in this project are easily available on amazon.
| S.N | Components Name | Quantity | |
|---|---|---|---|
| 1 | NodeMCU ESP8266 | 1 | https://amzn.to/3mTuL95 |
| 2 | RFID MFRC-522 Module | 1 | https://amzn.to/3pOPpb4 |
| 3 | 12V Solenoid Door Lock | 1 | https://amzn.to/3NygYTa |
| 4 | Green LED | 1 | https://amzn.to/3JXRSLd |
| 5 | Few jumpers wires | 20 | https://amzn.to/3klh0A4 |
| 6 | 3.7V 18650 Battery | 4 | https://amzn.to/3DnimDm |
| 7 | 3.7V 18650 Battery holder | 1 | https://amzn.to/3LpS7z8 |
| 8 | LM2596 Buck Converter | 1 | https://amzn.to/3ISoXHh |
| 9 | Buzzer | 1 | https://amzn.to/3mJNp4p |
*Please Note: These are affiliate links. I may make a commission if you buy the components through these links. I would appreciate your support in this way!
RFID Smart Door Lock Circuit Diagram
As you can see the circuit diagram is very simple to understand.
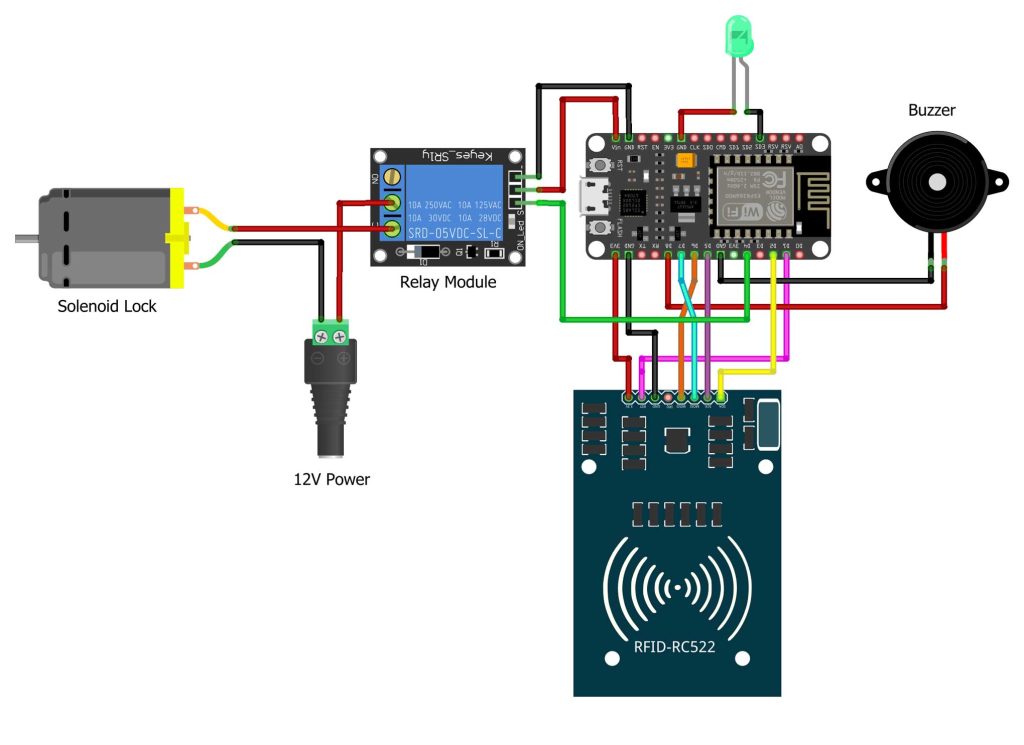
Connect the RFID Module to NodeMCU as per the circuit diagram.
D2 <———-> SDA/SS
D5 <———-> SCK
D7 <———-> MOSI
D6 <———-> MISO
GND <———-> GND
D1 <———-> RST
3V/3V3 <———-> 3.3V
Connect Relay Input Pin to D4 pin of NodeMCU. Similarly, Buzzer Negative Terminal is connected to the Ground and the Positive terminal to the D8 Pin of NodeMCU. Now the Green LED is connected to the SD3(GPIO 10) Pin of NodeMCU.
Project PCB Gerber File & PCB Ordering Online
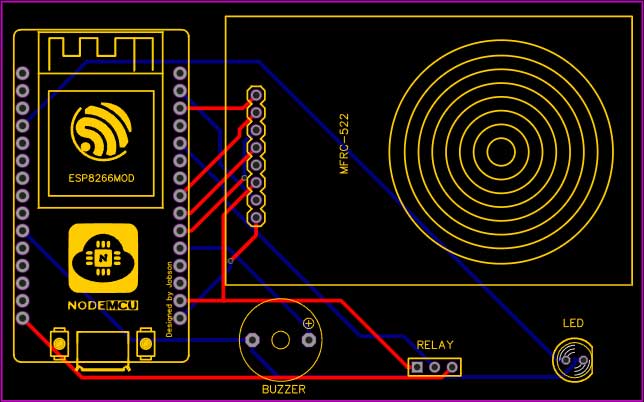
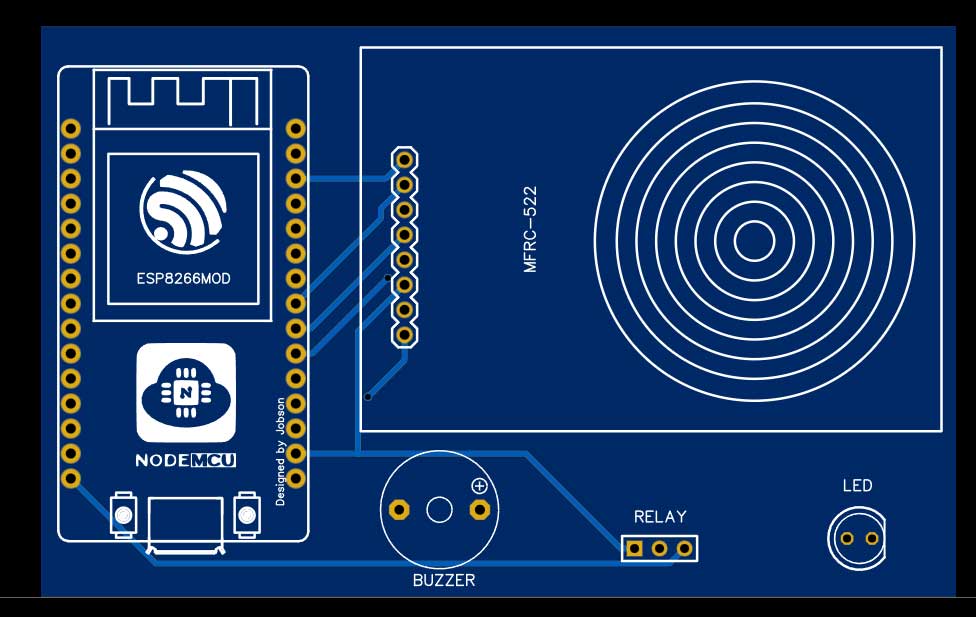
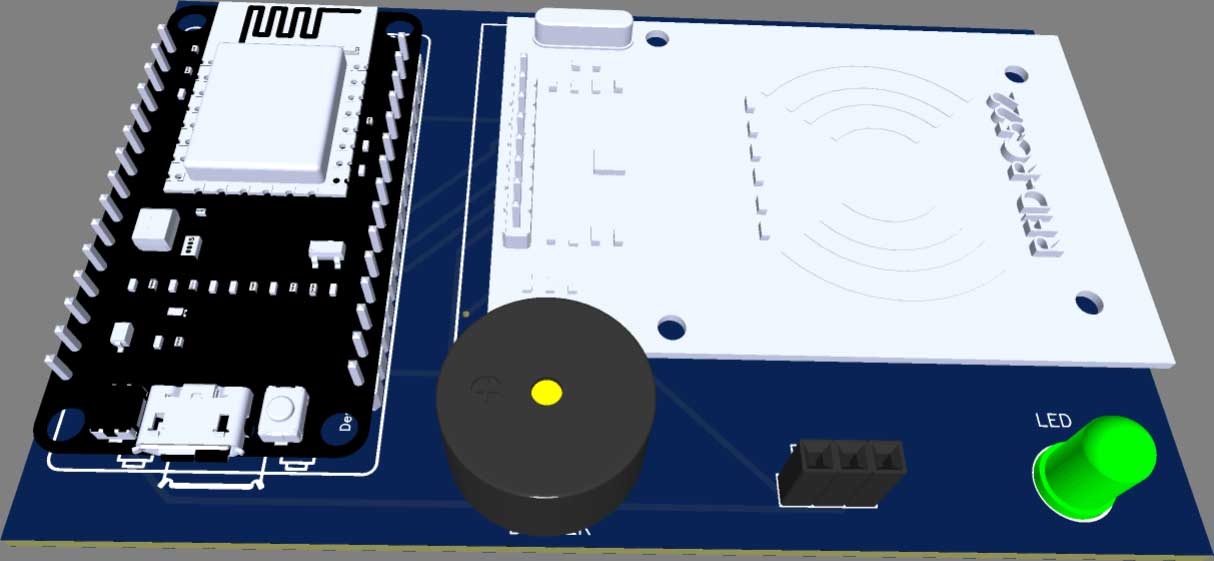
You can simply assemble the circuit on a breadboard. But To remove messy wiring and give a clean look, I designed a PCB prototype for this project. It is also helpful for troubleshooting without any errors. You can download the Gerber file of my PCB Design from the link attached below. The PCB looks like the image shown below.
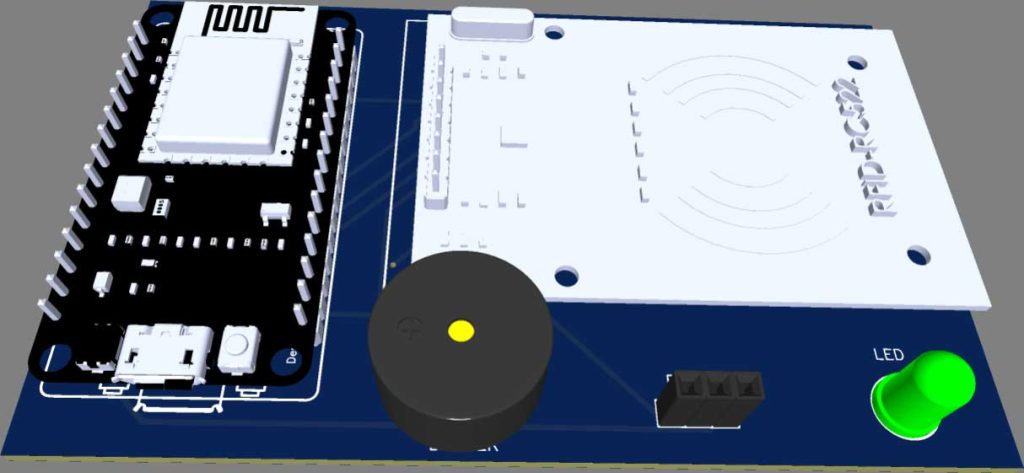
I provided the Gerber File for IoT Smart RFID Door Lock System Using NodeMCU ESP8266 PCB below.
You can simply download the Gerber File and order your custom PCB from PCBWay

Visit the PCBWay official website by clicking here: https://www.PCBWay.com/. Simply upload your Gerber File to the Website and place an order. I prefer PCBWay for ordering custom PCBs. PCBWay is a place that brings manufacturers and customers together. They have more than a decade of experience in this field of fabrication and prototyping and assembling of PCBs. PCBWay have proved their focus on their customers’ needs in terms of cost-effectiveness, delivery, and quality. And this can be proved by their outstanding customer reviews.
Setting up Blynk IoT Dashboard
In order to monitor and control door lock using Blynk IoT Server, you first need to set up the Blynk IoT Cloud dashboard. To set up the Blynk Server, visit https://blynk.cloud/. Create an account or simply sign in if you created the account earlier.
Creating Blynk New template
A template is a project in which we can create a web and mobile dashboard for specific hardware. In our case, it’s an IoT Smart Door Lock. For creating a project, first, you have to click on the New Template.
- Enter a template name. I am Giving it an “IoT Smart Door ”.
- Select the hardware board (ESP8266).
- The connection type will be WiFi.
- You can add a description of your project if required.
- Click on Done.
- Now the template is created.
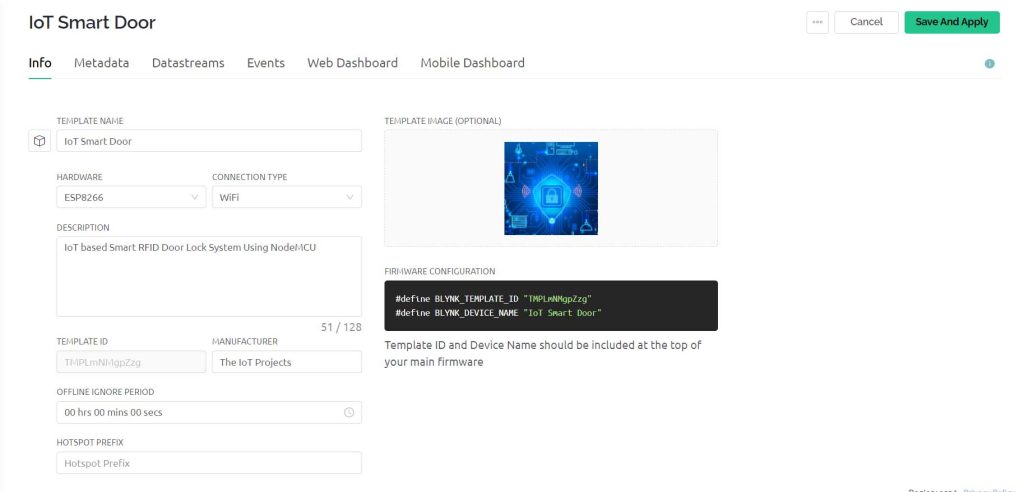
Here are two important things that you should remember one is the template id and another one is the device name which is required during the time of programming.
Creating New Blynk Datastream
A data stream is like a pipeline or channel. The data will be sent or received through these data channels.
In a single project or template, there can be multiple DataStream. In our project, we are adding three RFID Cards. So you can give names to those RFID cards. In my case, Mr. Alsan, Miss. Aashika, Doctor. Smith and Live Monitoring are four DataStream.
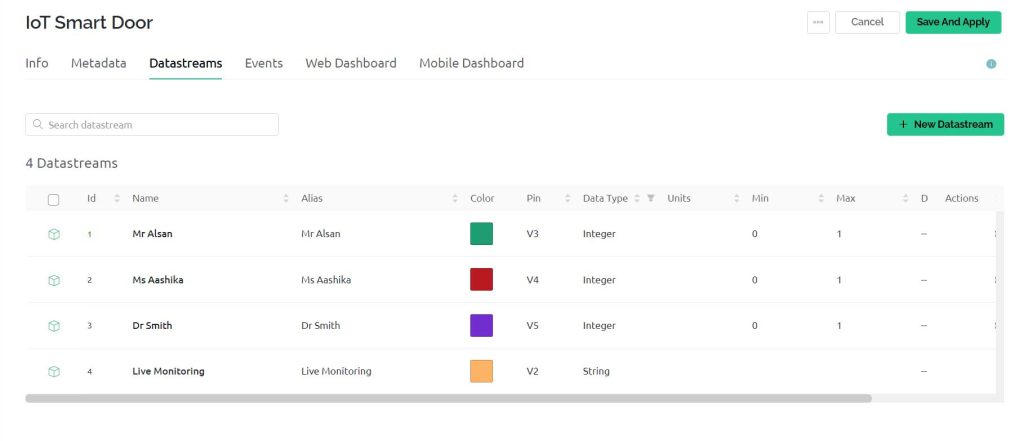
I choose virtual pins V3, V4, and V5 respectively for user names and V2 for the Live Monitoring. The Variable data type is a string for Live Monitoring and for users it’s an integer type.
Design the Blynk 2.0 Web Dashboard
After that move on to the web dashboard. In this section, you will be able to see some widgets for making your cool-looking web dashboard. But you can only authorize and deauthorize users from the web dashboard but cannot live monitor door lock from the web due to a lack of terminal widget.
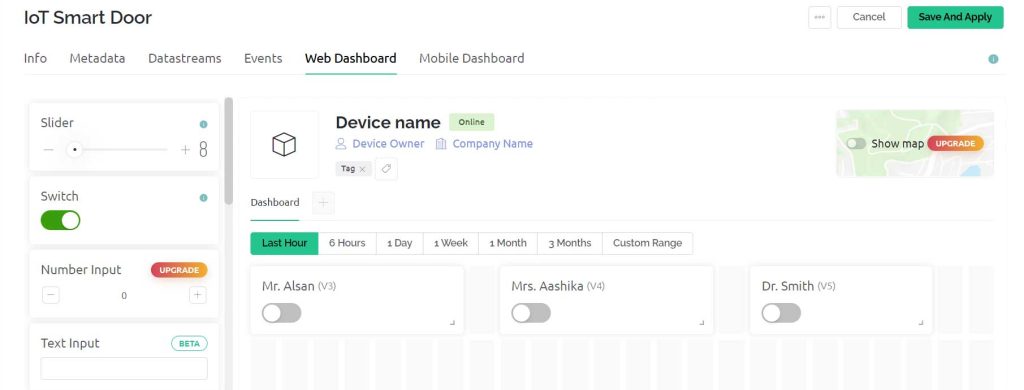
So, add three buttons for three different users and configure datastreams to them as per the user name.
Programming Sketch
Before you start the programming, first of all, make sure you have downloaded all the necessary libraries.
Download Program Sketch Zip File
Note: Place all the files under the same folder.
// Fill-in information from your Blynk Template here
#define BLYNK_TEMPLATE_ID "TMPLmNMgxxyz"
#define BLYNK_DEVICE_NAME "IoT Smart Door"

#define BLYNK_FIRMWARE_VERSION        "0.1.0"

#define BLYNK_PRINT Serial
//#define BLYNK_DEBUG

#define APP_DEBUG

// Uncomment your board, or configure a custom board in Settings.h
//#define USE_SPARKFUN_BLYNK_BOARD
#define USE_NODE_MCU_BOARD
//#define USE_WITTY_CLOUD_BOARD
//#define USE_WEMOS_D1_MINI

#include "BlynkEdgent.h"
#include <SPI.h>
#include <MFRC522.h>

#define SS_PIN 4  // sda pin D2
#define RST_PIN 5 // RST (flash) pin D2

#define relay 2 //Relay Pin D4
#define BUZZER 15 //buzzer pin D8


MFRC522 mfrc522(SS_PIN, RST_PIN);        // Create MFRC522 instance.

SimpleTimer timer;
int button1 = 0;
int button2 = 0;
int button3 = 0;
WidgetTerminal terminal(V2);

void setup()
{
  Serial.begin(115200);
  delay(100);

  BlynkEdgent.begin();

  pinMode(relay, OUTPUT);
  pinMode(BUZZER, OUTPUT);

  SPI.begin();                // Init SPI bus
  mfrc522.PCD_Init();        // Init MFRC522 card
  timer.setInterval(3000L, iot_rfid);
}

void loop() {
  timer.run(); // Initiates SimpleTimer
  BlynkEdgent.run();
}
void iot_rfid()
{

  // Prepare key - all keys are set to FFFFFFFFFFFFh at chip delivery from the factory.
  MFRC522::MIFARE_Key key;
  for (byte i = 0; i < 6; i++) {
    key.keyByte[i] = 0xFF;
  }
  // Look for new cards
  if ( ! mfrc522.PICC_IsNewCardPresent()) {
    return;
  }

  // Select one of the cards
  if ( ! mfrc522.PICC_ReadCardSerial()) {
    return;
  }
  // Now a card is selected. The UID and SAK is in mfrc522.uid.

  // Dump UID
  Serial.print("Card UID:");
  for (byte i = 0; i < mfrc522.uid.size; i++) {
    Serial.print(mfrc522.uid.uidByte[i] < 0x10 ? " 0" : " ");
    Serial.print(mfrc522.uid.uidByte[i], DEC);
  }
  Serial.println();

  // Dump PICC type
  byte piccType = mfrc522.PICC_GetType(mfrc522.uid.sak);
  //    Serial.print("PICC type: ");
  //Serial.println(mfrc522.PICC_GetTypeName(piccType));
  if (        piccType != MFRC522::PICC_TYPE_MIFARE_MINI
              &&        piccType != MFRC522::PICC_TYPE_MIFARE_1K
              &&        piccType != MFRC522::PICC_TYPE_MIFARE_4K) {
    //Serial.println("This sample only works with MIFARE Classic cards.");
    return;
  }
  // defining Cards here

  if ( ((mfrc522.uid.uidByte[0] == 129) && (mfrc522.uid.uidByte[1] == 163) && (mfrc522.uid.uidByte[2] == 220) && (mfrc522.uid.uidByte[3] == 121)) && (button1 == 1) )
  {
    Serial.println("Access Granted to Mr. Alsan");
    Blynk.virtualWrite(V2, "Access Granted to Mr. Alsan" );
    digitalWrite(relay, LOW);
    delay(5000);
    digitalWrite(relay, HIGH);
  }
  else if (( (mfrc522.uid.uidByte[0] == 134) && (mfrc522.uid.uidByte[1] == 96) && (mfrc522.uid.uidByte[2] == 128) && (mfrc522.uid.uidByte[3] == 248)) && (button2 == 1) )
  {
    Serial.println("Access Granted to Mrs. Aashika");
    Blynk.virtualWrite(V2, "Access Granted to Mrs. Aashika" );
    digitalWrite(relay, LOW);
    delay(5000);
    digitalWrite(relay, HIGH);
  }
  else if ( ((mfrc522.uid.uidByte[0] == 57) && (mfrc522.uid.uidByte[1] == 234) && (mfrc522.uid.uidByte[2] == 176) && (mfrc522.uid.uidByte[3] == 109)) && (button3 == 1) )
  {
    Serial.println("Access Granted to Dr. Smith");
    Blynk.virtualWrite(V2, "Access Granted to Dr. Smith" );
    digitalWrite(relay, LOW);
    delay(5000);
    digitalWrite(relay, HIGH);
  }

  else {
    Serial.println("Unregistered user");
    Blynk.virtualWrite(V2, "Unregistered user Trying to Access your Door Lock " );
    Serial.println("Access denied");
    Blynk.virtualWrite(V2, "Access denied");
    digitalWrite(BUZZER, HIGH);
    delay(2000);
    digitalWrite(BUZZER, LOW);
  }
}
// in Blynk app writes values to the Virtual Pin 3
BLYNK_WRITE(V3)
{
  button1 = param.asInt(); // assigning incoming value from pin V3 to a variable


}


// in Blynk app writes values to the Virtual Pin 4
BLYNK_WRITE(V4)
{
  button2 = param.asInt(); // assigning incoming value from pin V4 to a variable

}

BLYNK_WRITE(V5)
{
  button3 = param.asInt(); // assigning incoming value from pin V5 to a variable

}
Program Code Explanation
So at first, I started by including the libraries needed for IoT Smart RFID Door Lock System Using NodeMCU.
#include "BlynkEdgent.h"
#include <SPI.h>
#include <MFRC522.h>
Define SS and RST Pin of RFID.
#define SS_PIN 4  // sda pin D2
#define RST_PIN 5 // RST (flash) pin D2
Define Relay and Buzzer Pin.
#define relay 2 //Relay Pin D4
#define BUZZER 15 //buzzer pin D8
Create RFID Instance.
MFRC522 mfrc522(SS_PIN, RST_PIN); // Create MFRC522 instance.
I have defined a timer here. button1, button2, and button3 are the integer type variable. All the buttons are assigned to 0. This means by default the user has no access to the door lock. Hence the button value can be 0 and 1. 0 means no access and 1 means access is granted to the user.
SimpleTimer timer;
int button1 = 0;
int button2 = 0;
int button3 = 0;
The Terminal widget is assigned to the virtual Pin V2.
WidgetTerminal terminal(V2);
Inside void setup, serial communication is activated at 115200 baudrate for debugging purposes.
Serial.begin(115200);
SPI bus and the RFID reader are initiated.
 SPI.begin();                // Init SPI bus
 mfrc522.PCD_Init();        // Init MFRC522 card
LED, Relay, and Buzzer are used as output.
  pinMode(relay, OUTPUT);
  pinMode(BUZZER, OUTPUT);
IoT_RFID is a user-defined function that is executed after every 1 second. Using this Timer dot set interval function.
timer.setInterval(3000L, iot_rfid);
In the loop section timer.run and BlynkEdgent.run function are initiated.
void loop() {
  timer.run(); // Initiates SimpleTimer
  BlynkEdgent.run();
}
In this void iot_rfid( ) user-defined function. we read the RFID card, select the card and then Print the UID in the serial monitor.
  // Prepare key - all keys are set to FFFFFFFFFFFFh at chip delivery from the factory.
  MFRC522::MIFARE_Key key;
  for (byte i = 0; i < 6; i++) {
    key.keyByte[i] = 0xFF;
  }
  // Look for new cards
  if ( ! mfrc522.PICC_IsNewCardPresent()) {
    return;
  }

  // Select one of the cards
  if ( ! mfrc522.PICC_ReadCardSerial()) {
    return;
  }
  // Now a card is selected. The UID and SAK is in mfrc522.uid.

  // Dump UID
  Serial.print("Card UID:");
  for (byte i = 0; i < mfrc522.uid.size; i++) {
    Serial.print(mfrc522.uid.uidByte[i] < 0x10 ? " 0" : " ");
    Serial.print(mfrc522.uid.uidByte[i], DEC);
  }
  Serial.println();

  // Dump PICC type
  byte piccType = mfrc522.PICC_GetType(mfrc522.uid.sak);
  //    Serial.print("PICC type: ");
  //Serial.println(mfrc522.PICC_GetTypeName(piccType));
  if (        piccType != MFRC522::PICC_TYPE_MIFARE_MINI
              &&        piccType != MFRC522::PICC_TYPE_MIFARE_1K
              &&        piccType != MFRC522::PICC_TYPE_MIFARE_4K) {
    //Serial.println("This sample only works with MIFARE Classic cards.");
    return;
  }
The main logic behind this project is here. If the RFID identification matches the provided number and the button value is equal to 1, then only it will open the lock send a message to the serial monitor and Blynk Virtual Terminal for Live monitoring. After a delay of 5 seconds, the door is automatically locked. You can change the delay value according to your requirements. For the demonstration, I am using a delay of 5 seconds.
  if ( ((mfrc522.uid.uidByte[0] == 129) && (mfrc522.uid.uidByte[1] == 163) && (mfrc522.uid.uidByte[2] == 220) && (mfrc522.uid.uidByte[3] == 121)) && (button1 == 1) )
  {
    Serial.println("Access Granted to Mr. Alsan");
    Blynk.virtualWrite(V2, "Access Granted to Mr. Alsan" );
    digitalWrite(relay, LOW);
    delay(5000);
    digitalWrite(relay, HIGH);
  }
Note: Every RFID card has different Identification numbers. so to find your card UID number simply upload this program code and open the serial monitor. It will print the UID in the serial Monitor. Hence you can note them here in the program code.
Similarly, the same condition is applied to two more cards. You can add as many cards as you want. using this If …. else statement.
  else if (( (mfrc522.uid.uidByte[0] == 134) && (mfrc522.uid.uidByte[1] == 96) && (mfrc522.uid.uidByte[2] == 128) && (mfrc522.uid.uidByte[3] == 248)) && (button2 == 1) )
  {
    Serial.println("Access Granted to Mrs. Aashika");
    Blynk.virtualWrite(V2, "Access Granted to Mrs. Aashika" );
    digitalWrite(relay, LOW);
    delay(5000);
    digitalWrite(relay, HIGH);
  }
  else if ( ((mfrc522.uid.uidByte[0] == 57) && (mfrc522.uid.uidByte[1] == 234) && (mfrc522.uid.uidByte[2] == 176) && (mfrc522.uid.uidByte[3] == 109)) && (button3 == 1) )
  {
    Serial.println("Access Granted to Dr. Smith");
    Blynk.virtualWrite(V2, "Access Granted to Dr. Smith" );
    digitalWrite(relay, LOW);
    delay(5000);
    digitalWrite(relay, HIGH);
  }
Now, when either of the conditions becomes false then else statement is executed. This will print the Access denied message to the serial Monitor as well as the Blynk virtual terminal. After that, the warning will be given through Buzzer.
  else {
    Serial.println("Unregistered user");
    Blynk.virtualWrite(V2, "Unregistered user Trying to Access your Door Lock " );
    Serial.println("Access denied");
    Blynk.virtualWrite(V2, "Access denied");
    digitalWrite(BUZZER, HIGH);
    delay(2000);
    digitalWrite(BUZZER, LOW);
  }
}
These three functions are used to send values 0 and 1 using buttons through the virtual pins V3, V4, and V5. These variables are stored in button1, button2, and button3. Depending upon the values stored the access is given to the users. So, 0 means access denied and 1 means access is granted to the user.
// in Blynk app writes values to the Virtual Pin 3
BLYNK_WRITE(V3)
{
  button1 = param.asInt(); // assigning incoming value from pin V3 to a variable


}


// in Blynk app writes values to the Virtual Pin 4
BLYNK_WRITE(V4)
{
  button2 = param.asInt(); // assigning incoming value from pin V4 to a variable

}

BLYNK_WRITE(V5)
{
  button3 = param.asInt(); // assigning incoming value from pin V5 to a variable

}
Now choose your NodeMCU board and correct port. Compile the Program sketch and Upload it to the NodeMCU 12E Board. When you successfully upload the program to the NodeMCU board. Open the serial monitor to see the project into action.
Blynk IoT 2.0 Mobile application setup
Download the blynk application to your mobile.
- New Blynk Mobile App (Android)
- New Blynk Mobile App (iOS)
After installing the application login into your account. Turn on the developer mode if it is not turned on by going into your profile.
- Click on Add new device
- Click on Ready
- Choose the wifi which is created by the NodeMCU
- Give the wifi credentials of the router with which you want to connect the NodeMCU
- Click on Continue
- Now the board will connect to the router if the given wifi credentials are true
- Click on –> Continue
- Provide your Device Name and click Continue
- Add tabs widgets to the main screen and name tap1 as Remote access control and Tab 2 as Live Monitoring
- Similarly add three buttons and configure them as shown here.
- Also, configure the Terminal Widget in the Live Monitoring Tab
So, that’s all for the Mobile dashboard setup. Further, you can now Authorize or deauthorize the users from anywhere in the world. usually, you can also monitor the smart door lock remotely, if an unauthorized person is trying to access your door lock or not.
Video Tutorial on IoT based RFID smart door lock system using NodeMCU
This is the video that demonstrates how we made an IoT-based RFID smart door lock system using NodeMCU ESP8266 Board.
Conclusion
Finally, we have successfully made an IoT-based RFID smart door lock system using NodeMCU ESP8266, RFID MFRC-522 Module, a relay module, a Buzzer, and led. I hope you enjoyed reading this article. For more amazing content keep supporting us by sharing the post on social media.

I want to change the UID card number to my UID card number but, after changing the UID number on my card cannot be accessed by the RFID reader.
Make sure your card UID is correct. you can check the card UID from the serial monitor
Ciao, ho caricato diverse volte il tuo sketch così come lo hai pubblicato tu, cambiando le credenziali blynk per la mia app, ma non mi funziona niente, dalla finestra seriale mi esce questo:
ets Jan 8 2013,rst cause:4, boot mode:(3,4)
wdt reset
load 0x4010f000, len 3460, room 16
tail 4
chksum 0xcc
load 0x3fff20b8, len 40, room 4
tail 4
chksum 0xc9
csum 0xc9
v000739b0
~ld
se per cortesia puoi aiutarmi, mi piace molto il tuo lavoro.
Ciao, ho provato diverse volte a caricare il tuo sketch ma non funziona niente. Blinka ogni 10 secondi e nelle finestra seriale mi esce questo messaggio:
ets Jan 8 2013,rst cause:4, boot mode:(3,7)
wdt reset
load 0x4010f000, len 3460, room 16
tail 4
chksum 0xcc
load 0x3fff20b8, len 40, room 4
tail 4
chksum 0xc9
csum 0xc9
v000739b0
~ld
Ho cambiato le credenziali blynk dallo sketch con quelle per la mia app blynk IOT ma non capisco dove sia l’errore.
Sto usando una scheda node MCU con RFID RC522 e sto usando gli stessi pin per il collegamento come da tuo progetto,
l’unica cosa che ho cambiato sono i pin virtuali per i bottoni di accesso.
Se mi puoi aiutare in questo problema ti ringrazierei tanto.
Mi piace molto il tuo progetto e vorrei implementarlo nella mia casa.
WHEN i change this–>
#define BLYNK_TEMPLATE_ID “TMPLmNMgxxyz”
#define BLYNK_DEVICE_NAME “IoT Smart Door”
To this—>
#define BLYNK_TEMPLATE_ID “TMPL3vsysn13c”
#define BLYNK_TEMPLATE_NAME “IoT Smart Door”
Then an error is generating–>
#error “Please specify your BLYNK_TEMPLATE_ID and BLYNK_DEVICE_NAME
WHEN i Define this then also an error is generating –>
Compilation error: missing binary operator before token “Smart”
“so, please help”
thank you.
why doesnt my solenoid work
is blynk app free or subscription?
Hi! I tried to compile the sketch, but have error message”class BlynkConsole has no member named ‘Init’! Please help me!Thank You!