
In this project, we will make an Internet Clock Using NodeMCU ESP8266 and 16×2 LCD without RTC Module. This simple Internet Clock using NodeMCU ESP8266 gets the current Date and Time from NTP Client. Here, NTP stands for Network Time Protocol.
Overview
In this project, we will design an Internet Clock using NodeMCU ESP8266 Wifi Module. We will fetch the time and date from the internet using the ESP8266 controller. Actually, we all know that the internet time clock has a precision of 0.02 to 0.10 seconds. While being on lockdown due to coronavirus, I spent some time browsing the internet and found an Internet Clock that is made using RTC Modules like DS1307, DS3231 or PCF8563 to get the time. But, due to lockdown, there is no availability of any RTC Module.
So I tried making an Internet Clock Using NodeMCU ESP8266 and 16×2 LCD without RTC Module. Instead, I used the NTP client to get the current date and time through the Internet. Actually, while surfing the internet I found some disadvantages as well. The RTC has poor accuracy and requires manual adjustments from time to time to keep date and time-synchronized.
Hence, the solution I Founded here is to use the Network Time Protocol (NTP). If your NodeMCU ESP8266 project has access to the Internet, you can get date and time (with precision within a few milliseconds of UTC) for FREE. Basically, we don’t need any additional hardware to make this project. You can check one of my previous projects here: Covid-19 Outbreak tracker device for your Country/ESP8266 based Coronavirus Tracker for your country
Components Required
These are the components that are required for making this project. All the components are easily available.
- NodeMCU ESP8266
- 16*2 LCD display
- Jumpers
- Breadboard
What is an NTP (Network Time Protocol)?
The Network Time Protocol (NTP) is a TCP/IP Protocol used for clock synchronization between computer systems and data networks. NTP protocol can be used to synchronize all connected devices to Coordinated Universal Time (UTC) within a few milliseconds, for example 50 milliseconds over the public Internet.
Some of the advantages of using NTP are:
- The NTP can be easily hosted on servers hosting different services.
- NTP requires less resource overhead.
- It has minimal bandwidth requirements.
- Even with a minimum CPU usage, NTP can handle hundreds of clients at the same time.
How does NTP work?
The NTP client starts a time-request exchange with the NTP server. As a result of this exchange, the client is ready to compute the link delay and its local offset and adjust its local clock to match the clock at the server’s computer.
Once synchronized, the client updates the clock about once every 10 minutes. Usually requiring only one message exchange. Additionally to client-server synchronization, This transaction occurs via the UDP (User Datagram Protocol) on port 123.
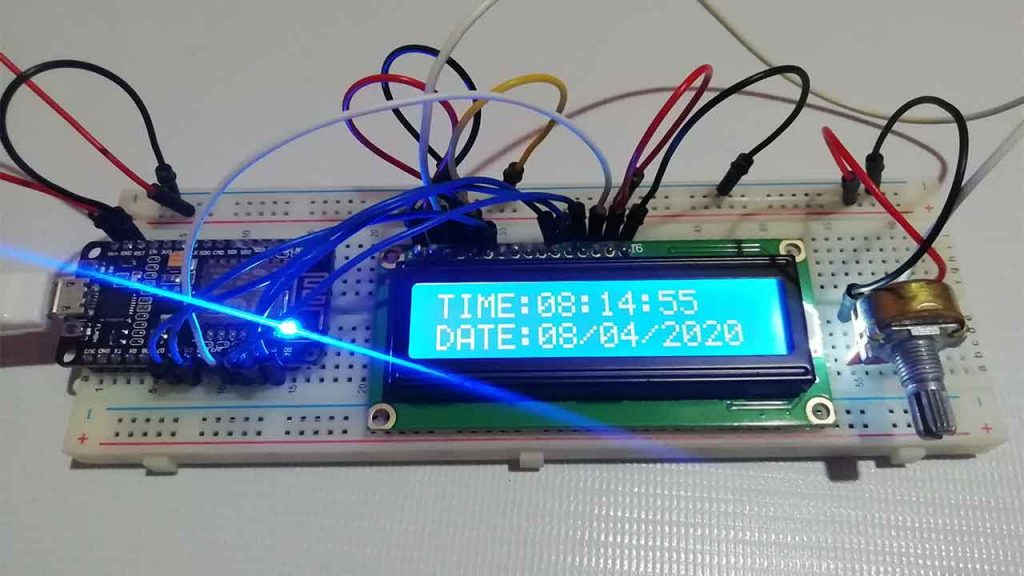
Internet Clock Using NodeMCU ESP8266 and 16×2 LCD
Now let us interface a 16×2 LCD Display with NodeMCU ESP8266 board. Then we will connect the ESP8266 to the wifi network and fetch the date and time. Hence, a simple internet clock using ESP8266 can be made.
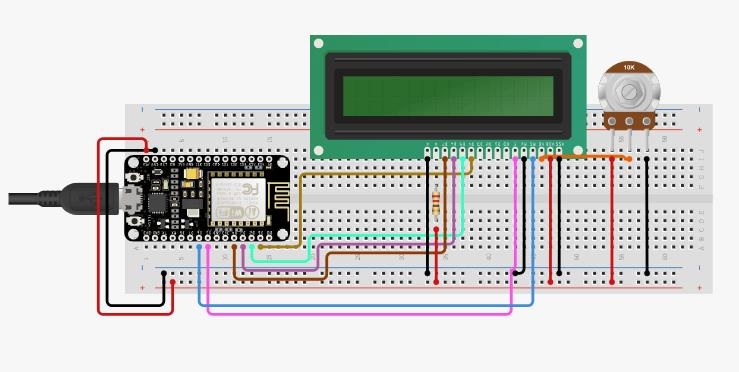
The connection between 16X2 LCD and ESP8266 is fairly simple. These are the connections between NodeMCU & LCD Display.
- RS pin of LCD — D6 pin of NodeMCU
- EN pin of LCD — D5 pin of NodeMCU
- D4 pin of LCD — D1 pin of NodeMCU
- D5 pin of LCD — D2 pin of NodeMCU
- D6 pin of LCD — D3 pin of NodeMCU
- D7 pin of LCD — D4 pin of NodeMCU
Similarly connect pin numbers 1, 5, and 16 of LCD to GND & Pin numbers 2, and 15 to 5V VCC. A 10K Potentiometer should be used at pin number 3 of LCD to adjust the contrast. 5V DC is enough to operate this device.
Libraries Requirement
To make an Internet Clock Using NodeMCU ESP8266 and 16×2 LCD without RTC Module, we need few libraries:
#include <ESP8266WiFi.h>
#include <WiFiUdp.h>
#include <NTPClient.h>
#include <TimeLib.h>
#include <LiquidCrystal.h>
First, we need the NTPClient Library. This library connects the ESP8266 WiFi to a time server, the server sends time information to the module. However, for sending and receiving UDP messages WiFiUdp.h library is used.
Then we have a Time library that converts a Unix timestamp (Unix epoch) into seconds, minutes, hours, day of the week, day, month and year.
The LCD Library is used to interface 16×2 LCD with ESP8266 Board.
Source Code/Program for ESP8266 Internet Clock
Here is a source code for getting NTP Time from Server. Before uploading the code to the NodeMCU ESP8266 Board, you need to make changes in the line below to match your time zone.
NTPClient timeClient(ntpUDP, "asia.pool.ntp.org", 20700, 60000);Currently, I am staying in Nepal. Nepal is 5 hours and 45 minutes ahead of Coordinated Universal Time (UTC Time). So I converted +5 hr 45 Mins to Seconds.
+5 hr 45 Mins = 5x60x60 + 45×60 = 20700
So change this Timing according to your time Zone and Country in order to get correct time.
Also in the below code, make changes to the Wifi SSID & Password.
char* ssid = "Alsan Air WiFi 4";  //wifi ssid
char* password = "11122235122@kap1";   //wifi password
Final Code/sketch
#include <ESP8266WiFi.h>
#include <WiFiUdp.h>
#include <NTPClient.h>
#include <TimeLib.h>
#include <LiquidCrystal.h>
LiquidCrystal lcd(D6, D5, D1, D2, D3, D4);


char* ssid = "Alsan Air WiFi 4";  //wifi ssid
char* password = "11122235122@kap1";   //wifi password

WiFiUDP ntpUDP;


NTPClient timeClient(ntpUDP, "asia.pool.ntp.org", 20700, 60000);

char Time[ ] = "TIME:00:00:00";
char Date[ ] = "DATE:00/00/2000";
byte last_second, second_, minute_, hour_, day_, month_;
int year_;


void setup() {

  Serial.begin(115200);
  lcd.begin(16, 2);                 // Initialize 16x2 LCD Display
  lcd.clear();
  lcd.setCursor(0, 0);
  lcd.print(Time);
  lcd.setCursor(0, 1);
  lcd.print(Date);

  WiFi.begin(ssid, password);
  Serial.print("Connecting.");

  while ( WiFi.status() != WL_CONNECTED ) {
    delay(500);
    Serial.print(".");
  }
  Serial.println("connected");
  timeClient.begin();
}


void loop() {

  timeClient.update();
  unsigned long unix_epoch = timeClient.getEpochTime();    // Get Unix epoch time from the NTP server

  second_ = second(unix_epoch);
  if (last_second != second_) {


    minute_ = minute(unix_epoch);
    hour_   = hour(unix_epoch);
    day_    = day(unix_epoch);
    month_  = month(unix_epoch);
    year_   = year(unix_epoch);


    Time[12] = second_ % 10 + 48;
    Time[11] = second_ / 10 + 48;
    Time[9]  = minute_ % 10 + 48;
    Time[8]  = minute_ / 10 + 48;
    Time[6]  = hour_   % 10 + 48;
    Time[5]  = hour_   / 10 + 48;


    Date[5]  = day_   / 10 + 48;
    Date[6]  = day_   % 10 + 48;
    Date[8]  = month_  / 10 + 48;
    Date[9]  = month_  % 10 + 48;
    Date[13] = (year_   / 10) % 10 + 48;
    Date[14] = year_   % 10 % 10 + 48;

    Serial.println(Time);
    Serial.println(Date);

    lcd.setCursor(0, 0);
    lcd.print(Time);
    lcd.setCursor(0, 1);
    lcd.print(Date);
    last_second = second_;

  }
  delay(500);
}
ESP8266 based Internet Clock video tutorial
Conclusion:
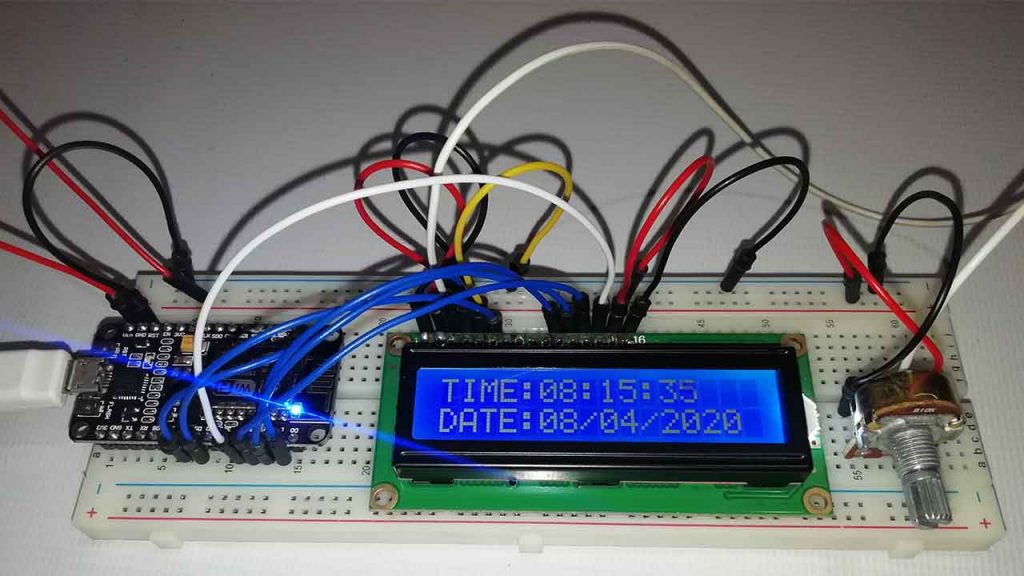
Once the code is uploaded, the ESP8266 will try connecting to the Network. After it connects to Network, the LCD will start displaying the correct time and date.


Why is 10k pot and resitor shown in the image not written in components list?
Because it is optional
My NodeMCU 8266 doesn’t have 5V. 3.3V doesn’t seem to be enough to power my 16×2 LCD. It’s too dim to see the output.
Use vin pin to power the LCD
nepali po ho?
Yes bro I am from Nepal
how do you convert the time to 12 hour format?
BRO CODE MAI KUCH PROB AA RAHA HAI
LiquidCrystal lcd(D6, D5, D1, D2, D3, D4); WAS NOT DELCARED IN THIS SCOPE
WHAT TO DO??
Use LiquidCrystal Library
summer time and witter time – clock working , but bad time
bro can u help me in sending written text from mobile to lcd using nodemcu plz can u ???
have a lot of hope!
Here is the exactly same project. You are searching for
http://iotprojectsideas.com/iot-web-controlled-smart-notice-board-using-nodemcu-esp8266/
plz bro help me
thanks alsan bro!!
I took the solderless way and used 2 mdoules.
A LOLIN (WeMOS) D1 R2 and a HD44780-LCD-Keypad-Shield.
For this I had to change the LCD-Init to:
LiquidCrystal lcd(D6, D7, D2, D3, D4, D5);
I use pool.ntp.org as NTP-Server and corrected the time-value for UTC+3 with 10800
for Istanbul-Time (Tuerkey).
Many Thanks for the ARDUINO-sketch! ????
Amazing project bro. And other project that you made are also Great.
I would like to make a request.
Can you make a project in which we can send audio data to the database and retreive or listen the audio on the phone??? It will be a great help if o u can help out with that or givr any suggestion.
Idk why but i uploaded the code and the lcd turns on but it does not display anything. can you help
#include
#include
#include
#include
#include
#include
// Initialize the I2C LCD (address 0x27, 16 columns and 2 rows)
LiquidCrystal_I2C lcd(0x27, 16, 2);
#define SDA_PIN D1 /* Define the SDA pin here */
#define SCL_PIN D2 /* Define the SCL Pin here */
const char* ssid = “MSASLAM”; // Replace with your WiFi SSID
const char* password = “26312631”; // Replace with your WiFi password
WiFiUDP ntpUDP;
NTPClient timeClient(ntpUDP, “0.in.pool.ntp.org”, 0, 60000); // NTP server and update interval
char Time[] = “TIME:00:00:00”;
char Date[] = “DATE:00/00/2000”;
byte last_second = 0; // Initialize last_second to 0
byte second_, minute_, hour_, day_, month_;
int year_;
void setup() {
Serial.begin(115200);
Wire.begin(SDA_PIN, SCL_PIN); /* Initialize I2C communication */
lcd.init(); /* initialize the lcd */
lcd.begin(16,2); // Initialize the I2C LCD
lcd.backlight(); // Turn on the backlight
lcd.clear();
lcd.setCursor(0, 0);
lcd.print(Time);
lcd.setCursor(0, 1);
lcd.print(Date);
WiFi.begin(ssid, password);
Serial.print(“Connecting to WiFi”);
while (WiFi.status() != WL_CONNECTED) {
delay(500);
Serial.print(“.”);
}
Serial.println(” connected”);
timeClient.begin();
}
void loop() {
timeClient.update();
unsigned long unix_epoch = timeClient.getEpochTime(); // Get Unix epoch time from the NTP server
second_ = second(unix_epoch);
if (last_second != second_) {
minute_ = minute(unix_epoch);
hour_ = hour(unix_epoch);
day_ = day(unix_epoch);
month_ = month(unix_epoch);
year_ = year(unix_epoch);
// Format Time
Time[12] = second_ % 10 + ‘0’;
Time[11] = second_ / 10 + ‘0’;
Time[9] = minute_ % 10 + ‘0’;
Time[8] = minute_ / 10 + ‘0’;
Time[6] = hour_ % 10 + ‘0’;
Time[5] = hour_ / 10 + ‘0’;
// Format Date
Date[5] = day_ / 10 + ‘0’;
Date[6] = day_ % 10 + ‘0’;
Date[8] = month_ / 10 + ‘0’;
Date[9] = month_ % 10 + ‘0’;
Date[13] = (year_ / 10) % 10 + ‘0’;
Date[14] = year_ % 10 + ‘0’;
Serial.println(Time);
Serial.println(Date);
lcd.setCursor(0, 0);
lcd.print(Time);
lcd.setCursor(0, 1);
lcd.print(Date);
last_second = second_;
}
delay(500);
}
Sir Time and Date is Displayed on Serial monitor but not displaying on My Crystal display….
help me sir..!
Hi!
When the hotspot of the mobile is deactivated the time update occurs every 8 second instead of every second . but the time is acurate . can it be rectified?