RFID Based Attendance System Using NodeMCU with PHP Web App
Overview
The RFID based attendance system is developed using PHP, CSS, and Javascript. An RFID Based Attendance System Using NodeMCU is a modern attendance system. Hence, is a very interesting project. It can be useful in different places like schools, Colleges, industry and private organizations to register the attendance of students, teachers, employees, etc. to tabulate monthly/daily working hours automatically. When the person with the correct RFID card swipes his/her RFID tag, His/Her arrival time will be stored in system Log. Usually, when the same person swipes his/her RFID tag again, the system will save it as his/her leaving time.
- Overview
- Features:
- Functionality Performed by users
- Hardware Components Required
- Software Required with Download Links
- Technology Used in RFID attendance System Using NodeMCU
- RFID Based Attendance System Network Topology
- RFID RC522 Module
- Specifications & Pin Details
- Interfacing RFID RC522 with NodeMcu ESP8266 Module
- How to run a server?
- Deploying our PHP Web App
- Setting Up Arduino IDE for NodeMCU ESP8266
- Selecting Port and Board
- Program/Sketch Code
- Program Code Explanation
- Video Tutorial of RFID Based Attendance System
- Conclusion
The RFID attendance system is developed with the IoT platform. We have used NodeMCU ESP8266 development board with MF-RC522 Module to send the card UID to the PHP Web app and store data into the website database. Basically, the admin plays an important role in the management of this system.
Also Read: IoT based RFID Attendance System Using ESP32, OLED Display, and RFID Module
- Home Automation with MIT App Inventor and ESP8266
- IoT based Silent Intruder Alarm using Arduino
- Temperature Controlled Home Automation using Arduino
- IoT Based RFID Smart Door Lock System Using NodeMCU ESp8266
- IoT Based Flood Monitoring System Using NodeMCU & Thingspeak
Features:
-Secured Login System
-Admin Panel
-User Entry Log
-User Management System
-Multiple Device Management System
-Filter the Log Data by Date, Time-In, Time-Out, and Department
-Export those filtered data to Excel
Functionality Performed by users
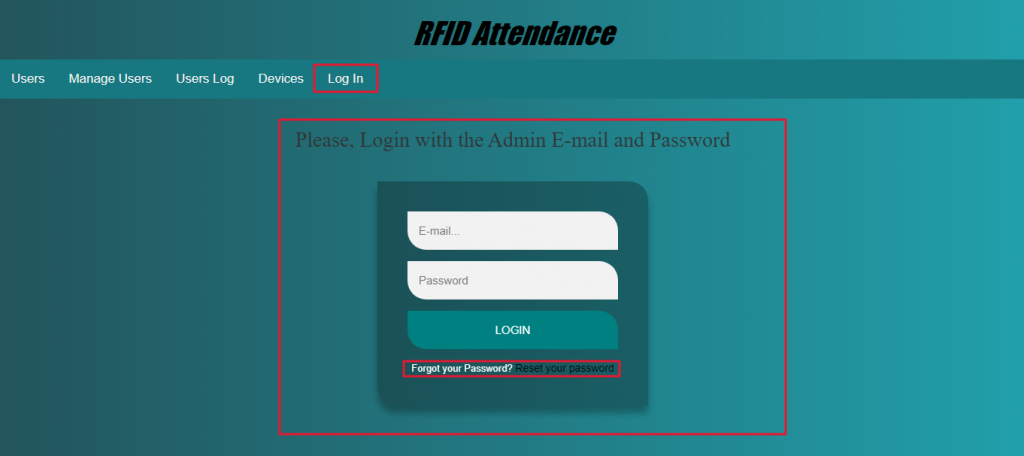
Now, talking about the features of the RFID based attendance system using NodeMCU.The home page displays the admin login page. Unless You login to the system, you won’t be able to browse other available options. Hence the system is secured. Basically, the design of the RFID attendance system project is pretty simple. Hence the user won’t find any difficulties while enrolling his/her attendance. The user needs to swipe his/her card or a keychain to maintain attendance that includes the entry time as well. The major functions provided to admin are mentioned below:
- Admin Login/Logout System
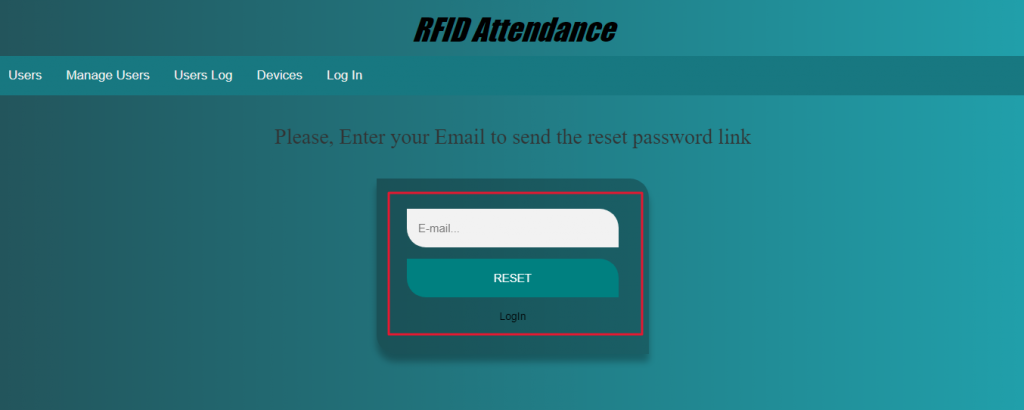
- Forgot Password for admin
- Edit and Update admin profile
Manage Users
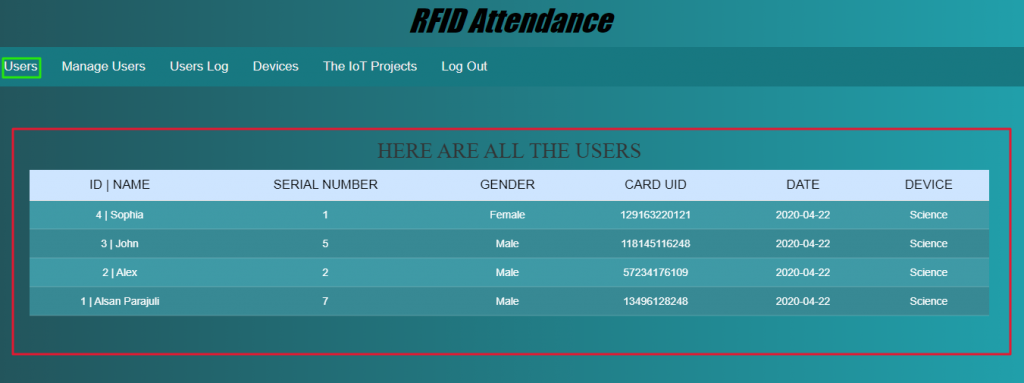
- View users
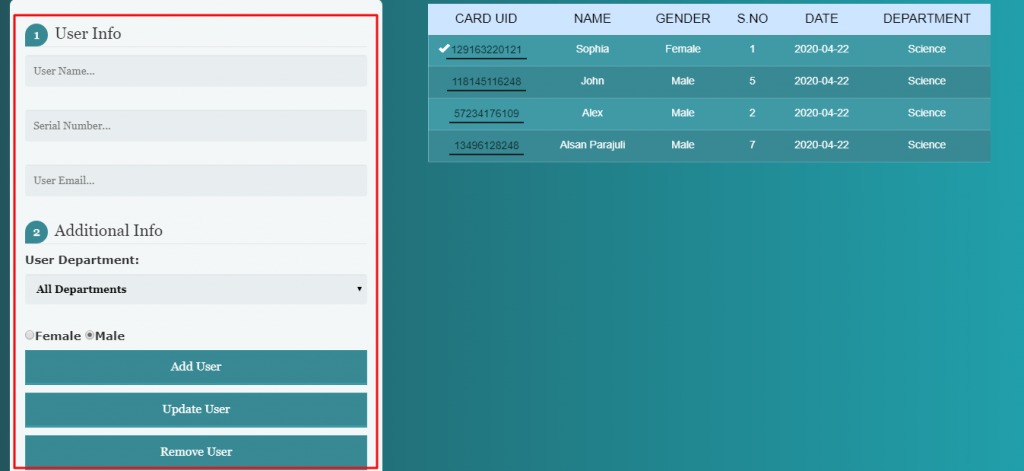
- Add New User
- Edit and update the existing users
- Remove Users
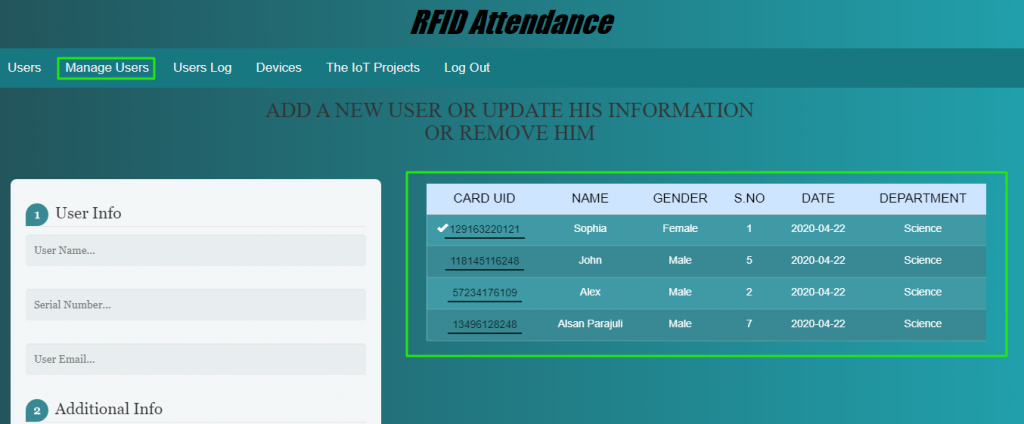
From the admin panel, the admin can enroll new users, update and remove users from the user management system. Further, the admin can view all the attendance records.
Manage Device
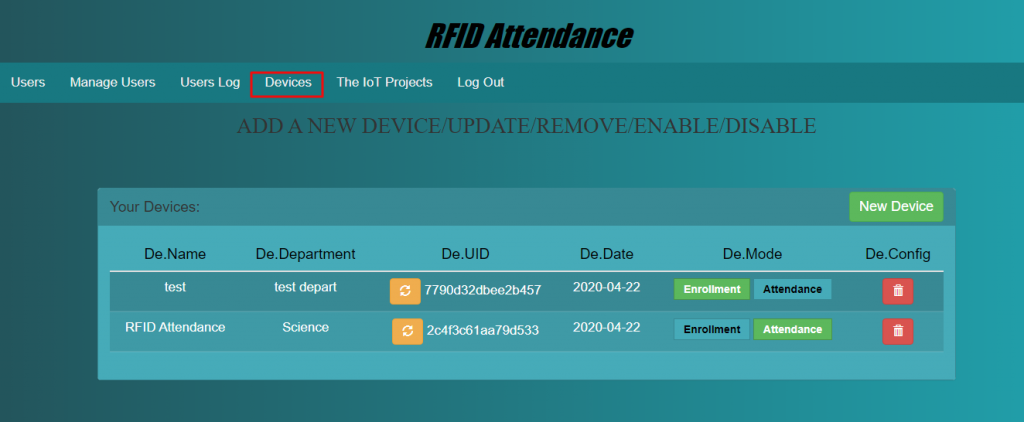
- Add new device
- Update existing device
- Delete device
- Update New token to the device
- Change the device mode (Enrollment mode: to register new users to the system, Attendance Mode: To record attendance of registered users)
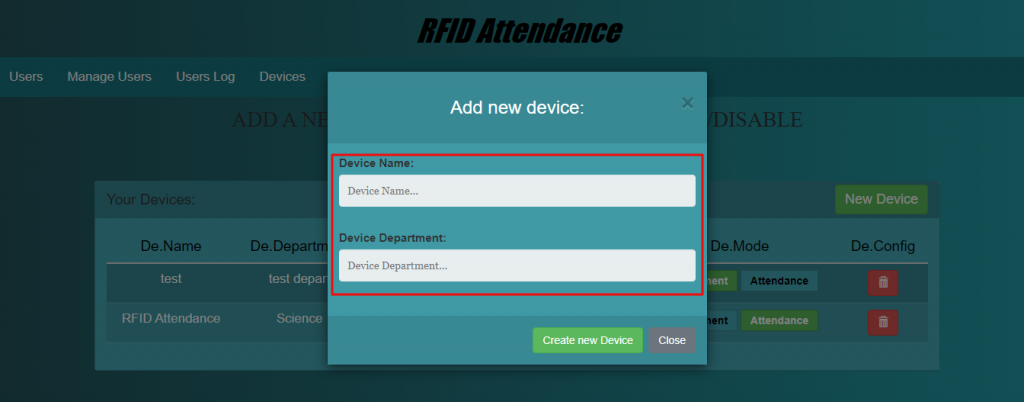
Actually, from the devices section admin can add a new device, update the device, and remove the device. To add a new device you need to enter a device name and its department. Furthermore, you can also update the device token from the device UID Section.
View Users Log
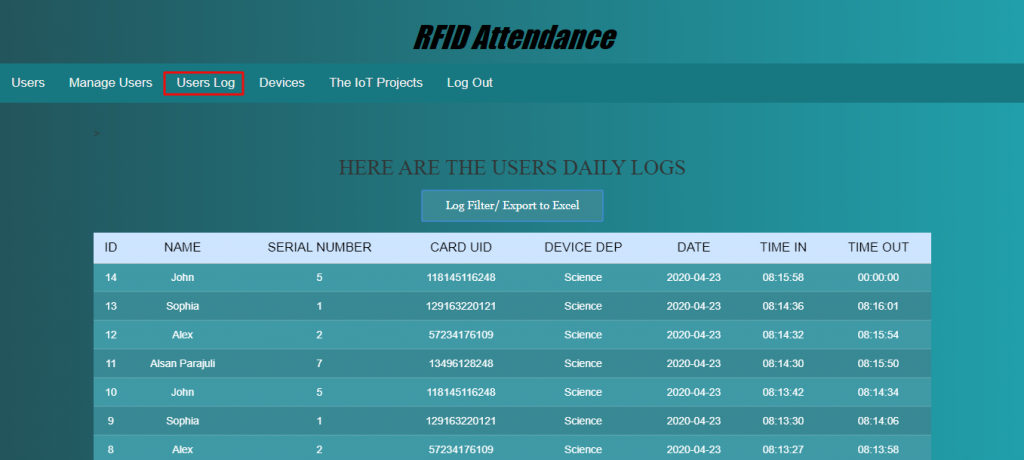
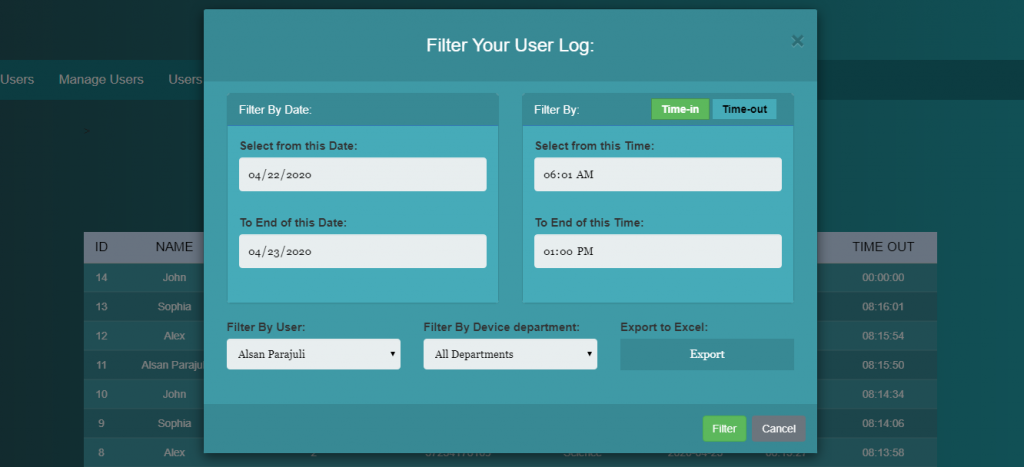
From the user log menu, you can navigate to all the user’s logs data. You can view their arrival and Leaving time as well. Furthermore, It has more functions to filter your logs by user, date, arrival time, leaving time, and filter by different departments, etc. Hence, you can also export those data to excel.
Hardware Components Required
| S.N | Components Name | Description | Quantity | |
|---|---|---|---|---|
| 1 | NodeMCU | ESP8266 12E Board | 1 | https://amzn.to/3mTuL95 |
| 2 | RFID Module | RFID-RC522 Module | 1 | https://amzn.to/3pOPpb4 |
| 3 | Jumper Wires | Male to Male Jumper Wires | 4 | https://amzn.to/2JWSR44 |
| 4 | Breadboard | Solderless Breadboard MIni | 1 | https://amzn.to/3n33uRT |
Software Required with Download Links
Technology Used in RFID attendance System Using NodeMCU
Here we are listing all the major required software components for this project to develop the user interface.
- Embedded C: All the hardware interface coding has been done in embedded C Language.
- PHP: All the Logics and web interface is written in PHP Language.
- MYSQL: For database, MYSQL Database is used.
- Apache 2: To run the web interface over the Apache 2 server.
- Javascript and CSS: To Style web Interface with animation and validate the form.
RFID Based Attendance System Network Topology
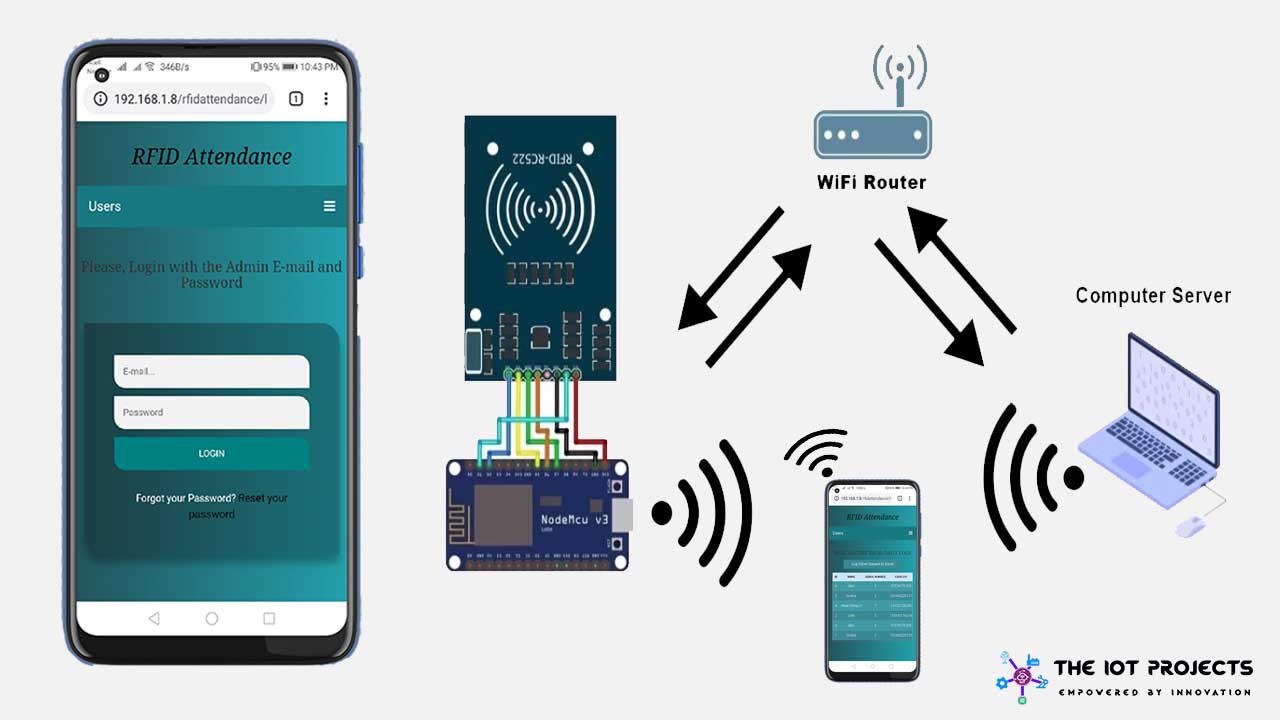
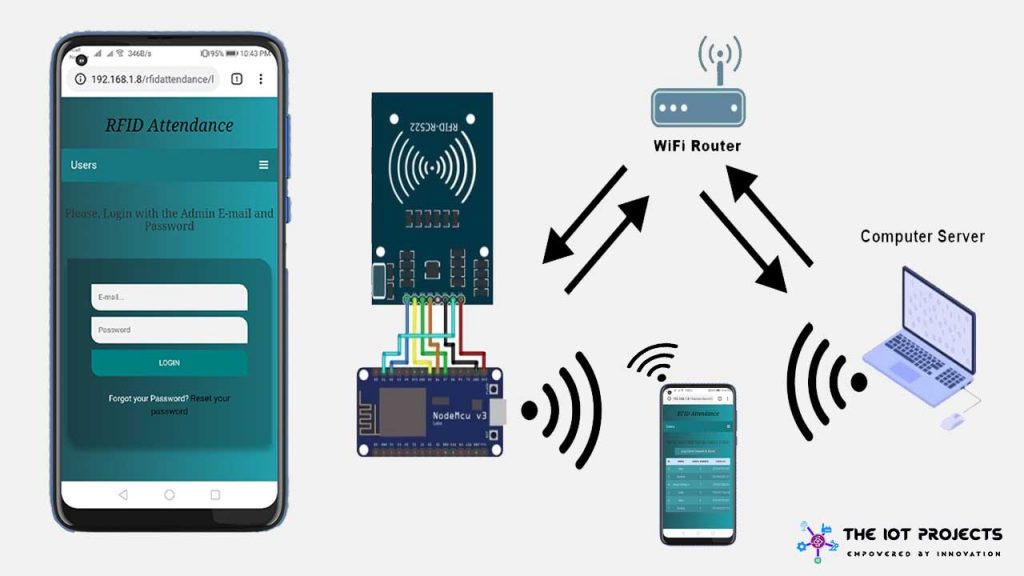
This is the simple network topology designed to run this project over a Local Area Network. The Project Device and Computer server are connected to the same network through WiFi.
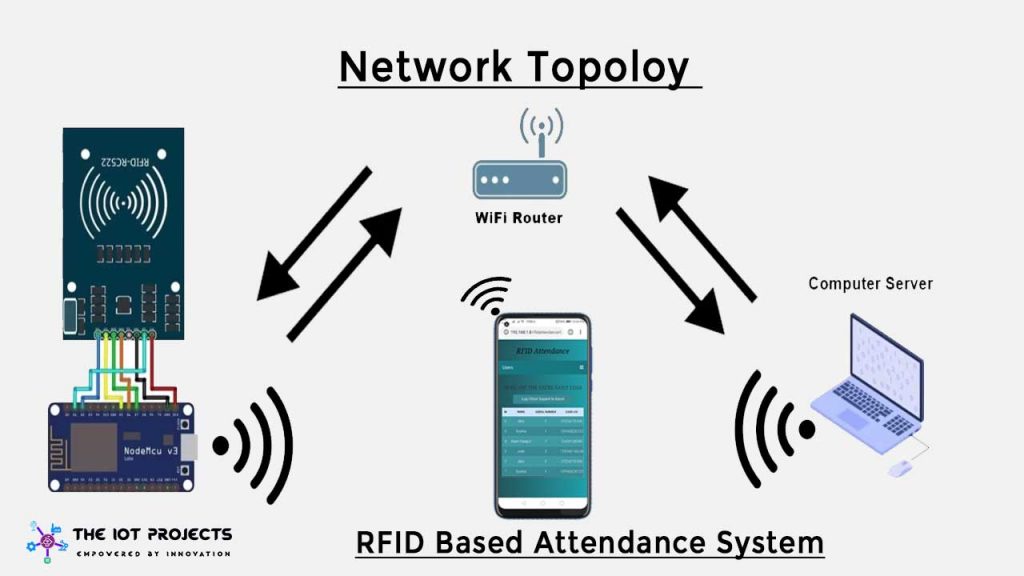
Now before getting started with this project, let’s learn What is RFID? with its specifications and Features.
RFID RC522 Module
What is RFID RC522 Module?
At first, let’s learn a little bit about RFID. RFID is the short form of Radio Frequency Identification. RFID modules use electromagnetic fields for transferring data between the card and the reader. Different RFID tags are attached to objects like Keychain, cards, etc. and whenever we place that object in front of the RFID reader, the reader reads that tags. The next benefit of RFID is that it doesn’t require to be in a straight line to get detected. Unlike a barcode, in RFID there’s no such restriction. So, here are some features of RFID RC522.
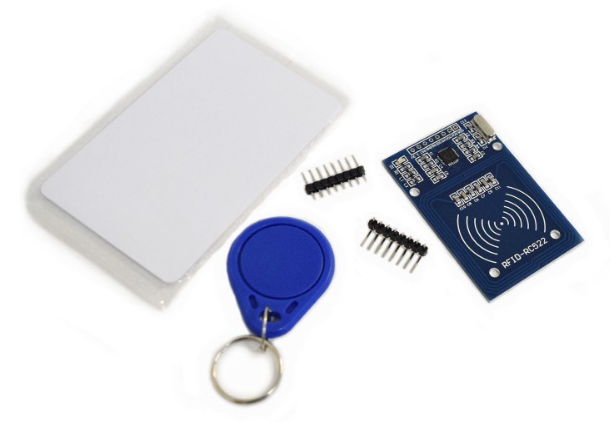
Features:
– Module Name: MF522-ED
– Working current:13—26mA/ DC 3.3V
– Standby current:10-13mA/DC 3.3V
– Sleeping current:<80uA
– Peak current:<30mA
– Working frequency:13.56MHz
– Card reading distance :0~60mm(mifare1 card)
– Protocol:SPI
– Data communication speed:Maximum 10Mbit/s
– Card types supported:mifare1 S50、mifare1 S70、 Mifare UltraLight、mifare Pro、 Mifare Desfire
– Dimension:40mm×60mm
– Working temperature:-20—80 degree
– Storage temperature:-40—85 degree
– Humidity:relevant humidity 5%—95%
– Max SPI speed: 10Mbit/s
Specifications & Pin Details
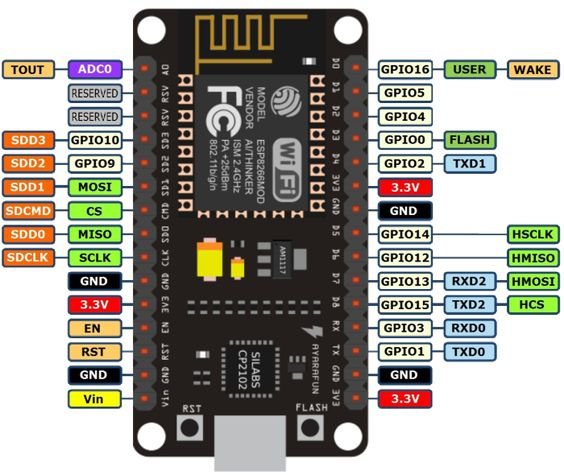
The simple specifications of RC522 module from left to right first pins are as follows:
Pin Name Details
1. 3.3V +3.3V Power Supply
2. RST Reset
3. GND Ground Pin
4. IRO Not Connected
5. MISO Serial Communication
6. MOSI Serial Communication
7. SCK TX/RX with ESP8266
8. SDA TX/RX with ESP8266
Interfacing RFID RC522 with NodeMcu ESP8266 Module
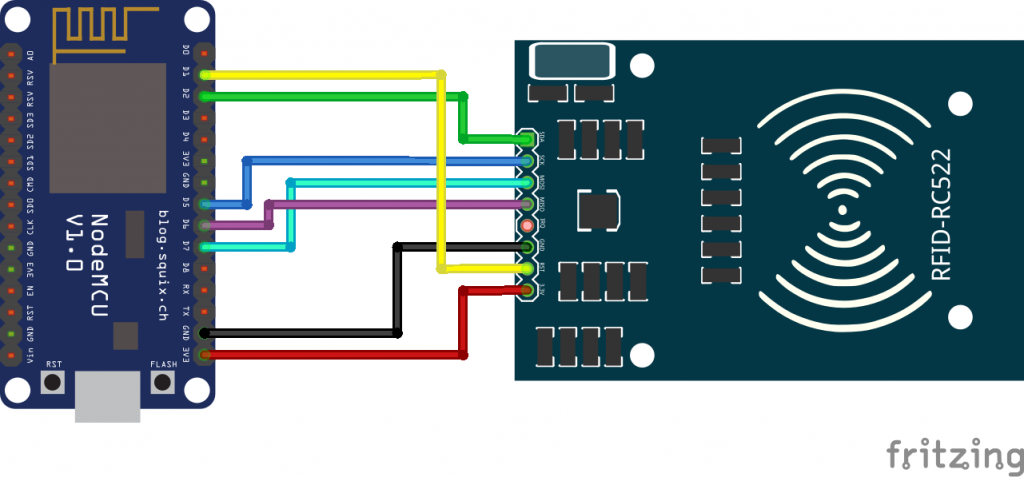
NodeMCU ESP8266/ESP12E RFID MFRC522 / RC522
D2 <———-> SDA/SS
D5 <———-> SCK
D7 <———-> MOSI
D6 <———-> MISO
GND <———-> GND
D1 <———-> RST
3V/3V3 <———-> 3.3V
How to run a server?
Actually, we can Deploy this PHP Web App on Hosting Server as well. But, you will need Public IP from Your Broadband connections to send data to the hosting server.
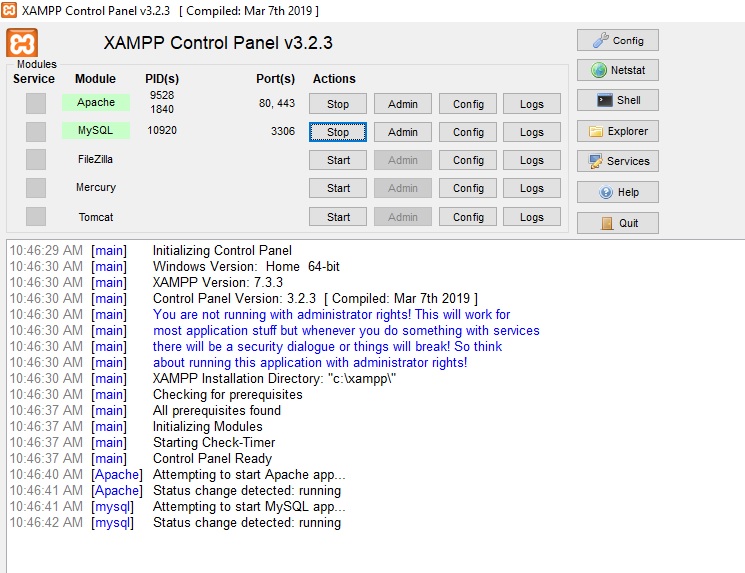
However, we are using the XAMPP server. It can be used both in Windows and Linux. Basically, Ubuntu users can use LAMP it’s better than XAMPP. But, I am using Windows so I am going to use the XAMPP server. So you can download the XAMPP server from this link.
Deploying our PHP Web App
- Start your Mysql and Apache from XAMPP Control Panel.
- Download the PHP web app and the Arduino IDE Program code.
- Extract the file.
- Copy the rfidattendance folder (Main Project folder).
- Paste the folder in C:>xampp/htdocs/ folder.
Now let’s connect the database to the RFID attendance system.
- Open the browser and go to the URL “http://localhost/phpmyadmin/”
- Then click on the database tab.
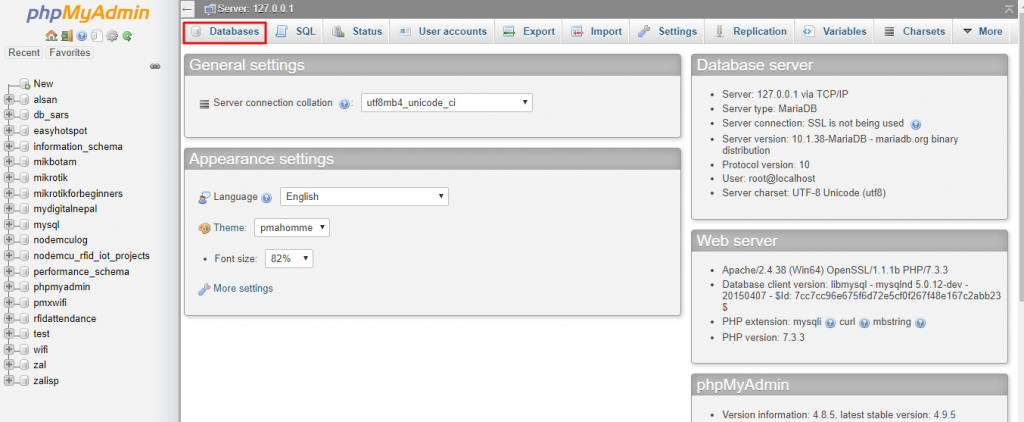
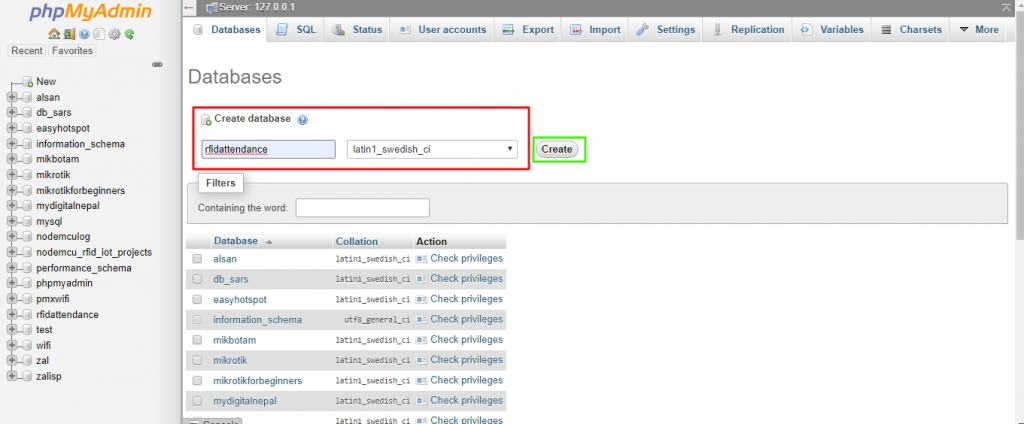
- Create a database name “rfidattendance” and then click on the import tab.
- Click on the browse file and then choose the “rfidattendance.sql” file located inside the rfidattendance folder.
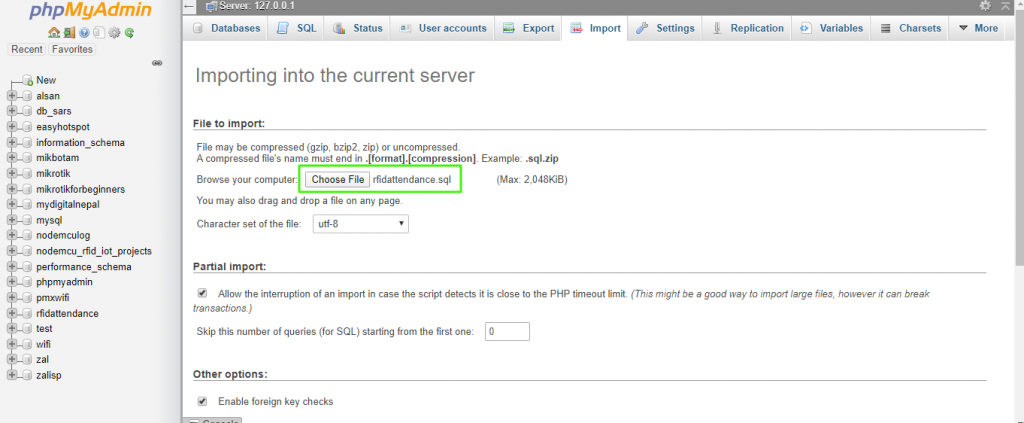
- Click on Go.
After creating a database, open a browser and go to the URL “http://localhost/rfidattenddance/”. Now, the admin login panel will be displayed.

- Enter the admin email and password to enter the system.
- The default admin credentials is: email= admin@gmail.com, and password= 123.
Setting Up Arduino IDE for NodeMCU ESP8266
We need to add the esp8266 board to our Arduino IDE. Open up your IDE then go to “File -> Preferences” or simply hit “Ctrl + comma”.
Paste http://arduino.esp8266.com/stable/package_esp8266com_index.json in additional board manager URLs.
Go to “Tools -> Board -> Boards Manager” search and install esp8266.
Selecting Port and Board
Go to Tools -> Port and select the COM Port of your NodeMCU. If you are not sure what port your NodeMcu is plugged in, go to Device Manager -> Ports (COM & LPT).
Now select NodeMcu 1.0 (ESP-12E Module) by clicking Tools -> Board. Scroll down until you find it.
Install the MFRC522 library to your Arduino Libraries folder – Download RFID Library
Program/Sketch Code
//*******************************libraries********************************
//RFID-----------------------------
#include <SPI.h>
#include <MFRC522.h>
//NodeMCU--------------------------
#include <ESP8266WiFi.h>
#include <ESP8266HTTPClient.h>
//************************************************************************
#define SS_PIN  D2  //D2
#define RST_PIN D1  //D1
//************************************************************************
MFRC522 mfrc522(SS_PIN, RST_PIN); // Create MFRC522 instance.
//************************************************************************
/* Set these to your desired credentials. */
const char *ssid = "Alsan Air WiFi 4";
const char *password = "11122235122@kap1";
const char* device_token  = "2c4f3c61aa79d533";
//************************************************************************
String URL = "http://192.168.1.8/rfidattendance/getdata.php"; //computer IP or the server domain
String getData, Link;
String OldCardID = "";
unsigned long previousMillis = 0;
//************************************************************************
void setup() {
  delay(1000);
  Serial.begin(115200);
  SPI.begin();  // Init SPI bus
  mfrc522.PCD_Init(); // Init MFRC522 card
  //---------------------------------------------
  connectToWiFi();
}
//************************************************************************
void loop() {
  //check if there's a connection to Wi-Fi or not
  if(!WiFi.isConnected()){
    connectToWiFi();    //Retry to connect to Wi-Fi
  }
  //---------------------------------------------
  if (millis() - previousMillis >= 15000) {
    previousMillis = millis();
    OldCardID="";
  }
  delay(50);
  //---------------------------------------------
  //look for new card
  if ( ! mfrc522.PICC_IsNewCardPresent()) {
    return;//got to start of loop if there is no card present
  }
  // Select one of the cards
  if ( ! mfrc522.PICC_ReadCardSerial()) {
    return;//if read card serial(0) returns 1, the uid struct contians the ID of the read card.
  }
  String CardID ="";
  for (byte i = 0; i < mfrc522.uid.size; i++) {
    CardID += mfrc522.uid.uidByte[i];
  }
  //---------------------------------------------
  if( CardID == OldCardID ){
    return;
  }
  else{
    OldCardID = CardID;
  }
  //---------------------------------------------
//  Serial.println(CardID);
  SendCardID(CardID);
  delay(1000);
}
//************send the Card UID to the website*************
void SendCardID( String Card_uid ){
  Serial.println("Sending the Card ID");
  if(WiFi.isConnected()){
    HTTPClient http;    //Declare object of class HTTPClient
    //GET Data
    getData = "?card_uid=" + String(Card_uid) + "&device_token=" + String(device_token); // Add the Card ID to the GET array in order to send it
    //GET methode
    Link = URL + getData;
    http.begin(Link); //initiate HTTP request   //Specify content-type header

    int httpCode = http.GET();   //Send the request
    String payload = http.getString();    //Get the response payload

//    Serial.println(Link);   //Print HTTP return code
    Serial.println(httpCode);   //Print HTTP return code
    Serial.println(Card_uid);     //Print Card ID
    Serial.println(payload);    //Print request response payload

    if (httpCode == 200) {
      if (payload.substring(0, 5) == "login") {
        String user_name = payload.substring(5);
    //  Serial.println(user_name);

      }
      else if (payload.substring(0, 6) == "logout") {
        String user_name = payload.substring(6);
    //  Serial.println(user_name);

      }
      else if (payload == "succesful") {

      }
      else if (payload == "available") {

      }
      delay(100);
      http.end();  //Close connection
    }
  }
}
//********************connect to the WiFi******************
void connectToWiFi(){
    WiFi.mode(WIFI_OFF);        //Prevents reconnection issue (taking too long to connect)
    delay(1000);
    WiFi.mode(WIFI_STA);
    Serial.print("Connecting to ");
    Serial.println(ssid);
    WiFi.begin(ssid, password);

    while (WiFi.status() != WL_CONNECTED) {
      delay(500);
      Serial.print(".");
    }
    Serial.println("");
    Serial.println("Connected");

    Serial.print("IP address: ");
    Serial.println(WiFi.localIP());  //IP address assigned to your ESP

    delay(1000);
}
//=======================================================================
Program Code Explanation
Include RFID Library
#include <SPI.h>
#include <MFRC522.h>
Include NodeMCU ESP8266 Library files.
#include <ESP8266WiFi.h>
#include <ESP8266HTTPClient.h>
Define RFID MF-RC522 Module Pin.
#define SS_PIN  D2  //D2
#define RST_PIN D1  //D1
Create MFRC522 instance.
MFRC522 mfrc522(SS_PIN, RST_PIN);Set your desired WiFi credentials.
const char *ssid = "Alsan Air WiFi 4";
const char *password = "11122235122@kap1";
Copy the Device token from devices section and paste it over here.
const char* device_token = "2c4f3c61aa79d533";Place your computer IP or the server domain.
String URL = "http://192.168.1.8/rfidattendance/getdata.php";Init SPI bus and MFRC522 card
SPI.begin();
mfrc522.PCD_Init();
check if there’s a connection to Wi-Fi or not.
if(!WiFi.isConnected())
Retry to connect to Wi-Fi
connectToWiFi();look for new card
if ( ! mfrc522.PICC_IsNewCardPresent()) {go to start of loop if there is no card present
if ( ! mfrc522.PICC_IsNewCardPresent()) {
    return;
Select one of the cards. If read card serial(0) returns 1, the UID struct contains the ID of the read card.
if ( ! mfrc522.PICC_ReadCardSerial()) {
    return;
Send the Card UID to the website.
void SendCardID( String Card_uid ){
  Serial.println("Sending the Card ID");
  if(WiFi.isConnected()){
    HTTPClient http;    //Declare object of class HTTPClient
    //GET Data
    getData = "?card_uid=" + String(Card_uid) + "&device_token=" + String(device_token); // Add the Card ID to the GET array in order to send it
    //GET methode
    Link = URL + getData;
    http.begin(Link); //initiate HTTP request   //Specify content-type header

    int httpCode = http.GET();   //Send the request
    String payload = http.getString();    //Get the response payload

//    Serial.println(Link);   //Print HTTP return code
    Serial.println(httpCode);   //Print HTTP return code
    Serial.println(Card_uid);     //Print Card ID
    Serial.println(payload);    //Print request response payload

    if (httpCode == 200) {
      if (payload.substring(0, 5) == "login") {
        String user_name = payload.substring(5);
    //  Serial.println(user_name);

      }
      else if (payload.substring(0, 6) == "logout") {
        String user_name = payload.substring(6);
    //  Serial.println(user_name);

      }
      else if (payload == "succesful") {

      }
      else if (payload == "available") {

      }
      delay(100);
      http.end();  //Close connection
    }
  }
}
connect to the WiFi
void connectToWiFi(){
    WiFi.mode(WIFI_OFF);        //Prevents reconnection issue (taking too long to connect)
    delay(1000);
    WiFi.mode(WIFI_STA);
    Serial.print("Connecting to ");
    Serial.println(ssid);
    WiFi.begin(ssid, password);

    while (WiFi.status() != WL_CONNECTED) {
      delay(500);
      Serial.print(".");
    }
    Serial.println("");
    Serial.println("Connected");

    Serial.print("IP address: ");
    Serial.println(WiFi.localIP());  //IP address assigned to your ESP

    delay(1000);
}
Video Tutorial of RFID Based Attendance System
Thank You so much Electronics Tech Channel for this awesome Project. Please help him to grow his channel. Your one subscribe can motivate him to create more projects like this on future.
Conclusion
Finally, we have completed the RFID based Attendance system using NodeMCU with a Website and Database. We hope you found this project useful! Drop a comment below if you have any doubts or queries. We’ll do our best to answer your questions

Hi I ran everything as described in the guide but, when I pass the rfid card in front of the reader the code is not transmitted to the ‘getdata.php’ script I tried multiple strings in ‘string url’ but without success (wireshark sees the transmission and the answer ), I have no more ideas, thanks
RFID is SPI module sometimes loose connection to the NodeMCU cause the Problem. Next Thing Make sure you have updated your IPV4 address in the code. Try Running Some RFID example code in Arduino IDE. To make sure your RFID don’t have any hardware issue.
Hi Alsan, I tried with another rfid reader connected to a wemos D1 R1 but I get the same result on screen I don’t see any card code, but with wireshark I see that as soon as I pass the card on the reader there is a transmission to the ip of the machine server, I think ipv4 is right, I tried both with http://192.168.1.60/getdata.php and with ddns address and port but nothing happens, should I read the card code in serial mode or not? thanks for assistance
May be some firewall in the OS is blocking incoming connection to web server.
hi Alsan, I have disabled the windows firewall but I don’t get any results, I have also installed rfidattendance on debian buster (lampp) but also the graphical interface does not receive the card_uid, sorry if I steal your time.
I have tested it with NodeMCU V3 and ESP32 board. It’s working fine. It would be great if I can help you out. Due to lockdown my all testing equipment are left at hostel room. If I had one i would test it and figure out the actual issue.
Sir can we use this project over host IP or web server
WhatsApp me 9414692699
Hey Alsan, can I use my own hosting service like GoDaddy…?
Mr. Alsan, the code is working fine. The only problem in server side is immediately, the same card cannot be logged in and logged out. But waiting for some, the lapse time is not known, it gets the logged out status. Then immediately it cannot be logged in. What changes is required in the php file
hi Alsan, I have disabled the windows firewall but I don’t get any results, I have also installed rfidattendance on debian buster (lampp) but also the graphical interface does not receive the card_uid, sorry if I steal your time.
hi Alsan, I solved it, it was a simple problem: I just had to adapt the Sda / ss and Rst pins in the arduino sketc, now everything works perfectly even if I don’t know how to change the Admin password since it is encrypted in the db, thanks and sorry for the time I made you lose, congratulations for the work
Great to know that you really love this project ?
hi great Alsan, one last thing, rfid attendance is now operational ? but I would like to change the admin password to make it stronger but I don’t know how to do it, plus if I press on ‘recover password’ or ‘reset password’ it gives me an error because the link of the button leads to reset_pass.php that does not exist, how can I solve it if possible? thanks and good day
We are working on it. To add reset Password page. I will let you know when it’s done ?
Hi Alsan
When i go to serial monitor to check if is running doesn´t appear nothing and when i press RST this appear “⸮⸮⸮⸮/⸮⸮⸮⸮⸮⸮” why is this happening?
Check your SS and RST pin on Program Sketch. There may be pin defined error.
Hello Alsan.
Couldn’t find reset_pass.php file. How to add new admin?. I tried to insert new admin in SQL but the password always wrong. Thanks
Reset password is not working for now because the password is encoded we will fix it on another release ?
Hi, thank you for your project. I found and error (in my case) wherein the user_logs are not saving in mysql,
and found that line 6 $t = date(“H:i:sa”); is at am/pm, changed it to $t = date(“H:i:s”); and the project worked fine.
Thanks Danilo Gonzales, Your suggestions is valuable for other users.
hi danilo i have the same issue ,all are working fine but the userlog data didnot apperar .can you tell me how to solve it.it will be kind enough if you do that
thank you
What I meant was there was an error in line 6 of your getdata.php file.
But it’s working for us without any changes. Still thanks for your reply
wow! I really like this project now working with my project hope will be successfully completed thanks for this awesome IoT project
Hi there I have some error message during uploading to my NodeMCU board : Invalid library found in C:\Program Files (x86)\Arduino\libraries\examples: no headers files (.h) found in C:\Program Files (x86)\Arduino\libraries\examples
Invalid library found in C:\Program Files (x86)\Arduino\libraries\doc: no headers files (.h) found in C:\Program Files (x86)\Arduino\libraries\doc
Please help Thank you
Install all the Library header file mentioned on a code. You can also get download link in this post
Thank you very much I spent several hours looking for the error, I also have LAMP !!!
Great!!!! Danke. ?
Francesco, I have the same problem just like you so can you please send me the part of the code which you edited…?
Try from this link: https://drive.google.com/file/d/1P5c8MwKc_BlDYW9ApiZG-tF7qUJABQSx/view?usp=drivesdk
hello, when i enter admin email and password its giving me database error what should i do
while entering admin email and password i am getting database error what should i do please help asap
That means you have not followed all the steps. Default admin credentials are: admin@gmail.com password:123
Hello Alsan, in the part of arduino code, at the moment that I read the target, show me the rfid number but appears a message: Not found!, and didnt sent to the database.
Check your URL or IP address. It should be like this: http://192.xxx.x.x/……do not use https.
did you solve this bro.
……….
Connected
IP address: 192.168.145.63
199825025
Sending the Card ID
Failed to connect to server
199825025
Sending the Card ID
Failed to connect to server
how can i solve this
Hello Alsan, let me know how to get the device token? I know this is a stupid question because i have just learned arduino for a month.
Please read all the instructions provided. You can get device token from Devices>Device UID section of website
Ciao Alsan avete lavorato nella pagina reset_pass.php
Reset password from web interface is not available but you can do it from mySQL database.
Alsan ti ringrazio comunque la password da mySQL non si imposta. Magari se hai il file reset_pass.php posso dare un okkiata io per la funzione. Il software è bellissimo sensa l’impostazione della password perde il suo valore. Fammi sapere grazie.
You can easily change the password from the MYSQL Database. You have to change the Field type to MD5 from txt. because it is in an encrypted form.
Hi Alsan, possible to use windows 10 64bit?
Yes, it works with both 64bit and 32bit
Alsan forse sblagli crittografata non è MD5 ed è impossibile sostituirla. Controlla fai le prove in piu’ ti lascio un link
dove puoi cittografare on-line.
http://www.md5online.it/index.lm?key_decript=%242y%2410%2489uX3LBy4mlU%2FDcBveQ1l.32nSianDP%2FE1MfUh.Z.6B4Z0ql3y7PK
123 non corrisponde a questa Pass MD5 $2y$10$89uX3LBy4mlU/DcBveQ1l.32nSianDP/E1MfUh.Z.6B4Z0ql3y7PK
123 corrisponde a 202cb962ac59075b964b07152d234b70 in MD5
Puoi chiarirmi la mente grazie.
Risolto reset_pass.php
hello Alsan ,Thank you for such good project,
I am having error while login,
the login and password i try to enter/change , but i didnt get any solution.
it is keep showing data base error. Kindly share any video or anything for the solution, Thank you
You can change it from mySQL database admin tables
But, make sure you have choosen MD5 format on password field before applying it.
hello, how can i read the current timein and timout time in this project?
You can read timein and Time out from user log
HI ALSAN, WHEN I WANT TO ADD DEVICE APPEARS ERROR = “FATAL ERROR: CALL TO UNDEFINED FUNCTION RANDOM_BYTE” AT DEVICE_CONFIG.PHP. PLEASE EXPLANATION. THANK YOU
Please download the file again and start from beginning. Sometimes it happens while downloading files.
Hiya,
Thanks for this great project, It is working fine for me (I am at development stage to setup up a rfid attendance logging system for my school).
Now, I got my hand on a stock of 125Khz rfid cards,and RDM6300 modules, as my coding skills are not that strong, can you show me the right direction to adapt your code?
Thanks!
Hi can u show me were to get the device UID, because each tine i try to add a device noting Happens
First change the device mode to enrollment mode then scan the UID. Under add device section you can get the UID of scanned card
hi alsan !
i got i problem with the project
when i tried to save attendance it’s not save data on user_log table !
hello how to configure my time in and out according to my country ?
You can change time zone by editing getdata.php file
Change this line according to your country zone.
date_default_timezone_set(‘Asia/Damascus’);
Sorry for late reply ?
Hello Alsan. My NodeMCU wont connect to my wifi network. What could be the problem?
Try creating a Hotspot from PC or Mobile. It may solve your issue
hellow, i have problem with serial monitor
Invalid Device!
Sending the Card ID
200
3417123652
Invalid Device!
have you slove this problem
Is this problem solved?
hello i have problem in function GET
[HTTP] GET… failed, error: connection refused
Hello Alsan , From my esp8266 i am not able to connect to the php server , i am getting -1 response from server .i did everything from above steps i am using xampp server. When i send the send the same get request that you are sending from sendCard function from postman it works. What must me the problem and how should i solve it
Use http instead of https in url
I have mutiple rfid cards. Which device token do i use in the arduino code? Plus i am still having trouble capturing the cards on the rfid and displaying the data on the php web app. Do i first create a new device, take the token number and put it in the arduino code, scan the card then change the mode to attendance so that the web app registers the card uid?
Yes ?
hoi all if i go to http://localhost/rfidattenddance than it said Not Found
The requested URL was not found on this server.
Apache/2.4.46 (Win64) OpenSSL/1.1.1g PHP/7.2.34 Server at localhost Port 80
What did i wrong?
Run server first
what’s means run the server? Could u explain more detail on it. Thanks
@Alsan, I am almost giving up:(… The RFID wont simply capture the tag details and send them to the php web app. I am using your amazing knowledge to do my final year project and I am stuck and do not know where I am going wrong. I really need your help
i got a website now thank you.
If compile i got the next
GPIO was not declared in this scope
mooirfid_met_interface:9:17: error: ‘GPIO’ was not declared in this scope
#define SS_PIN GPIO D2 //D2
^
C:\Users\hanss\Documents\Arduino\mooirfid_met_interface\mooirfid_met_interface.ino:12:17: note: in expansion of macro ‘SS_PIN’
MFRC522 mfrc522(SS_PIN, RST_PIN); // Create MFRC522 instance.
^
mooirfid_met_interface:10:17: error: ‘GPIO’ was not declared in this scope
#define RST_PIN GPIO D1 //D1
^
C:\Users\hanss\Documents\Arduino\mooirfid_met_interface\mooirfid_met_interface.ino:12:25: note: in expansion of macro ‘RST_PIN’
MFRC522 mfrc522(SS_PIN, RST_PIN); // Create MFRC522 instance.
^
exit status 1
‘GPIO’ was not declared in this scope
#define SS_PIN GPIO D2 //D2 (was first the same error but now good i think)
#define RST_PIN GPIO D1 //D1 (is now in error)
============================================================
Bellow is original code from you
#define SS_PIN D2 //D2
#define RST_PIN D1 //D1
//#define SS_PIN D2 //D2
//#define RST_PIN D1 //D1
#define RST_PIN 15 // RST-PIN for RC522 – RFID – SPI – Modul GPIO15
#define SS_PIN 2 // SDA-PIN for RC522 – RFID – SPI – Modul GPIO2
No more errors strange
Great
@Alsan.. I am only able to capture one card.. I have multiple. How do I do that?
You can add multiple cards with same procedure
Thanks for the reply.I was able to register the cards but when I scan them, I do not get the log times
@Alsan I was able to register the cards but when I scan them, I do not get the log times. What could be the problem?
Are you using hosting or Local server?
@Alsan
local server
What gonna change when we use an arduino otherwise ESP32 module..
hi, alsan, great project, i’m trying it on a web server on nodemcu everything works i read the cards but when i go to the web page to insert a user it doesn’t read the cards
thanks
If you are using Hosting then you should go with HTTPS GET and POST request instead of HTTP. It is only for LocalHost.
Also, check the status on the serial monitor. To post the data to the webserver it should show the status 200.
ok thanks, in any case everything is ok locally beautiful project, I would like to insert a buzzer, where I should change https and Post thanks
You can add buzzer. Just take a buzzer example code and integrate it on the place where you want sound
Hi Alsan,
If i want to add a user and fill in the credentials than i see then following error There’s no selected Card!
Please will you help me?
https://imgupload.io/image/RlkMZ
First change the Device mode to Enrollment mode
not working
All done now
I am using localhost and my my serial monitor shows 200. Despite that, it still doesnt send the data to the php web app. Is there a way I can send you the images so that you can see?
https://imgupload.io/image/RkLye
https://imgupload.io/image/Rk0bH
https://imgupload.io/image/RkEGD
Those are the images of the serial monitor, the manager users page and user log page..I still dont know why the user logs wont show
I think your firewall is blocking something which interface while sending data to PHP
One thing…. Did you change the device mode to Attendance mode? Before reading logs. I think you have missed this step. Here we have two modes Enrollment is used for registering user and Attendance mode for taking Attendance.
https://imgupload.io/image/RHzt4
I have changed the mode to attendace but nothing.
https://imgupload.io/image/RHzt4
I changed the modes to attendance but no data shows on the webpage.
@Alsan I was able to register the cards but when I scan them, I do not get the log times. What could be the problem? Off course that’s excellent project . I’m run in host not local server
You should edit the code by replacing HTTP POST and GET Request with HTTPS POST and GET request. This code is only supported for local websever.
Grear work ! But can use MQTT protocol instead of http in this?? If yes can you explain in brief as how to use
Great work! But can we use MQTT protocol instead of http in this project ? If yes then can you please explain as how to use.
@Alsan many thanks I’ll test with these. The best for you for 2021 and family
Hello. Can i use this database with arduino mega + ethernet shield?
Yes you can but you need to add and remove some library
bonjour j’ai essayé d’accédez à l’ URL « http: // localhost / rfidattenddance /». mais il fonctionne pas il m’affiché error 404
English please ????
J’ai meme problème s’il vous plait comment tu l’ai résoudre
What does “DE.” mean in your php website?
i cannot register new user the system because i get -1 whenever i tag my card. I have also tried removing the http from the url and still the same. I am using the enrollment option to register it is not working. Anyone can help?
hi did u find the solution?
Hi sir may u teach me how you make that website & design it?
Hi Alsan Parajuli, the password you suggest is not 123. Is impossible for me to enter and change de password from database also using MD5. What can I do?
Hello, first of all, thank you for sharing this project!
I have done the project successfully but when I change the timezone from Damascus to Manila, it doesn’t seem to appear on http://localhost/rfidattendance/UsersLog.php even though it appears on the database. What could be the problem?
Thank you!
https://i.imgur.com/Y3rj6DV.pnghttps://i.imgur.com/4pd6h9e.png
Hello, first of all, thank you for sharing this project!
I have done the project successfully. However, changing the timezone from Damascus to Manila seems to break http://localhost/rfidattendance/UsersLog.php as it won’t list the logs but the phpmyadmin database sees it. Any solution to this?
Thank you!
https://i.imgur.com/Y3rj6DV.png
https://i.imgur.com/4pd6h9e.png
hi Alsan,can u give me library for use arduino mega + esp8266 connnect this database
Same library will work
tq,can give me link download library,some library i cannt find
Plz help me.i cannot compile n uploade tp Arduino mega + esp8266
Some library not found in Arduino mega
hello sir mein try kar raha hun aapki encrypted technique ko samajhne ki main sare comments ko pada but mujhe lag raha hai ki yah md5 main encrypted nahin hai kya bata sakte hai . Ki aapne konsa algorithm use kiya hai..(Which algorithm have you used to encrypt the password? ) Which folder have you saved in and which is the code of the line, please tell
Hi brother,
Can you post the link to the needed library because is hard to get it work with the good ones.
Please
please reply sir
i am unable to read card can you help me out in that i even read comments but not able to do it
Hello … I just follow the procedures with photo buy i was stock in finding rfidattendance.sql but instead its .opt
I cant find the right file for (ESP8266WiFi.h) ESP8266WiFi.h: No such file or directory
good day I cant find a right file for this issue ESP8266WiFi.h: No such file or directory
First install ESP8266 board manager
Hi Alsan, when I tried to login it shows me fatal error…can you help ?
This is the error it shows : https://i.imgur.com/nZnMWYa.png
Hey Alsan. When I login it shows me fatal error. Can you help
here is the error link : https://i.imgur.com/nZnMWYa.png
please edit http server. (real server)
Hi Alsan,
I have tried everything, but when I try to add a user to manage user (http://localhost/rfidattendance/ManageUsers.php) I keep getting the error: There’s no selected Card! ”
When I start NodeMCU_RFIDv2.0 in arduino, and hold a card in front of the reader, I see in the serial monitor:
Connecting to Ziggo
…….
Connected
IP address: 192.168.178.61
Sending the Card ID
-1
2019817543
So that seems to be working.
I connected D2 from ESP12F to SDA / SS
and D1 to RST so that seems to match the sketch NodeMCU_RFIDv2.0
I Use in the sketch
String URL = “http: //localhost/rfidattendance/getdata.php”; // computer IP or the server domain
I use Wemos D1 (ESP-12F) and RC522
thanks in advance for your time and wonderful script.
Stay healthy.
Use IP address instead of localhost
Also change the device mode to enrollment mode to add user and the turn it back to attendance mode for taking attendance
I forgot to say that I created a device and entered the relevant UID code in the sketch:
const char * device_token = “870230263fa323f2”;
Unfortunately, I really don’t know what to do anymore.
Thanks for your quick response.
I have the device mode on enrollment
Same problem when using:
String URL = “http://localhost/rfidattendance/getdata.php”;
String URL = “http://127.0.0.1/rfidattendance/getdata.php”;
String URL = “http://192.168.178.61/rfidattendance/getdata.php”;
String URL = “http://92.108.235.147/rfidattendance/getdata.php”;
How to find the propper IP adress?
Type ipconfig in command prompt. Then check your ipv4 address
IT’s WORKING,
Stupid me.
Indeed it was the IP adres.
I found the correct adres by using ipconfing in command line from windows.
It seemed that IPv4 Address was 192.168.178.21
Now I can continue.
Cheers
Good luck ????
Hello Alsan ,
I`m facing a issue “call to ‘HTTPClient’::begin declared with attribute error:obsolete API,use ::begin(WifiClient,url)”
can you pls tell whats the issue ?
Jai rencontré le meme probleme
call to ‘HTTPClient::begin’ declared with attribute error: obsolete API, use ::begin(WiFiClient, url)
Hello, has anyone found the problem?
change the Board to esp8266 version 2.6.3
Hello Alsan, we’re having a trouble in reading a card, All was set up and connected, in Arduino GUI, it was displayed as connected, but the RFID doesn’t read or doesn’t have any feed back in arduino GUI
Can I change time that display on webserver ?
Yes, you can just edit the time zone from getdata.php file
void SendCardID( String Card_uid ){
Serial.println(“Sending the Card ID”);
if(WiFi.isConnected()){
HTTPClient http; //Declare object of class HTTPClient
//GET Data
getData = “?card_uid=” + String(Card_uid) + “&device_token=” + String(device_token); // Add the Card ID to the GET array in order to send it
//GET methode
Link = URL + getData;
http.begin(Link); //initiate HTTP request //Specify content-type header
int httpCode = http.GET(); //Send the request
String payload = http.getString(); //Get the response payload
how can I solve this error
rfid:78:15: error: call to ‘HTTPClient::begin’ declared with attribute error: obsolete API, use ::begin(WiFiClient, url)
78 | http.begin(Link); //initiate HTTP request //Specify content-type header
| ~~~~~~~~~~^~~~~~
exit status 1
call to ‘HTTPClient::begin’ declared with attribute error: obsolete API, use ::begin(WiFiClient, url)
Thanks u very much !!
How can I add a card I can’t find this.. Please explain.?
How can I add a card I can’t find this.. Please explain.?
Hi @Alsan!
I have a problem.
When wipe card , i see on serial monitor
“Sending the Card ID
-1
2019817563”
Server not respone. Could you to help me? Please!
Hi, I have also the same problem as @Dlee
what i see on serial monitor is
Sending the Card ID
-1
1035598180
and that it.. nothing appear on website… I am unable to add card… also device mode is enrollment
and I have also check ipv4 by ipconfig
Have the same problem. Please help!
Sir I really like this project. Thank you very much. I have a problem, is there a way to delete user logs?
Hi Alsan Parajuli
Works as a charme i only have 1 question is the a posibility to generate the output in the monitor to a lcd2 ore something else?
Yes possible
hold the card to the reader in Manage users and u see the card.
You must first insert the Tag or card
If you use a password delete it or change it in the db connect
Where to find a example ore how to do?
https://i2.wp.com/theiotprojects.com/wp-content/uploads/2020/04/Manages-Users-for-RFID-Based-Attenance-System-Using-NodeMCU.png?resize=768%2C318&ssl=1
Oke where to find? Example?
can we get asp.net code for the same
Hello,
I had this problem when I surfed on this link: http://localhost/rfidattenddance/.
Object not found!
The requested URL could not be found on this server. If you typed the URL by hand, please check the spelling and try again.
Could you please clarify the problem?
Thank you
the string “Card_uid” in the Sketch Code should be in lowercase based on the getdata.php
the string “Card_uid” in the Sketch Code should be in lowercase based on the getdata.php script.
change the ssid and password in the Program Sketch into the SSID your using.
Can this be run on raspberry pi localhost?
How did you doing? Thanks.
How??
Has there been any update on the password reset? MD5 is not the correct encryption. A hash was used to create the “123” password. If you could tell us what hash was used, maybe we could help write the reset_pass.php…
I tried to leave a comment but it did not post ???
Has there been any update on the password reset page?
Encrypting with MD5 in MySQL is not the correct encryption that this program looks for. The “123” password looks to be encrypted with password_hash() php function using a specific hash or cost. Perhaps if you coould let us know what the exact encryption was, we could possibly create the reset_pass.php file ourselves.
I have created the files required to have the reset_pass.php file that works. Click the file download which should take you to the github repository then look for my fork.
It seems that getting to my github fork from here is more difficult that I thought. So…..
https://github.com/stewert69/RFID-Attendance-system-V2.0
hello I face this error
Failed to connect to mailserver at “localhost” port 25, verify your “SMTP” and “smtp_port” setting
Hi alson. May i ask question? Everything works fine but i cannot add new devices to get uid token. I already click new device button but nothing appeared. Do you know how to counter this problem. Hope you can help me. Thank youu
hi need help for my project in school how can i host this and what should i need to change
where can I find the PHP code?
Arduino: 1.8.17 Hourly Build 2021/09/06 02:33 (Windows 10), Board: “WifInfo, ESP07 (1M/192K FS), 80 MHz, Flash, Disabled (new aborts on oom), Disabled, All SSL ciphers (most compatible), 32KB cache + 32KB IRAM (balanced), Use pgm_read macros for IRAM/PROGMEM, 40MHz, 1MB (FS:64KB OTA:~470KB), v2 Lower Memory, Disabled, None, Only Sketch, 115200”
C:\Users\USER\Desktop\RFID-Attendance-system-V2.0-master\NodeMCU_RFIDv2.0\NodeMCU_RFIDv2.0.ino: In function ‘void SendCardID(String)’:
NodeMCU_RFIDv2.0:86:27: error: expected primary-expression before ‘url’
86 | http.begin(WiFiClient url); //initiate HTTP request //Specify content-type header
| ^~~
exit status 1
expected primary-expression before ‘url’
This report would have more information with
“Show verbose output during compilation”
option enabled in File -> Preferences.
hi alsan, how i want to solved this error?
Hi sir, why add new devices and export excel not working ?
Do you have solution for Excel?
Hello Alsan,
first of all thanks for your great job. i’ve just installed all the files downloaded from github in my web server.
I’m not able to create a devices token beacuse appereantly the js function doesn’t run properly. clicking on the “Create new devices” nothing happen. Any suggest?? Thank you
Hi, if you have found the solution can you reply this chat or email me at adam.mikhaild@gmail.com
Thank you
yeahh me too
Hi Alsan, i’ve fixed the problem and now both software and hardware works great. I’d like to know if there’s a way to let the system not restart the timing every 24 hours, who is entered today and is going to getting out tomorrow must be registered with the tomorrow date time time-out. Many thanks for your job. Greetings from italy
Hi .how to add temperature data in this projek.anyone can help me?
call to ‘HTTPClient::begin’ declared with attribute error: obsolete API, use ::begin(WiFiClient, url) Can u help me
Hey Alsan, nice project
What do I need to do if I wanted to add a solenoid lock to this project that open/close based on the RFID in the database?
For all the people who cant change the password because they cant find the encryption, here is the link https://phppasswordhash.com/
https ://phppasswordhash.com/ password tool for encryption and changing of the password for this project
1]why this problem is occur !
Sending the Card ID
-1
2523092194
Sending the Card ID
-1
18311319961
AND not get data in web applicatioin
please give a solution and i read all comments but not solve the error please help to solve the problem
I’ve the same Problem
Any solution?
have anyone found a solution for this?
Hi,
I’m just about to start building this project after building something similar but with the Database, Web server and RFID scanner all in one device.
I just have one question; if I wanted to add a buzzer so it made a noise after a successful scan of the RFID, where would I connect this and what changes would be needed to the program?
Thanks,
Rod
How do I remove time out? I want to record the time in only
try http://localhost/rfidattendance/ – notice the extra “d” is missing.
hello stwarr2 can u dm me on ig akim_ball
Need help, let me what are the changes i need to make?
C:\Users\xxxxx\Documents\Arduino\sketch_feb24b\sketch_feb24b.ino: In function ‘void _Z10SendCardID6String$part$0(String)’:
sketch_feb24b:78:15: error: call to ‘HTTPClient::begin’ declared with attribute error: obsolete API, use ::begin(WiFiClient, url)
78 | http.begin(Link); //initiate HTTP request //Specify content-type header
| ~~~~~~~~~~^~~~~~
exit status 1
call to ‘HTTPClient::begin’ declared with attribute error: obsolete API, use ::begin(WiFiClient, url)
Hi Alsan,
Thank you for the cool Tool. It works perfectly ????
Ive have only one problem. When time in ist on a other day as the time out is, the next step is time in again instead of time out in the next day. How can i change this?
Thank you!
Thomas
I’ve the same Problem 🙁
Any solution?
I’ve the same Problem ????
Any solution?
i meant this post
Roberto La Mantiasays:
November 23, 2021 at 2:51 pm
Hi Alsan, i’ve fixed the problem and now both software and hardware works great. I’d like to know if there’s a way to let the system not restart the timing every 24 hours, who is entered today and is going to getting out tomorrow must be registered with the tomorrow date time time-out. Many thanks for your job. Greetings from italy
Same problem! Did you find the solution for this?
I have problem>
D:\Arduino\new\NodeMCU_RFIDv2.0\NodeMCU_RFIDv2.0.ino: In function ‘void _Z10SendCardID6String$part$0(String)’:
NodeMCU_RFIDv2.0:78:15: error: call to ‘HTTPClient::begin’ declared with attribute error: obsolete API, use ::begin(WiFiClient, url)
78 | http.begin(Link); //initiate HTTP request //Specify content-type header
| ~~~~~~~~~~^~~~~~
exit status 1
call to ‘HTTPClient::begin’ declared with attribute error: obsolete API, use ::begin(WiFiClient, url)
Using node mcu v3
not able to add user i have turned on the enrollment mode no serial monitor it just showing ”sending card uid”.please help
I tried the code bt the data doesn’t show up in the manager user log wht should I ??
I bought extra cards , just like master card. But the RFID is not reading them. It is just working fine with tag and master card Can anyone help me with it
You need to check frequency of RFID cards and RFID reader
Error
“message”: “call to ‘HTTPClient::begin’ declared with attribute error: obsolete API, use ::begin(WiFiClient, url)”
Give Solution
Change esp8266 board manager version to 2.3.6 in Arduino IDE
Can I email you ??
Can you help me , How can I add Card UID in this ? I run it but I am not able to add cards in it ?
call to ‘HTTPClient::begin’ declared with attribute error: obsolete API, use ::begin(WiFiClient, url)
It shows me this error
Hi brother , I want to Ask if you can help with, that how to add card UID on web ? Please help
hello brother how to i add User Serial Number?.
Hello Alsan excellent project thanks for the contribution you are great I have a problem I wanted to know which is which line to change the users logs time according to my pc or my region
Hello Alsan excellent project thanks for the contribution you are great I have a problem I wanted to know which is which line to change the users logs time according to my pc or my region
call to ‘HTTPClient::begin’ declared with attribute error: obsolete API, use ::begin(WiFiClient, url)
solve this please
HTTPClient::start call declared with attribute error: outdated API, use::start(WiFiClient, url)
What is the problem??
Brother I am having alot of Issues with your Project and you are not helping ?
Add:
WiFiClient client;
and then, add the client to the http.begin
http.begin(client, Link);
see the code below for reference
if(WiFi.isConnected()){
WiFiClient client; // LINE TO ADD
HTTPClient http; //Declare object of class HTTPClient
//GET Data
getData = “?card_uid=” + String(Card_uid) + “&device_token=” + String(device_token); // Add the Card ID to the GET array in order to send it
//GET methode
Link = URL + getData;
http.begin(client, Link); //initiate HTTP request // — line to EDT
can i used this system in my RFID reader R20XC-USB without adruino?
can you help me how to function it ?
Hey Francesco can you help me with the solution you wrote
Hello Francesco please help me out with this . I am facing problem
hello
I have try your code but reset password is not working can you suggest me what is solution for this
hello aslan, how do i register a user. on arduino uno the rfid tag is read but not sent to the website (ip address and url are correct}
how do I fill in the serial number in the manage users menu. I have scanned the rfid tag but it doesn’t show up. my notification data on arduino uno Sending the Card ID
23:38:55.403 -> 200
23:38:55.403 -> 753321134
23:38:55.403 -> Not found!
HELLO ,TIME IS NOT GEETING RIGHT ..WHAT WILL BE THE SOLUTION
Change your time zone
I got this error. How to fix them? Please help me
Fatal error: Uncaught mysqli_sql_exception: Access denied for user ‘root’@’localhost’ (using password: NO) in C:\xampp\htdocs\rfidattendance\connectDB.php:8 Stack trace: #0 C:\xampp\htdocs\rfidattendance\connectDB.php(8): mysqli_connect(‘localhost’, ‘root’, ”, ‘rfidattendance’) #1 C:\xampp\htdocs\rfidattendance\ac_login.php(5): require(‘C:\\xampp\\htdocs…’) #2 {main} thrown in C:\xampp\htdocs\rfidattendance\connectDB.php on line 8
i follow all step but when i go to http://localhost/rfidattenddance then it said Not Found
The requested URL was not found on this server.
Apache/2.4.46 (Win64) OpenSSL/1.1.1g PHP/7.2.34 Server at localhost Port 80
can u help me with it?
thank you!
hello aslan,
What Is This Error..
exit status 1
call to ‘HTTPClient::begin’ declared with attribute error: obsolete API, use ::begin(WiFiClient, url)
Hello sir, all the individual component ie website , database , and hardware connection are ready but there is no integration b/w them. I am encountering 1 problem after uploading code, ie,when I scan the RFId tag , the serial monitor displays -1.Pls help me solve the above mentioned issue.
Thank you Alsan sir. I am Electronics student and I have done a RFID attendance with Google sheets but I faced a lot of issues with that. Thank God I found this web page and this project now I done my final project and I gained 98 of 100 marks in my university.
sir i got an endless loop error, please tell me, i changed the baudrate fully
Hi Alsan
When i go to serial monitor to check if is running doesn´t appear nothing and when i press RST this appear “⸮⸮⸮⸮/⸮⸮⸮⸮⸮⸮” why is this happening?
Please this is not working for me
Check your SS and RST pin on Program Sketch. There may be pin defined error.
What else could be the problem
Hi ray
Please set the baud rate in serial monitor as 11200
Thank you
How can I add buzzer to this project
Hi Alsan,
I need to change the ssid but when I compile the sketch I have this error message:
NodeMCU_RFIDv2.0:121:15: error: call to ‘HTTPClient::begin’ declared with attribute error: obsolete API, use ::begin(WiFiClient, url)
121 | http.begin(Link); //initiate HTTP request //Specify content-type header
| ~~~~~~~~~~^~~~~~
Multiple libraries were found for “LiquidCrystal_I2C.h”
Used: C:\Users\Confezioni Cristina\Documents\Arduino\libraries\Arduino-LiquidCrystal-I2C-library-master
Not used: C:\Users\Confezioni Cristina\Documents\Arduino\libraries\LiquidCrystal_I2C
exit status 1
call to ‘HTTPClient::begin’ declared with attribute error: obsolete API, use ::begin(WiFiClient, url)
How can I do to resolve the problem?
Takns in advance
Manuel
http.begin(client, Link); use it in the place of http.begin(Link);
and you have repeated the same libraries in your program check it once
Did you turn in your final project using a buzzer? If so, can you send it to my email please? mnlip06032000@gmail.com
call to ‘HTTPClient::begin’ declared with attribute error: obsolete API, use ::begin(WiFiClient, url)
will uploading code
did u get it fixed
Can we use Raspberry Pi instead of NodeMCU here..with the same source code?
Why my attendance data (user daily log) doesn’t appear? Any help?
Any solution for httpcode giving -1 ?
Dear Alsan!
Everything is working great, as you made it and described.
The only thing that doesn’t work for me is exporting to excel.
Filtering works, but exporting doesn’t start.
Thank you!
Hi, soon after my comment the exporting worked just fine. At the moment I’m trying to localize the timezone…
what did you do to fix the exporting
Do you find solution for excel?
Hey, everything is fine, only password reset page is not working. After I fill in the Email for password reset, page just restarts and this appears in the link “/login.php?reset=failed”. Did somebody encounter this problem or did somebody manage to fix it, if yes I would really appreciate help. Thank you. email contact: zeromonster242@gmail.com
Please how can I use sim800 instead of esp32
I downloaded the files and the web app works great, i just need to buy components of reader
For now everything is fine thank you
I just dont have a lot of information about security i want to understand the algorithm you used
When i log in i use 123 password but inside the php my admin database its encrypted by somehow
Can you plz talk a little about that encryption and security methods!
I have an endless loop error please can you tell me, I have changed many ways but it doesn’t work, can I have the code please:duonggloihk09@gmail.com
CAN I ADD AURDRINO TO THIS PROJECT IF YES PLS CAN U GIVE THE CODE AND CIRCUIT LAYOUT
hi aslan,
i used ur code on rfid.uniqueschoolbetul.com, but i m facing too many issues. like i hv installed as u told me in ur video, i hv created database named rfidattedence. n excuted sql, but when i login on ur page n put which u told us, admin@gmail.com n pass is 123 after putting this, http erro 500 occurs. n other part of nodemcu coding, an error occurs which is
call to ‘HTTPClient::begin’ declared with attribute error: obsolete API, use ::begin(WiFiClient, url)
what’s wrong i m doing. plz help me
//NodeMCU————————–
#include
#include
#include //
if(WiFi.isConnected()){
WiFiClient client; //
HTTPClient http; //Declare object of class HTTPClient
//GET Data
getData = “?card_uid=” + String(Card_uid) + “&device_token=” + String(device_token); // Add the Card ID to the GET array in order to send it
//GET methode
Link = URL + getData;
http.begin(client, Link); //
The error “HTTP GET… failed, error: connection refused”
i am facing this error how to solve it plz
Compilation error: ‘HTTPClient’ was not declared in this scope
I have a problem!
Sending the Card ID
-1
83341328
Sending the Card ID
-1
249113177212
AND not get data in web application
please give a solution and i read all comments but not solve the error please help to solve the problem! Thank you!
hi aslan can i ask about log filter/export to excel. why we can’t use that kind of function?
hi Alsan, I have disabled the windows firewall but I don’t get any results, I have also installed rfidattendance but does not receive the card_uid, sorry if I steal your time.
Superb Work Man. Anyhow there’s missing table in database rfidattendance
pwd_reset
with content
id (primary key) , pwd_reset_email,pwd_reset_selector,pwd_reset_token,pwd_reset_expires
Also you have to set sendmail in xampp server to be able to change email. Anyhow could you please tell me how those database name places should be configured… I still can’t edit password 😦
On reset password I get
Check your E-mail!
When I follow the link to update my pass i get result
The link is valid to reset the admin password
On password change I get result
Could not validate your request, please retry!!
On retry no result as well. It has to be related to type of database nameplaces??? PLIIIIIIIIS HELP =)
BTW thank you your Awesomeness =)
To all of you having problems on getting your arduino sketch uploaded and compiled due to http client issue…
SOLVED
add
#include
WiFiClient wifiClient;
then to this
void SendCardID( String Card_uid ){
Serial.println(“Sending the Card ID”);
if(WiFi.isConnected()){
WiFiClient client;
HTTPClient http;
// Your Domain name with URL path or IP address with path
http.begin(client, Link);
.
.
.
Now it can compute… And drill for some oil… =)
RE SUB… IT WORKS. FINALLY RESULT. WITH SOME MINOR ISSUES ANYHOW BRILLIANT WORK MAN!!!
The issue changing password… SOLVED. It finally works. And I must say UAU what an idea!!! YOU RULE MAN!!!
Our main products: Boom Barriers, Parking Management System Entrance Ticket (card or RFID) dispenser, Exit Ticket Valuator, Turnstile, Flap Barrier, Automatic Bollards, Parking Guidance, Gate Automation (Motorized) Sliding & Swing gates motor, SS#304 or Ms. Sliding & Swing gate Manufacturing.
Sir basically we very need full require making of our self-name IOT based. or QR access door opening barriers and all systems opening systems controller or android web app application. name of my firm
so how can be easy this think. Residences societies vehicle access or or daily Pederson movement date or controlling thru security process. please can you make this?
How to add new user
i can i know how to fix this issues, i try to find and fix it but still cant
6:58:45 PM [Apache] Problem detected!
6:58:45 PM [Apache] Port 80 in use by “Unable to open process” with PID 4!
6:58:45 PM [Apache] Apache WILL NOT start without the configured ports free!
6:58:45 PM [Apache] You need to uninstall/disable/reconfigure the blocking application
6:58:45 PM [Apache] or reconfigure Apache and the Control Panel to listen on a different port
6:58:45 PM [Apache] Problem detected!
6:58:45 PM [Apache] Port 443 in use by “Unable to open process” with PID 4!
6:58:45 PM [Apache] Apache WILL NOT start without the configured ports free!
6:58:45 PM [Apache] You need to uninstall/disable/reconfigure the blocking application
6:58:45 PM [Apache] or reconfigure Apache and the Control Panel to listen on a different port
can u reply my email.
open xampp control panel and start apache and mysql
Before each lecture in the institute, students’ attendance is noted using an RFID-based attendance system. The pupils are required to mark their presence on the RFID reader using an RFID tag. The attendance system stores the data with great accuracy and effectiveness. To get such an RFID system visit here – https://www.ubitrack.com/collections/all/products/ubitrack-tb3
Im a noob, please help me :(((((
Object not found!
The requested URL was not found on this server. If you entered the URL manually please check your spelling and try again.
If you think this is a server error, please contact the webmaster.
Error 404
localhost
Apache/2.4.56 (Unix) OpenSSL/1.1.1t PHP/8.0.28 mod_perl/2.0.12 Perl/v5.34.1
Can I Run the server Attendance System on Raspberry Pi insteded of Windows PC?
Hi I am Getting this:
Sketch uses 241865 bytes (23%) of program storage space. Maximum is 1044464 bytes.
Global variables use 32608 bytes (39%) of dynamic memory, leaving 49312 bytes for local variables. Maximum is 81920 bytes.
Uploading 246016 bytes from C:\Users\User\AppData\Local\Temp\arduino\sketches\99B7098C4DAFE9F753651DF41AF49A0C/NodeMCU_RFIDv2.0.ino.bin to flash at 0x00000000
…………………………………………………………………….. [ 33% ]
…………………………………………………………………….. [ 66% ]
…………………………………………………………………….. [ 99% ]
. [ 100% ]
And after that I do not have new window with COM port, can you tell me why?
open your serial monitor. go to tools > serial monitor
any update on the not displaying user logs? for those who’ve successfully ran the project, please share your knowledge
it only gives me this:
Sending the Card ID
-1
1911421915
how to fix the export to excel?
Hi!!!! I would like to ask if is it possible to change how to website looks like?
Hi!! I created multiple DE.departments but only the one that has the DE.UID code programmed on the Arduino
Hi alsan. How to fix Export excel?
sketch_may23a:78:15: error: call to ‘HTTPClient::begin’ declared with attribute error: obsolete API, use ::begin(WiFiClient, url)
78 | http.begin(Link); //initiate HTTP request //Specify content-type header
| ~~~~~~~~~~^~~~~~
exit status 1
call to ‘HTTPClient::begin’ declared with attribute error: obsolete API, use ::begin(WiFiClient, url)
This report would have more information with
“Show verbose output during compilation”
option enabled in File -> Preferences.
Hola, buenas noches tengo un error el código se complica correctamente en arduino y todo bien con lo de.as
Con lo que tengo detalle es que al correr la URL http://198…./ La página se queda en blanco y no hace nada y en com no me aparece lo de la ip ni conectado a wifi la esp8266 y seguí todo tu vídeo, que debo de hacer!
Mr. Alsan, the code is working fine. The only problem in server side is immediately, the same card cannot be logged in and logged out. But waiting for some, the lapse time is not known, it gets the logged out status. Then immediately it cannot be logged in. What changes is required in the php file
Buenas. Muy agradable su proyecto y agradecido por compartirlo. La duda que tengo es hasta cuantos usuarios (Usuarios con tarjetas) soporta y Cuantos registros de autenticación almacena? Y si se puede agregar un Rele para ampliarlo a control de acceso también? Muchas gracias.
Your system is fantastic. But I am facing a problem. On User Log page the system did not show any between 12:00Am to 4:00 Am on the other hand mysql table is working fine .And after 4:00Am the entries between the 12 to 4 also display .Why there is 4 hour no display. Where to solve this problem.
Your system is fantastic. But I am facing a problem. On User Log page the system did not show any between 12:00Am to 4:00 Am on the other hand mysql table is working fine .And after 4:00Am the entries between the 12 to 4 also display .Why there is 4 hour no display. Where to solve this problem. Even i had not found the place where u marked the condition to show 24 data only
I am facing a problem. On User Log page the system did not show any between 12:00Am to 4:00 Am on the other hand mysql table is working fine .And after 4:00Am the entries between the 12 to 4 also display .Why there is 4 hour no display. Where to solve this problem. Even i had not found the place where u marked the condition to show 24 data only
i am facing the same.Where to solve this 24 hour problem
‘how i register RFID
Thank you for sharing; it is very interesting and useful to me. However, I would like to save the data to both the website and Google Sheets. Could you please help me with this? Thank you so much…