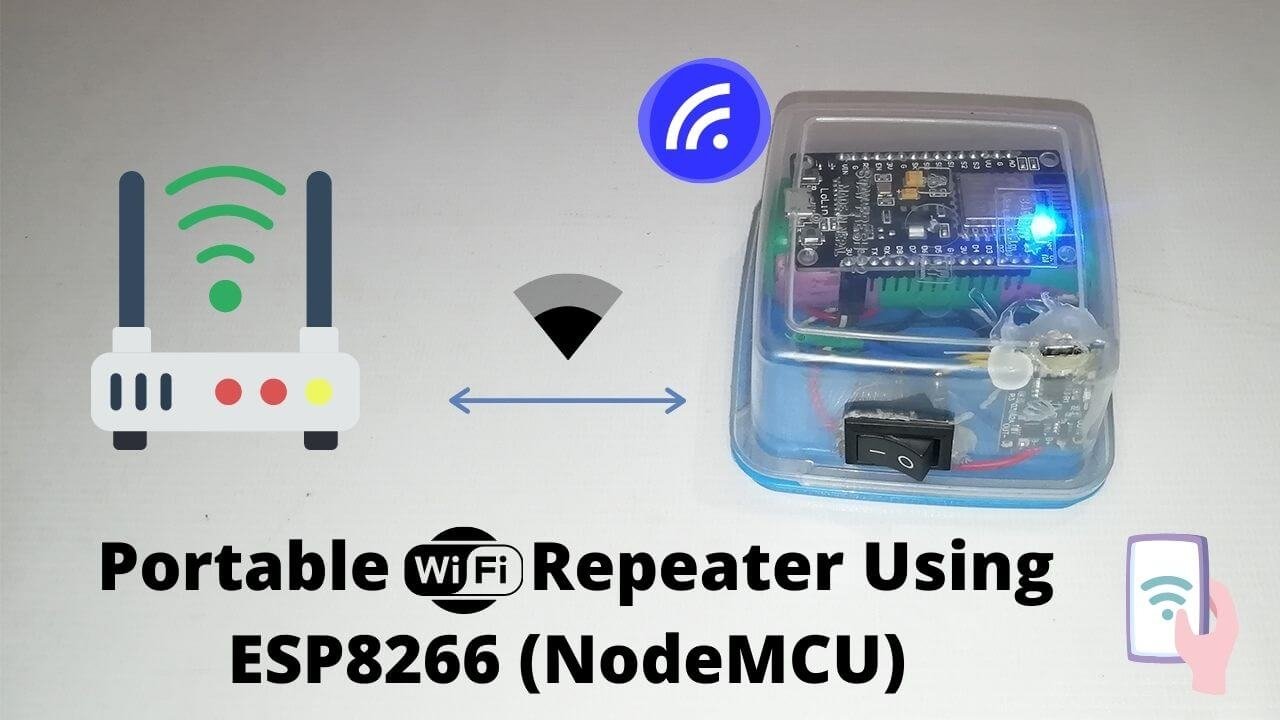
We are from the Internet of Things (IoT) Generations. These days, we control our home appliances like air-conditioners, room heaters, water heaters, etc. remotely from anywhere. But for every Wi-Fi-based IoT-enabled device, we require uninterrupted Internet/Wi-Fi connectivity. The problem of Low Wi-Fi signal is very common due to interference from room to room or floor to floor. Many people face this problem in their daily lives. Everything needs the internet. Smart TV, smartphone, laptop, desktop computer, but you just have one router to provide a wireless connection on a house. Don’t worry we will build the cheapest and Portable Wi-Fi Repeater using ESP8266 NodeMCU.
So, the question is How can we access the internet in every corner of the house? If you have a big house single router is not enough to cover this range! Each footstep lowers the Wi-Fi signal. And it’s not good for a multi-story building So what solves this problem?
- What is Wi-Fi Repeater?
- Components Required
- Advantages of ESP8266 Repeater
- Disadvantages of ESP8266 Repeater
- Working of ESP8266 as Wi-Fi Repeater
- How to build your own Wi-Fi extender from a cheap ESP8266 Wi-Fi module?
- Setting up NodeMCU ESP8266 for Flashing Wi-Fi Repeater Firmware
- Configuring Portable Wi-Fi Repeater using ESP8266
- Assembling and testing ESP8266 Portable Wi-Fi Repeater
- Video Demonstration
- Conclusion
The one and only solution is Wi-Fi Repeater !!!!! Yes, repeater solves this problem.
What is Wi-Fi Repeater?
A Wi-Fi repeater or expander is used to expand the coverage area of your Wi-Fi network. It works by receiving your existing Wi-Fi signal, amplifying it and then transmitting the enhanced signal. With a Wi-Fi repeater you can effectively double the coverage area of your Wi-Fi network – to reach the far corners of your home or office, on different floors, or to expand coverage in your yard.
But it’s also too bulky, costly, and are not portable !!!! So what to do ?
Why not make your own Wi-Fi Repeater
We use NodeMCU ESP8266 (IoT) development board for our this project.
What is NodeMCU?
Introduction: The NodeMCU is an open-source firmware and development kit that helps you to Prototype your IoT product within a few Lua script lines. For more details, please visit https://github.com/nodemcu/nodemcu-firmware/wiki/…
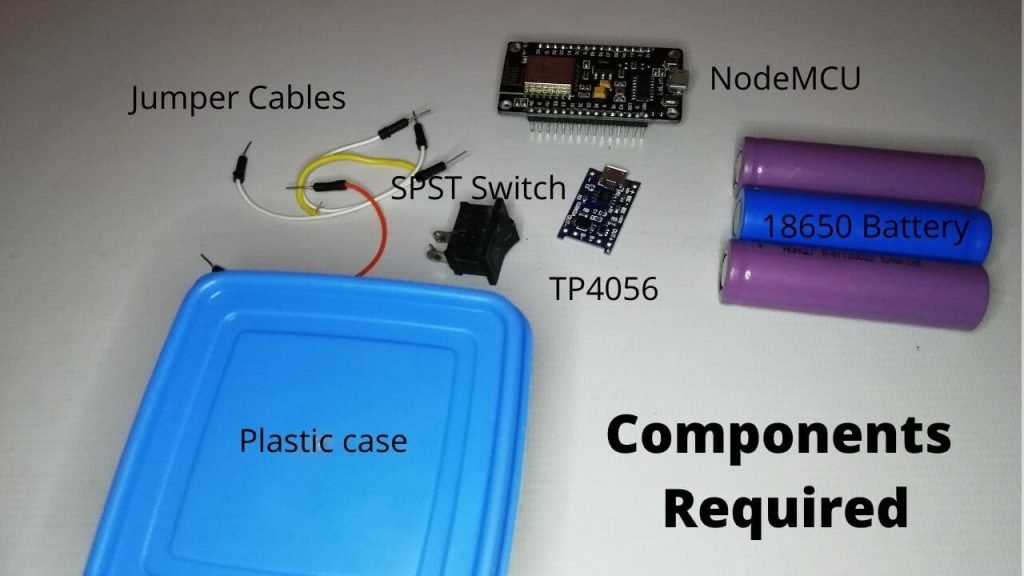
Components Required
These are the list of the components required to build a powerful and Portable Wi-Fi Repeater using ESP8266 NodeMCU.
| S.N | Components Name | Description | Quantity | |
|---|---|---|---|---|
| 1 | NodeMCU | ESP8266 12E Board | 1 | https://amzn.to/3fbZHk5 |
| 2 | TP4056 Module | Charging Module with protection | 1 | https://amzn.to/3aNUY5x |
| 3 | 18650 Battery | Rechargeable 3000mAh battery | 2 | https://amzn.to/3f6omWU |
| 4 | Jumper cables | Male to Male Jumper Wires | 5 | https://amzn.to/2JWSR44 |
| 5 | Project box | Plastic Enclosure | 1 | https://amzn.to/398uPNn |
| 6 | SPST Switch | Rocker ON/OFF Switch | 1 | https://amzn.to/315ZTZB |
Advantages of ESP8266 Repeater
- Simple range expander for existing Wi-Fi networks
- Battery-powered (can be used while charging)
- Setting up an additional WiFi network with different SSIDs / passwords for guests
- Establishing a secure and restricted network for IoT devices
- Translating WPA2 PSK to WPA2 Enterprise Network
- Monitor for Wi-Fi traffic analysis
- Simple design and low cost
Disadvantages of ESP8266 Repeater
- Due to the limitations of ESP’s SoftAP implementation, only 8 stations can be connected simultaneously.
- The ESP8266 needs a good power supply as it produces a current spike of up to 1mA during transmission (normal average consumption is around 700 mA when WiFi is turned on).
- Check the power supply first, if your ESP is unstable and reboots periodically. A large capacitor between VDD and GND can help if you experience problems here.
- The maximum input voltage is only 8 V.
- The maximum charging current is only 1A
- Output charging voltage fixed at 4.2V (no alternative for different types of batteries – LiFe etc.)
Working of ESP8266 as Wi-Fi Repeater
By default, ESP acts as STA and forwards any IP traffic through it as a soft-AP and transparently. It does not require any routing entries as it uses NAT, either on the network side or on connected stations. The stations are configured via DHCP the 192.168.4.0/24 net and receive their DNS responding address from the existing Wi-Fi network.
Also, Read:
- ESP8266 Manual Wifi Configuration with EEPROM without Hard-Code
- Home Automation with ESP8266 Web Server & Relay Module Control Appliances from Local Network
- Home Automation with MIT App Inventor and ESP8266
How to build your own Wi-Fi extender from a cheap ESP8266 Wi-Fi module?
Note: If the repeater is far from your router, it will have low connection speeds, but we do not require fast speed for most IoT projects. I needed an inexpensive way to increase the Wi-Fi range so that my IoT devices could connect to the Internet on a remote Wi-Fi router and send notifications to my phone. This ESP8266 repeater can extend your signal up to 300 feet with a good connection.
Download the .zip from the link below
It contains the firmware files and software tools you will need. Unzip the ZIP File and Browse the ESP8266 Repeater Folder.
About the sponsor: This article is sponsored by PCBway Company, one of the most experienced PCB and PCB assembly manufacturers. They produce high-quality PCBs at a reasonable price, only $5 for 10 PCBs and a total of $30 for 20 PCB assembly. In addition, new members also receive a $5 bonus.
Setting up NodeMCU ESP8266 for Flashing Wi-Fi Repeater Firmware
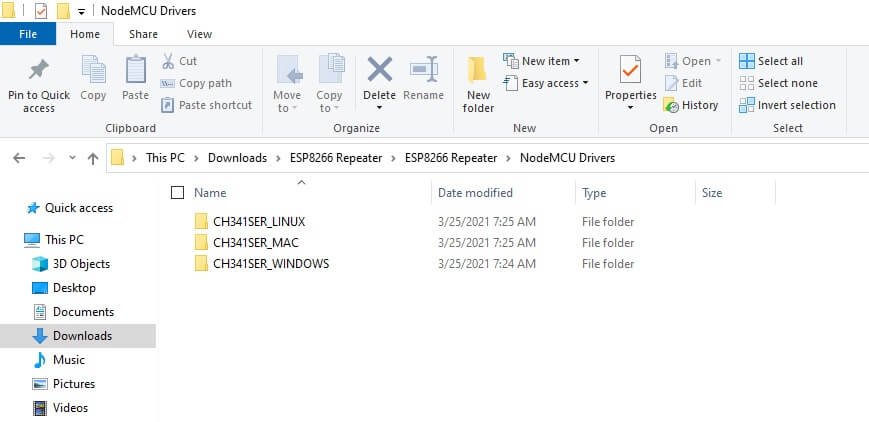
Install the NodeMCU ESP8266 Driver on PC. To get the USB adapter to communicate with the computer, you may need to install the CH340 driver. In the subfolder of ESP8266 Repeater from the zip, you downloaded. Open the NodeMCU Driver folder where you can find three more sub-folder “CH341SER_WINDOWS” for Windows “CH341SER_MAC” for Macs, and “CH341SER_LINUX for Linux”. Just open the program in the folder and install the drivers.
Flash the Repeater Firmware onto the ESP8266
Plug the ESP8266 NodeMCU into the USB adapter, plug it all into your computer. Open up the program in the sub-folder called “flash_download_tool_v3.8.5“. If you are on a Windows PC. Run the application called “flash_download_tool_3.8.5” and select “Developer Mode” after that select “ESP8266 Download Tool“.
Setup that program to the setting shown in the screenshot below.
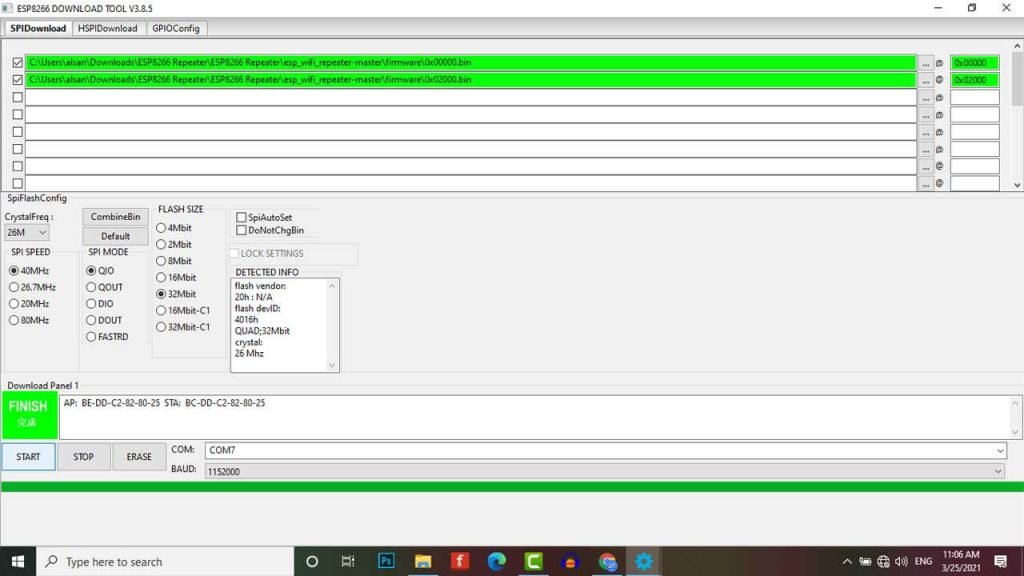
For the ESP8266 NodeMCU, under “Download Path Config“, click the three dots button for each section and browse to find the “firmware“. Click each one and type out their names to the right as shown in the screenshot e.g. “0x00000“, “0x10000” and “0x10000“
Select the COM port of your NodeMCU ESP8266, and set the baud rate to “115200“, then click “start“.
When it says “finish“, unplug your adapter and ESP8266 module from your computer.
Configuring Portable Wi-Fi Repeater using ESP8266
You must connect a computer to your extender in order to configure it. You can do this by using a smartphone as well. After the first boot, it provides an open-AP and ssid “MyAP” a WiFi network. Connect to this WiFi network and perform basic configuration via a simple web interface.
The web interface allows for the configuration of all the parameters required for basic forwarding functionality. Open your web browser and enter the following address: “http://192.168.4.1“. Now you should see the following page.
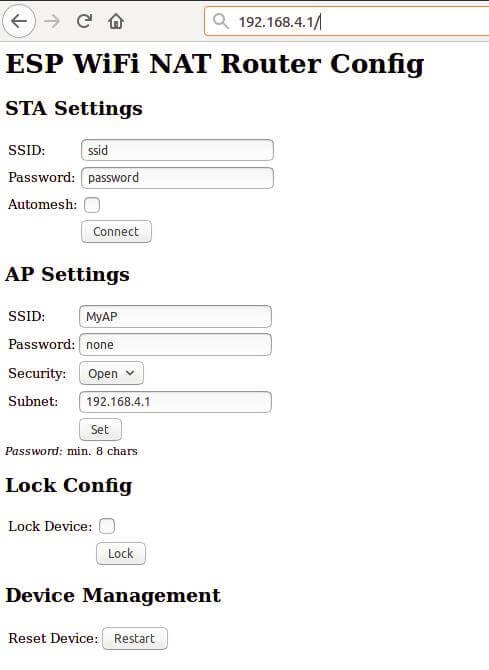
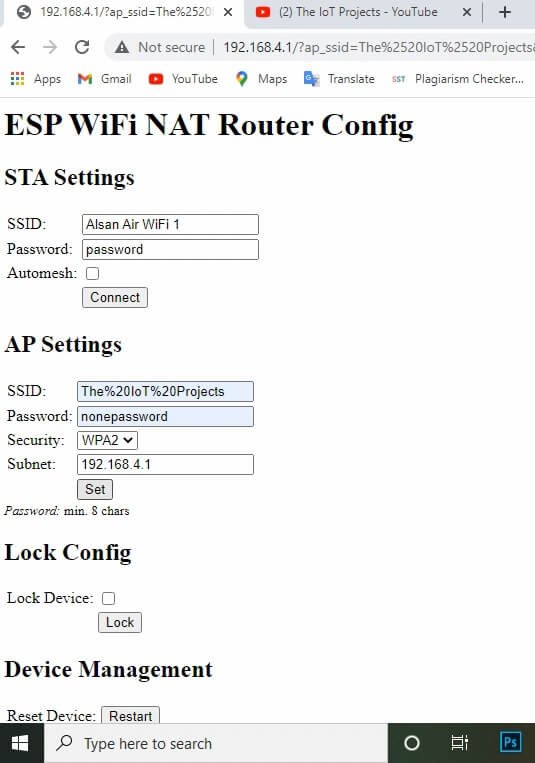
Firstly, in the “STA Settings” enter the correct WiFi credentials of your main WiFi network that you want to extend. Use password “none” for open networks. (Check the “Automesh” box if and only if you really want to use the automesh mode.) Click on “Connect“. The NodeMCU ESP8266 reboots and will connect to your WiFi router. You should see the status LED should be blinking after few seconds.
If you have selected automesh, you are done with configuration. Configuring the “AP Settings” is not required as in automesh mode these settings are identical to the “STA Settings“. The same ssid will be shown by all connected ESP8266 repeaters.
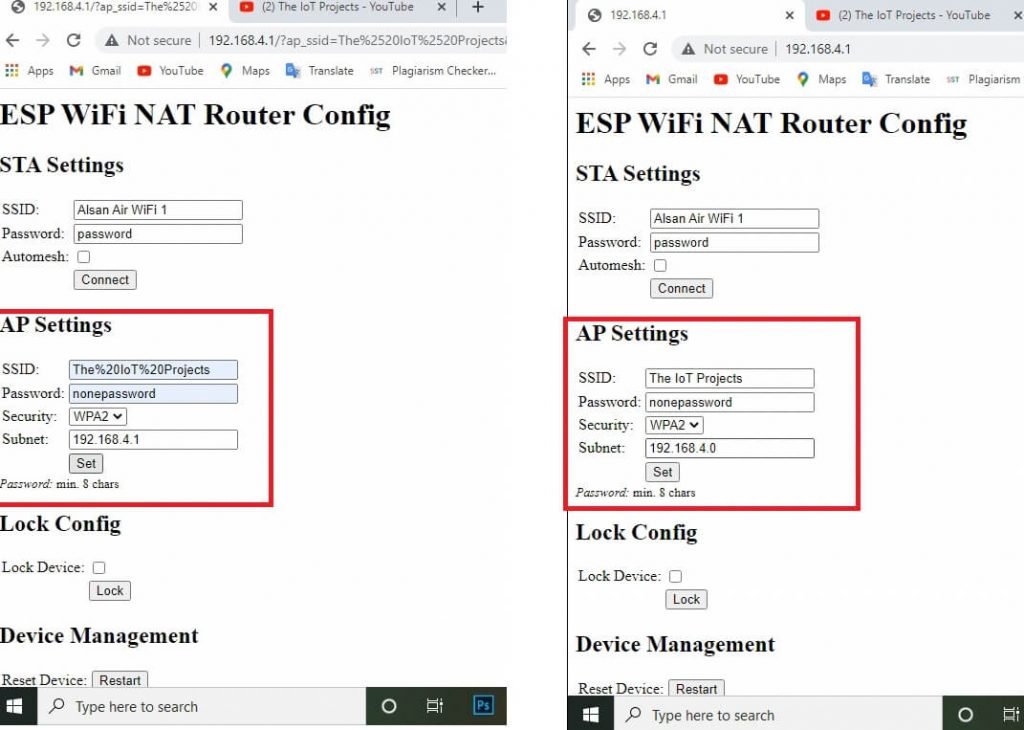
If you are not using automesh, you can now reload the page and change the “AP Settings“. Enter your Network SSID, Set Password choose security as WPA2. You can also change the subnet as your requirements. Finally, click “Set” and again the ESP reboots. Now it is ready for forwarding traffic over the newly configured Access Point.
Remember that these changes also affect the config interface, i.e. to do further configuration, enter the IP address of the newly configured Access point.
You can also click the “lock” checkbox and click “Lock“. This allows you to secure your configuration. Now, none can change the configuration without unlocking it with the main WiFi network’s password. (“password” is the default password if the network is open).
If you want to enter non-ASCII or special characters in the web interface you have to use HTTP-style hex encoding like “The%20IoT%20Projects“. This will result in a string “The IoT Projects“.
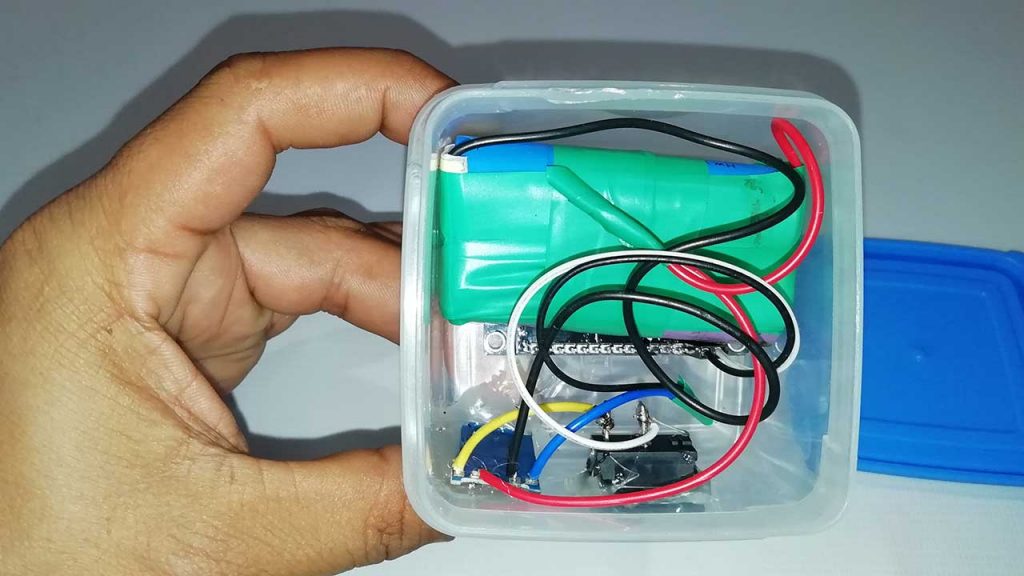
Assembling and testing ESP8266 Portable Wi-Fi Repeater
Now it’s time to assemble our portable powerful ESP8266 Wi-Fi repeater. You can use the following circuit diagram to connect each component together.
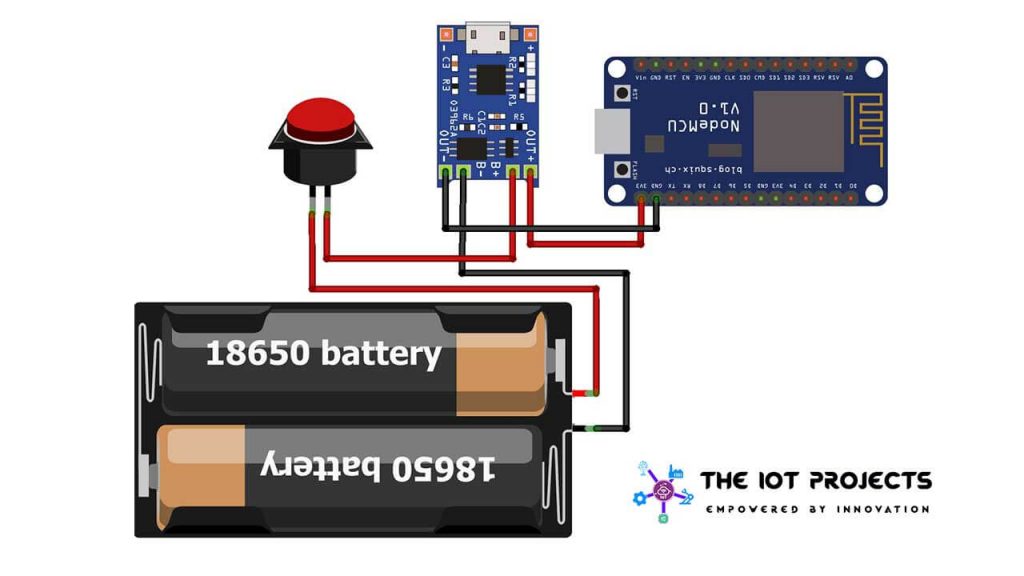
I have set up the components inside a waterproof case as shown in the images below. You can place this repeater in any corner of your home, office, or workspace.
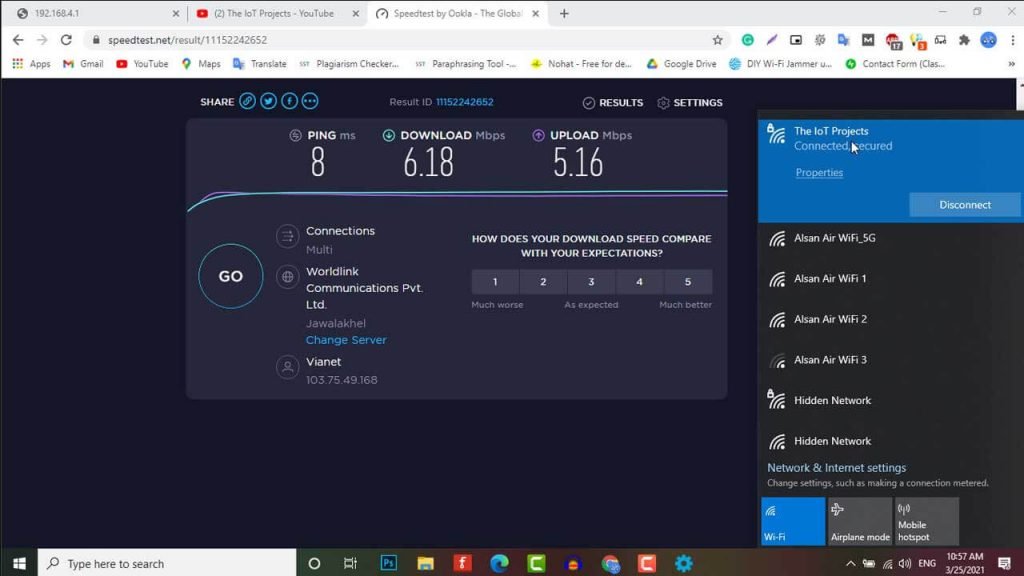
The speed test measurement show, that we can achieve about 5 Mbps in both upload and download. So streaming is also possible for a single user. Like watching Netflix, YouTube, and Browsing the Internet.
Video Demonstration
Here we have a full video tutorial for portable Wi-Fi Repeater using ESP8266 NodeMCU
Conclusion
Finally, I hope you have built your own Portable Wi-Fi Repeater using ESP8266 NodeMCU. If you need any kind of help regarding this project please do let me know in the comment section below.
Recommended Readings:


I flashed this to my esp8266 and can not get it to work. It fails to keep the STA settings when it reboots. It comes back online with the default settings. When I fill in the AP settings is does store those as the web interface shoes and does change the wifi name as well. Any help you could suggect would be appreciated.
Wow! This really worked and was better and cheaper than a Pi Zero hotspot. I just had to play around with the distances from the ESP8266 repeater to the router and to where I want to access the internet.
I found out the problem, it has to do with capitalized letters in the AP name. I also tried using caps in the station settings and it to failed to retain anything that was in caps.
I attempted to recompile using the Makefile included to no avail. It wont compile failing at the driver directory if I recall correctly.
Any assistance on this would be appreciated..
Hello.
I was pretty excited when I saw this on your site and jumped into it right away. I was pretty disappointed, though, at how vague the tutorial is. I’ve followed several of your tutorials and even purchased a couple of eBooks from you, so I was expecting something along those lines.
Anyway, I followed this tutorial as best as I could and I’m a bit confused at the end. There’s a couple of reasons/questions that I have. 1. When I clicked the “Set” button in the AP settings, the 192.168.4.1 page lost connection as did my computer that the ESP8266 was attached to. Does this mean I’m not connected to my router? 2. If my ESP8266 and my router are sharing the same SSID, how do I know I’m connected to the ESP8266? 3. (Lastly) There was a lot of files in the downloaded .zip file. What are the extra files for and were we supposed to load something else into the ESP?
Any clarification would be helpful and appreciated.
Ron K.