LoRa Based Wireless Weather Station using Arduino & ESP32
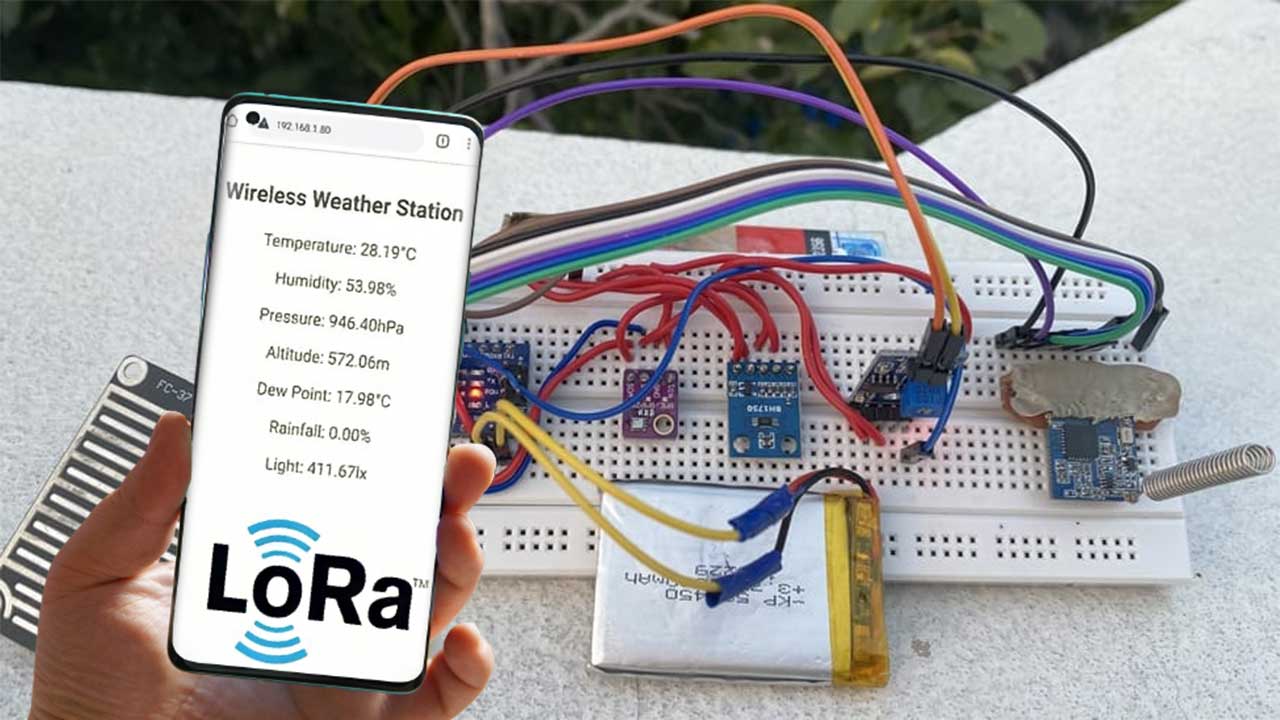
In this project, we will learn how to build a LoRa based wireless weather station using the Arduino Pro Mini and ESP32 WiFi module. You can place this weather station node on the roof of your house or at a remote place a few kilometers away from your house. You can also use a BH1750 light sensor and a rain sensor with a sensor like BME280 barometric pressure sensor. Generally, this weather station can monitor environmental parameters such as temperature, humidity, pressure, altitude, dew point, rainfall, and light intensity.
- Methods of Visualizing weather station data
- Components Required
- Video Tutorial & Guide: Wireless LoRa Weather Station
In this LoRa based wireless weather station using ESP32 project. You can monitor data from a few kilometers (up to 5 kilometers) using LoRa Module SX1278 / RFM95. The device operates on a 3.7V lithium-ion battery and power consumption is low.
The gateway can be placed indoors or at a certain height to cover long distances. The gateway is built using the LoRa SX1278 / RFM95 and ESP32 Wifi Module. The receiver collects data from the sender or sensor node and uploads it to the server.
Methods of Visualizing weather station data
The data obtained can be viewed in multiple ways. I will demonstrate how to visualize the data in 3 different manners. The first method is to monitor the data on the webserver. Using the local IP of the ESP32 board, you can monitor the data on the webpage. In the second method, you can upload the data to the Thingspeak server and monitor the data logged in a graphical format. The third method allows you to monitor data online in the Blynk application. You can choose any of the methods to monitor the weather data. With such a great wireless weather station, you can do it yourself.
You can check a few of our previous Weather Station Projects:
1. ESP8266 IoT Weather Station Using DHT11 Sensor
2. BME280 Based Mini Weather Station using ESP8266/ESP32
3. Simple Weather station using Arduino & BME280 Barometric Pressure Sensor
Components Required
To build a LoRa based weather station we need some microcontrollers board and some sensors. Below are all the components needed to make this project. You can buy components from Amazon.
| S.N. | Components Name | Description | Quantity | |
|---|---|---|---|---|
| 1 | ESP32 Module | ESP32 ESP-32S Development Board | 1 | https://amzn.to/34wlYTj |
| 2 | Arduino Pro Mini | Arduino Pro Mini 3.3V, 8MHz | 1 | https://amzn.to/3nBeeaf |
| 3 | LoRa Module | Ra-02 SX1278 | 2 | https://amzn.to/2KBJpnb |
| 4 | BME280 | Barometric Pressure Sensor | 1 | https://amzn.to/38s2WPo |
| 5 | BH1750 | Light Sensor | 1 | https://amzn.to/3h2uHSt |
| 6 | Rain Sensor | FC-37 Analog/Digital Rain Sensor | 1 | https://amzn.to/3rePTJy |
| 7 | Battery | 3.7V 1000mAh Lithium-Ion Battery | 1 | https://amzn.to/34ulkWl |
Sensors for Lora Based Weather Station
BME280 Barometric Pressure Sensor
The BME280 is a barometric pressure sensor that can measure temperature, humidity, and atmospheric pressure. The sensor has an I2C bus and operates on a 3.3V power supply. The unit combines high linearity and high accuracy sensors and has great potential for low current consumption, long-term stability, and high EMC robustness.
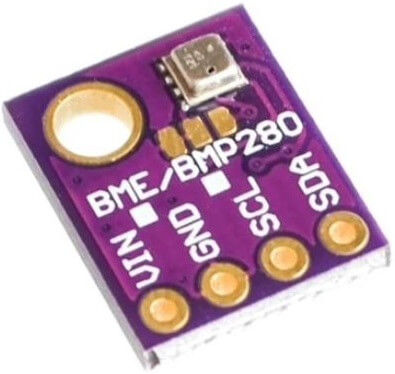
The sensor is ideal for measuring humidity, with ±3% accuracy, barometric pressure with an absolute accuracy of ±1 hPa, and temperature measurement with ±1.0°C accuracy. As we know, pressure changes with altitude. Hence, you can also use it as an altimeter with ±1 meter or better accuracy!
Rain Sensor
Basically, the Rain sensors are used to detect water beyond what the humidity sensor can detect.
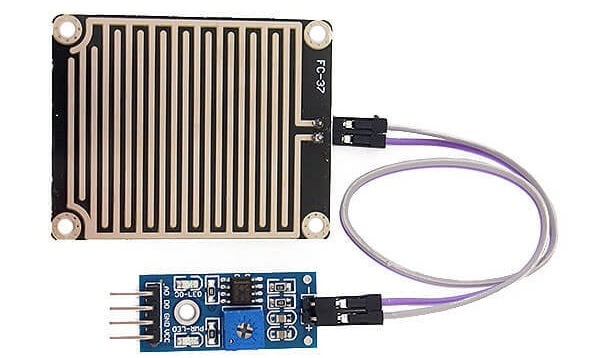
The rain sensor detects water that completes the circuits on its sensor boards’ with printed leads. The sensor board acts as a variable resistor that converts from 100k ohm when wet to 2M ohm when dry. In short, the current conduction will be high on the watery board.
BH1750 Ambient Light Sensor
The BH1750 light intensity sensor. It is a digital ambient light sensor with an I2C bus interface. This sensor is best suited to receive ambient light data. This sensor can measure the LUX value of light up to 65535. It consumes a very small amount of current and uses photodiodes to sense light.
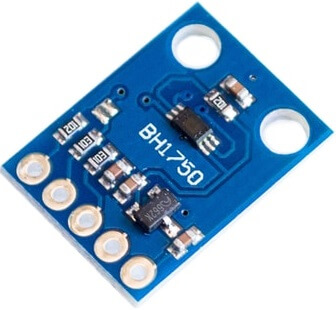
The sensor works at 3.3V and you can easily interface it with any microcontroller using its I2C pin.
LoRa Weather Station Node & Gateway Circuit
Wireless weather stations require wireless communication for the sender and receiver circuits. Hence the sender circuit is called the sensor node and the receiver circuit is called the gateway.
Sensor Node Circuit
We need to select a low-power Arduino board. So, the Arduino Pro Mini is the best board that works at 3.3V and runs at 8 MHz clock frequency. We can use the LoRa Module SX1278 from AI-thinker. The BH1750 and BME280 sensors work on the I2C protocol. The LoRa Module SX1278 works on the SPI protocol. The device is powered by a 3.7V lithium-ion battery and is connected to the Pro Mini’s RAW pin.
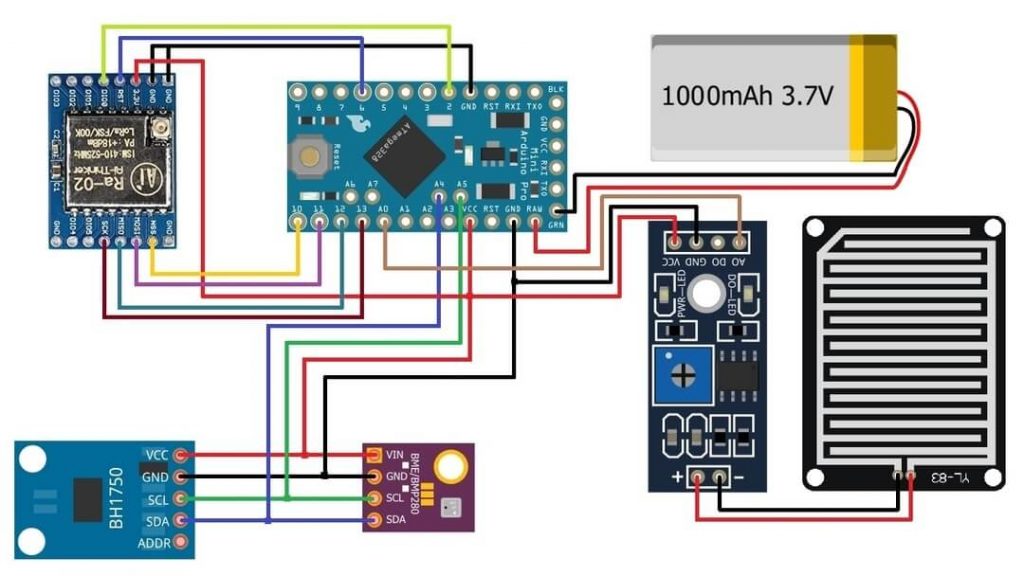
Note: Rain sensor, BH1750 ambient light sensor, BME280 barometric sensor, and LoRa module are connected in 3.3V of Arduino Pro Mini. You can use an additional TP4050 battery charging module to charge the battery. Apart from this, adding solar panels and collecting solar energy in the circuit would be the best option.
Sensor Node placement
The LoRa module operates at a frequency of 433 MHz, but you can choose the 868 MHz or the 915 MHz frequency depending on your region. You can use any other LoRa module with different antennas depending on the availability in your area. Remember the LoRa based weather station is not a waterproof device, so keep it inside a waterproof case.
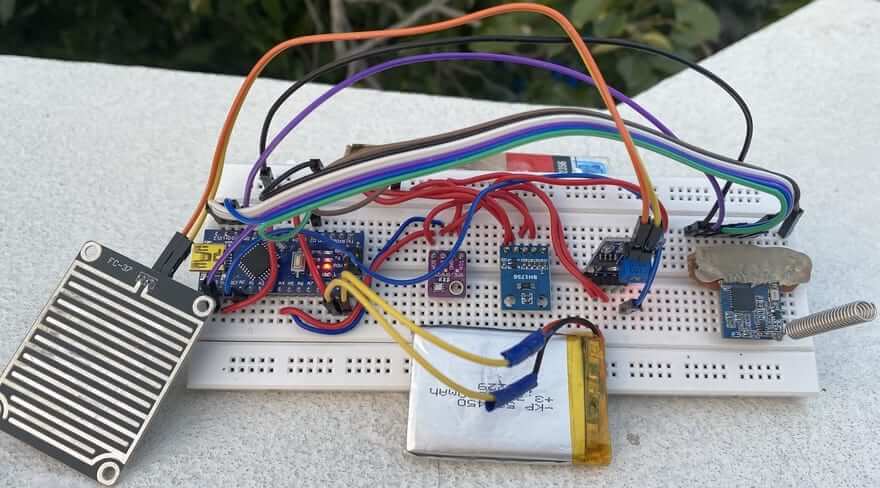
The circuit is assembled on a breadboard. However, you can design a custom PCB for this project. Well, all the sensors except the rain sensor can be kept in a small waterproof box which should be kept outside to monitor the rain.
The sensor node operates at very low power and putting the device in sleep mode increases the battery life. Also removing unnecessary voltage regulators and using low power LDO or buck converter IC can reduce the power consumption.
Wi-Fi Gateway Circuit
On the gateway side, we only have the LoRa Module SX1278 & ESP32 Wifi Module. It is connected to the ESP32 board via LoRa SPI PIN. And this unit is powered via a USB cable.
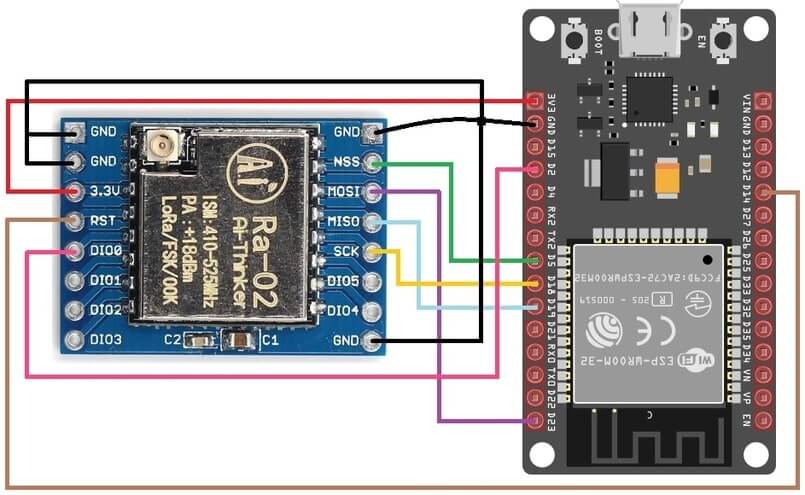
The gateway unit can be placed inside or outside the room but next to the Wi-Fi network. The ESP32 Wifi module connects to the local wifi network. And LoRa receives data from the sensor node. ESP32 module uses wifi to upload the data to the server.
Library Installation on Arduino IDE
You must install the libraries on the Arduino IDE before moving to the program part. Below is a list of libraries used in the code below.
1. LoRa Library
The LoRa library is used to send and receive data using LoRa radio. This library highlights LoRa radio directly and allows you to send data to any radio in the range with the same radio parameters. All data is transmitted and there is no addressing.
2. BME280 Library
The Adfruit BME280 Library from Adfruit creates an I2C interface with Arduino or any other microcontroller and reads the temperature, humidity, and pressure values from sensors.
3. BH1750 Library
This package includes an Arduino library for digital light sensor breakout boards containing the BH1750FVI IC. The I2C bus configuration should be done in user code to help communicate between the Arduino and the sensor.
4. Blynk Library
Blynk is one of the most popular Internet of Things platforms for connecting any hardware to the cloud, designing applications to control them, and managing your posted products on the scale. With the Blynk Library, you can connect over 100 hardware models to the Blynk Cloud, including ESP8266, ESP32, NodeMCU, and Arduino.
Source Code/Program for Sensor Node
The program or code for the LoRa weather station sensor node is given below. You can copy the code and upload it to the Arduino Pro Mini board. If you are using multiple sensor nodes, be sure to change the device ID from the code.
#include <SPI.h>
#include <LoRa.h>
#include <Adafruit_Sensor.h>
#include <Adafruit_BME280.h>
#include <BH1750.h>       // adds BH1750 library file

//#define SS 10
//#define RST 9
//#define DI0 2

//#define TX_P 17
//#define ENCRYPT 0x78

#define BAND 433E6
#define rain_sensor A0

#define SEALEVELPRESSURE_HPA (1013.25)
Adafruit_BME280 bme;

BH1750 lightMeter;

String LoRaMessage = "";
char device_id[12] = "MyDevice123";


void setup()
{
  Serial.begin(115200);
  Wire.begin();
  lightMeter.begin();

  pinMode (rain_sensor, INPUT);
  while (!Serial);

  Serial.println(F("LoRa Sender"));

  //LoRa.setPins(SS, RST, DI0);
  //LoRa.setTxPower(TX_P);
  //LoRa.setSyncWord(ENCRYPT);

  if (!LoRa.begin(BAND))
  {
    Serial.println(F("Starting LoRa failed!"));
    while (1);
  }
  if (!bme.begin(0x76))
  {
    Serial.println("Could not find a valid BME280 sensor, check wiring!");
    while (1);
  }
}

void loop()
{
  float temperature = bme.readTemperature();
  float pressure = bme.readPressure() / 100.0F;
  float altitude = bme.readAltitude(SEALEVELPRESSURE_HPA);
  float humidity = bme.readHumidity();

  double dewPoint = dewPointFast(temperature, humidity);

  int rainfall = map(analogRead(rain_sensor), 780, 0, 0, 100);
  if (rainfall >= 100)
  {
    rainfall = 100;
  }
  if (rainfall <= 0)
  {
    rainfall = 0;
  }

  float lux = lightMeter.readLightLevel();

  Serial.print(F("Device ID: "));
  Serial.println(device_id);

  Serial.print(F("Temperature = "));
  Serial.print(temperature);
  Serial.println(F("*C"));

  Serial.print(F("Pressure = "));
  Serial.print(pressure);
  Serial.println(F("hPa"));

  Serial.print(F("Approx. Altitude = "));
  Serial.print(altitude);
  Serial.println(F("m"));

  Serial.print(F("Humidity = "));
  Serial.print(humidity);
  Serial.println(F("%"));

  Serial.print(F("Dew point = "));
  Serial.print(dewPoint);
  Serial.println(F(" *C"));

  Serial.print(F("Rainfall = "));
  Serial.print(rainfall);
  Serial.println(F("%"));

  Serial.print(F("Light = "));
  Serial.print(lux);
  Serial.println(F(" lx"));


  Serial.println();

  LoRaMessage = String(device_id) + "/" + String(temperature) + "&" + String(pressure)
                + "#" + String(altitude) + "@" + String(humidity) + "$" + String(dewPoint)
                + "^" + String(rainfall) + "!" + String(lux);

  // send packet
  LoRa.beginPacket();
  LoRa.print(LoRaMessage);
  LoRa.endPacket();
  delay(10000);
}


double dewPointFast(double celsius, double humidity)
{
  double a = 17.271;
  double b = 237.7;
  double temp = (a * celsius) / (b + celsius) + log(humidity * 0.01);
  double Td = (b * temp) / (a - temp);
  return Td;
}
Source Code/Program for Gateway: WebServer
Here is the gateway code for the ESP32 board. Using this code you can view weather station data in a web browser. The ESP32 web server creates a webpage where all weather station data is logged.
#include <LoRa.h>
#include <WiFi.h>
#include <WebServer.h>


#define SS 5
#define RST 14
#define DI0 2

//#define TX_P 17
#define BAND 433E6
//#define ENCRYPT 0x78

String device_id;
String temperature;
String pressure;
String altitude;
String humidity;
String dewPoint;
String rainfall;
String lux;

const char* ssid = "Bynark_Airtel";
const char* password = "bynark@123";

WebServer server(80);

void setup()
{
  Serial.begin(115200);
  Serial.println("LoRa Receiver");
  //LoRa.setTxPower(TX_P);
  //LoRa.setSyncWord(ENCRYPT);

  LoRa.setPins(SS, RST, DI0);
  if (!LoRa.begin(BAND))
  {
    Serial.println("Starting LoRa failed!");
    while (1);
  }

  Serial.println("Connecting to ");
  Serial.println(ssid);

  //Connect to your local wi-fi network
  WiFi.begin(ssid, password);

  //check wi-fi is connected to wi-fi network
  while (WiFi.status() != WL_CONNECTED) {
  delay(1000);
  Serial.print(".");
  }
  Serial.println("");
  Serial.println("WiFi connected..!");
  Serial.print("Got IP: ");  Serial.println(WiFi.localIP());

  server.on("/", handle_OnConnect);
  server.onNotFound(handle_NotFound);

  server.begin();
  Serial.println("HTTP server started");
}

void loop()
{
  // try to parse packet
  int pos1, pos2, pos3, pos4, pos5, pos6, pos7;

  int packetSize = LoRa.parsePacket();
  if (packetSize)
  {
    // received a packet
    Serial.print("Received packet:  ");
    String LoRaData = LoRa.readString();
    Serial.print(LoRaData);
    // read packet
    while (LoRa.available()) {
      Serial.print((char)LoRa.read());
    }
    // print RSSI of packet
    Serial.print("' with RSSI ");
    Serial.println(LoRa.packetRssi());

    pos1 = LoRaData.indexOf('/');
    pos2 = LoRaData.indexOf('&');
    pos3 = LoRaData.indexOf('#');
    pos4 = LoRaData.indexOf('@');
    pos5 = LoRaData.indexOf('$');
    pos6 = LoRaData.indexOf('^');
    pos7 = LoRaData.indexOf('!');

    device_id = LoRaData.substring(0, pos1);
    temperature = LoRaData.substring(pos1 + 1, pos2);
    pressure = LoRaData.substring(pos2 + 1, pos3);
    altitude = LoRaData.substring(pos3 + 1, pos4);
    humidity = LoRaData.substring(pos4 + 1, pos5);
    dewPoint = LoRaData.substring(pos5 + 1, pos6);
    rainfall = LoRaData.substring(pos6 + 1, pos7);
    lux = LoRaData.substring(pos7 + 1, LoRaData.length());

    Serial.print(F("Device ID = "));
    Serial.println(device_id);

    Serial.print(F("Temperature = "));
    Serial.print(temperature);
    Serial.println(F("*C"));

    Serial.print(F("Pressure = "));
    Serial.print(pressure);
    Serial.println(F("hPa"));

    Serial.print(F("Approx. Altitude = "));
    Serial.print(altitude);
    Serial.println(F("m"));

    Serial.print(F("Humidity = "));
    Serial.print(humidity);
    Serial.println(F("%"));

    Serial.print("Dew point = ");
    Serial.print(dewPoint);
    Serial.println(" *C");

    Serial.print(F("Rainfall = "));
    Serial.print(rainfall);
    Serial.println(F("%"));

    Serial.print(F("Light = "));
    Serial.print(lux);
    Serial.println(F(" lx"));

    Serial.println();

    server.handleClient();
  }
}

void handle_OnConnect()
{
  server.send(200, "text/html", SendHTML(temperature.toFloat(), humidity.toFloat(), pressure.toFloat(), altitude.toFloat(), dewPoint.toFloat(), rainfall.toFloat(), lux.toFloat()));
}


void handle_NotFound()
{
  server.send(404, "text/plain", "Not found");
}

String SendHTML(float temperature, float humidity, float pressure, float altitude, float dewPoint, float rainfall, float lux)
{
  String ptr = "<!DOCTYPE html> <html>n";
  ptr += "<head><meta name="viewport" content="width=device-width, initial-scale=1.0, user-scalable=no">n";
  ptr += "<title>Wireless Weather Station</title>n";
  ptr += "<style>html { font-family: Helvetica; display: inline-block; margin: 0px auto; text-align: center;}n";
  ptr += "body{margin-top: 50px;} h1 {color: #444444;margin: 50px auto 30px;}n";
  ptr += "p {font-size: 24px;color: #444444;margin-bottom: 10px;}n";
  ptr += "</style>n";
  ptr += "</head>n";
  ptr += "<body>n";
  ptr += "<div id="webpage">n";
  ptr += "<h1>Wireless Weather Station</h1>n";

  ptr += "<p>Temperature: ";
  ptr += temperature;
  ptr += "°C</p>";

  ptr += "<p>Humidity: ";
  ptr += humidity;
  ptr += "%</p>";

  ptr += "<p>Pressure: ";
  ptr += pressure;
  ptr += "hPa</p>";

  ptr += "<p>Altitude: ";
  ptr += altitude;
  ptr += "m</p>";

  ptr += "<p>Dew Point: ";
  ptr += dewPoint;
  ptr += "°C</p>";

  ptr += "<p>Rainfall: ";
  ptr += rainfall;
  ptr += "%</p>";

  ptr += "<p>Light: ";
  ptr += lux;
  ptr += "lx</p>";

  ptr += "</div>n";
  ptr += "</body>n";
  ptr += "</html>n";
  return ptr;
}
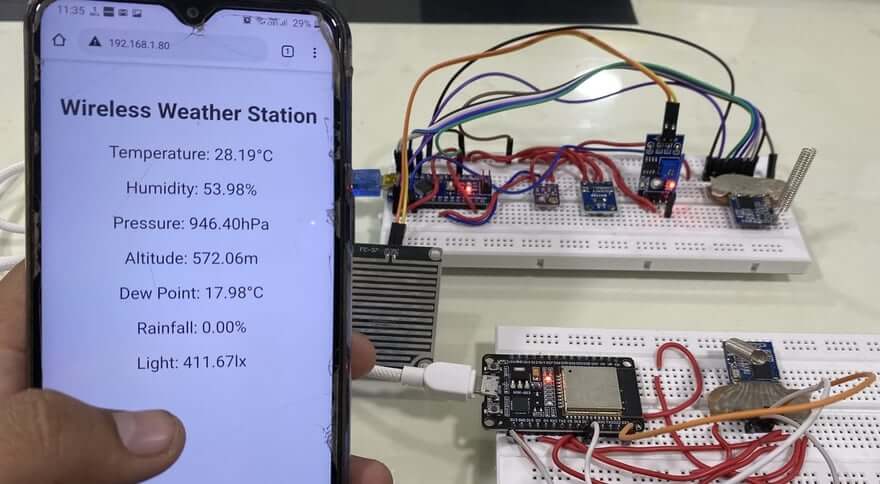
Now you can upload the code to Arduino Pro Mini and ESP32 board. Once the code is uploaded, open the serial monitor for both transmitters and then the receiver portion. If each connection is correct the sender will start and start sending data. On the receiver side, the receiver connects to the network and prints the IP address.
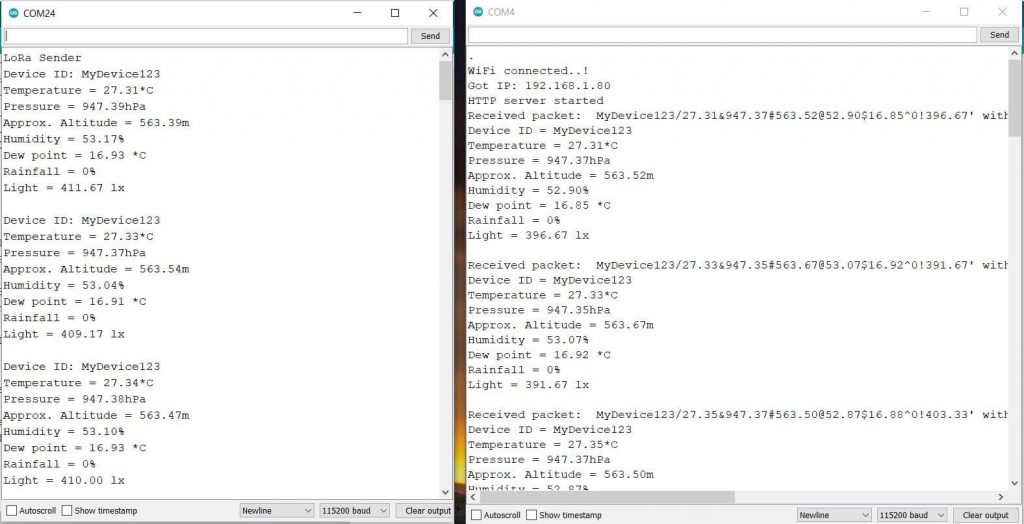
Copy the IP address and paste it into the web browser. You can paste and hit Enter into your computer’s Chrome browser or just on a smartphone.
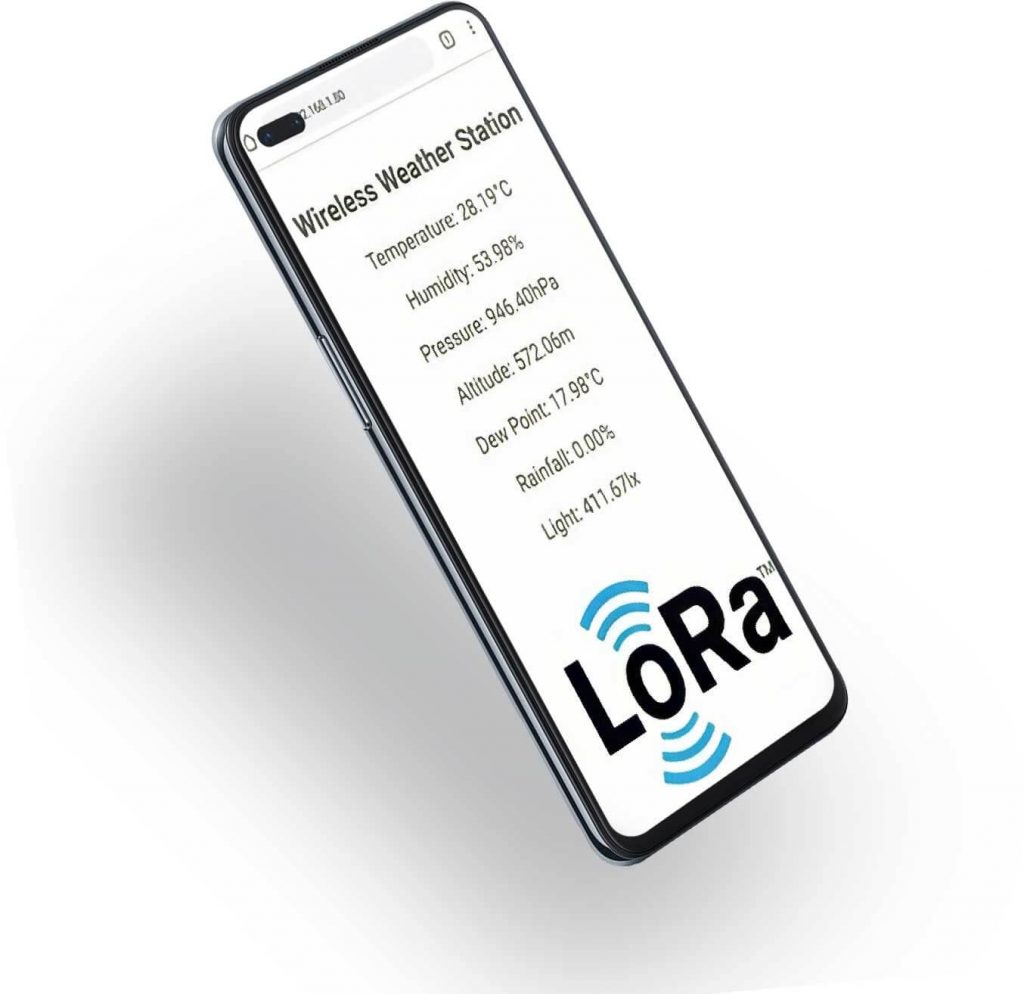
Weather station data will only be displayed in a web browser. You can reload the page to refresh the weather page. Or you can refresh the data without reloading the page using the AJAX function in the code.
Source Code/Program for Gateway: Thingspeak Server
Now let’s monitor the LoRa weather station data on the Thingspeak server. To do so, create an account on Thingspack Server or log in only if you have already created an account. Then create a new channel with the following details such as temperature, humidity, pressure, altitude, dew point, precipitation, and light intensity.
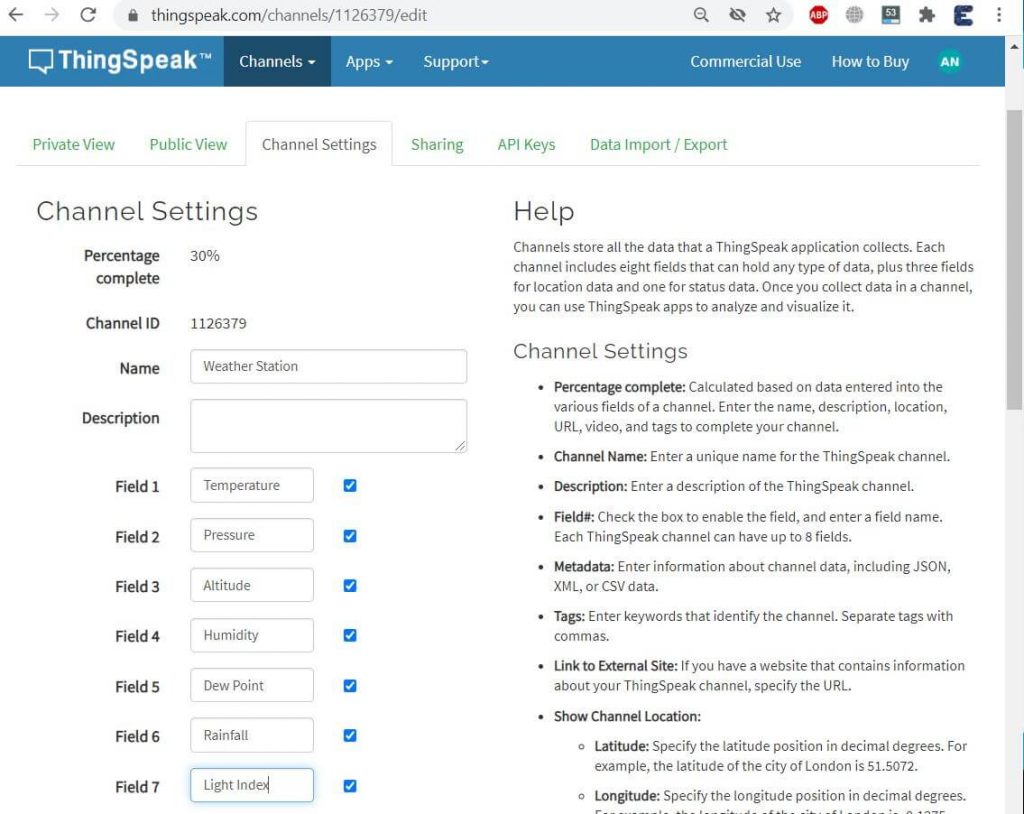
So go to the API key and copy the API key. Change the API key, WiFi SSID and password in the code below.
#include <SPI.h>
#include <LoRa.h>
#include <WiFi.h>

String apiKey = "************"; // Enter your Write API key from ThingSpeak
const char* ssid = "************";
const char* password = "************";
const char* server = "api.thingspeak.com";

#define SS 5
#define RST 14
#define DI0 2

//#define TX_P 17
#define BAND 433E6
//#define ENCRYPT 0x78

String device_id;
String temperature;
String pressure;
String altitude;
String humidity;
String dewPoint;
String rainfall;
String lux;

WiFiClient client;


void setup()
{
  Serial.begin(115200);
  Serial.println("LoRa Receiver");
  //LoRa.setTxPower(TX_P);
  //LoRa.setSyncWord(ENCRYPT);

  LoRa.setPins(SS, RST, DI0);
  if (!LoRa.begin(BAND))
  {
    Serial.println("Starting LoRa failed!");
    while (1);
  }

  Serial.println("Connecting to ");
  Serial.println(ssid);

  //connect to your local wi-fi network
  WiFi.begin(ssid, password);

  //check wi-fi is connected to wi-fi network
  while (WiFi.status() != WL_CONNECTED) {
    delay(1000);
    Serial.print(".");
  }
  Serial.println("");
  Serial.println("WiFi connected..!");
  Serial.print("Got IP: ");
  Serial.println(WiFi.localIP());

}

void loop()
{
  // try to parse packet
  int pos1, pos2, pos3, pos4, pos5, pos6, pos7;

  int packetSize = LoRa.parsePacket();
  if (packetSize)
  {
    // received a packet
    Serial.print("Received packet:  ");
    String LoRaData = LoRa.readString();
    Serial.print(LoRaData);
    // read packet
    while (LoRa.available())
    {
      Serial.print((char)LoRa.read());
    }
    // print RSSI of packet
    Serial.print("' with RSSI ");
    Serial.println(LoRa.packetRssi());

    pos1 = LoRaData.indexOf('/');
    pos2 = LoRaData.indexOf('&');
    pos3 = LoRaData.indexOf('#');
    pos4 = LoRaData.indexOf('@');
    pos5 = LoRaData.indexOf('$');
    pos6 = LoRaData.indexOf('^');
    pos7 = LoRaData.indexOf('!');

    device_id = LoRaData.substring(0, pos1);
    temperature = LoRaData.substring(pos1 + 1, pos2);
    pressure = LoRaData.substring(pos2 + 1, pos3);
    altitude = LoRaData.substring(pos3 + 1, pos4);
    humidity = LoRaData.substring(pos4 + 1, pos5);
    dewPoint = LoRaData.substring(pos5 + 1, pos6);
    rainfall = LoRaData.substring(pos6 + 1, pos7);
    lux = LoRaData.substring(pos7 + 1, LoRaData.length());

    Serial.print(F("Device ID = "));
    Serial.println(device_id);

    Serial.print(F("Temperature = "));
    Serial.print(temperature);
    Serial.println(F("*C"));

    Serial.print(F("Pressure = "));
    Serial.print(pressure);
    Serial.println(F("hPa"));

    Serial.print(F("Approx. Altitude = "));
    Serial.print(altitude);
    Serial.println(F("m"));

    Serial.print(F("Humidity = "));
    Serial.print(humidity);
    Serial.println(F("%"));

    Serial.print("Dew point = ");
    Serial.print(dewPoint);
    Serial.println(" *C");

    Serial.print(F("Rainfall = "));
    Serial.print(rainfall);
    Serial.println(F("%"));

    Serial.print(F("Light = "));
    Serial.print(lux);
    Serial.println(F(" lx"));

    Serial.println();

    if (client.connect(server, 80)) // "184.106.153.149" or api.thingspeak.com
    {
      String postStr = apiKey;
      postStr += "&field1=";
      postStr += String(temperature);
      postStr += "&field2=";
      postStr += String(pressure);
      postStr += "&field3=";
      postStr += String(altitude);
      postStr += "&field4=";
      postStr += String(humidity);
      postStr += "&field5=";
      postStr += String(dewPoint);
      postStr += "&field6=";
      postStr += String(rainfall);
      postStr += "&field7=";
      postStr += String(lux);
      postStr += "rn";

      client.print("POST /update HTTP/1.1n");
      client.print("Host: api.thingspeak.comn");
      client.print("Connection: closen");
      client.print("X-THINGSPEAKAPIKEY: " + apiKey + "n");
      client.print("Content-Type: application/x-www-form-urlencodedn");
      client.print("Content-Length: ");
      client.print(postStr.length());
      client.print("nn");
      client.print(postStr);

      Serial.println("Data Send to Thingspeak");
      delay(500);
    }
    client.stop();
    Serial.println("Waiting...");

  }
}
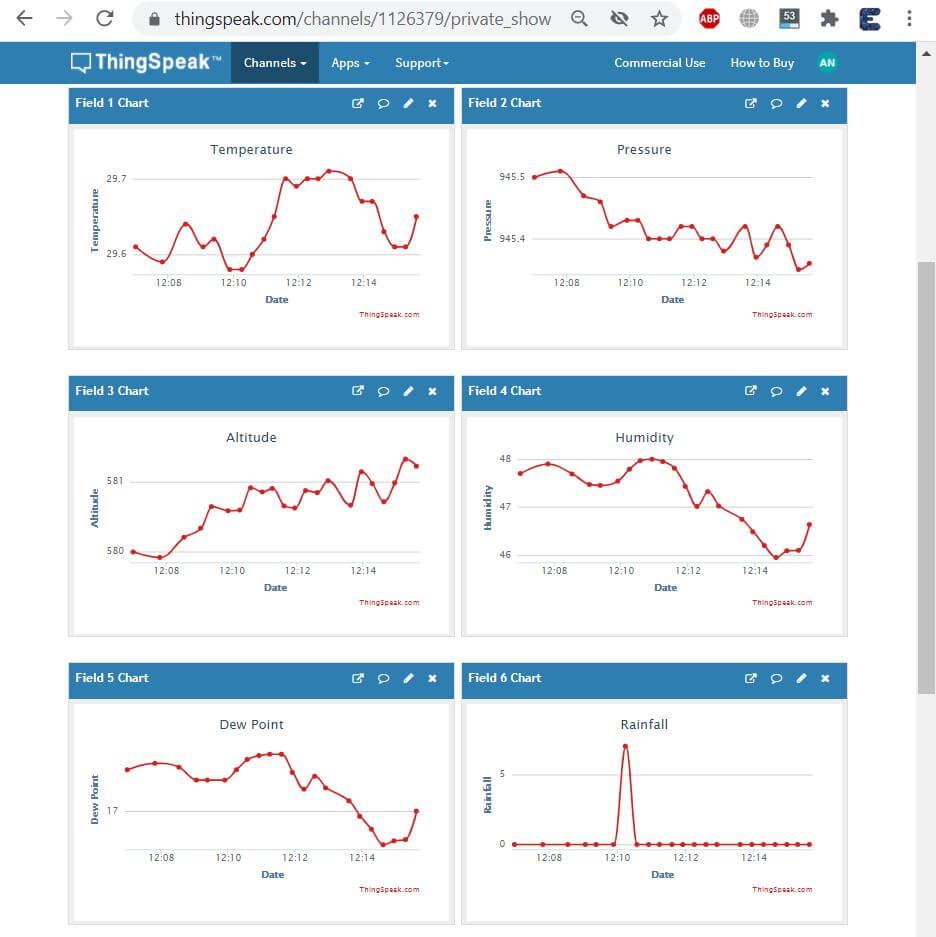
Now again open the Serial Monitor. So if you see the data is sent and received means your node and gateway both are working fine.

Now go to Thingspeak Private View. Here you will see login data in graphical format. Data was retrieved after an interval of 15 seconds.
Source Code/Program for Gateway: Blynk Application
Here are the Blynk code and Blynk app for wireless weather station data monitoring. Data from ESP32 LoRa Gateway will be logged to Blynk Cloud Server.
Change the Blynk Authentication Token to the following code which is generated by your Blynk application. Also, Change WiFi SSID and password.
#define BLYNK_PRINT Serial
#include <SPI.h>
#include <LoRa.h>
#include <WiFi.h>
#include <Blynk.h>
#include <BlynkSimpleEsp32.h>

char auth[] = "**********************";       // You should get Auth Token in the Blynk App.
char ssid[] = "************";                 // Your WiFi credentials.
char pass[] = "************";

#define SS 5
#define RST 14
#define DI0 2

//#define TX_P 17
#define BAND 433E6
//#define ENCRYPT 0x78

String device_id;
String temperature;
String pressure;
String altitude;
String humidity;
String dewPoint;
String rainfall;
String lux;

void setup()
{
  Serial.begin(115200);
  Blynk.begin(auth, ssid, pass);
  Serial.println("LoRa Receiver");
  //LoRa.setTxPower(TX_P);
  //LoRa.setSyncWord(ENCRYPT);

  LoRa.setPins(SS, RST, DI0);
  if (!LoRa.begin(BAND))
  {
    Serial.println("Starting LoRa failed!");
    while (1);
  }

  Serial.println("Connecting to ");
  Serial.println(ssid);

  //connect to your local wi-fi network
  WiFi.begin(ssid, pass);

  //check wi-fi is connected to wi-fi network
  while (WiFi.status() != WL_CONNECTED)
  {
    delay(1000);
    Serial.print(".");
  }
  Serial.println("");
  Serial.println("WiFi connected..!");
  Serial.print("Got IP: ");
  Serial.println(WiFi.localIP());

}

void loop()
{
  // try to parse packet
  int pos1, pos2, pos3, pos4, pos5, pos6, pos7;

  int packetSize = LoRa.parsePacket();
  if (packetSize)
  {
    Blynk.run();
    // received a packet
    Serial.print("Received packet:  ");
    String LoRaData = LoRa.readString();
    Serial.print(LoRaData);
    // read packet
    while (LoRa.available())
    {
      Serial.print((char)LoRa.read());
    }
    // print RSSI of packet
    Serial.print("' with RSSI ");
    Serial.println(LoRa.packetRssi());

    pos1 = LoRaData.indexOf('/');
    pos2 = LoRaData.indexOf('&');
    pos3 = LoRaData.indexOf('#');
    pos4 = LoRaData.indexOf('@');
    pos5 = LoRaData.indexOf('$');
    pos6 = LoRaData.indexOf('^');
    pos7 = LoRaData.indexOf('!');

    device_id = LoRaData.substring(0, pos1);
    temperature = LoRaData.substring(pos1 + 1, pos2);
    pressure = LoRaData.substring(pos2 + 1, pos3);
    altitude = LoRaData.substring(pos3 + 1, pos4);
    humidity = LoRaData.substring(pos4 + 1, pos5);
    dewPoint = LoRaData.substring(pos5 + 1, pos6);
    rainfall = LoRaData.substring(pos6 + 1, pos7);
    lux = LoRaData.substring(pos7 + 1, LoRaData.length());

    Serial.print(F("Device ID = "));
    Serial.println(device_id);

    Serial.print(F("Temperature = "));
    Serial.print(temperature);
    Serial.println(F("*C"));

    Serial.print(F("Pressure = "));
    Serial.print(pressure);
    Serial.println(F("hPa"));

    Serial.print(F("Approx. Altitude = "));
    Serial.print(altitude);
    Serial.println(F("m"));

    Serial.print(F("Humidity = "));
    Serial.print(humidity);
    Serial.println(F("%"));

    Serial.print("Dew point = ");
    Serial.print(dewPoint);
    Serial.println(" *C");

    Serial.print(F("Rainfall = "));
    Serial.print(rainfall);
    Serial.println(F("%"));

    Serial.print(F("Light = "));
    Serial.print(lux);
    Serial.println(F(" lx"));

    Serial.println();

    Blynk.virtualWrite(V1, temperature);
    Blynk.virtualWrite(V2, humidity);
    Blynk.virtualWrite(V3, pressure);
    Blynk.virtualWrite(V4, altitude);
    Blynk.virtualWrite(V5, dewPoint);
    Blynk.virtualWrite(V6, rainfall);
    Blynk.virtualWrite(V7, lux);

  }
}
Blynk App setup for LoRa based Weather Station
To set up a Blynk IoT App for Wireless Weather Station you need to first download the app from the Play Store for Android users and the App Store for iOS users. Once the installation is complete, open the app and sign-up using your email address and password.
- Click on create a new project
- Provide the Name of your project as “Weather Station”
- Choose ESP32 Dev Board
- Select connection type as Wi-Fi, then click on Create Button.
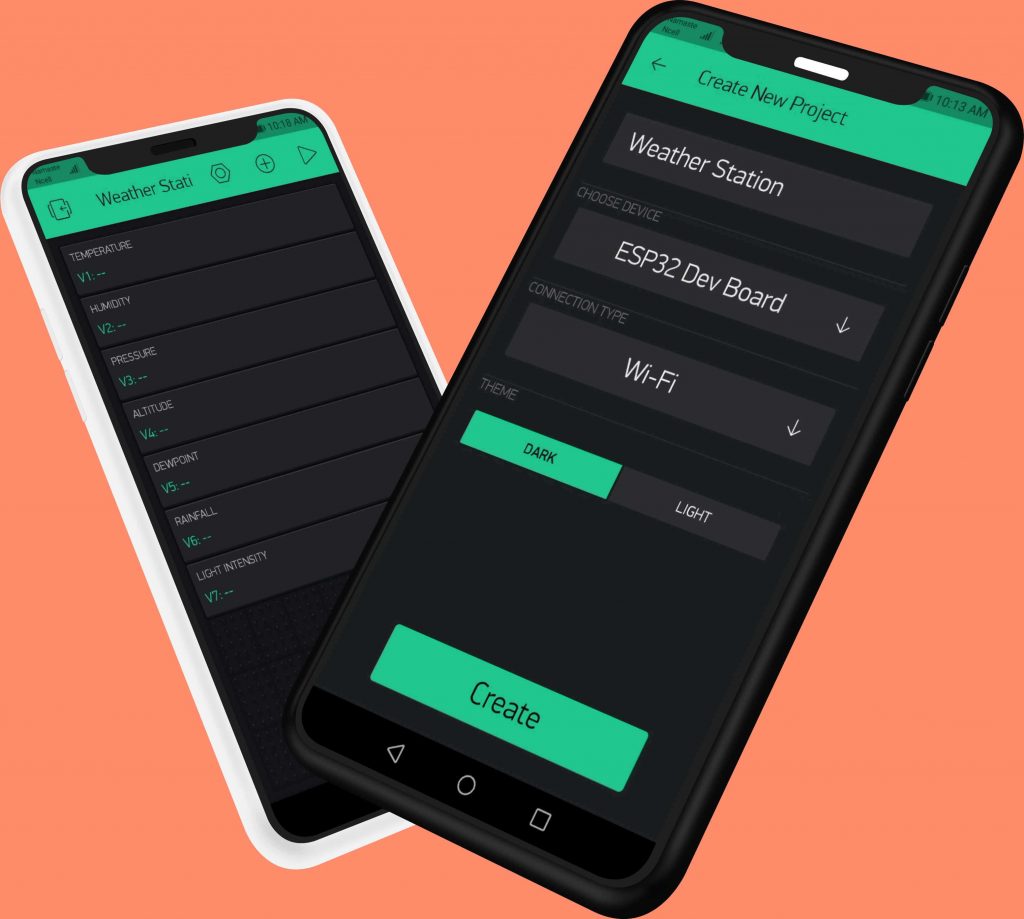
- The Blynk authentication token is sent to your email address. (We need it later on programming)
- Now, click on the (+) icon at the top right corner of the screen.
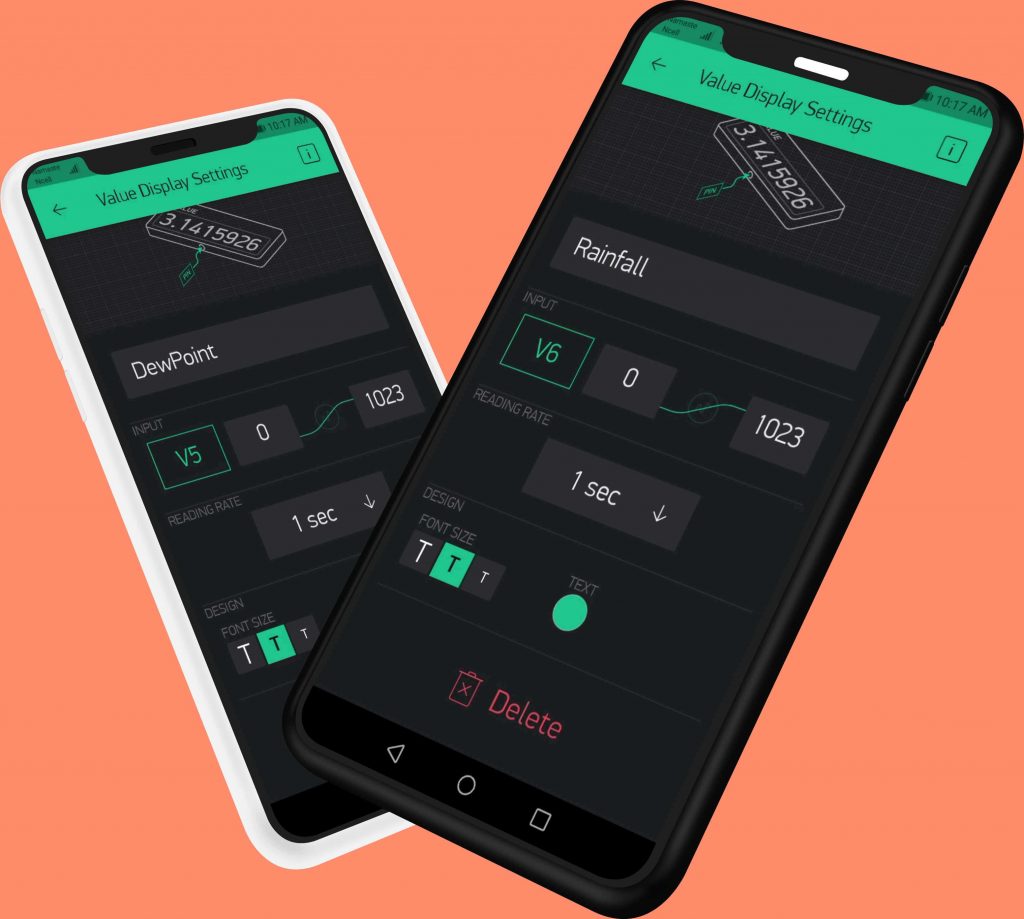
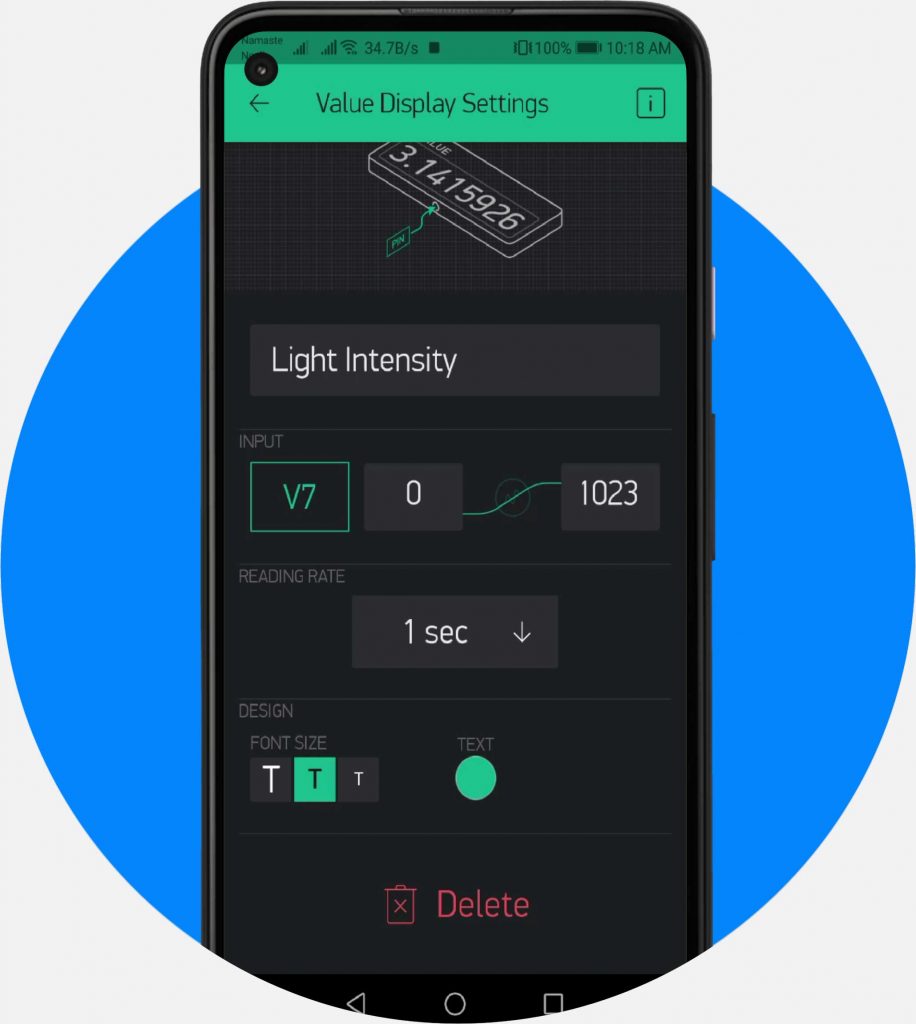
- Search for Display Value and add 7 of them to your main screen.
- Click on the Display value.
- Name it as “Temperature”
- Set the Input Pin to Virtual Pin V1 & Choose the refresh rate as 1sec.
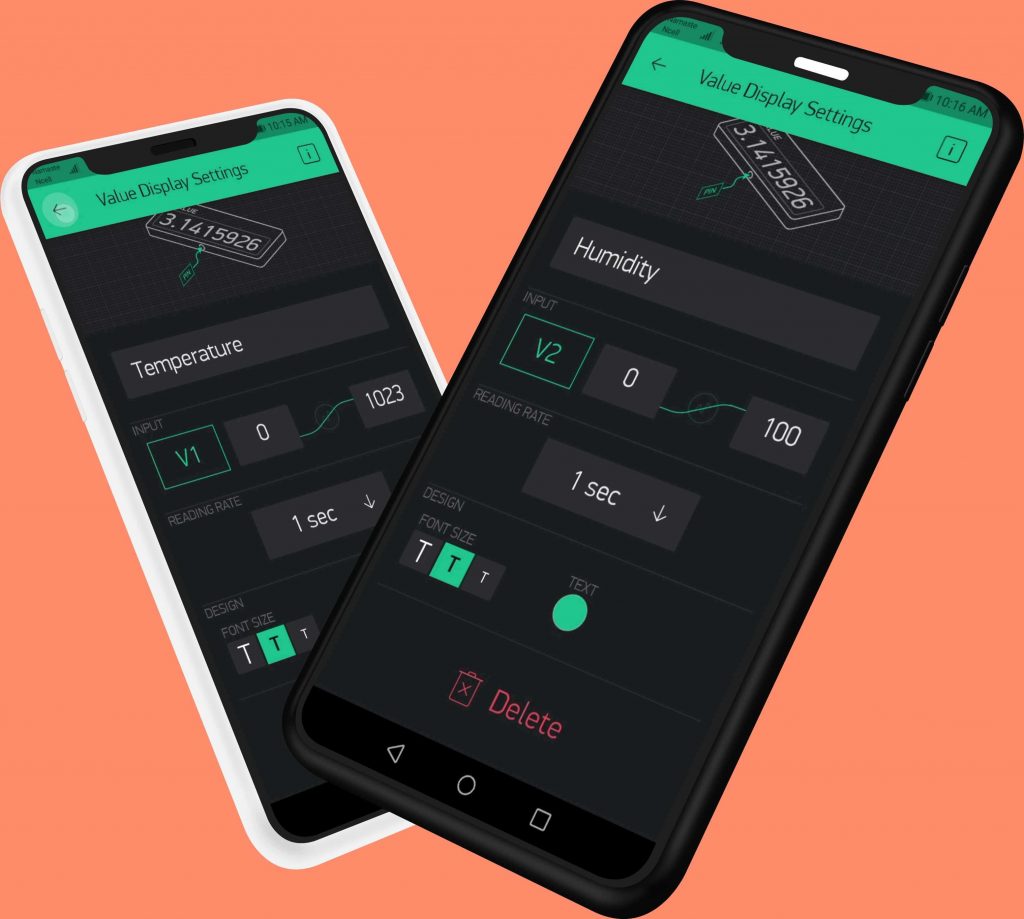
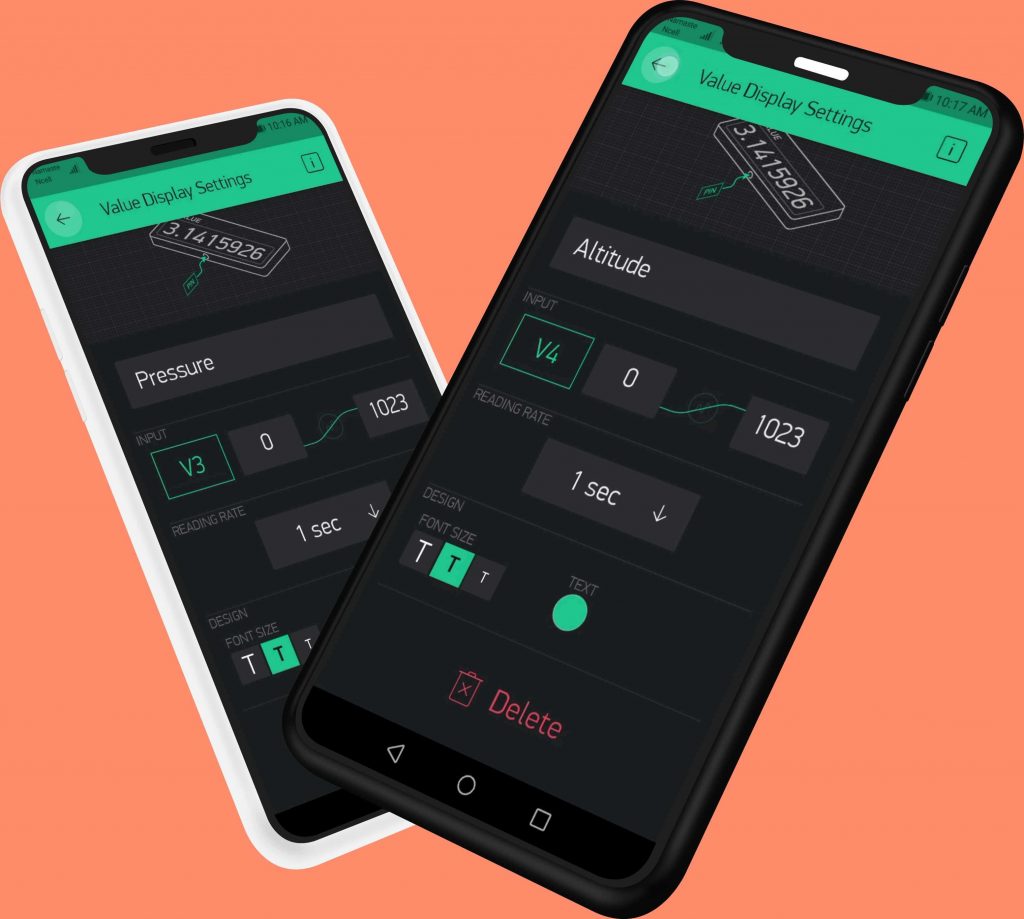
Similarly, do the same for Humidity, Pressure, Altitude, Dewpoint, Rainfall, and Light intensity.
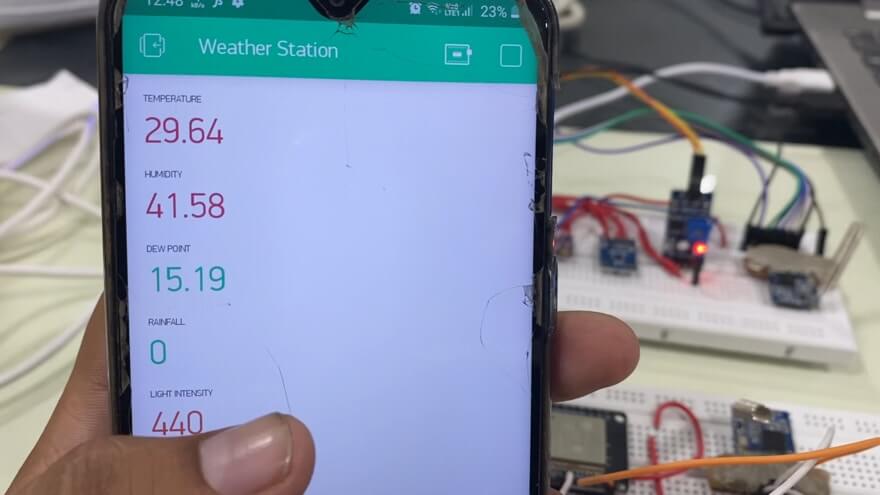
Finally, the Blynk App setup for Monitoring Wireless weather station data on Blynk using Arduino, ESP32, and LoRa is completed.
When the code is uploaded, ESP32 will connect to the Blynk server. Now you can check the Blynk app on your mobile phone. The mobile phone receives wireless LoRa weather station data.
Video Tutorial & Guide: Wireless LoRa Weather Station
Recommended Readings:

How did you connect Lora to Blynk ?(Blynk doesn’t support Lora)
Lora is connected to Arduino and esp board. We cannot use lora without esp board on blynk IoT
I used parts of your sketch in my remote weather station. I really like the simplicity of the lora.h library. Thanks for the great example
Hi,
I going to use your complete module and learn more about the modules you are using.
Do you have one with an anemometer?