Capacitive Soil Moisture Sensor with ESP8266 & OLED Display
IoT Plant Monitoring System
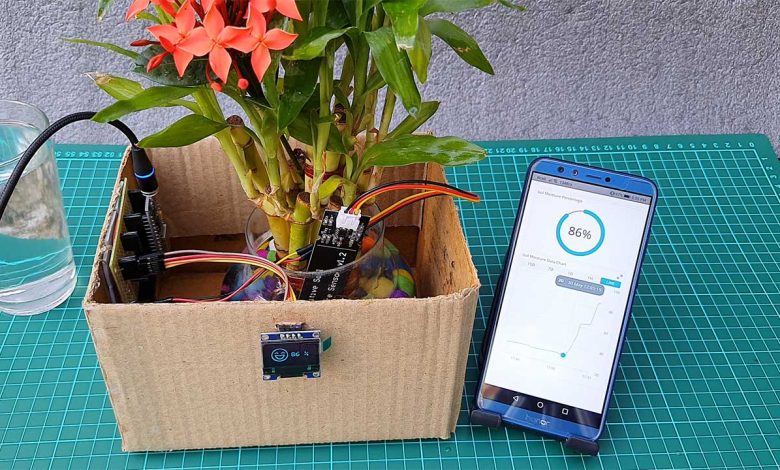
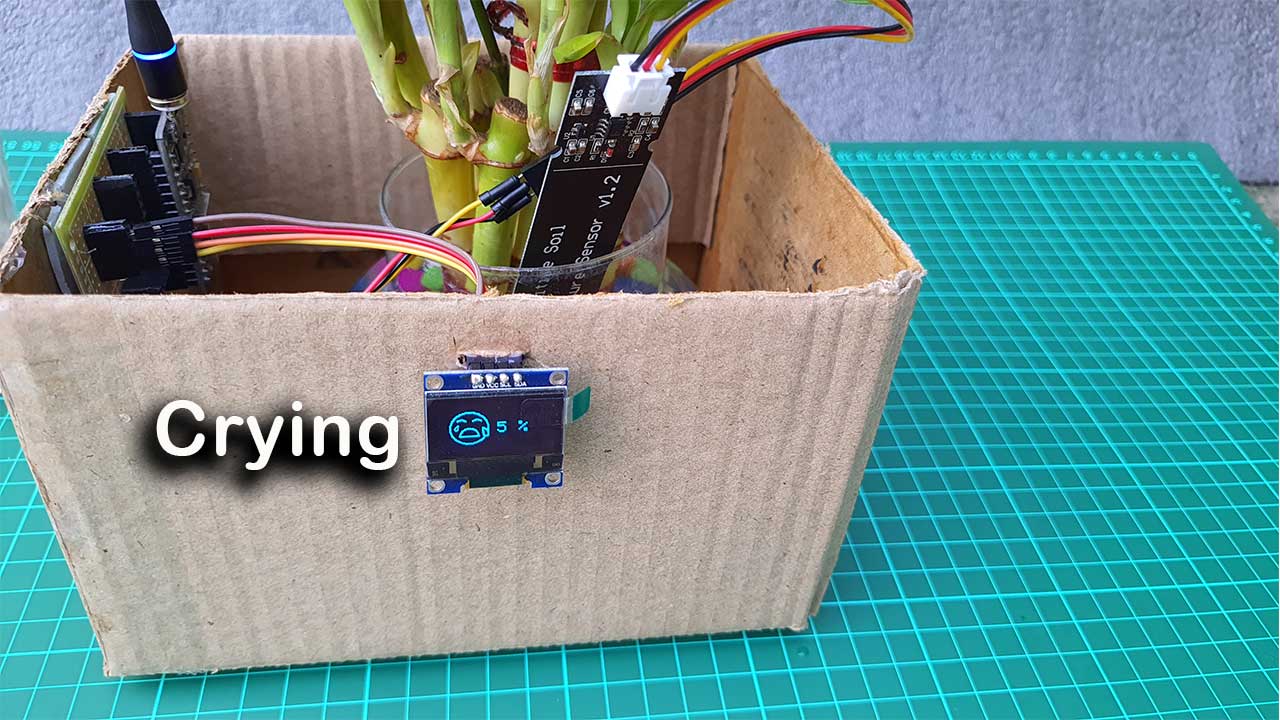
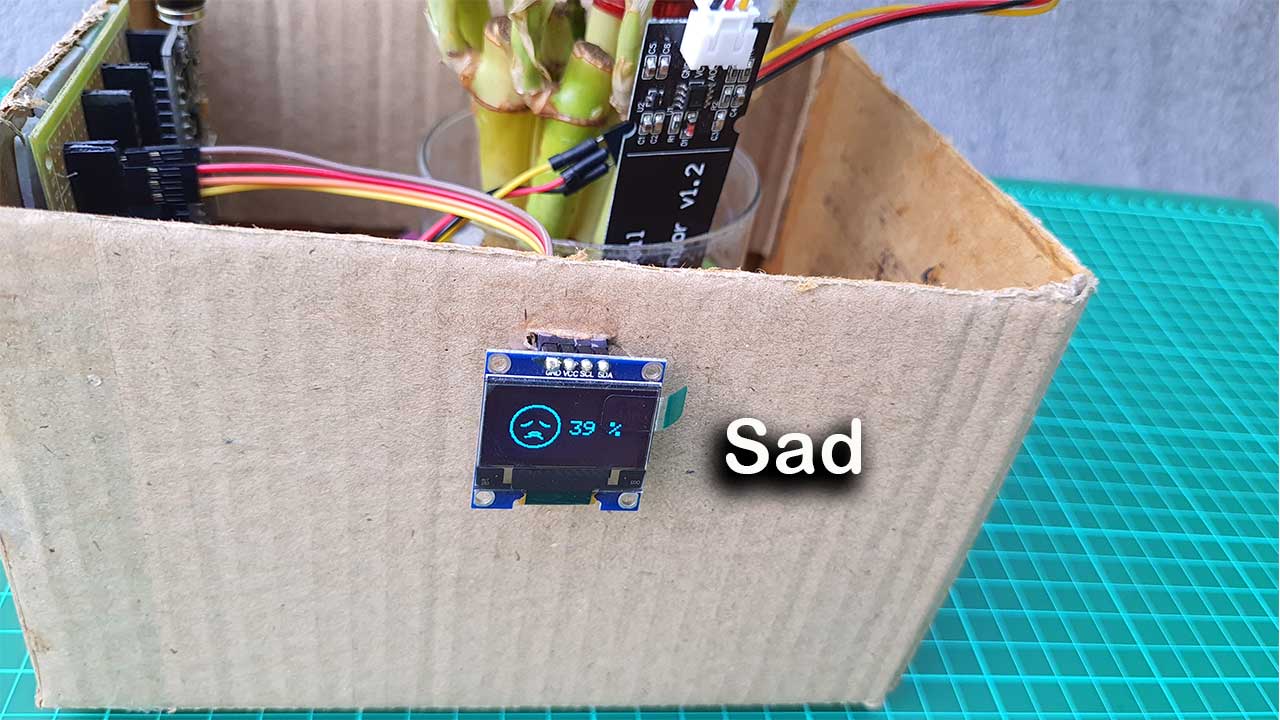
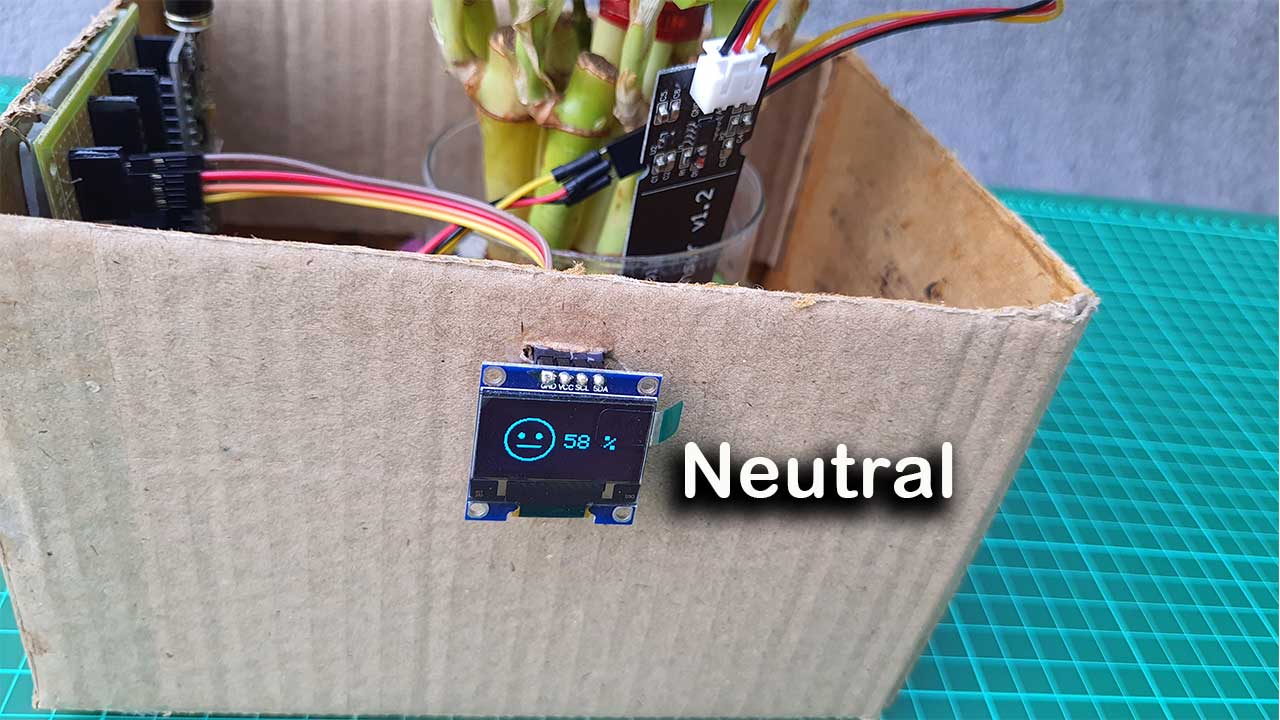
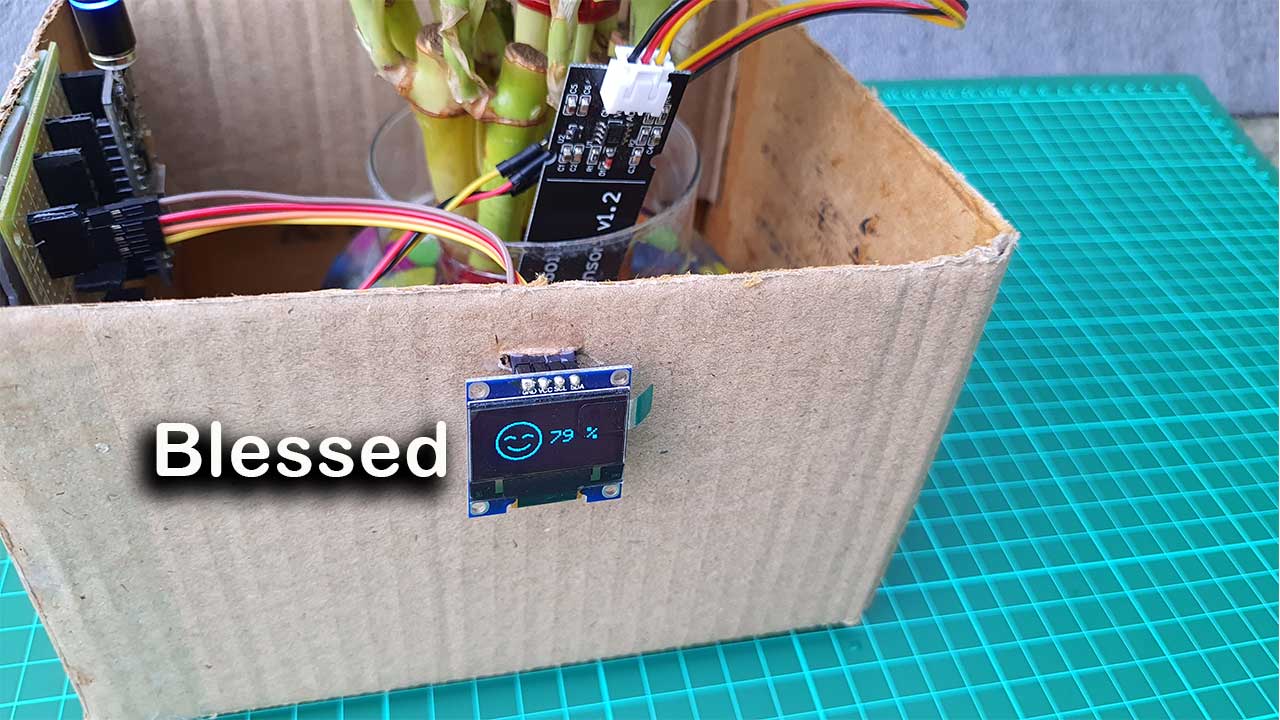
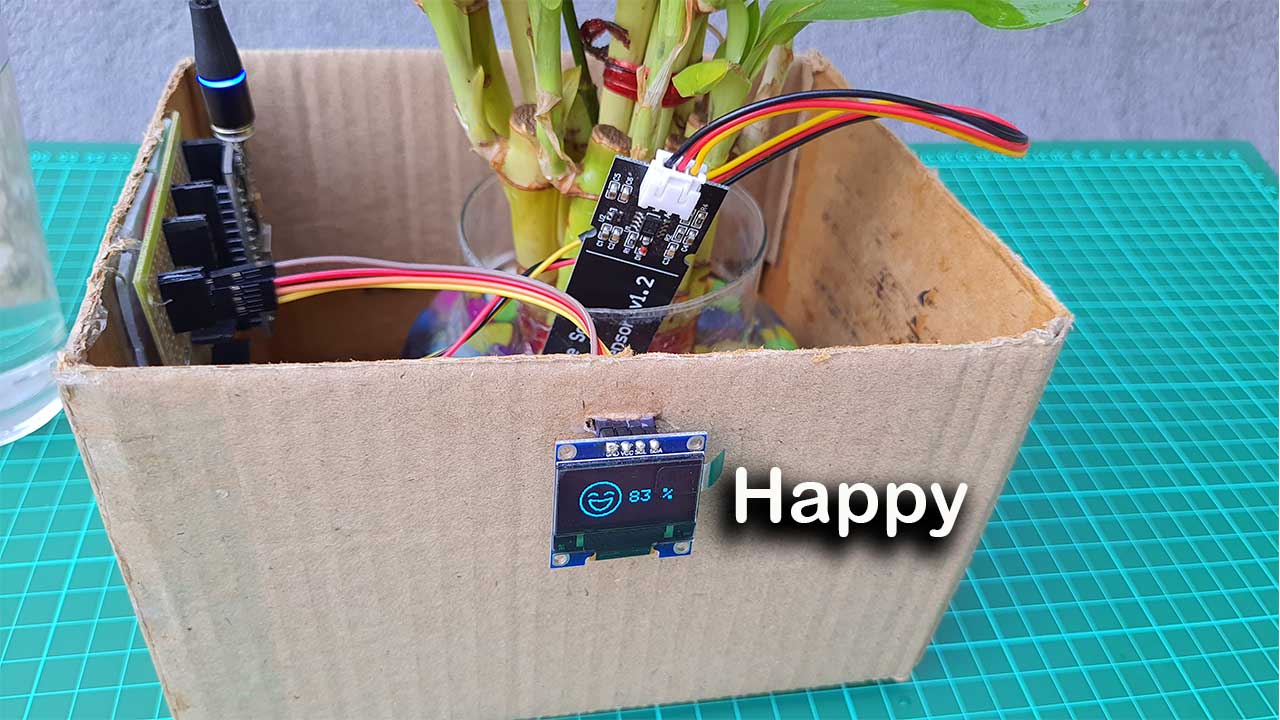
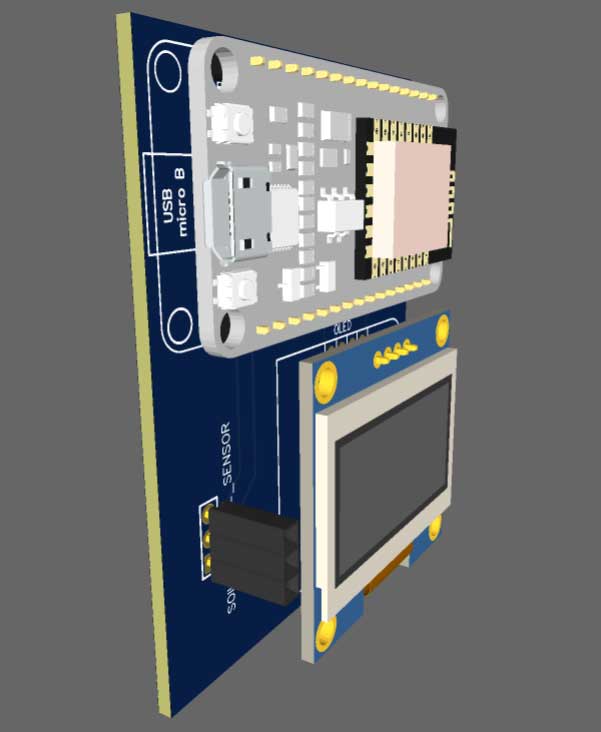
In this project, you will learn to Interface Capacitive Soil Moisture Sensor with NodeMCU ESP8266 & OLED Display. The system uses a soil moisture sensor to monitor the relative humidity (soil moisture) of soil and display different emotional expressions of a plant with soil moisture value in percentage (%) on a 0.96″ OLED Display. Furthermore, you can also remotely monitor the soil moisture data using Arduino IoT Cloud. So, we can say that we are going to build IoT based Plant monitoring system which shows the emotions of the plant.
In this tutorial you will learn to:
- Interface capacitive soil moisture with ESP8266 NodeMCU.
- Create different emotional expressions graphics for different soil moisture values and Display them on OLED Display.
- Calibrate Soil Moisture Sensor for displaying the correct value as well.
- Send Sensor Data to Arduino IoT Cloud and Monitor them remotely from anywhere in the world.
Overview: Capacitive Soil Moisture Sensor with ESP8266
As we know that plant needs water to be alive and it is like food to them. Soil moisture is the amount of water present in the soil. This can be measured using a soil moisture sensor either resistive or capacitive. But today we will use Capacitive Soil Moisture Sensor v1.2. This sensor measures the volumetric content of water inside the soil and gives us the moisture level as output.

Simply, Insert it into the soil around your plants and monitor the real-time soil moisture data. This module includes an onboard voltage regulator which gives it an operating voltage range of 3.3 ~ 5.5V. It is perfect for low-voltage microcontrollers with both 3.3V and 5V power supplies.
You can go through our previous tutorials to learn more about this sensor:
- IoT Smart Agriculture & Automatic Irrigation System with ESP8266
- LoRa based IoT Smart Irrigation System with ESP8266 & Blynk 2.0
- Capacitive Soil Moisture Sensor with Arduino
Components Required
The following are the components required for making this project. All the components can be easily purchased from Amazon. The components purchase links are given below as well.
| S.N | Components Name | Quantity | |
|---|---|---|---|
| 1 | NodeMCU ESP8266-12E Board | 1 | https://amzn.to/3sCrEbj |
| 2 | Capacitive Soil Moisture Sensor | 1 | https://amzn.to/3nyL9y7 |
| 3 | 0.96" I2C OLED Display | 1 | https://amzn.to/3kvENyc |
| 4 | Few jumpers wires | 10 | https://amzn.to/3klh0A4 |
Capacitive Soil Moisture Sensor with ESP8266 & OLED Display
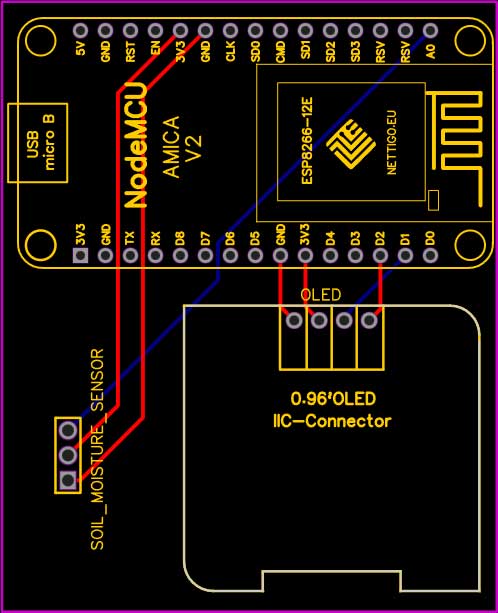
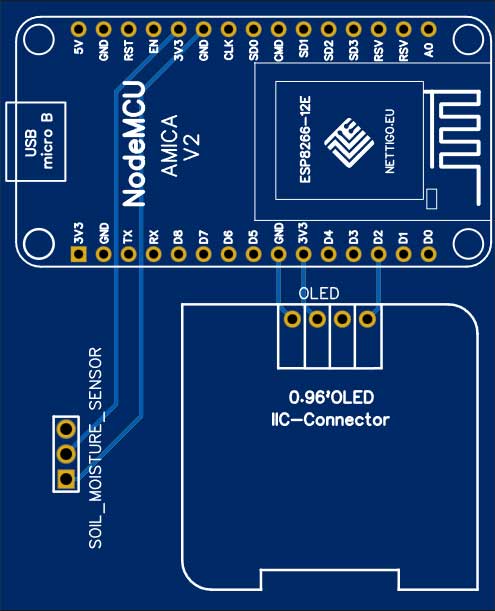
Now let’s interface the Capacitive Soil Moisture Sensor with ESP8266 & OLED Display and display different emotions with soil moisture value in percentage. The circuit diagram for this is very simple.
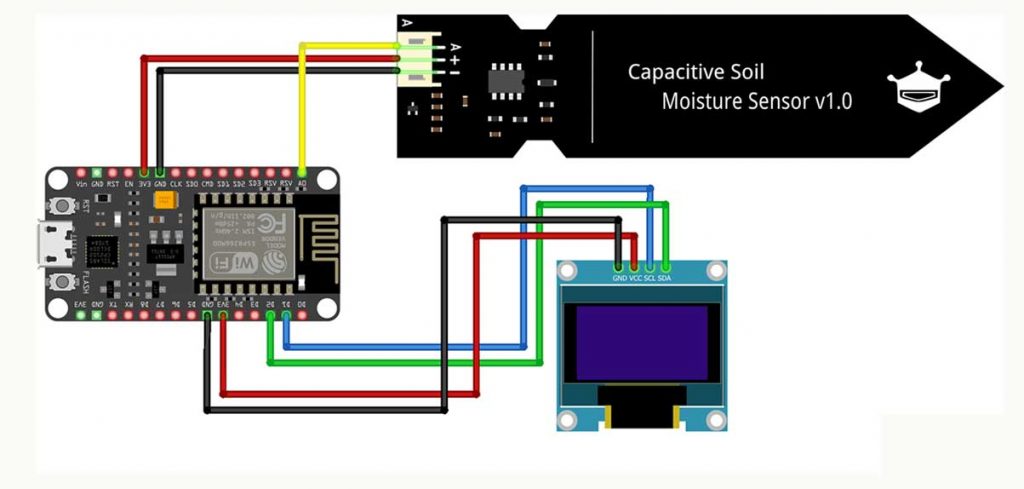
Connect the VCC pin to 3.3V of NodeMCU and GND to GND. Similarly, connect the Analog output pin to the A0 pin of NodeMCU ESP8266. The I2C OLED Display has 4 pins VCC, GND, SDA & SCL. So Connect VCC to 3.3V of NodeMCU & GND to GND. Connect its SDA pin to D2 of NodeMCU & SCL to D1.
Project PCB Gerber File & PCB Ordering Online
You can simply assemble the circuit on a breadboard. But To remove messy wiring and give a clean look, I designed a PCB prototype for this project. It is also helpful for troubleshooting without any errors. You can download the Gerber file of my PCB Design from the link attached below. The PCB looks like the image shown below.
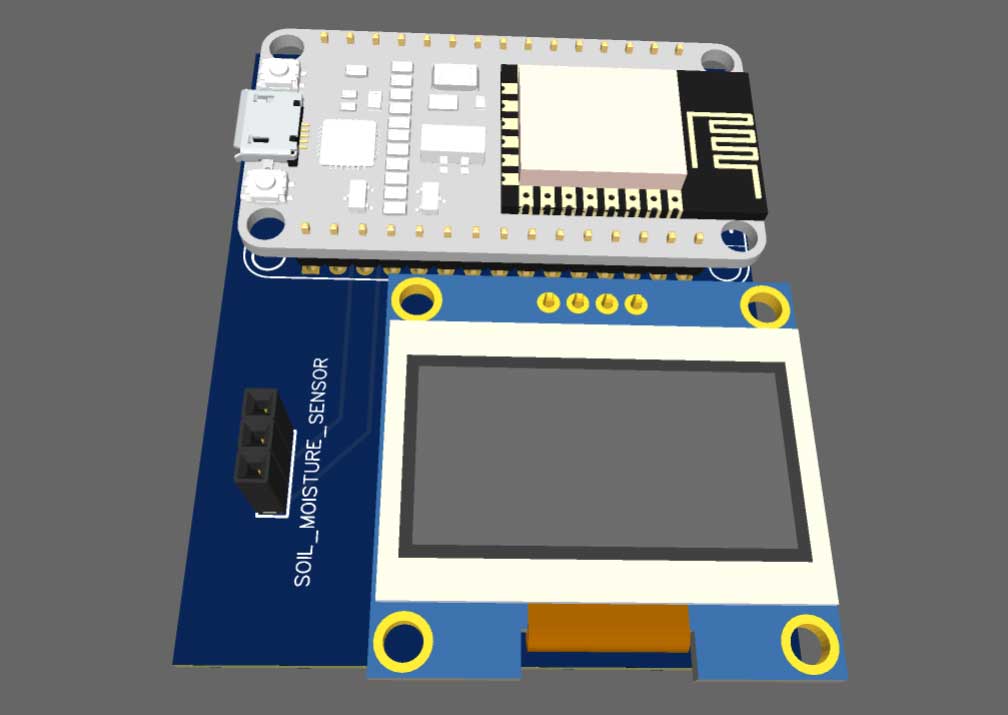
I provided the Gerber File for Capacitive Soil Moisture Sensor with ESP8266 & OLED Display PCB below.
You can simply download the Gerber File and order your custom PCB from PCBWay

Visit the PCBWay official website by clicking here: https://www.PCBWay.com/. Simply upload your Gerber File to the Website and place an order. I prefer PCBWay for ordering custom PCBs. PCBWay is a place that brings manufacturers and customers together. They have more than a decade of experience in this field of fabrication, prototyping, and assembling PCBs. PCBWay has proved its focus on its customers’ needs in terms of cost-effectiveness, delivery, and quality. And this can be proved by their outstanding customer reviews.
Setting Up Arduino IoT Cloud
Now it’s time to set up the Arduino IoT Cloud Dashboard. So, go to the Arduino Store. Click on IoT Cloud.

Then you need to create a Thing first.

Click on create Thing and Give it a name anything like Soil Moisture Sensor.

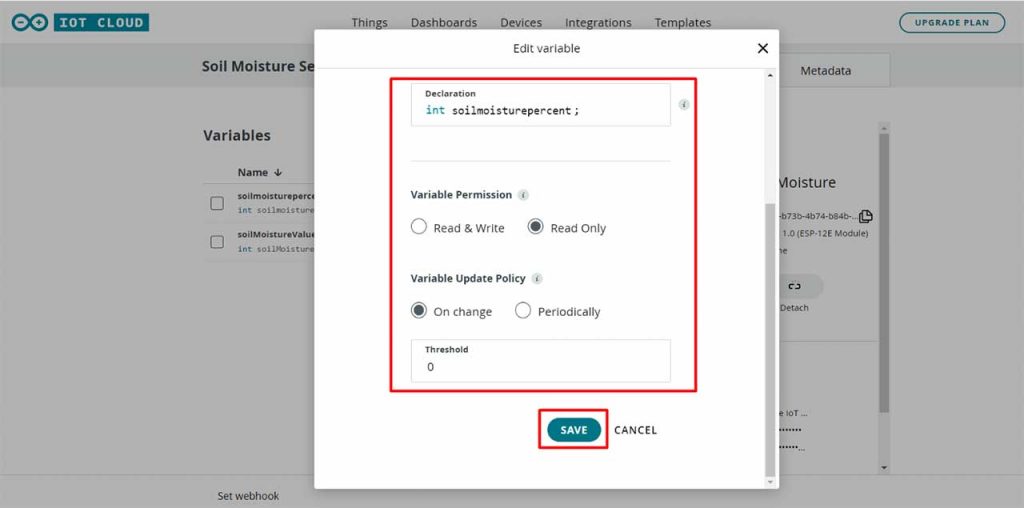
Now we need to create a variable. For that, click on add variable.
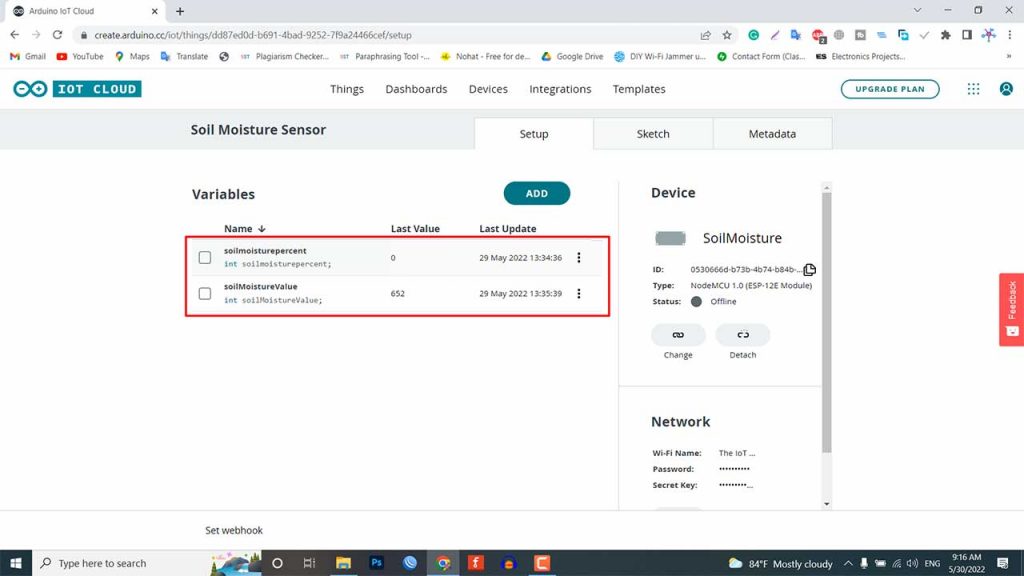
Name the variable “soil moisture value”. In the variable type, select Integer. So an automatic declaration of variables will be done. Now set the variable permission to Read-only. Then click on the Add variable button to create the first variable.
Create another variable”soilmoisturepercent”. In the variable type, select Integer. Now set the variable permission to Read-only. Then click on the Add variable button.
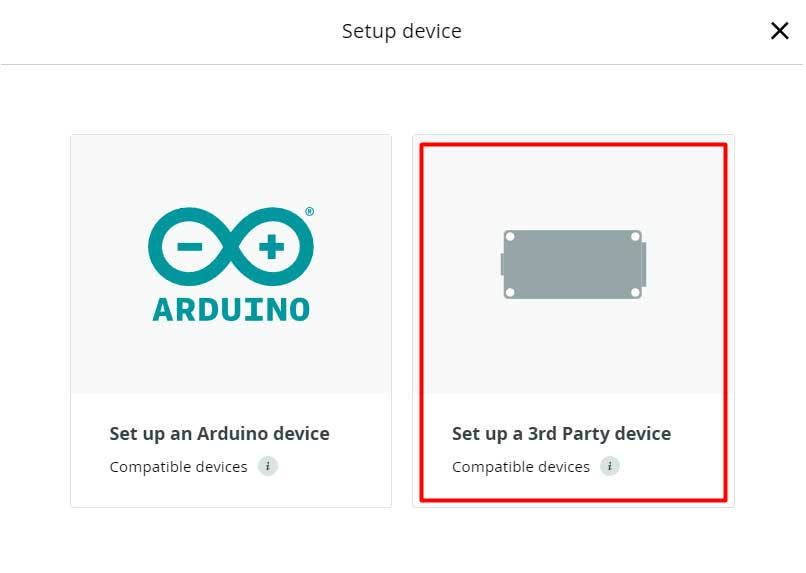
Now, we need to configure a device as well. For that, select the device option. From the list, select a 3rd party device.
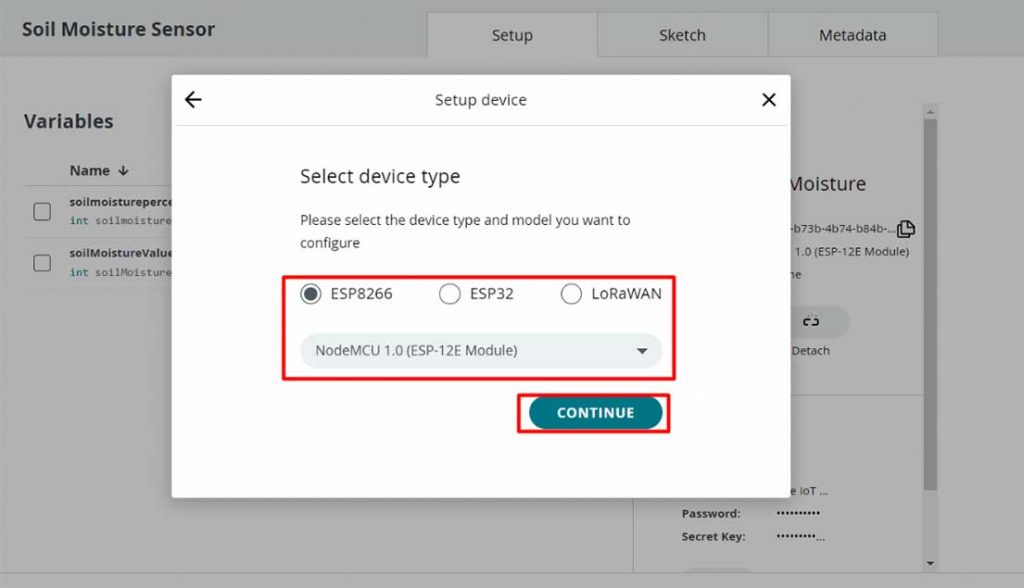
Then select ESP8266. From this list, select NodeMCU 1.0 ESP-12E Module.
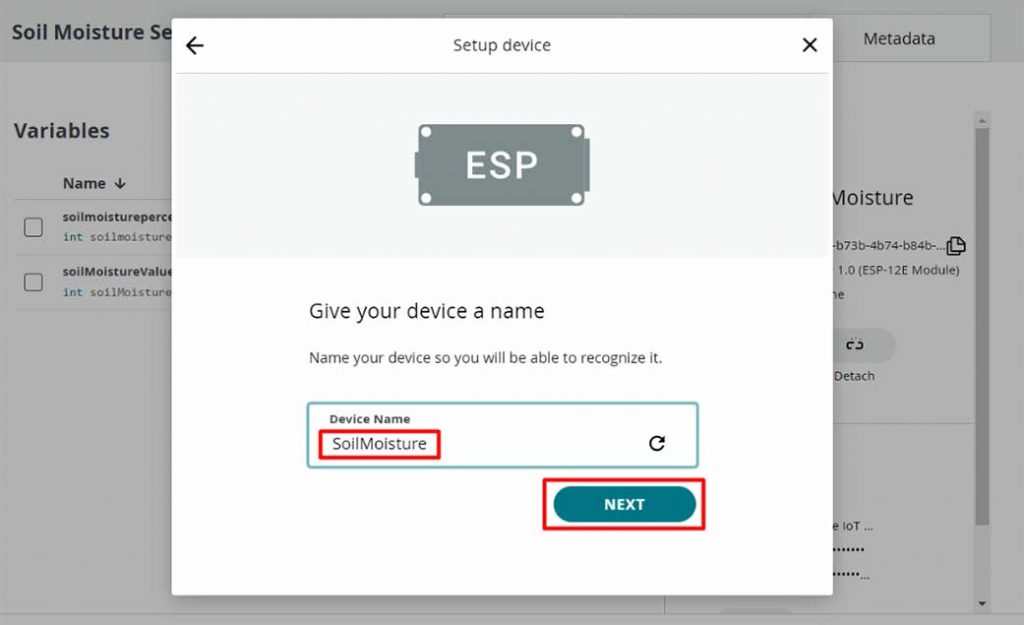
Click to continue and give any name to the device. Give any name like “Soil Moisture” Then clicks next.
So device ID & Secret Key is created here. Save this device ID for the coding part. Or simply download this PDF File which has the information of Secret Key. Then click on continue.

Now again, you need to set up the Network Credentials. So input your SSID, Password, and Secret Key that you created earlier. Finally, everything is set now.

Design Web and Mobile Dashboard
Go to the dashboard. Here we need to build a Web dashboard and Mobile app dashboard for monitoring live soil moisture data from anywhere in the world.
You can also provide a name to the dashboard. I am giving “Soil Moisture Sensor” as a dashboard name.
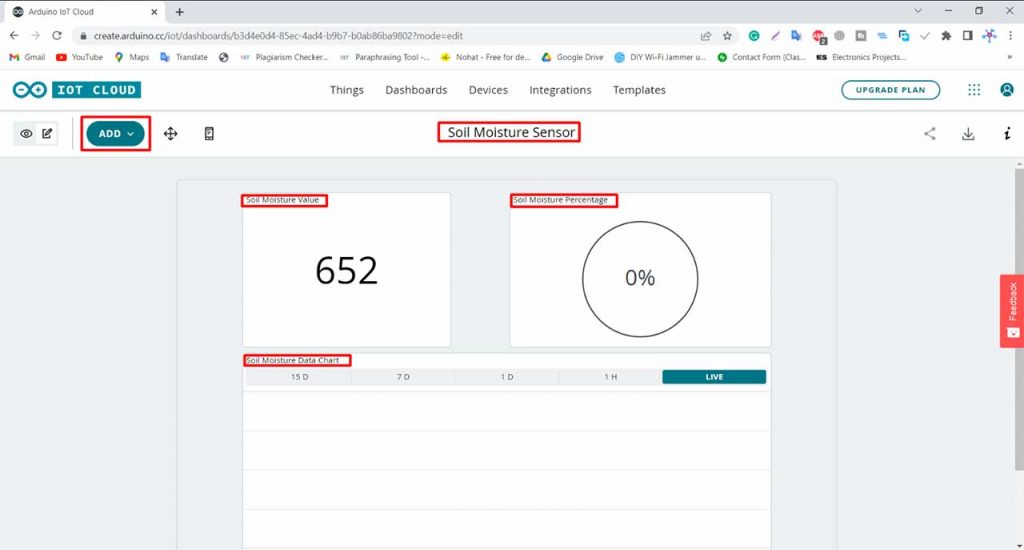
Now click on add button then select the Value Display widget. Provide a name to the widget. I am giving “Soil Moisture Value”. Also, link the same variable then click on done.
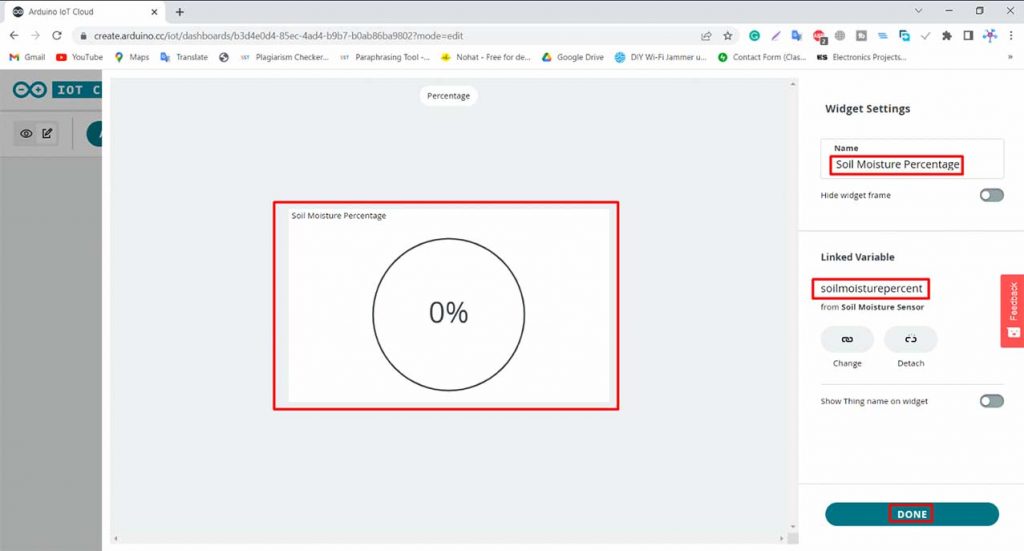
Now again click on the add button. Then scroll down to select Percentage Widget. Give it the name “Soil Moisture Percentage”. Then link a “soilmoisturepercent” variable that we created earlier. Click on Done.
Similarly, add a chart widget and link the “soilmoisturepercent” variable. You can arrange and resize the widget as per your requirements for a web dashboard as well as a mobile dashboard as shown here.

So finally, we are done with the IoT dashboard setup.
Source Code/Program
The code looks messy but it is very simple! At the beginning of the code, I include some important libraries.
After adding those libraries I create functions for every frame of animation for every emotional expression. In the setup section, I initialize the display. And in the loop section, I analog read the sensor value from the A0 pin.
soilMoistureValue = analogRead(SensorPin);
Then I make some conditions to calibrate the capacitive soil moisture sensor for different moisture levels and display the frames for that emotional expression. You can find the Capacitive Soil Moisture Sensor Calibration process below this source code.
/*
  Sketch generated by the Arduino IoT Cloud Thing "Soil Moisture Sensor"
  https://create.arduino.cc/cloud/things/dd87ed0d-b691-4bad-9252-7f9a24466cef

  Arduino IoT Cloud Variables description

  The following variables are automatically generated and updated when changes are made to the Thing

  int soilmoisturepercent;
  int soilMoistureValue;

  Variables which are marked as READ/WRITE in the Cloud Thing will also have functions
  which are called when their values are changed from the Dashboard.
  These functions are generated with the Thing and added at the end of this sketch.
*/

#include "thingProperties.h"
#include <SPI.h>
#include <Wire.h>
#include <Adafruit_GFX.h>
#include <Adafruit_SSD1306.h>

#define SCREEN_WIDTH 128 // OLED display width, in pixels
#define SCREEN_HEIGHT 64 // OLED display height, in pixels
#define OLED_RESET -1 // Reset pin # (or -1 if sharing Arduino reset pin)
Adafruit_SSD1306 display(SCREEN_WIDTH, SCREEN_HEIGHT, &Wire, OLED_RESET);

const int AirValue = 650;   //you need to replace this value with Value_1
const int WaterValue = 310;  //you need to replace this value with Value_2
const int SensorPin = A0;

/********************************************************************************************************************************/

//SAD**********/
const unsigned char PROGMEM frame011 [] = {0x00, 0x00, 0x00, 0x00, 0x00, 0x00, 0x00, 0x00, 0x00, 0x00, 0x00, 0x00, 0x00, 0x00, 0x1F, 0xFC, 0x00, 0x00, 0x00, 0x00, 0xFF, 0xFF, 0x00, 0x00, 0x00, 0x07, 0xE0, 0x07, 0xE0, 0x00, 0x00, 0x0F, 0x00, 0x00, 0xF0, 0x00, 0x00, 0x3C, 0x00, 0x00, 0x3C, 0x00, 0x00, 0x78, 0x00, 0x00, 0x1E, 0x00, 0x00, 0xE0, 0x00, 0x00, 0x07, 0x00, 0x01, 0xC0, 0x00, 0x00, 0x03, 0x80, 0x03, 0x80, 0x00, 0x00, 0x01, 0xC0, 0x03, 0x00, 0x00, 0x00, 0x00, 0xC0, 0x07, 0x00, 0x00, 0x00, 0x00, 0xE0, 0x0E, 0x00, 0x00, 0x00, 0x00, 0x70, 0x0C, 0x00, 0x00, 0x00, 0x00, 0x30, 0x0C, 0x00, 0x00, 0x00, 0x00, 0x30, 0x18, 0x00, 0x00, 0x00, 0x00, 0x18, 0x18, 0x00, 0x00, 0x00, 0x00, 0x18, 0x18, 0x00, 0x00, 0x00, 0x00, 0x18, 0x30, 0x00, 0x00, 0x00, 0x00, 0x0C, 0x30, 0x00, 0x00, 0x00, 0x00, 0x0C, 0x30, 0x00, 0x18, 0x18, 0x00, 0x0C, 0x30, 0x00, 0x38, 0x1C, 0x00, 0x0C, 0x30, 0x00, 0x70, 0x0E, 0x00, 0x0C, 0x30, 0x03, 0xE0, 0x07, 0xC0, 0x0C, 0x30, 0x1F, 0x80, 0x01, 0xF8, 0x0C, 0x30, 0x1E, 0x00, 0x00, 0x78, 0x0C, 0x30, 0x00, 0x00, 0x00, 0x00, 0x0C, 0x30, 0x00, 0x00, 0x00, 0x00, 0x0C, 0x18, 0x00, 0x00, 0x00, 0x00, 0x1C, 0x18, 0x00, 0x00, 0x00, 0x00, 0x18, 0x18, 0x00, 0x00, 0x00, 0x00, 0x18, 0x0C, 0x00, 0x0F, 0xF0, 0x00, 0x30, 0x0C, 0x00, 0x1F, 0xF8, 0x00, 0x30, 0x0E, 0x00, 0x78, 0x1C, 0x00, 0x60, 0x07, 0x00, 0xE0, 0x07, 0x00, 0xE0, 0x03, 0x00, 0xC0, 0x03, 0x00, 0xC0, 0x01, 0x81, 0xC0, 0x03, 0x81, 0x80, 0x01, 0xC0, 0x00, 0x00, 0x03, 0x80, 0x00, 0xE0, 0x00, 0x00, 0x07, 0x00, 0x00, 0x78, 0x00, 0x00, 0x1E, 0x00, 0x00, 0x3C, 0x00, 0x00, 0x3C, 0x00, 0x00, 0x0F, 0x00, 0x00, 0xF0, 0x00, 0x00, 0x03, 0xE0, 0x0F, 0xE0, 0x00, 0x00, 0x00, 0xFF, 0xFF, 0x00, 0x00, 0x00, 0x00, 0x1F, 0xF8, 0x00, 0x00, 0x00, 0x00, 0x00, 0x00, 0x00, 0x00, 0x00, 0x00, 0x00, 0x00, 0x00, 0x00};

const unsigned char PROGMEM frame21 [] = {0x00, 0x00, 0x00, 0x00, 0x00, 0x00, 0x00, 0x00, 0x00, 0x00, 0x00, 0x00, 0x00, 0x00, 0x1F, 0xFC, 0x00, 0x00, 0x00, 0x00, 0xFF, 0xFF, 0x00, 0x00, 0x00, 0x07, 0xE0, 0x07, 0xE0, 0x00, 0x00, 0x0F, 0x00, 0x00, 0xF0, 0x00, 0x00, 0x3C, 0x00, 0x00, 0x3C, 0x00, 0x00, 0x78, 0x00, 0x00, 0x1E, 0x00, 0x00, 0xE0, 0x00, 0x00, 0x07, 0x00, 0x01, 0xC0, 0x00, 0x00, 0x03, 0x80, 0x03, 0x80, 0x00, 0x00, 0x01, 0xC0, 0x03, 0x00, 0x00, 0x00, 0x00, 0xC0, 0x07, 0x00, 0x00, 0x00, 0x00, 0xE0, 0x0E, 0x00, 0x00, 0x00, 0x00, 0x70, 0x0C, 0x00, 0x00, 0x00, 0x00, 0x30, 0x0C, 0x00, 0x00, 0x00, 0x00, 0x38, 0x18, 0x00, 0x00, 0x00, 0x00, 0x18, 0x18, 0x00, 0x00, 0x00, 0x00, 0x18, 0x18, 0x00, 0x08, 0x10, 0x00, 0x18, 0x30, 0x00, 0x38, 0x1C, 0x00, 0x0C, 0x30, 0x00, 0x70, 0x0E, 0x00, 0x0C, 0x30, 0x01, 0xE0, 0x07, 0x80, 0x0C, 0x30, 0x1F, 0xC0, 0x03, 0xF8, 0x0C, 0x30, 0x1F, 0x00, 0x00, 0xF8, 0x0C, 0x30, 0x00, 0x00, 0x00, 0x00, 0x0C, 0x30, 0x00, 0x00, 0x00, 0x00, 0x0C, 0x30, 0x00, 0x00, 0x00, 0x00, 0x0C, 0x30, 0x00, 0x00, 0x00, 0x00, 0x0C, 0x30, 0x00, 0x00, 0x00, 0x00, 0x0C, 0x38, 0x00, 0x07, 0xE0, 0x00, 0x1C, 0x18, 0x00, 0x1F, 0xF8, 0x00, 0x18, 0x18, 0x00, 0x38, 0x1C, 0x00, 0x18, 0x0C, 0x00, 0x70, 0x0E, 0x00, 0x30, 0x0C, 0x00, 0xE0, 0x07, 0x00, 0x30, 0x0E, 0x01, 0xC0, 0x03, 0x80, 0x60, 0x07, 0x00, 0x80, 0x01, 0x00, 0xE0, 0x03, 0x00, 0x00, 0x00, 0x00, 0xC0, 0x01, 0x80, 0x00, 0x00, 0x01, 0x80, 0x01, 0xC0, 0x00, 0x00, 0x03, 0x80, 0x00, 0xE0, 0x00, 0x00, 0x07, 0x00, 0x00, 0x78, 0x00, 0x00, 0x1E, 0x00, 0x00, 0x3C, 0x00, 0x00, 0x3C, 0x00, 0x00, 0x0F, 0x00, 0x00, 0xF0, 0x00, 0x00, 0x03, 0xE0, 0x0F, 0xE0, 0x00, 0x00, 0x00, 0xFF, 0xFF, 0x00, 0x00, 0x00, 0x00, 0x1F, 0xF8, 0x00, 0x00, 0x00, 0x00, 0x00, 0x00, 0x00, 0x00, 0x00, 0x00, 0x00, 0x00, 0x00, 0x00};

const unsigned char PROGMEM frame31 [] = {0x00, 0x00, 0x00, 0x00, 0x00, 0x00, 0x00, 0x00, 0x00, 0x00, 0x00, 0x00, 0x00, 0x00, 0x1F, 0xFC, 0x00, 0x00, 0x00, 0x00, 0xFF, 0xFF, 0x00, 0x00, 0x00, 0x07, 0xE0, 0x07, 0xE0, 0x00, 0x00, 0x0F, 0x00, 0x00, 0xF0, 0x00, 0x00, 0x3C, 0x00, 0x00, 0x3C, 0x00, 0x00, 0x78, 0x00, 0x00, 0x1E, 0x00, 0x00, 0xE0, 0x00, 0x00, 0x07, 0x00, 0x01, 0xC0, 0x00, 0x00, 0x03, 0x80, 0x03, 0x80, 0x00, 0x00, 0x01, 0xC0, 0x03, 0x00, 0x00, 0x00, 0x00, 0xC0, 0x06, 0x00, 0x00, 0x00, 0x00, 0xE0, 0x0E, 0x00, 0x00, 0x00, 0x00, 0x70, 0x0C, 0x00, 0x00, 0x00, 0x00, 0x30, 0x0C, 0x00, 0x00, 0x00, 0x00, 0x30, 0x18, 0x00, 0x38, 0x1C, 0x00, 0x18, 0x18, 0x00, 0x78, 0x1E, 0x00, 0x18, 0x18, 0x03, 0xE0, 0x07, 0xC0, 0x18, 0x30, 0x1F, 0x80, 0x01, 0xF8, 0x0C, 0x30, 0x3E, 0x00, 0x00, 0x78, 0x0C, 0x30, 0x00, 0x00, 0x00, 0x00, 0x0C, 0x30, 0x00, 0x00, 0x00, 0x00, 0x0C, 0x30, 0x00, 0x00, 0x00, 0x00, 0x0C, 0x30, 0x00, 0x00, 0x00, 0x00, 0x0C, 0x30, 0x00, 0x00, 0x00, 0x00, 0x0C, 0x30, 0x00, 0x07, 0xE0, 0x00, 0x0C, 0x30, 0x00, 0x1F, 0xF8, 0x00, 0x0C, 0x30, 0x00, 0x3C, 0x3C, 0x00, 0x0C, 0x18, 0x00, 0x70, 0x0E, 0x00, 0x1C, 0x18, 0x00, 0xE0, 0x07, 0x00, 0x18, 0x18, 0x00, 0xC0, 0x03, 0x00, 0x18, 0x0C, 0x00, 0x80, 0x01, 0x00, 0x30, 0x0C, 0x00, 0x00, 0x00, 0x00, 0x30, 0x0E, 0x00, 0x00, 0x00, 0x00, 0x60, 0x07, 0x00, 0x00, 0x00, 0x00, 0xE0, 0x03, 0x00, 0x00, 0x00, 0x00, 0xC0, 0x01, 0x80, 0x00, 0x00, 0x01, 0x80, 0x01, 0xC0, 0x00, 0x00, 0x03, 0x80, 0x00, 0xE0, 0x00, 0x00, 0x07, 0x00, 0x00, 0x78, 0x00, 0x00, 0x1E, 0x00, 0x00, 0x3C, 0x00, 0x00, 0x3C, 0x00, 0x00, 0x0F, 0x00, 0x00, 0xF0, 0x00, 0x00, 0x03, 0xE0, 0x0F, 0xC0, 0x00, 0x00, 0x00, 0xFF, 0xFF, 0x00, 0x00, 0x00, 0x00, 0x1F, 0xF8, 0x00, 0x00, 0x00, 0x00, 0x00, 0x00, 0x00, 0x00, 0x00, 0x00, 0x00, 0x00, 0x00, 0x00};

const unsigned char PROGMEM frame51 [] = {0x00, 0x00, 0x00, 0x00, 0x00, 0x00, 0x00, 0x00, 0x00, 0x00, 0x00, 0x00, 0x00, 0x00, 0x1F, 0xFC, 0x00, 0x00, 0x00, 0x00, 0xFF, 0xFF, 0x00, 0x00, 0x00, 0x07, 0xE0, 0x07, 0xE0, 0x00, 0x00, 0x0F, 0x00, 0x00, 0xF0, 0x00, 0x00, 0x3C, 0x00, 0x00, 0x3C, 0x00, 0x00, 0x78, 0x00, 0x00, 0x1E, 0x00, 0x00, 0xE0, 0x00, 0x00, 0x07, 0x00, 0x01, 0xC0, 0x00, 0x00, 0x03, 0x80, 0x03, 0x80, 0x00, 0x00, 0x01, 0xC0, 0x03, 0x00, 0x00, 0x00, 0x00, 0xC0, 0x06, 0x00, 0x00, 0x00, 0x00, 0xE0, 0x0E, 0x00, 0x00, 0x00, 0x00, 0x70, 0x0C, 0x00, 0x00, 0x00, 0x00, 0x30, 0x0C, 0x00, 0x00, 0x00, 0x00, 0x30, 0x18, 0x00, 0x00, 0x00, 0x00, 0x18, 0x18, 0x00, 0x00, 0x00, 0x00, 0x18, 0x18, 0x00, 0x00, 0x00, 0x00, 0x18, 0x30, 0x00, 0x00, 0x00, 0x00, 0x0C, 0x30, 0x00, 0x38, 0x1C, 0x00, 0x0C, 0x30, 0x00, 0xF8, 0x1F, 0x00, 0x0C, 0x30, 0x07, 0xC0, 0x07, 0xE0, 0x0C, 0x30, 0x1F, 0x00, 0x00, 0xF8, 0x0C, 0x30, 0x3C, 0x00, 0x00, 0x38, 0x0C, 0x30, 0x00, 0x00, 0x00, 0x00, 0x0C, 0x30, 0x00, 0x00, 0x00, 0x00, 0x0C, 0x30, 0x00, 0x00, 0x00, 0x00, 0x0C, 0x30, 0x00, 0x00, 0x00, 0x00, 0x0C, 0x18, 0x00, 0x03, 0xC0, 0x00, 0x1C, 0x18, 0x00, 0x0F, 0xF0, 0x00, 0x18, 0x18, 0x00, 0x1C, 0x78, 0x00, 0x18, 0x0C, 0x00, 0x38, 0x1C, 0x00, 0x30, 0x0C, 0x00, 0x70, 0x0E, 0x00, 0x30, 0x0E, 0x00, 0x77, 0xF6, 0x00, 0x60, 0x07, 0x00, 0x7F, 0xFE, 0x00, 0xE0, 0x03, 0x00, 0xF8, 0x0F, 0x00, 0xC0, 0x01, 0x80, 0x40, 0x02, 0x01, 0x80, 0x01, 0xC0, 0x00, 0x00, 0x03, 0x80, 0x00, 0xE0, 0x00, 0x00, 0x07, 0x00, 0x00, 0x78, 0x00, 0x00, 0x1E, 0x00, 0x00, 0x3C, 0x00, 0x00, 0x3C, 0x00, 0x00, 0x0F, 0x00, 0x00, 0xF0, 0x00, 0x00, 0x03, 0xE0, 0x0F, 0xC0, 0x00, 0x00, 0x00, 0xFF, 0xFF, 0x00, 0x00, 0x00, 0x00, 0x1F, 0xF8, 0x00, 0x00, 0x00, 0x00, 0x00, 0x00, 0x00, 0x00, 0x00, 0x00, 0x00, 0x00, 0x00, 0x00};

const unsigned char PROGMEM frame61 [] = {0x00, 0x00, 0x00, 0x00, 0x00, 0x00, 0x00, 0x00, 0x00, 0x00, 0x00, 0x00, 0x00, 0x00, 0x1F, 0xFC, 0x00, 0x00, 0x00, 0x00, 0xFF, 0xFF, 0x00, 0x00, 0x00, 0x07, 0xE0, 0x07, 0xE0, 0x00, 0x00, 0x0F, 0x00, 0x00, 0xF0, 0x00, 0x00, 0x3C, 0x00, 0x00, 0x3C, 0x00, 0x00, 0x78, 0x00, 0x00, 0x1E, 0x00, 0x00, 0xE0, 0x00, 0x00, 0x07, 0x00, 0x01, 0xC0, 0x00, 0x00, 0x03, 0x80, 0x03, 0x80, 0x00, 0x00, 0x01, 0xC0, 0x03, 0x00, 0x00, 0x00, 0x00, 0xC0, 0x07, 0x00, 0x00, 0x00, 0x00, 0xE0, 0x0E, 0x00, 0x00, 0x00, 0x00, 0x70, 0x0C, 0x00, 0x00, 0x00, 0x00, 0x30, 0x0C, 0x00, 0x00, 0x00, 0x00, 0x30, 0x18, 0x00, 0x00, 0x00, 0x00, 0x18, 0x18, 0x00, 0x00, 0x00, 0x00, 0x18, 0x18, 0x00, 0x00, 0x00, 0x00, 0x18, 0x30, 0x00, 0x00, 0x00, 0x00, 0x0C, 0x30, 0x00, 0x00, 0x00, 0x00, 0x0C, 0x30, 0x00, 0x18, 0x18, 0x00, 0x0C, 0x30, 0x00, 0x78, 0x1E, 0x00, 0x0C, 0x30, 0x03, 0xE0, 0x07, 0xC0, 0x0C, 0x30, 0x0F, 0x80, 0x01, 0xF0, 0x0C, 0x30, 0x1E, 0x00, 0x00, 0x78, 0x0C, 0x30, 0x18, 0x00, 0x00, 0x18, 0x0C, 0x30, 0x00, 0x00, 0x00, 0x00, 0x0C, 0x30, 0x00, 0x00, 0x00, 0x00, 0x0C, 0x18, 0x00, 0x00, 0x00, 0x00, 0x1C, 0x18, 0x00, 0x00, 0x00, 0x00, 0x18, 0x18, 0x00, 0x07, 0xF0, 0x00, 0x18, 0x0C, 0x00, 0x1F, 0xF8, 0x00, 0x30, 0x0C, 0x00, 0x38, 0x1C, 0x00, 0x30, 0x0E, 0x00, 0x70, 0x0C, 0x00, 0x60, 0x07, 0x00, 0x60, 0x06, 0x00, 0xE0, 0x03, 0x00, 0x60, 0x06, 0x00, 0xC0, 0x01, 0x80, 0x60, 0x07, 0x01, 0x80, 0x01, 0xC0, 0xFF, 0xFE, 0x03, 0x80, 0x00, 0xE0, 0x3F, 0xFC, 0x07, 0x00, 0x00, 0x78, 0x00, 0x00, 0x1E, 0x00, 0x00, 0x3C, 0x00, 0x00, 0x3C, 0x00, 0x00, 0x0F, 0x00, 0x00, 0xF0, 0x00, 0x00, 0x03, 0xE0, 0x0F, 0xE0, 0x00, 0x00, 0x00, 0xFF, 0xFF, 0x00, 0x00, 0x00, 0x00, 0x1F, 0xF8, 0x00, 0x00, 0x00, 0x00, 0x00, 0x00, 0x00, 0x00, 0x00, 0x00, 0x00, 0x00, 0x00, 0x00};

const unsigned char PROGMEM frame81 [] = {0x00, 0x00, 0x00, 0x00, 0x00, 0x00, 0x00, 0x00, 0x00, 0x00, 0x00, 0x00, 0x00, 0x00, 0x1F, 0xFC, 0x00, 0x00, 0x00, 0x00, 0xFF, 0xFF, 0x00, 0x00, 0x00, 0x07, 0xE0, 0x07, 0xE0, 0x00, 0x00, 0x0F, 0x00, 0x00, 0xF0, 0x00, 0x00, 0x3C, 0x00, 0x00, 0x3C, 0x00, 0x00, 0x78, 0x00, 0x00, 0x1E, 0x00, 0x00, 0xE0, 0x00, 0x00, 0x07, 0x00, 0x01, 0xC0, 0x00, 0x00, 0x03, 0x80, 0x03, 0x80, 0x00, 0x00, 0x01, 0xC0, 0x03, 0x00, 0x00, 0x00, 0x00, 0xC0, 0x07, 0x00, 0x00, 0x00, 0x00, 0xE0, 0x0E, 0x00, 0x00, 0x00, 0x00, 0x70, 0x0C, 0x00, 0x00, 0x00, 0x00, 0x30, 0x0C, 0x00, 0x00, 0x00, 0x00, 0x30, 0x18, 0x00, 0x00, 0x00, 0x00, 0x18, 0x18, 0x00, 0x00, 0x00, 0x00, 0x18, 0x18, 0x00, 0x00, 0x00, 0x00, 0x18, 0x30, 0x00, 0x00, 0x00, 0x00, 0x0C, 0x30, 0x00, 0x00, 0x00, 0x00, 0x0C, 0x30, 0x00, 0x18, 0x18, 0x00, 0x0C, 0x30, 0x00, 0x78, 0x1E, 0x00, 0x0C, 0x30, 0x03, 0xE0, 0x07, 0xC0, 0x0C, 0x30, 0x0F, 0x80, 0x01, 0xF0, 0x0C, 0x30, 0x1E, 0x00, 0x00, 0x78, 0x0C, 0x30, 0x18, 0x00, 0x00, 0x18, 0x0C, 0x30, 0x00, 0x00, 0x00, 0x00, 0x0C, 0x30, 0x00, 0x00, 0x00, 0x00, 0x0C, 0x18, 0x00, 0x00, 0x00, 0x00, 0x1C, 0x18, 0x00, 0x00, 0x00, 0x00, 0x18, 0x18, 0x00, 0x07, 0xF0, 0x00, 0x18, 0x0C, 0x00, 0x1F, 0xF8, 0x00, 0x30, 0x0C, 0x00, 0x38, 0x1C, 0x00, 0x30, 0x0E, 0x00, 0x70, 0x0C, 0x00, 0x60, 0x07, 0x00, 0x60, 0x06, 0x00, 0xE0, 0x03, 0x00, 0x60, 0x06, 0x00, 0xC0, 0x01, 0x80, 0x60, 0x07, 0x01, 0x80, 0x01, 0xC0, 0xFF, 0xFE, 0x03, 0x80, 0x00, 0xE0, 0x3F, 0xFC, 0x07, 0x00, 0x00, 0x78, 0x00, 0x00, 0x1E, 0x00, 0x00, 0x3C, 0x00, 0x00, 0x3C, 0x00, 0x00, 0x0F, 0x00, 0x00, 0xF0, 0x00, 0x00, 0x03, 0xE0, 0x0F, 0xE0, 0x00, 0x00, 0x00, 0xFF, 0xFF, 0x00, 0x00, 0x00, 0x00, 0x1F, 0xF8, 0x00, 0x00, 0x00, 0x00, 0x00, 0x00, 0x00, 0x00, 0x00, 0x00, 0x00, 0x00, 0x00, 0x00};

const unsigned char PROGMEM frame91 [] = {0x00, 0x00, 0x00, 0x00, 0x00, 0x00, 0x00, 0x00, 0x00, 0x00, 0x00, 0x00, 0x00, 0x00, 0x1F, 0xFC, 0x00, 0x00, 0x00, 0x00, 0xFF, 0xFF, 0x00, 0x00, 0x00, 0x07, 0xE0, 0x07, 0xE0, 0x00, 0x00, 0x0F, 0x00, 0x00, 0xF0, 0x00, 0x00, 0x3C, 0x00, 0x00, 0x3C, 0x00, 0x00, 0x78, 0x00, 0x00, 0x1E, 0x00, 0x00, 0xE0, 0x00, 0x00, 0x07, 0x00, 0x01, 0xC0, 0x00, 0x00, 0x03, 0x80, 0x03, 0x80, 0x00, 0x00, 0x01, 0xC0, 0x03, 0x00, 0x00, 0x00, 0x00, 0xC0, 0x06, 0x00, 0x00, 0x00, 0x00, 0xE0, 0x0E, 0x00, 0x00, 0x00, 0x00, 0x70, 0x0C, 0x00, 0x00, 0x00, 0x00, 0x30, 0x0C, 0x00, 0x00, 0x00, 0x00, 0x30, 0x18, 0x00, 0x00, 0x00, 0x00, 0x18, 0x18, 0x00, 0x00, 0x00, 0x00, 0x18, 0x18, 0x00, 0x00, 0x00, 0x00, 0x18, 0x30, 0x00, 0x00, 0x00, 0x00, 0x0C, 0x30, 0x00, 0x38, 0x1C, 0x00, 0x0C, 0x30, 0x00, 0xF8, 0x1F, 0x00, 0x0C, 0x30, 0x07, 0xC0, 0x07, 0xE0, 0x0C, 0x30, 0x1F, 0x00, 0x00, 0xF8, 0x0C, 0x30, 0x3C, 0x00, 0x00, 0x38, 0x0C, 0x30, 0x00, 0x00, 0x00, 0x00, 0x0C, 0x30, 0x00, 0x00, 0x00, 0x00, 0x0C, 0x30, 0x00, 0x00, 0x00, 0x00, 0x0C, 0x30, 0x00, 0x00, 0x00, 0x00, 0x0C, 0x18, 0x00, 0x03, 0xC0, 0x00, 0x1C, 0x18, 0x00, 0x0F, 0xF0, 0x00, 0x18, 0x18, 0x00, 0x1C, 0x78, 0x00, 0x18, 0x0C, 0x00, 0x38, 0x1C, 0x00, 0x30, 0x0C, 0x00, 0x70, 0x0E, 0x00, 0x30, 0x0E, 0x00, 0x77, 0xF6, 0x00, 0x60, 0x07, 0x00, 0x7F, 0xFE, 0x00, 0xE0, 0x03, 0x00, 0xF8, 0x0F, 0x00, 0xC0, 0x01, 0x80, 0x40, 0x02, 0x01, 0x80, 0x01, 0xC0, 0x00, 0x00, 0x03, 0x80, 0x00, 0xE0, 0x00, 0x00, 0x07, 0x00, 0x00, 0x78, 0x00, 0x00, 0x1E, 0x00, 0x00, 0x3C, 0x00, 0x00, 0x3C, 0x00, 0x00, 0x0F, 0x00, 0x00, 0xF0, 0x00, 0x00, 0x03, 0xE0, 0x0F, 0xC0, 0x00, 0x00, 0x00, 0xFF, 0xFF, 0x00, 0x00, 0x00, 0x00, 0x1F, 0xF8, 0x00, 0x00, 0x00, 0x00, 0x00, 0x00, 0x00, 0x00, 0x00, 0x00, 0x00, 0x00, 0x00, 0x00};

const unsigned char PROGMEM frame111 [] = {0x00, 0x00, 0x00, 0x00, 0x00, 0x00, 0x00, 0x00, 0x00, 0x00, 0x00, 0x00, 0x00, 0x00, 0x1F, 0xFC, 0x00, 0x00, 0x00, 0x00, 0xFF, 0xFF, 0x00, 0x00, 0x00, 0x07, 0xE0, 0x07, 0xE0, 0x00, 0x00, 0x0F, 0x00, 0x00, 0xF0, 0x00, 0x00, 0x3C, 0x00, 0x00, 0x3C, 0x00, 0x00, 0x78, 0x00, 0x00, 0x1E, 0x00, 0x00, 0xE0, 0x00, 0x00, 0x07, 0x00, 0x01, 0xC0, 0x00, 0x00, 0x03, 0x80, 0x03, 0x80, 0x00, 0x00, 0x01, 0xC0, 0x03, 0x00, 0x00, 0x00, 0x00, 0xC0, 0x07, 0x00, 0x00, 0x00, 0x00, 0xE0, 0x0E, 0x00, 0x00, 0x00, 0x00, 0x70, 0x0C, 0x00, 0x00, 0x00, 0x00, 0x30, 0x0C, 0x00, 0x00, 0x00, 0x00, 0x38, 0x18, 0x00, 0x38, 0x1C, 0x00, 0x18, 0x18, 0x00, 0xF8, 0x0F, 0x00, 0x18, 0x18, 0x03, 0xE0, 0x07, 0xC0, 0x18, 0x30, 0x1F, 0x80, 0x01, 0xF8, 0x0C, 0x30, 0x3E, 0x00, 0x00, 0x38, 0x0C, 0x30, 0x00, 0x00, 0x00, 0x00, 0x0C, 0x30, 0x00, 0x00, 0x00, 0x00, 0x0C, 0x30, 0x00, 0x00, 0x00, 0x00, 0x0C, 0x30, 0x00, 0x00, 0x00, 0x00, 0x0C, 0x30, 0x00, 0x00, 0x00, 0x00, 0x0C, 0x30, 0x00, 0x0F, 0xE0, 0x00, 0x0C, 0x30, 0x00, 0x3F, 0xF0, 0x00, 0x0C, 0x30, 0x00, 0x78, 0x38, 0x00, 0x0C, 0x38, 0x00, 0xE0, 0x1C, 0x00, 0x1C, 0x18, 0x01, 0xC0, 0x0E, 0x00, 0x18, 0x18, 0x00, 0x80, 0x07, 0x00, 0x18, 0x0C, 0x00, 0x00, 0x03, 0x00, 0x30, 0x0C, 0x00, 0x00, 0x03, 0x00, 0x30, 0x0E, 0x00, 0x00, 0x00, 0x00, 0x60, 0x07, 0x00, 0x00, 0x00, 0x00, 0xE0, 0x03, 0x00, 0x00, 0x00, 0x00, 0xC0, 0x01, 0x80, 0x00, 0x00, 0x01, 0x80, 0x01, 0xC0, 0x00, 0x00, 0x03, 0x80, 0x00, 0xE0, 0x00, 0x00, 0x07, 0x00, 0x00, 0x78, 0x00, 0x00, 0x1E, 0x00, 0x00, 0x3C, 0x00, 0x00, 0x3C, 0x00, 0x00, 0x0F, 0x00, 0x00, 0xF0, 0x00, 0x00, 0x03, 0xE0, 0x0F, 0xE0, 0x00, 0x00, 0x00, 0xFF, 0xFF, 0x00, 0x00, 0x00, 0x00, 0x1F, 0xF8, 0x00, 0x00, 0x00, 0x00, 0x00, 0x00, 0x00, 0x00, 0x00, 0x00, 0x00, 0x00, 0x00, 0x00};

const unsigned char PROGMEM frame121 [] = {0x00, 0x00, 0x00, 0x00, 0x00, 0x00, 0x00, 0x00, 0x00, 0x00, 0x00, 0x00, 0x00, 0x00, 0x1F, 0xFC, 0x00, 0x00, 0x00, 0x00, 0xFF, 0xFF, 0x00, 0x00, 0x00, 0x07, 0xE0, 0x07, 0xE0, 0x00, 0x00, 0x0F, 0x00, 0x00, 0xF0, 0x00, 0x00, 0x3C, 0x00, 0x00, 0x3C, 0x00, 0x00, 0x78, 0x00, 0x00, 0x1E, 0x00, 0x00, 0xE0, 0x00, 0x00, 0x07, 0x00, 0x01, 0xC0, 0x00, 0x00, 0x03, 0x80, 0x03, 0x80, 0x00, 0x00, 0x01, 0xC0, 0x03, 0x00, 0x00, 0x00, 0x00, 0xC0, 0x07, 0x00, 0x00, 0x00, 0x00, 0xE0, 0x0E, 0x00, 0x00, 0x00, 0x00, 0x70, 0x0C, 0x00, 0x00, 0x00, 0x00, 0x30, 0x0C, 0x00, 0x00, 0x00, 0x00, 0x38, 0x18, 0x00, 0x00, 0x00, 0x00, 0x18, 0x18, 0x00, 0x00, 0x00, 0x00, 0x18, 0x18, 0x00, 0x08, 0x10, 0x00, 0x18, 0x30, 0x00, 0x38, 0x1C, 0x00, 0x0C, 0x30, 0x00, 0x70, 0x0E, 0x00, 0x0C, 0x30, 0x01, 0xE0, 0x07, 0x80, 0x0C, 0x30, 0x1F, 0xC0, 0x03, 0xF8, 0x0C, 0x30, 0x1E, 0x00, 0x00, 0x78, 0x0C, 0x30, 0x00, 0x00, 0x00, 0x00, 0x0C, 0x30, 0x00, 0x00, 0x00, 0x00, 0x0C, 0x30, 0x00, 0x00, 0x00, 0x00, 0x0C, 0x30, 0x00, 0x00, 0x00, 0x00, 0x0C, 0x30, 0x00, 0x00, 0x00, 0x00, 0x0C, 0x38, 0x00, 0x0F, 0xE0, 0x00, 0x1C, 0x18, 0x00, 0x3F, 0xF0, 0x00, 0x18, 0x18, 0x00, 0x78, 0x3C, 0x00, 0x18, 0x0C, 0x00, 0xE0, 0x0E, 0x00, 0x30, 0x0C, 0x01, 0xC0, 0x06, 0x00, 0x30, 0x0E, 0x00, 0x80, 0x03, 0x00, 0x60, 0x07, 0x00, 0x00, 0x03, 0x00, 0xE0, 0x03, 0x00, 0x00, 0x00, 0x00, 0xC0, 0x01, 0x80, 0x00, 0x00, 0x01, 0x80, 0x01, 0xC0, 0x00, 0x00, 0x03, 0x80, 0x00, 0xE0, 0x00, 0x00, 0x07, 0x00, 0x00, 0x78, 0x00, 0x00, 0x1E, 0x00, 0x00, 0x3C, 0x00, 0x00, 0x3C, 0x00, 0x00, 0x0F, 0x00, 0x00, 0xF0, 0x00, 0x00, 0x03, 0xE0, 0x0F, 0xE0, 0x00, 0x00, 0x00, 0xFF, 0xFF, 0x00, 0x00, 0x00, 0x00, 0x1F, 0xF8, 0x00, 0x00, 0x00, 0x00, 0x00, 0x00, 0x00, 0x00, 0x00, 0x00, 0x00, 0x00, 0x00, 0x00};

//Happy/

const unsigned char PROGMEM frame012 [] = {0x00, 0x00, 0x00, 0x00, 0x00, 0x00, 0x00, 0x00, 0x00, 0x00, 0x00, 0x00, 0x00, 0x00, 0x1F, 0xFC, 0x00, 0x00, 0x00, 0x00, 0xFF, 0xFF, 0x00, 0x00, 0x00, 0x07, 0xE0, 0x07, 0xE0, 0x00, 0x00, 0x0F, 0x00, 0x00, 0xF0, 0x00, 0x00, 0x3C, 0x00, 0x00, 0x3C, 0x00, 0x00, 0x78, 0x00, 0x00, 0x1E, 0x00, 0x00, 0xE0, 0x00, 0x00, 0x07, 0x00, 0x01, 0xC0, 0x00, 0x00, 0x03, 0x80, 0x03, 0x80, 0x00, 0x00, 0x01, 0xC0, 0x03, 0x00, 0x00, 0x00, 0x00, 0xC0, 0x06, 0x00, 0x00, 0x00, 0x00, 0xE0, 0x0E, 0x00, 0x00, 0x00, 0x00, 0x70, 0x0C, 0x00, 0x00, 0x00, 0x00, 0x30, 0x0C, 0x07, 0x80, 0x03, 0xC0, 0x30, 0x18, 0x1F, 0xE0, 0x0F, 0xF0, 0x18, 0x18, 0x3C, 0x78, 0x1E, 0x3C, 0x18, 0x18, 0x30, 0x18, 0x18, 0x0C, 0x18, 0x30, 0x00, 0x00, 0x00, 0x00, 0x0C, 0x30, 0x00, 0x00, 0x00, 0x00, 0x0C, 0x30, 0x00, 0x00, 0x00, 0x00, 0x0C, 0x30, 0x00, 0x00, 0x00, 0x00, 0x0C, 0x30, 0x1E, 0x00, 0x00, 0xF0, 0x0C, 0x30, 0x1F, 0xF8, 0x2F, 0xF8, 0x0C, 0x30, 0x1D, 0xFF, 0xFF, 0xB8, 0x0C, 0x30, 0x18, 0x17, 0xF0, 0x30, 0x0C, 0x30, 0x0C, 0x00, 0x00, 0x30, 0x0C, 0x30, 0x0C, 0x00, 0x00, 0x30, 0x0C, 0x18, 0x0E, 0x00, 0x00, 0x60, 0x1C, 0x18, 0x06, 0x00, 0x00, 0x60, 0x18, 0x18, 0x07, 0x00, 0x00, 0xE0, 0x18, 0x0C, 0x03, 0x00, 0x01, 0xC0, 0x30, 0x0C, 0x01, 0x80, 0x03, 0x80, 0x30, 0x0E, 0x01, 0xC0, 0x07, 0x00, 0x60, 0x07, 0x00, 0xF0, 0x0E, 0x00, 0xE0, 0x03, 0x00, 0x7E, 0x3C, 0x00, 0xC0, 0x01, 0x80, 0x1F, 0xF8, 0x01, 0x80, 0x01, 0xC0, 0x03, 0xC0, 0x03, 0x80, 0x00, 0xE0, 0x00, 0x00, 0x07, 0x00, 0x00, 0x78, 0x00, 0x00, 0x1E, 0x00, 0x00, 0x3C, 0x00, 0x00, 0x3C, 0x00, 0x00, 0x0F, 0x00, 0x00, 0xF0, 0x00, 0x00, 0x03, 0xE0, 0x0F, 0xC0, 0x00, 0x00, 0x00, 0xFF, 0xFF, 0x00, 0x00, 0x00, 0x00, 0x1F, 0xF8, 0x00, 0x00, 0x00, 0x00, 0x00, 0x00, 0x00, 0x00, 0x00, 0x00, 0x00, 0x00, 0x00, 0x00};

const unsigned char PROGMEM frame22 [] = {0x00, 0x00, 0x00, 0x00, 0x00, 0x00, 0x00, 0x00, 0x00, 0x00, 0x00, 0x00, 0x00, 0x00, 0x1F, 0xFC, 0x00, 0x00, 0x00, 0x00, 0xFF, 0xFF, 0x00, 0x00, 0x00, 0x07, 0xE0, 0x07, 0xE0, 0x00, 0x00, 0x0F, 0x00, 0x00, 0xF0, 0x00, 0x00, 0x3C, 0x00, 0x00, 0x3C, 0x00, 0x00, 0x78, 0x00, 0x00, 0x1E, 0x00, 0x00, 0xE0, 0x00, 0x00, 0x07, 0x00, 0x01, 0xC0, 0x00, 0x00, 0x03, 0x80, 0x03, 0x80, 0x00, 0x00, 0x01, 0xC0, 0x03, 0x00, 0x00, 0x00, 0x00, 0xC0, 0x06, 0x0F, 0xC0, 0x07, 0xE0, 0xE0, 0x0E, 0x1F, 0xF0, 0x1F, 0xF0, 0x70, 0x0C, 0x38, 0x30, 0x18, 0x38, 0x30, 0x0C, 0x30, 0x38, 0x38, 0x18, 0x30, 0x18, 0x00, 0x00, 0x00, 0x00, 0x18, 0x18, 0x00, 0x00, 0x00, 0x00, 0x18, 0x18, 0x00, 0x00, 0x00, 0x00, 0x18, 0x30, 0x00, 0x00, 0x00, 0x00, 0x0C, 0x30, 0x00, 0x00, 0x00, 0x00, 0x0C, 0x30, 0x0F, 0xFF, 0xFF, 0xE0, 0x0C, 0x30, 0x0F, 0xFF, 0xFF, 0xE0, 0x0C, 0x30, 0x0C, 0x00, 0x00, 0x60, 0x0C, 0x30, 0x0C, 0x00, 0x00, 0x60, 0x0C, 0x30, 0x0C, 0x00, 0x00, 0x60, 0x0C, 0x30, 0x0C, 0x00, 0x00, 0x60, 0x0C, 0x30, 0x0E, 0x00, 0x00, 0x60, 0x0C, 0x30, 0x06, 0x00, 0x00, 0xC0, 0x0C, 0x18, 0x06, 0x00, 0x00, 0xC0, 0x1C, 0x18, 0x07, 0x00, 0x01, 0xC0, 0x18, 0x18, 0x03, 0x00, 0x01, 0x80, 0x18, 0x0C, 0x03, 0x80, 0x03, 0x80, 0x30, 0x0C, 0x01, 0x80, 0x03, 0x00, 0x30, 0x0E, 0x00, 0xC0, 0x06, 0x00, 0x60, 0x07, 0x00, 0xE0, 0x0E, 0x00, 0xE0, 0x03, 0x00, 0x78, 0x3C, 0x00, 0xC0, 0x01, 0x80, 0x1F, 0xF0, 0x01, 0x80, 0x01, 0xC0, 0x07, 0xC0, 0x03, 0x80, 0x00, 0xE0, 0x00, 0x00, 0x07, 0x00, 0x00, 0x78, 0x00, 0x00, 0x1E, 0x00, 0x00, 0x3C, 0x00, 0x00, 0x3C, 0x00, 0x00, 0x0F, 0x00, 0x00, 0xF0, 0x00, 0x00, 0x03, 0xE0, 0x0F, 0xC0, 0x00, 0x00, 0x00, 0xFF, 0xFF, 0x00, 0x00, 0x00, 0x00, 0x1F, 0xF8, 0x00, 0x00, 0x00, 0x00, 0x00, 0x00, 0x00, 0x00, 0x00, 0x00, 0x00, 0x00, 0x00, 0x00};

const unsigned char PROGMEM frame42 [] = {0x00, 0x00, 0x00, 0x00, 0x00, 0x00, 0x00, 0x00, 0x00, 0x00, 0x00, 0x00, 0x00, 0x00, 0x1F, 0xFC, 0x00, 0x00, 0x00, 0x00, 0xFF, 0xFF, 0x00, 0x00, 0x00, 0x07, 0xE0, 0x07, 0xE0, 0x00, 0x00, 0x0F, 0x00, 0x00, 0xF0, 0x00, 0x00, 0x3C, 0x00, 0x00, 0x3C, 0x00, 0x00, 0x78, 0x00, 0x00, 0x1E, 0x00, 0x00, 0xE0, 0x00, 0x00, 0x07, 0x00, 0x01, 0xC0, 0x00, 0x00, 0x03, 0x80, 0x03, 0x80, 0x00, 0x00, 0x01, 0xC0, 0x03, 0x00, 0x00, 0x00, 0x00, 0xC0, 0x07, 0x00, 0x00, 0x00, 0x00, 0xE0, 0x0E, 0x00, 0x00, 0x00, 0x00, 0x70, 0x0C, 0x1F, 0xC0, 0x0F, 0xE0, 0x30, 0x0C, 0x3F, 0xE0, 0x1F, 0xF8, 0x30, 0x18, 0x70, 0x70, 0x38, 0x38, 0x18, 0x18, 0x40, 0x10, 0x20, 0x08, 0x18, 0x18, 0x00, 0x00, 0x00, 0x00, 0x18, 0x30, 0x00, 0x00, 0x00, 0x00, 0x0C, 0x30, 0x00, 0x00, 0x00, 0x00, 0x0C, 0x30, 0x38, 0x00, 0x00, 0x70, 0x0C, 0x30, 0x3F, 0x80, 0x07, 0xF0, 0x0C, 0x30, 0x3F, 0xFF, 0xFF, 0xF0, 0x0C, 0x30, 0x30, 0x7F, 0xFC, 0x30, 0x0C, 0x30, 0x38, 0x00, 0x00, 0x70, 0x0C, 0x30, 0x18, 0x00, 0x00, 0x60, 0x0C, 0x30, 0x1C, 0x00, 0x00, 0xE0, 0x0C, 0x30, 0x0C, 0x00, 0x00, 0xC0, 0x0C, 0x18, 0x06, 0x00, 0x01, 0xC0, 0x1C, 0x18, 0x07, 0x00, 0x03, 0x80, 0x18, 0x18, 0x03, 0x80, 0x07, 0x00, 0x18, 0x0C, 0x01, 0xE0, 0x1E, 0x00, 0x30, 0x0C, 0x00, 0xF8, 0x7C, 0x00, 0x30, 0x0E, 0x00, 0x3F, 0xF0, 0x00, 0x60, 0x07, 0x00, 0x0F, 0xC0, 0x00, 0xE0, 0x03, 0x00, 0x00, 0x00, 0x00, 0xC0, 0x01, 0x80, 0x00, 0x00, 0x01, 0x80, 0x01, 0xC0, 0x00, 0x00, 0x03, 0x80, 0x00, 0xE0, 0x00, 0x00, 0x07, 0x00, 0x00, 0x78, 0x00, 0x00, 0x1E, 0x00, 0x00, 0x3C, 0x00, 0x00, 0x3C, 0x00, 0x00, 0x0F, 0x00, 0x00, 0xF0, 0x00, 0x00, 0x03, 0xE0, 0x0F, 0xE0, 0x00, 0x00, 0x00, 0xFF, 0xFF, 0x00, 0x00, 0x00, 0x00, 0x1F, 0xF8, 0x00, 0x00, 0x00, 0x00, 0x00, 0x00, 0x00, 0x00, 0x00, 0x00, 0x00, 0x00, 0x00, 0x00};

const unsigned char PROGMEM frame52 [] = {0x00, 0x00, 0x00, 0x00, 0x00, 0x00, 0x00, 0x00, 0x00, 0x00, 0x00, 0x00, 0x00, 0x00, 0x1F, 0xFC, 0x00, 0x00, 0x00, 0x00, 0xFF, 0xFF, 0x00, 0x00, 0x00, 0x07, 0xE0, 0x07, 0xE0, 0x00, 0x00, 0x0F, 0x00, 0x00, 0xF0, 0x00, 0x00, 0x3C, 0x00, 0x00, 0x3C, 0x00, 0x00, 0x78, 0x00, 0x00, 0x1E, 0x00, 0x00, 0xE0, 0x00, 0x00, 0x07, 0x00, 0x01, 0xC0, 0x00, 0x00, 0x03, 0x80, 0x03, 0x80, 0x00, 0x00, 0x01, 0xC0, 0x03, 0x00, 0x00, 0x00, 0x00, 0xC0, 0x07, 0x00, 0x00, 0x00, 0x00, 0xE0, 0x0E, 0x00, 0x00, 0x00, 0x00, 0x70, 0x0C, 0x1F, 0xC0, 0x0F, 0xE0, 0x30, 0x0C, 0x3F, 0xE0, 0x1F, 0xF8, 0x30, 0x18, 0x70, 0x70, 0x38, 0x38, 0x18, 0x18, 0x40, 0x10, 0x20, 0x08, 0x18, 0x18, 0x00, 0x00, 0x00, 0x00, 0x18, 0x30, 0x00, 0x00, 0x00, 0x00, 0x0C, 0x30, 0x00, 0x00, 0x00, 0x00, 0x0C, 0x30, 0x38, 0x00, 0x00, 0x70, 0x0C, 0x30, 0x3F, 0x80, 0x03, 0xF0, 0x0C, 0x30, 0x3F, 0xFF, 0xFF, 0xF0, 0x0C, 0x30, 0x30, 0xFF, 0xFC, 0x30, 0x0C, 0x30, 0x18, 0x00, 0x00, 0x70, 0x0C, 0x30, 0x18, 0x00, 0x00, 0x60, 0x0C, 0x30, 0x1C, 0x00, 0x00, 0xE0, 0x0C, 0x30, 0x0E, 0x00, 0x00, 0xC0, 0x0C, 0x18, 0x06, 0x00, 0x01, 0xC0, 0x1C, 0x18, 0x07, 0x00, 0x03, 0x80, 0x18, 0x18, 0x03, 0x80, 0x07, 0x00, 0x18, 0x0C, 0x01, 0xE0, 0x1E, 0x00, 0x30, 0x0C, 0x00, 0x7C, 0xFC, 0x00, 0x30, 0x0E, 0x00, 0x3F, 0xF0, 0x00, 0x60, 0x07, 0x00, 0x07, 0x00, 0x00, 0xE0, 0x03, 0x00, 0x00, 0x00, 0x00, 0xC0, 0x01, 0x80, 0x00, 0x00, 0x01, 0x80, 0x01, 0xC0, 0x00, 0x00, 0x03, 0x80, 0x00, 0xE0, 0x00, 0x00, 0x07, 0x00, 0x00, 0x78, 0x00, 0x00, 0x1E, 0x00, 0x00, 0x3C, 0x00, 0x00, 0x3C, 0x00, 0x00, 0x0F, 0x00, 0x00, 0xF0, 0x00, 0x00, 0x03, 0xE0, 0x0F, 0xC0, 0x00, 0x00, 0x00, 0xFF, 0xFF, 0x00, 0x00, 0x00, 0x00, 0x1F, 0xF8, 0x00, 0x00, 0x00, 0x00, 0x00, 0x00, 0x00, 0x00, 0x00, 0x00, 0x00, 0x00, 0x00, 0x00};

const unsigned char PROGMEM frame72 [] = {0x00, 0x00, 0x00, 0x00, 0x00, 0x00, 0x00, 0x00, 0x00, 0x00, 0x00, 0x00, 0x00, 0x00, 0x1F, 0xFC, 0x00, 0x00, 0x00, 0x00, 0xFF, 0xFF, 0x00, 0x00, 0x00, 0x07, 0xE0, 0x07, 0xE0, 0x00, 0x00, 0x0F, 0x00, 0x00, 0xF0, 0x00, 0x00, 0x3C, 0x00, 0x00, 0x3C, 0x00, 0x00, 0x78, 0x00, 0x00, 0x1E, 0x00, 0x00, 0xE0, 0x00, 0x00, 0x07, 0x00, 0x01, 0xC3, 0xC0, 0x03, 0xC3, 0x80, 0x03, 0x8F, 0xF0, 0x0F, 0xF1, 0xC0, 0x03, 0x1C, 0x78, 0x0E, 0x38, 0xC0, 0x07, 0x18, 0x18, 0x18, 0x18, 0xE0, 0x0E, 0x10, 0x18, 0x18, 0x08, 0x70, 0x0C, 0x00, 0x00, 0x00, 0x00, 0x30, 0x0C, 0x00, 0x00, 0x00, 0x00, 0x30, 0x18, 0x00, 0x00, 0x00, 0x00, 0x18, 0x18, 0x00, 0x00, 0x00, 0x00, 0x18, 0x18, 0x00, 0x00, 0x00, 0x00, 0x18, 0x30, 0x07, 0xFF, 0xFF, 0xF0, 0x0C, 0x30, 0x0F, 0xFF, 0xFF, 0xE0, 0x0C, 0x30, 0x0C, 0x00, 0x00, 0x30, 0x0C, 0x30, 0x06, 0x00, 0x00, 0x60, 0x0C, 0x30, 0x06, 0x00, 0x00, 0x60, 0x0C, 0x30, 0x06, 0x00, 0x00, 0x60, 0x0C, 0x30, 0x06, 0x00, 0x00, 0x60, 0x0C, 0x30, 0x06, 0x00, 0x00, 0xE0, 0x0C, 0x30, 0x03, 0x00, 0x00, 0xC0, 0x0C, 0x30, 0x03, 0x00, 0x00, 0xC0, 0x0C, 0x18, 0x03, 0x80, 0x01, 0xC0, 0x1C, 0x18, 0x01, 0x80, 0x01, 0x80, 0x18, 0x18, 0x01, 0xC0, 0x03, 0x80, 0x18, 0x0C, 0x00, 0xE0, 0x07, 0x00, 0x30, 0x0C, 0x00, 0x70, 0x0E, 0x00, 0x30, 0x0E, 0x00, 0x3C, 0x3C, 0x00, 0x60, 0x07, 0x00, 0x1F, 0xF8, 0x00, 0xE0, 0x03, 0x00, 0x07, 0xE0, 0x00, 0xC0, 0x01, 0x80, 0x00, 0x00, 0x01, 0x80, 0x01, 0xC0, 0x00, 0x00, 0x03, 0x80, 0x00, 0xE0, 0x00, 0x00, 0x07, 0x00, 0x00, 0x78, 0x00, 0x00, 0x1E, 0x00, 0x00, 0x3C, 0x00, 0x00, 0x3C, 0x00, 0x00, 0x0F, 0x00, 0x00, 0xF0, 0x00, 0x00, 0x03, 0xE0, 0x0F, 0xC0, 0x00, 0x00, 0x00, 0xFF, 0xFF, 0x00, 0x00, 0x00, 0x00, 0x1F, 0xF8, 0x00, 0x00, 0x00, 0x00, 0x00, 0x00, 0x00, 0x00, 0x00, 0x00, 0x00, 0x00, 0x00, 0x00};

const unsigned char PROGMEM frame82 [] = {0x00, 0x00, 0x00, 0x00, 0x00, 0x00, 0x00, 0x00, 0x00, 0x00, 0x00, 0x00, 0x00, 0x00, 0x1F, 0xFC, 0x00, 0x00, 0x00, 0x00, 0xFF, 0xFF, 0x00, 0x00, 0x00, 0x07, 0xE0, 0x07, 0xE0, 0x00, 0x00, 0x0F, 0x00, 0x00, 0xF0, 0x00, 0x00, 0x3C, 0x00, 0x00, 0x3C, 0x00, 0x00, 0x78, 0x00, 0x00, 0x1E, 0x00, 0x00, 0xE0, 0x00, 0x00, 0x07, 0x00, 0x01, 0xC0, 0x00, 0x00, 0x03, 0x80, 0x03, 0x80, 0x00, 0x00, 0x01, 0xC0, 0x03, 0x03, 0xE0, 0x03, 0xF0, 0xC0, 0x06, 0x0F, 0xF0, 0x07, 0xF8, 0xE0, 0x0E, 0x1C, 0x38, 0x0E, 0x1C, 0x70, 0x0C, 0x18, 0x1C, 0x1C, 0x0C, 0x30, 0x0C, 0x00, 0x00, 0x00, 0x00, 0x30, 0x18, 0x00, 0x00, 0x00, 0x00, 0x18, 0x18, 0x00, 0x00, 0x00, 0x00, 0x18, 0x18, 0x00, 0x00, 0x00, 0x00, 0x18, 0x30, 0x00, 0x00, 0x00, 0x10, 0x0C, 0x30, 0x0F, 0xFE, 0xBF, 0xF8, 0x0C, 0x30, 0x0F, 0xFF, 0xFF, 0xF8, 0x0C, 0x30, 0x0C, 0x02, 0xA0, 0x18, 0x0C, 0x30, 0x06, 0x00, 0x00, 0x18, 0x0C, 0x30, 0x06, 0x00, 0x00, 0x30, 0x0C, 0x30, 0x06, 0x00, 0x00, 0x30, 0x0C, 0x30, 0x07, 0x00, 0x00, 0x30, 0x0C, 0x30, 0x03, 0x00, 0x00, 0x60, 0x0C, 0x30, 0x03, 0x80, 0x00, 0x60, 0x0C, 0x18, 0x01, 0x80, 0x00, 0xE0, 0x1C, 0x18, 0x01, 0xC0, 0x01, 0xC0, 0x18, 0x18, 0x00, 0xE0, 0x01, 0x80, 0x18, 0x0C, 0x00, 0x70, 0x07, 0x00, 0x30, 0x0C, 0x00, 0x38, 0x0F, 0x00, 0x30, 0x0E, 0x00, 0x1F, 0x7C, 0x00, 0x60, 0x07, 0x00, 0x07, 0xF8, 0x00, 0xE0, 0x03, 0x00, 0x00, 0x80, 0x00, 0xC0, 0x01, 0x80, 0x00, 0x00, 0x01, 0x80, 0x01, 0xC0, 0x00, 0x00, 0x03, 0x80, 0x00, 0xE0, 0x00, 0x00, 0x07, 0x00, 0x00, 0x78, 0x00, 0x00, 0x1E, 0x00, 0x00, 0x3C, 0x00, 0x00, 0x3C, 0x00, 0x00, 0x0F, 0x00, 0x00, 0xF0, 0x00, 0x00, 0x03, 0xE0, 0x0F, 0xC0, 0x00, 0x00, 0x00, 0xFF, 0xFF, 0x00, 0x00, 0x00, 0x00, 0x1F, 0xF8, 0x00, 0x00, 0x00, 0x00, 0x00, 0x00, 0x00, 0x00, 0x00, 0x00, 0x00, 0x00, 0x00, 0x00};

const unsigned char PROGMEM frame92 [] = {0x00, 0x00, 0x00, 0x00, 0x00, 0x00, 0x00, 0x00, 0x00, 0x00, 0x00, 0x00, 0x00, 0x00, 0x1F, 0xFC, 0x00, 0x00, 0x00, 0x00, 0xFF, 0xFF, 0x00, 0x00, 0x00, 0x07, 0xE0, 0x07, 0xE0, 0x00, 0x00, 0x0F, 0x00, 0x00, 0xF0, 0x00, 0x00, 0x3C, 0x00, 0x00, 0x3C, 0x00, 0x00, 0x78, 0x00, 0x00, 0x1E, 0x00, 0x00, 0xE0, 0x00, 0x00, 0x07, 0x00, 0x01, 0xC0, 0x00, 0x00, 0x03, 0x80, 0x03, 0x80, 0x00, 0x00, 0x01, 0xC0, 0x03, 0x00, 0x00, 0x00, 0x00, 0xC0, 0x06, 0x00, 0x00, 0x00, 0x00, 0xE0, 0x0E, 0x00, 0x00, 0x00, 0x00, 0x70, 0x0C, 0x07, 0xF0, 0x03, 0xF8, 0x30, 0x0C, 0x1F, 0xF8, 0x07, 0xFC, 0x30, 0x18, 0x1C, 0x1C, 0x0E, 0x0E, 0x18, 0x18, 0x10, 0x0C, 0x08, 0x02, 0x18, 0x18, 0x00, 0x00, 0x00, 0x00, 0x18, 0x30, 0x00, 0x00, 0x00, 0x00, 0x0C, 0x30, 0x00, 0x00, 0x00, 0x00, 0x0C, 0x30, 0x0E, 0x00, 0x00, 0x1C, 0x0C, 0x30, 0x0F, 0xE0, 0x00, 0xFC, 0x0C, 0x30, 0x0F, 0xFF, 0xFF, 0xFC, 0x0C, 0x30, 0x0C, 0x3F, 0xFF, 0x0C, 0x0C, 0x30, 0x0E, 0x00, 0x00, 0x1C, 0x0C, 0x30, 0x06, 0x00, 0x00, 0x18, 0x0C, 0x30, 0x07, 0x00, 0x00, 0x38, 0x0C, 0x30, 0x03, 0x00, 0x00, 0x70, 0x0C, 0x18, 0x01, 0x80, 0x00, 0x60, 0x1C, 0x18, 0x01, 0xC0, 0x00, 0xE0, 0x18, 0x18, 0x00, 0xE0, 0x01, 0xC0, 0x18, 0x0C, 0x00, 0x78, 0x07, 0x80, 0x30, 0x0C, 0x00, 0x1E, 0x3E, 0x00, 0x30, 0x0E, 0x00, 0x0F, 0xFC, 0x00, 0x60, 0x07, 0x00, 0x01, 0xC0, 0x00, 0xE0, 0x03, 0x00, 0x00, 0x00, 0x00, 0xC0, 0x01, 0x80, 0x00, 0x00, 0x01, 0x80, 0x01, 0xC0, 0x00, 0x00, 0x03, 0x80, 0x00, 0xE0, 0x00, 0x00, 0x07, 0x00, 0x00, 0x78, 0x00, 0x00, 0x1E, 0x00, 0x00, 0x3C, 0x00, 0x00, 0x3C, 0x00, 0x00, 0x0F, 0x00, 0x00, 0xF0, 0x00, 0x00, 0x03, 0xE0, 0x0F, 0xC0, 0x00, 0x00, 0x00, 0xFF, 0xFF, 0x00, 0x00, 0x00, 0x00, 0x1F, 0xF8, 0x00, 0x00, 0x00, 0x00, 0x00, 0x00, 0x00, 0x00, 0x00, 0x00, 0x00, 0x00, 0x00, 0x00};

const unsigned char PROGMEM frame102 [] = {0x00, 0x00, 0x00, 0x00, 0x00, 0x00, 0x00, 0x00, 0x00, 0x00, 0x00, 0x00, 0x00, 0x00, 0x1F, 0xFC, 0x00, 0x00, 0x00, 0x00, 0xFF, 0xFF, 0x00, 0x00, 0x00, 0x07, 0xE0, 0x07, 0xE0, 0x00, 0x00, 0x0F, 0x00, 0x00, 0xF0, 0x00, 0x00, 0x3C, 0x00, 0x00, 0x3C, 0x00, 0x00, 0x78, 0x00, 0x00, 0x1E, 0x00, 0x00, 0xE0, 0x00, 0x00, 0x07, 0x00, 0x01, 0xC0, 0x00, 0x00, 0x03, 0x80, 0x03, 0x80, 0x00, 0x00, 0x01, 0xC0, 0x03, 0x00, 0x00, 0x00, 0x00, 0xC0, 0x06, 0x00, 0x00, 0x00, 0x00, 0xE0, 0x0E, 0x00, 0x00, 0x00, 0x00, 0x70, 0x0C, 0x07, 0xF0, 0x03, 0xF8, 0x30, 0x0C, 0x1F, 0xF8, 0x07, 0xFC, 0x30, 0x18, 0x1C, 0x1C, 0x0E, 0x0E, 0x18, 0x18, 0x10, 0x04, 0x08, 0x02, 0x18, 0x18, 0x00, 0x00, 0x00, 0x00, 0x18, 0x30, 0x00, 0x00, 0x00, 0x00, 0x0C, 0x30, 0x00, 0x00, 0x00, 0x00, 0x0C, 0x30, 0x0E, 0x00, 0x00, 0x1C, 0x0C, 0x30, 0x0F, 0xE0, 0x01, 0xFC, 0x0C, 0x30, 0x0F, 0xFF, 0xFF, 0xFC, 0x0C, 0x30, 0x0C, 0x1F, 0xFF, 0x0C, 0x0C, 0x30, 0x0E, 0x00, 0x00, 0x1C, 0x0C, 0x30, 0x06, 0x00, 0x00, 0x18, 0x0C, 0x30, 0x07, 0x00, 0x00, 0x38, 0x0C, 0x30, 0x03, 0x00, 0x00, 0x30, 0x0C, 0x18, 0x03, 0x80, 0x00, 0x70, 0x1C, 0x18, 0x01, 0xC0, 0x00, 0xE0, 0x18, 0x18, 0x00, 0xE0, 0x01, 0xC0, 0x18, 0x0C, 0x00, 0x70, 0x07, 0x80, 0x30, 0x0C, 0x00, 0x3E, 0x1F, 0x00, 0x30, 0x0E, 0x00, 0x0F, 0xFC, 0x00, 0x60, 0x07, 0x00, 0x03, 0xE0, 0x00, 0xE0, 0x03, 0x00, 0x00, 0x00, 0x00, 0xC0, 0x01, 0x80, 0x00, 0x00, 0x01, 0x80, 0x01, 0xC0, 0x00, 0x00, 0x03, 0x80, 0x00, 0xE0, 0x00, 0x00, 0x07, 0x00, 0x00, 0x78, 0x00, 0x00, 0x1E, 0x00, 0x00, 0x3C, 0x00, 0x00, 0x3C, 0x00, 0x00, 0x0F, 0x00, 0x00, 0xF0, 0x00, 0x00, 0x03, 0xE0, 0x0F, 0xE0, 0x00, 0x00, 0x00, 0xFF, 0xFF, 0x00, 0x00, 0x00, 0x00, 0x1F, 0xF8, 0x00, 0x00, 0x00, 0x00, 0x00, 0x00, 0x00, 0x00, 0x00, 0x00, 0x00, 0x00, 0x00, 0x00};

const unsigned char PROGMEM frame122 [] = {0x00, 0x00, 0x00, 0x00, 0x00, 0x00, 0x00, 0x00, 0x00, 0x00, 0x00, 0x00, 0x00, 0x00, 0x1F, 0xFC, 0x00, 0x00, 0x00, 0x00, 0xFF, 0xFF, 0x00, 0x00, 0x00, 0x07, 0xE0, 0x07, 0xE0, 0x00, 0x00, 0x0F, 0x00, 0x00, 0xF0, 0x00, 0x00, 0x3C, 0x00, 0x00, 0x3C, 0x00, 0x00, 0x78, 0x00, 0x00, 0x1E, 0x00, 0x00, 0xE0, 0x00, 0x00, 0x07, 0x00, 0x01, 0xC0, 0x00, 0x00, 0x03, 0x80, 0x03, 0x80, 0x00, 0x00, 0x01, 0xC0, 0x03, 0x00, 0x00, 0x00, 0x00, 0xC0, 0x06, 0x07, 0xE0, 0x03, 0xF0, 0xE0, 0x0E, 0x0F, 0xF8, 0x0F, 0xF8, 0x70, 0x0C, 0x1C, 0x18, 0x0C, 0x1C, 0x30, 0x0C, 0x18, 0x1C, 0x1C, 0x0C, 0x30, 0x18, 0x00, 0x00, 0x00, 0x00, 0x18, 0x18, 0x00, 0x00, 0x00, 0x00, 0x18, 0x18, 0x00, 0x00, 0x00, 0x00, 0x18, 0x30, 0x00, 0x00, 0x00, 0x00, 0x0C, 0x30, 0x00, 0x00, 0x00, 0x00, 0x0C, 0x30, 0x07, 0xFF, 0xFF, 0xF0, 0x0C, 0x30, 0x07, 0xFF, 0xFF, 0xF0, 0x0C, 0x30, 0x06, 0x00, 0x00, 0x30, 0x0C, 0x30, 0x06, 0x00, 0x00, 0x30, 0x0C, 0x30, 0x06, 0x00, 0x00, 0x30, 0x0C, 0x30, 0x06, 0x00, 0x00, 0x30, 0x0C, 0x30, 0x06, 0x00, 0x00, 0x30, 0x0C, 0x30, 0x03, 0x00, 0x00, 0x60, 0x0C, 0x18, 0x03, 0x00, 0x00, 0x60, 0x1C, 0x18, 0x03, 0x80, 0x00, 0xE0, 0x18, 0x18, 0x01, 0x80, 0x00, 0xC0, 0x18, 0x0C, 0x01, 0xC0, 0x01, 0xC0, 0x30, 0x0C, 0x00, 0xC0, 0x01, 0x80, 0x30, 0x0E, 0x00, 0x60, 0x03, 0x00, 0x60, 0x07, 0x00, 0x70, 0x07, 0x00, 0xE0, 0x03, 0x00, 0x3C, 0x1E, 0x00, 0xC0, 0x01, 0x80, 0x0F, 0xF8, 0x01, 0x80, 0x01, 0xC0, 0x03, 0xE0, 0x03, 0x80, 0x00, 0xE0, 0x00, 0x00, 0x07, 0x00, 0x00, 0x78, 0x00, 0x00, 0x1E, 0x00, 0x00, 0x3C, 0x00, 0x00, 0x3C, 0x00, 0x00, 0x0F, 0x00, 0x00, 0xF0, 0x00, 0x00, 0x03, 0xE0, 0x0F, 0xC0, 0x00, 0x00, 0x00, 0xFF, 0xFF, 0x00, 0x00, 0x00, 0x00, 0x1F, 0xF8, 0x00, 0x00, 0x00, 0x00, 0x00, 0x00, 0x00, 0x00, 0x00, 0x00, 0x00, 0x00, 0x00, 0x00};

const unsigned char PROGMEM frame132 [] = {0x00, 0x00, 0x00, 0x00, 0x00, 0x00, 0x00, 0x00, 0x00, 0x00, 0x00, 0x00, 0x00, 0x00, 0x1F, 0xFC, 0x00, 0x00, 0x00, 0x00, 0xFF, 0xFF, 0x00, 0x00, 0x00, 0x07, 0xE0, 0x07, 0xE0, 0x00, 0x00, 0x0F, 0x00, 0x00, 0xF0, 0x00, 0x00, 0x3C, 0x00, 0x00, 0x3C, 0x00, 0x00, 0x78, 0x00, 0x00, 0x1E, 0x00, 0x00, 0xE0, 0x00, 0x00, 0x07, 0x00, 0x01, 0xC0, 0x00, 0x00, 0x03, 0x80, 0x03, 0x80, 0x00, 0x00, 0x01, 0xC0, 0x03, 0x00, 0x00, 0x00, 0x00, 0xC0, 0x06, 0x00, 0x00, 0x00, 0x00, 0xE0, 0x0E, 0x00, 0x00, 0x00, 0x00, 0x70, 0x0C, 0x00, 0x00, 0x00, 0x00, 0x30, 0x0C, 0x07, 0xC0, 0x03, 0xE0, 0x30, 0x18, 0x0F, 0xF0, 0x07, 0xF8, 0x18, 0x18, 0x1C, 0x78, 0x1E, 0x3C, 0x18, 0x18, 0x30, 0x18, 0x18, 0x0C, 0x18, 0x30, 0x00, 0x00, 0x00, 0x00, 0x0C, 0x30, 0x00, 0x00, 0x00, 0x00, 0x0C, 0x30, 0x00, 0x00, 0x00, 0x00, 0x0C, 0x30, 0x00, 0x00, 0x00, 0x00, 0x0C, 0x30, 0x0E, 0x00, 0x00, 0x78, 0x0C, 0x30, 0x1F, 0xF4, 0x0F, 0xF8, 0x0C, 0x30, 0x1D, 0xFF, 0xFF, 0xB8, 0x0C, 0x30, 0x0C, 0x07, 0xF0, 0x18, 0x0C, 0x30, 0x0C, 0x00, 0x00, 0x30, 0x0C, 0x30, 0x0C, 0x00, 0x00, 0x30, 0x0C, 0x18, 0x06, 0x00, 0x00, 0x70, 0x1C, 0x18, 0x06, 0x00, 0x00, 0x60, 0x18, 0x18, 0x03, 0x00, 0x00, 0xE0, 0x18, 0x0C, 0x03, 0x80, 0x01, 0xC0, 0x30, 0x0C, 0x01, 0xC0, 0x01, 0x80, 0x30, 0x0E, 0x00, 0xE0, 0x03, 0x80, 0x60, 0x07, 0x00, 0x70, 0x0F, 0x00, 0xE0, 0x03, 0x00, 0x3E, 0x3C, 0x00, 0xC0, 0x01, 0x80, 0x1F, 0xF8, 0x01, 0x80, 0x01, 0xC0, 0x01, 0xC0, 0x03, 0x80, 0x00, 0xE0, 0x00, 0x00, 0x07, 0x00, 0x00, 0x78, 0x00, 0x00, 0x1E, 0x00, 0x00, 0x3C, 0x00, 0x00, 0x3C, 0x00, 0x00, 0x0F, 0x00, 0x00, 0xF0, 0x00, 0x00, 0x03, 0xE0, 0x0F, 0xC0, 0x00, 0x00, 0x00, 0xFF, 0xFF, 0x00, 0x00, 0x00, 0x00, 0x1F, 0xF8, 0x00, 0x00, 0x00, 0x00, 0x00, 0x00, 0x00, 0x00, 0x00, 0x00, 0x00, 0x00, 0x00, 0x00};

//Neutral************/

const unsigned char PROGMEM frame03 [] = {0x00, 0x00, 0x00, 0x00, 0x00, 0x00, 0x00, 0x00, 0x00, 0x00, 0x00, 0x00, 0x00, 0x00, 0x1F, 0xFC, 0x00, 0x00, 0x00, 0x00, 0xFF, 0xFF, 0x00, 0x00, 0x00, 0x07, 0xE0, 0x07, 0xE0, 0x00, 0x00, 0x0F, 0x00, 0x00, 0xF0, 0x00, 0x00, 0x3C, 0x00, 0x00, 0x3C, 0x00, 0x00, 0x78, 0x00, 0x00, 0x1E, 0x00, 0x00, 0xE0, 0x00, 0x00, 0x07, 0x00, 0x01, 0xC0, 0x00, 0x00, 0x03, 0x80, 0x03, 0x80, 0x00, 0x00, 0x01, 0xC0, 0x03, 0x00, 0x00, 0x00, 0x00, 0xC0, 0x07, 0x00, 0x00, 0x00, 0x00, 0xE0, 0x0E, 0x00, 0x00, 0x00, 0x00, 0x70, 0x0C, 0x00, 0x00, 0x00, 0x00, 0x30, 0x0C, 0x00, 0x00, 0x00, 0x00, 0x30, 0x18, 0x00, 0x00, 0x00, 0x00, 0x18, 0x18, 0x01, 0x80, 0x03, 0x80, 0x18, 0x18, 0x03, 0xE0, 0x07, 0xC0, 0x18, 0x30, 0x03, 0xE0, 0x07, 0xC0, 0x0C, 0x30, 0x07, 0xE0, 0x07, 0xE0, 0x0C, 0x30, 0x03, 0xE0, 0x07, 0xC0, 0x0C, 0x30, 0x01, 0xC0, 0x03, 0x80, 0x0C, 0x30, 0x00, 0x00, 0x00, 0x00, 0x0C, 0x30, 0x00, 0x00, 0x00, 0x00, 0x0C, 0x30, 0x00, 0x00, 0x00, 0x00, 0x0C, 0x30, 0x00, 0x00, 0x00, 0x00, 0x0C, 0x30, 0x00, 0x00, 0x00, 0x00, 0x0C, 0x30, 0x00, 0x00, 0x00, 0x00, 0x0C, 0x18, 0x00, 0x00, 0x00, 0x00, 0x1C, 0x18, 0x07, 0xFF, 0xFF, 0xE0, 0x18, 0x18, 0x03, 0xFF, 0xFF, 0xC0, 0x18, 0x0C, 0x00, 0x00, 0x00, 0x00, 0x30, 0x0C, 0x00, 0x00, 0x00, 0x00, 0x30, 0x0E, 0x00, 0x00, 0x00, 0x00, 0x60, 0x07, 0x00, 0x00, 0x00, 0x00, 0xE0, 0x03, 0x00, 0x00, 0x00, 0x00, 0xC0, 0x01, 0x80, 0x00, 0x00, 0x01, 0x80, 0x01, 0xC0, 0x00, 0x00, 0x03, 0x80, 0x00, 0xE0, 0x00, 0x00, 0x07, 0x00, 0x00, 0x78, 0x00, 0x00, 0x1E, 0x00, 0x00, 0x3C, 0x00, 0x00, 0x3C, 0x00, 0x00, 0x0F, 0x00, 0x00, 0xF0, 0x00, 0x00, 0x03, 0xE0, 0x0F, 0xC0, 0x00, 0x00, 0x00, 0xFF, 0xFF, 0x00, 0x00, 0x00, 0x00, 0x1F, 0xF8, 0x00, 0x00, 0x00, 0x00, 0x00, 0x00, 0x00, 0x00, 0x00, 0x00, 0x00, 0x00, 0x00, 0x00};

const unsigned char PROGMEM frame013 [] = {0x00, 0x00, 0x00, 0x00, 0x00, 0x00, 0x00, 0x00, 0x00, 0x00, 0x00, 0x00, 0x00, 0x00, 0x1F, 0xFC, 0x00, 0x00, 0x00, 0x00, 0xFF, 0xFF, 0x00, 0x00, 0x00, 0x07, 0xE0, 0x07, 0xE0, 0x00, 0x00, 0x0F, 0x00, 0x00, 0xF0, 0x00, 0x00, 0x3C, 0x00, 0x00, 0x3C, 0x00, 0x00, 0x78, 0x00, 0x00, 0x1E, 0x00, 0x00, 0xE0, 0x00, 0x00, 0x07, 0x00, 0x01, 0xC0, 0x00, 0x00, 0x03, 0x80, 0x03, 0x80, 0x00, 0x00, 0x01, 0xC0, 0x03, 0x00, 0x00, 0x00, 0x00, 0xC0, 0x07, 0x00, 0x00, 0x00, 0x00, 0xE0, 0x0E, 0x00, 0x00, 0x00, 0x00, 0x70, 0x0C, 0x00, 0x00, 0x00, 0x00, 0x30, 0x0C, 0x00, 0x00, 0x00, 0x00, 0x30, 0x18, 0x00, 0x00, 0x00, 0x00, 0x18, 0x18, 0x01, 0x80, 0x03, 0x80, 0x18, 0x18, 0x03, 0xE0, 0x07, 0xC0, 0x18, 0x30, 0x03, 0xE0, 0x07, 0xC0, 0x0C, 0x30, 0x07, 0xE0, 0x07, 0xE0, 0x0C, 0x30, 0x03, 0xE0, 0x07, 0xC0, 0x0C, 0x30, 0x01, 0xC0, 0x03, 0x80, 0x0C, 0x30, 0x00, 0x00, 0x00, 0x00, 0x0C, 0x30, 0x00, 0x00, 0x00, 0x00, 0x0C, 0x30, 0x00, 0x00, 0x00, 0x00, 0x0C, 0x30, 0x00, 0x00, 0x00, 0x00, 0x0C, 0x30, 0x00, 0x00, 0x00, 0x00, 0x0C, 0x30, 0x00, 0x00, 0x00, 0x00, 0x0C, 0x18, 0x00, 0x00, 0x00, 0x00, 0x1C, 0x18, 0x07, 0xFF, 0xFF, 0xE0, 0x18, 0x18, 0x03, 0xFF, 0xFF, 0xC0, 0x18, 0x0C, 0x00, 0x00, 0x00, 0x00, 0x30, 0x0C, 0x00, 0x00, 0x00, 0x00, 0x30, 0x0E, 0x00, 0x00, 0x00, 0x00, 0x60, 0x07, 0x00, 0x00, 0x00, 0x00, 0xE0, 0x03, 0x00, 0x00, 0x00, 0x00, 0xC0, 0x01, 0x80, 0x00, 0x00, 0x01, 0x80, 0x01, 0xC0, 0x00, 0x00, 0x03, 0x80, 0x00, 0xE0, 0x00, 0x00, 0x07, 0x00, 0x00, 0x78, 0x00, 0x00, 0x1E, 0x00, 0x00, 0x3C, 0x00, 0x00, 0x3C, 0x00, 0x00, 0x0F, 0x00, 0x00, 0xF0, 0x00, 0x00, 0x03, 0xE0, 0x0F, 0xC0, 0x00, 0x00, 0x00, 0xFF, 0xFF, 0x00, 0x00, 0x00, 0x00, 0x1F, 0xF8, 0x00, 0x00, 0x00, 0x00, 0x00, 0x00, 0x00, 0x00, 0x00, 0x00, 0x00, 0x00, 0x00, 0x00};

const unsigned char PROGMEM frame23 [] = {0x00, 0x00, 0x00, 0x00, 0x00, 0x00, 0x00, 0x00, 0x00, 0x00, 0x00, 0x00, 0x00, 0x00, 0x1F, 0xFC, 0x00, 0x00, 0x00, 0x00, 0xFF, 0xFF, 0x00, 0x00, 0x00, 0x07, 0xE0, 0x07, 0xE0, 0x00, 0x00, 0x0F, 0x00, 0x00, 0xF0, 0x00, 0x00, 0x3C, 0x00, 0x00, 0x3C, 0x00, 0x00, 0x78, 0x00, 0x00, 0x1E, 0x00, 0x00, 0xE0, 0x00, 0x00, 0x07, 0x00, 0x01, 0xC0, 0x00, 0x00, 0x03, 0x80, 0x03, 0x80, 0x00, 0x00, 0x01, 0xC0, 0x03, 0x00, 0x00, 0x00, 0x00, 0xC0, 0x07, 0x00, 0x00, 0x00, 0x00, 0xE0, 0x0E, 0x00, 0x00, 0x00, 0x00, 0x70, 0x0C, 0x00, 0x00, 0x00, 0x00, 0x30, 0x0C, 0x00, 0x00, 0x00, 0x00, 0x30, 0x18, 0x00, 0x00, 0x00, 0x00, 0x18, 0x18, 0x00, 0x80, 0x01, 0x00, 0x18, 0x18, 0x03, 0xE0, 0x07, 0xC0, 0x18, 0x30, 0x07, 0xE0, 0x07, 0xE0, 0x0C, 0x30, 0x07, 0xE0, 0x07, 0xE0, 0x0C, 0x30, 0x03, 0xE0, 0x07, 0xC0, 0x0C, 0x30, 0x01, 0xC0, 0x03, 0x80, 0x0C, 0x30, 0x00, 0x00, 0x00, 0x00, 0x0C, 0x30, 0x00, 0x00, 0x00, 0x00, 0x0C, 0x30, 0x00, 0x00, 0x00, 0x00, 0x0C, 0x30, 0x00, 0x00, 0x00, 0x00, 0x0C, 0x30, 0x00, 0x00, 0x00, 0x00, 0x0C, 0x30, 0x00, 0x00, 0x00, 0x00, 0x0C, 0x18, 0x00, 0x00, 0x00, 0x00, 0x1C, 0x18, 0x07, 0xFF, 0xFF, 0xE0, 0x18, 0x18, 0x03, 0xFF, 0xFF, 0xC0, 0x18, 0x0C, 0x00, 0x00, 0x00, 0x00, 0x30, 0x0C, 0x00, 0x00, 0x00, 0x00, 0x30, 0x0E, 0x00, 0x00, 0x00, 0x00, 0x60, 0x07, 0x00, 0x00, 0x00, 0x00, 0xE0, 0x03, 0x00, 0x00, 0x00, 0x00, 0xC0, 0x01, 0x80, 0x00, 0x00, 0x01, 0x80, 0x01, 0xC0, 0x00, 0x00, 0x03, 0x80, 0x00, 0xE0, 0x00, 0x00, 0x07, 0x00, 0x00, 0x78, 0x00, 0x00, 0x1E, 0x00, 0x00, 0x3C, 0x00, 0x00, 0x3C, 0x00, 0x00, 0x0F, 0x00, 0x00, 0xF0, 0x00, 0x00, 0x03, 0xE0, 0x0F, 0xE0, 0x00, 0x00, 0x00, 0xFF, 0xFF, 0x00, 0x00, 0x00, 0x00, 0x1F, 0xF8, 0x00, 0x00, 0x00, 0x00, 0x00, 0x00, 0x00, 0x00, 0x00, 0x00, 0x00, 0x00, 0x00, 0x00};

const unsigned char PROGMEM frame33 [] = {0x00, 0x00, 0x00, 0x00, 0x00, 0x00, 0x00, 0x00, 0x00, 0x00, 0x00, 0x00, 0x00, 0x00, 0x1F, 0xFC, 0x00, 0x00, 0x00, 0x00, 0xFF, 0xFF, 0x00, 0x00, 0x00, 0x07, 0xE0, 0x07, 0xE0, 0x00, 0x00, 0x0F, 0x00, 0x00, 0xF0, 0x00, 0x00, 0x3C, 0x00, 0x00, 0x3C, 0x00, 0x00, 0x78, 0x00, 0x00, 0x1E, 0x00, 0x00, 0xE0, 0x00, 0x00, 0x07, 0x00, 0x01, 0xC0, 0x00, 0x00, 0x03, 0x80, 0x03, 0x80, 0x00, 0x00, 0x01, 0xC0, 0x03, 0x00, 0x00, 0x00, 0x00, 0xC0, 0x07, 0x00, 0x00, 0x00, 0x00, 0xE0, 0x0E, 0x00, 0x00, 0x00, 0x00, 0x70, 0x0C, 0x00, 0x00, 0x00, 0x00, 0x30, 0x0C, 0x00, 0x00, 0x00, 0x00, 0x30, 0x18, 0x00, 0x00, 0x00, 0x00, 0x18, 0x18, 0x00, 0x00, 0x00, 0x00, 0x18, 0x18, 0x03, 0xC0, 0x07, 0xC0, 0x18, 0x30, 0x07, 0xF0, 0x07, 0xE0, 0x0C, 0x30, 0x07, 0xE0, 0x0F, 0xE0, 0x0C, 0x30, 0x03, 0xE0, 0x07, 0xC0, 0x0C, 0x30, 0x00, 0x00, 0x00, 0x00, 0x0C, 0x30, 0x00, 0x00, 0x00, 0x00, 0x0C, 0x30, 0x00, 0x00, 0x00, 0x00, 0x0C, 0x30, 0x00, 0x00, 0x00, 0x00, 0x0C, 0x30, 0x00, 0x00, 0x00, 0x00, 0x0C, 0x30, 0x00, 0x00, 0x00, 0x00, 0x0C, 0x30, 0x00, 0x00, 0x00, 0x00, 0x0C, 0x18, 0x00, 0x00, 0x00, 0x00, 0x1C, 0x18, 0x07, 0xFF, 0xFF, 0xE0, 0x18, 0x18, 0x03, 0xFF, 0xFF, 0xC0, 0x18, 0x0C, 0x00, 0x00, 0x00, 0x00, 0x30, 0x0C, 0x00, 0x00, 0x00, 0x00, 0x30, 0x0E, 0x00, 0x00, 0x00, 0x00, 0x60, 0x07, 0x00, 0x00, 0x00, 0x00, 0xE0, 0x03, 0x00, 0x00, 0x00, 0x00, 0xC0, 0x01, 0x80, 0x00, 0x00, 0x01, 0x80, 0x01, 0xC0, 0x00, 0x00, 0x03, 0x80, 0x00, 0xE0, 0x00, 0x00, 0x07, 0x00, 0x00, 0x78, 0x00, 0x00, 0x1E, 0x00, 0x00, 0x3C, 0x00, 0x00, 0x3C, 0x00, 0x00, 0x0F, 0x00, 0x00, 0xF0, 0x00, 0x00, 0x03, 0xE0, 0x0F, 0xC0, 0x00, 0x00, 0x00, 0xFF, 0xFF, 0x00, 0x00, 0x00, 0x00, 0x1F, 0xF8, 0x00, 0x00, 0x00, 0x00, 0x00, 0x00, 0x00, 0x00, 0x00, 0x00, 0x00, 0x00, 0x00, 0x00};

const unsigned char PROGMEM frame43 [] = {0x00, 0x00, 0x00, 0x00, 0x00, 0x00, 0x00, 0x00, 0x00, 0x00, 0x00, 0x00, 0x00, 0x00, 0x1F, 0xFC, 0x00, 0x00, 0x00, 0x00, 0xFF, 0xFF, 0x00, 0x00, 0x00, 0x07, 0xE0, 0x07, 0xE0, 0x00, 0x00, 0x0F, 0x00, 0x00, 0xF0, 0x00, 0x00, 0x3C, 0x00, 0x00, 0x3C, 0x00, 0x00, 0x78, 0x00, 0x00, 0x1E, 0x00, 0x00, 0xE0, 0x00, 0x00, 0x07, 0x00, 0x01, 0xC0, 0x00, 0x00, 0x03, 0x80, 0x03, 0x80, 0x00, 0x00, 0x01, 0xC0, 0x03, 0x00, 0x00, 0x00, 0x00, 0xC0, 0x07, 0x00, 0x00, 0x00, 0x00, 0xE0, 0x0E, 0x00, 0x00, 0x00, 0x00, 0x70, 0x0C, 0x00, 0x00, 0x00, 0x00, 0x30, 0x0C, 0x00, 0x00, 0x00, 0x00, 0x38, 0x18, 0x00, 0x00, 0x00, 0x00, 0x18, 0x18, 0x00, 0x00, 0x00, 0x00, 0x18, 0x18, 0x00, 0x80, 0x01, 0x00, 0x18, 0x30, 0x07, 0xF0, 0x0F, 0xE0, 0x0C, 0x30, 0x07, 0xF0, 0x0F, 0xE0, 0x0C, 0x30, 0x03, 0xC0, 0x03, 0x80, 0x0C, 0x30, 0x00, 0x00, 0x00, 0x00, 0x0C, 0x30, 0x00, 0x00, 0x00, 0x00, 0x0C, 0x30, 0x00, 0x00, 0x00, 0x00, 0x0C, 0x30, 0x00, 0x00, 0x00, 0x00, 0x0C, 0x30, 0x00, 0x00, 0x00, 0x00, 0x0C, 0x30, 0x00, 0x00, 0x00, 0x00, 0x0C, 0x30, 0x00, 0x00, 0x00, 0x00, 0x0C, 0x38, 0x00, 0x00, 0x00, 0x00, 0x1C, 0x18, 0x07, 0xFF, 0xFF, 0xE0, 0x18, 0x18, 0x03, 0xFF, 0xFF, 0xC0, 0x18, 0x0C, 0x00, 0x00, 0x00, 0x00, 0x30, 0x0C, 0x00, 0x00, 0x00, 0x00, 0x30, 0x0E, 0x00, 0x00, 0x00, 0x00, 0x60, 0x07, 0x00, 0x00, 0x00, 0x00, 0xE0, 0x03, 0x00, 0x00, 0x00, 0x00, 0xC0, 0x01, 0x80, 0x00, 0x00, 0x01, 0x80, 0x01, 0xC0, 0x00, 0x00, 0x03, 0x80, 0x00, 0xE0, 0x00, 0x00, 0x07, 0x00, 0x00, 0x78, 0x00, 0x00, 0x1E, 0x00, 0x00, 0x3C, 0x00, 0x00, 0x3C, 0x00, 0x00, 0x0F, 0x00, 0x00, 0xF0, 0x00, 0x00, 0x03, 0xE0, 0x0F, 0xE0, 0x00, 0x00, 0x00, 0xFF, 0xFF, 0x00, 0x00, 0x00, 0x00, 0x1F, 0xF8, 0x00, 0x00, 0x00, 0x00, 0x00, 0x00, 0x00, 0x00, 0x00, 0x00, 0x00, 0x00, 0x00, 0x00};

const unsigned char PROGMEM frame53 [] = {0x00, 0x00, 0x00, 0x00, 0x00, 0x00, 0x00, 0x00, 0x00, 0x00, 0x00, 0x00, 0x00, 0x00, 0x1F, 0xFC, 0x00, 0x00, 0x00, 0x00, 0xFF, 0xFF, 0x00, 0x00, 0x00, 0x07, 0xE0, 0x07, 0xE0, 0x00, 0x00, 0x0F, 0x00, 0x00, 0xF0, 0x00, 0x00, 0x3C, 0x00, 0x00, 0x3C, 0x00, 0x00, 0x78, 0x00, 0x00, 0x1E, 0x00, 0x00, 0xE0, 0x00, 0x00, 0x07, 0x00, 0x01, 0xC0, 0x00, 0x00, 0x03, 0x80, 0x03, 0x80, 0x00, 0x00, 0x01, 0xC0, 0x03, 0x00, 0x00, 0x00, 0x00, 0xC0, 0x07, 0x00, 0x00, 0x00, 0x00, 0xE0, 0x0E, 0x00, 0x00, 0x00, 0x00, 0x70, 0x0C, 0x00, 0x00, 0x00, 0x00, 0x30, 0x0C, 0x00, 0x00, 0x00, 0x00, 0x38, 0x18, 0x00, 0x00, 0x00, 0x00, 0x18, 0x18, 0x00, 0x00, 0x00, 0x00, 0x18, 0x18, 0x00, 0x00, 0x00, 0x00, 0x18, 0x30, 0x07, 0xE0, 0x07, 0xE0, 0x0C, 0x30, 0x07, 0xF0, 0x0F, 0xE0, 0x0C, 0x30, 0x00, 0x00, 0x00, 0x00, 0x0C, 0x30, 0x00, 0x00, 0x00, 0x00, 0x0C, 0x30, 0x00, 0x00, 0x00, 0x00, 0x0C, 0x30, 0x00, 0x00, 0x00, 0x00, 0x0C, 0x30, 0x00, 0x00, 0x00, 0x00, 0x0C, 0x30, 0x00, 0x00, 0x00, 0x00, 0x0C, 0x30, 0x00, 0x00, 0x00, 0x00, 0x0C, 0x30, 0x00, 0x00, 0x00, 0x00, 0x0C, 0x38, 0x00, 0x00, 0x00, 0x00, 0x1C, 0x18, 0x07, 0xFF, 0xFF, 0xE0, 0x18, 0x18, 0x03, 0xFF, 0xFF, 0xC0, 0x18, 0x0C, 0x00, 0x00, 0x00, 0x00, 0x30, 0x0C, 0x00, 0x00, 0x00, 0x00, 0x30, 0x0E, 0x00, 0x00, 0x00, 0x00, 0x60, 0x07, 0x00, 0x00, 0x00, 0x00, 0xE0, 0x03, 0x00, 0x00, 0x00, 0x00, 0xC0, 0x01, 0x80, 0x00, 0x00, 0x01, 0x80, 0x01, 0xC0, 0x00, 0x00, 0x03, 0x80, 0x00, 0xE0, 0x00, 0x00, 0x07, 0x00, 0x00, 0x78, 0x00, 0x00, 0x1E, 0x00, 0x00, 0x3C, 0x00, 0x00, 0x3C, 0x00, 0x00, 0x0F, 0x00, 0x00, 0xF0, 0x00, 0x00, 0x03, 0xE0, 0x0F, 0xE0, 0x00, 0x00, 0x00, 0xFF, 0xFF, 0x00, 0x00, 0x00, 0x00, 0x1F, 0xF8, 0x00, 0x00, 0x00, 0x00, 0x00, 0x00, 0x00, 0x00, 0x00, 0x00, 0x00, 0x00, 0x00, 0x00};

const unsigned char PROGMEM frame63 [] = {0x00, 0x00, 0x00, 0x00, 0x00, 0x00, 0x00, 0x00, 0x00, 0x00, 0x00, 0x00, 0x00, 0x00, 0x1F, 0xFC, 0x00, 0x00, 0x00, 0x00, 0xFF, 0xFF, 0x00, 0x00, 0x00, 0x07, 0xE0, 0x07, 0xE0, 0x00, 0x00, 0x0F, 0x00, 0x00, 0xF0, 0x00, 0x00, 0x3C, 0x00, 0x00, 0x3C, 0x00, 0x00, 0x78, 0x00, 0x00, 0x1E, 0x00, 0x00, 0xE0, 0x00, 0x00, 0x07, 0x00, 0x01, 0xC0, 0x00, 0x00, 0x03, 0x80, 0x03, 0x80, 0x00, 0x00, 0x01, 0xC0, 0x03, 0x00, 0x00, 0x00, 0x00, 0xC0, 0x07, 0x00, 0x00, 0x00, 0x00, 0xE0, 0x0E, 0x00, 0x00, 0x00, 0x00, 0x70, 0x0C, 0x00, 0x00, 0x00, 0x00, 0x30, 0x0C, 0x00, 0x00, 0x00, 0x00, 0x38, 0x18, 0x00, 0x00, 0x00, 0x00, 0x18, 0x18, 0x00, 0x00, 0x00, 0x00, 0x18, 0x18, 0x00, 0x80, 0x01, 0x00, 0x18, 0x30, 0x07, 0xF0, 0x0F, 0xE0, 0x0C, 0x30, 0x07, 0xF0, 0x0F, 0xE0, 0x0C, 0x30, 0x03, 0xC0, 0x03, 0x80, 0x0C, 0x30, 0x00, 0x00, 0x00, 0x00, 0x0C, 0x30, 0x00, 0x00, 0x00, 0x00, 0x0C, 0x30, 0x00, 0x00, 0x00, 0x00, 0x0C, 0x30, 0x00, 0x00, 0x00, 0x00, 0x0C, 0x30, 0x00, 0x00, 0x00, 0x00, 0x0C, 0x30, 0x00, 0x00, 0x00, 0x00, 0x0C, 0x30, 0x00, 0x00, 0x00, 0x00, 0x0C, 0x38, 0x00, 0x00, 0x00, 0x00, 0x1C, 0x18, 0x07, 0xFF, 0xFF, 0xE0, 0x18, 0x18, 0x03, 0xFF, 0xFF, 0xC0, 0x18, 0x0C, 0x00, 0x00, 0x00, 0x00, 0x30, 0x0C, 0x00, 0x00, 0x00, 0x00, 0x30, 0x0E, 0x00, 0x00, 0x00, 0x00, 0x60, 0x07, 0x00, 0x00, 0x00, 0x00, 0xE0, 0x03, 0x00, 0x00, 0x00, 0x00, 0xC0, 0x01, 0x80, 0x00, 0x00, 0x01, 0x80, 0x01, 0xC0, 0x00, 0x00, 0x03, 0x80, 0x00, 0xE0, 0x00, 0x00, 0x07, 0x00, 0x00, 0x78, 0x00, 0x00, 0x1E, 0x00, 0x00, 0x3C, 0x00, 0x00, 0x3C, 0x00, 0x00, 0x0F, 0x00, 0x00, 0xF0, 0x00, 0x00, 0x03, 0xE0, 0x0F, 0xE0, 0x00, 0x00, 0x00, 0xFF, 0xFF, 0x00, 0x00, 0x00, 0x00, 0x1F, 0xF8, 0x00, 0x00, 0x00, 0x00, 0x00, 0x00, 0x00, 0x00, 0x00, 0x00, 0x00, 0x00, 0x00, 0x00};

const unsigned char PROGMEM frame73 [] = {0x00, 0x00, 0x00, 0x00, 0x00, 0x00, 0x00, 0x00, 0x00, 0x00, 0x00, 0x00, 0x00, 0x00, 0x1F, 0xFC, 0x00, 0x00, 0x00, 0x00, 0xFF, 0xFF, 0x00, 0x00, 0x00, 0x07, 0xE0, 0x07, 0xE0, 0x00, 0x00, 0x0F, 0x00, 0x00, 0xF0, 0x00, 0x00, 0x3C, 0x00, 0x00, 0x3C, 0x00, 0x00, 0x78, 0x00, 0x00, 0x1E, 0x00, 0x00, 0xE0, 0x00, 0x00, 0x07, 0x00, 0x01, 0xC0, 0x00, 0x00, 0x03, 0x80, 0x03, 0x80, 0x00, 0x00, 0x01, 0xC0, 0x03, 0x00, 0x00, 0x00, 0x00, 0xC0, 0x07, 0x00, 0x00, 0x00, 0x00, 0xE0, 0x0E, 0x00, 0x00, 0x00, 0x00, 0x70, 0x0C, 0x00, 0x00, 0x00, 0x00, 0x30, 0x0C, 0x00, 0x00, 0x00, 0x00, 0x30, 0x18, 0x00, 0x00, 0x00, 0x00, 0x18, 0x18, 0x00, 0x00, 0x00, 0x00, 0x18, 0x18, 0x03, 0xC0, 0x07, 0xC0, 0x18, 0x30, 0x07, 0xF0, 0x07, 0xE0, 0x0C, 0x30, 0x07, 0xE0, 0x0F, 0xE0, 0x0C, 0x30, 0x03, 0xE0, 0x07, 0xC0, 0x0C, 0x30, 0x00, 0x00, 0x00, 0x00, 0x0C, 0x30, 0x00, 0x00, 0x00, 0x00, 0x0C, 0x30, 0x00, 0x00, 0x00, 0x00, 0x0C, 0x30, 0x00, 0x00, 0x00, 0x00, 0x0C, 0x30, 0x00, 0x00, 0x00, 0x00, 0x0C, 0x30, 0x00, 0x00, 0x00, 0x00, 0x0C, 0x30, 0x00, 0x00, 0x00, 0x00, 0x0C, 0x18, 0x00, 0x00, 0x00, 0x00, 0x1C, 0x18, 0x07, 0xFF, 0xFF, 0xE0, 0x18, 0x18, 0x03, 0xFF, 0xFF, 0xC0, 0x18, 0x0C, 0x00, 0x00, 0x00, 0x00, 0x30, 0x0C, 0x00, 0x00, 0x00, 0x00, 0x30, 0x0E, 0x00, 0x00, 0x00, 0x00, 0x60, 0x07, 0x00, 0x00, 0x00, 0x00, 0xE0, 0x03, 0x00, 0x00, 0x00, 0x00, 0xC0, 0x01, 0x80, 0x00, 0x00, 0x01, 0x80, 0x01, 0xC0, 0x00, 0x00, 0x03, 0x80, 0x00, 0xE0, 0x00, 0x00, 0x07, 0x00, 0x00, 0x78, 0x00, 0x00, 0x1E, 0x00, 0x00, 0x3C, 0x00, 0x00, 0x3C, 0x00, 0x00, 0x0F, 0x00, 0x00, 0xF0, 0x00, 0x00, 0x03, 0xE0, 0x0F, 0xC0, 0x00, 0x00, 0x00, 0xFF, 0xFF, 0x00, 0x00, 0x00, 0x00, 0x1F, 0xF8, 0x00, 0x00, 0x00, 0x00, 0x00, 0x00, 0x00, 0x00, 0x00, 0x00, 0x00, 0x00, 0x00, 0x00};

const unsigned char PROGMEM frame83 [] = {0x00, 0x00, 0x00, 0x00, 0x00, 0x00, 0x00, 0x00, 0x00, 0x00, 0x00, 0x00, 0x00, 0x00, 0x1F, 0xFC, 0x00, 0x00, 0x00, 0x00, 0xFF, 0xFF, 0x00, 0x00, 0x00, 0x07, 0xE0, 0x07, 0xE0, 0x00, 0x00, 0x0F, 0x00, 0x00, 0xF0, 0x00, 0x00, 0x3C, 0x00, 0x00, 0x3C, 0x00, 0x00, 0x78, 0x00, 0x00, 0x1E, 0x00, 0x00, 0xE0, 0x00, 0x00, 0x07, 0x00, 0x01, 0xC0, 0x00, 0x00, 0x03, 0x80, 0x03, 0x80, 0x00, 0x00, 0x01, 0xC0, 0x03, 0x00, 0x00, 0x00, 0x00, 0xC0, 0x07, 0x00, 0x00, 0x00, 0x00, 0xE0, 0x0E, 0x00, 0x00, 0x00, 0x00, 0x70, 0x0C, 0x00, 0x00, 0x00, 0x00, 0x30, 0x0C, 0x00, 0x00, 0x00, 0x00, 0x30, 0x18, 0x00, 0x00, 0x00, 0x00, 0x18, 0x18, 0x01, 0x80, 0x03, 0x80, 0x18, 0x18, 0x03, 0xE0, 0x07, 0xC0, 0x18, 0x30, 0x03, 0xE0, 0x07, 0xC0, 0x0C, 0x30, 0x07, 0xE0, 0x07, 0xE0, 0x0C, 0x30, 0x03, 0xE0, 0x07, 0xC0, 0x0C, 0x30, 0x01, 0xC0, 0x03, 0x80, 0x0C, 0x30, 0x00, 0x00, 0x00, 0x00, 0x0C, 0x30, 0x00, 0x00, 0x00, 0x00, 0x0C, 0x30, 0x00, 0x00, 0x00, 0x00, 0x0C, 0x30, 0x00, 0x00, 0x00, 0x00, 0x0C, 0x30, 0x00, 0x00, 0x00, 0x00, 0x0C, 0x30, 0x00, 0x00, 0x00, 0x00, 0x0C, 0x18, 0x00, 0x00, 0x00, 0x00, 0x1C, 0x18, 0x07, 0xFF, 0xFF, 0xE0, 0x18, 0x18, 0x03, 0xFF, 0xFF, 0xC0, 0x18, 0x0C, 0x00, 0x00, 0x00, 0x00, 0x30, 0x0C, 0x00, 0x00, 0x00, 0x00, 0x30, 0x0E, 0x00, 0x00, 0x00, 0x00, 0x60, 0x07, 0x00, 0x00, 0x00, 0x00, 0xE0, 0x03, 0x00, 0x00, 0x00, 0x00, 0xC0, 0x01, 0x80, 0x00, 0x00, 0x01, 0x80, 0x01, 0xC0, 0x00, 0x00, 0x03, 0x80, 0x00, 0xE0, 0x00, 0x00, 0x07, 0x00, 0x00, 0x78, 0x00, 0x00, 0x1E, 0x00, 0x00, 0x3C, 0x00, 0x00, 0x3C, 0x00, 0x00, 0x0F, 0x00, 0x00, 0xF0, 0x00, 0x00, 0x03, 0xE0, 0x0F, 0xC0, 0x00, 0x00, 0x00, 0xFF, 0xFF, 0x00, 0x00, 0x00, 0x00, 0x1F, 0xF8, 0x00, 0x00, 0x00, 0x00, 0x00, 0x00, 0x00, 0x00, 0x00, 0x00, 0x00, 0x00, 0x00, 0x00};

//Blessed***********************/
const unsigned char PROGMEM frame04 [] = {0x00, 0x00, 0x00, 0x00, 0x00, 0x00, 0x00, 0x00, 0x00, 0x00, 0x00, 0x00, 0x00, 0x00, 0x1F, 0xFC, 0x00, 0x00, 0x00, 0x00, 0xFF, 0xFF, 0x00, 0x00, 0x00, 0x07, 0xE0, 0x07, 0xE0, 0x00, 0x00, 0x0F, 0x00, 0x00, 0xF0, 0x00, 0x00, 0x3C, 0x00, 0x00, 0x3C, 0x00, 0x00, 0x78, 0x00, 0x00, 0x1E, 0x00, 0x00, 0xE0, 0x00, 0x00, 0x07, 0x00, 0x01, 0xC0, 0x00, 0x00, 0x03, 0x80, 0x03, 0x80, 0x00, 0x00, 0x01, 0xC0, 0x03, 0x00, 0x00, 0x00, 0x00, 0xC0, 0x07, 0x00, 0x00, 0x00, 0x00, 0xE0, 0x0E, 0x00, 0x00, 0x00, 0x00, 0x70, 0x0C, 0x00, 0x00, 0x00, 0x00, 0x30, 0x0C, 0x00, 0x00, 0x00, 0x00, 0x38, 0x18, 0x00, 0x00, 0x00, 0x00, 0x18, 0x18, 0x07, 0xC0, 0x03, 0xE0, 0x18, 0x18, 0x1F, 0xF0, 0x0F, 0xF8, 0x18, 0x30, 0x38, 0x78, 0x1E, 0x3C, 0x0C, 0x30, 0x30, 0x18, 0x18, 0x0C, 0x0C, 0x30, 0x00, 0x00, 0x00, 0x00, 0x0C, 0x30, 0x00, 0x00, 0x00, 0x00, 0x0C, 0x30, 0x00, 0x00, 0x00, 0x00, 0x0C, 0x30, 0x00, 0x00, 0x00, 0x00, 0x0C, 0x30, 0x00, 0x00, 0x00, 0x00, 0x0C, 0x30, 0x00, 0x00, 0x00, 0x00, 0x0C, 0x30, 0x00, 0x00, 0x00, 0x00, 0x0C, 0x30, 0x04, 0x00, 0x00, 0x20, 0x0C, 0x38, 0x06, 0x00, 0x00, 0x60, 0x1C, 0x18, 0x07, 0x00, 0x00, 0xE0, 0x18, 0x18, 0x03, 0xC0, 0x03, 0xC0, 0x18, 0x0C, 0x01, 0xF0, 0x0F, 0x80, 0x30, 0x0C, 0x00, 0x7F, 0xFE, 0x00, 0x30, 0x0E, 0x00, 0x1F, 0xF8, 0x00, 0x60, 0x07, 0x00, 0x00, 0x00, 0x00, 0xE0, 0x03, 0x00, 0x00, 0x00, 0x00, 0xC0, 0x01, 0x80, 0x00, 0x00, 0x01, 0x80, 0x01, 0xC0, 0x00, 0x00, 0x03, 0x80, 0x00, 0xE0, 0x00, 0x00, 0x07, 0x00, 0x00, 0x78, 0x00, 0x00, 0x1E, 0x00, 0x00, 0x3C, 0x00, 0x00, 0x3C, 0x00, 0x00, 0x0F, 0x00, 0x00, 0xF0, 0x00, 0x00, 0x03, 0xE0, 0x0F, 0xE0, 0x00, 0x00, 0x00, 0xFF, 0xFF, 0x00, 0x00, 0x00, 0x00, 0x1F, 0xF8, 0x00, 0x00, 0x00, 0x00, 0x00, 0x00, 0x00, 0x00, 0x00, 0x00, 0x00, 0x00, 0x00, 0x00};

const unsigned char PROGMEM frame14 [] = {0x00, 0x00, 0x00, 0x00, 0x00, 0x00, 0x00, 0x00, 0x00, 0x00, 0x00, 0x00, 0x00, 0x00, 0x1F, 0xFC, 0x00, 0x00, 0x00, 0x00, 0xFF, 0xFF, 0x00, 0x00, 0x00, 0x07, 0xE0, 0x07, 0xE0, 0x00, 0x00, 0x0F, 0x00, 0x00, 0xF0, 0x00, 0x00, 0x3C, 0x00, 0x00, 0x3C, 0x00, 0x00, 0x78, 0x00, 0x00, 0x1E, 0x00, 0x00, 0xE0, 0x00, 0x00, 0x07, 0x00, 0x01, 0xC0, 0x00, 0x00, 0x03, 0x80, 0x03, 0x80, 0x00, 0x00, 0x01, 0xC0, 0x03, 0x00, 0x00, 0x00, 0x00, 0xC0, 0x06, 0x00, 0x00, 0x00, 0x00, 0xE0, 0x0E, 0x00, 0x00, 0x00, 0x00, 0x70, 0x0C, 0x00, 0x00, 0x00, 0x00, 0x30, 0x0C, 0x00, 0x00, 0x00, 0x00, 0x30, 0x18, 0x00, 0x00, 0x00, 0x00, 0x18, 0x18, 0x0F, 0xE0, 0x07, 0xF0, 0x18, 0x18, 0x3F, 0xF8, 0x1F, 0xFC, 0x18, 0x30, 0x38, 0x18, 0x1C, 0x1C, 0x0C, 0x30, 0x20, 0x00, 0x00, 0x04, 0x0C, 0x30, 0x00, 0x00, 0x00, 0x00, 0x0C, 0x30, 0x00, 0x00, 0x00, 0x00, 0x0C, 0x30, 0x00, 0x00, 0x00, 0x00, 0x0C, 0x30, 0x00, 0x00, 0x00, 0x00, 0x0C, 0x30, 0x00, 0x00, 0x00, 0x00, 0x0C, 0x30, 0x00, 0x00, 0x00, 0x00, 0x0C, 0x30, 0x04, 0x00, 0x00, 0x20, 0x0C, 0x30, 0x0E, 0x00, 0x00, 0x70, 0x0C, 0x18, 0x07, 0x00, 0x00, 0xE0, 0x1C, 0x18, 0x03, 0x80, 0x01, 0xC0, 0x18, 0x18, 0x01, 0xE0, 0x03, 0x80, 0x18, 0x0C, 0x00, 0xFC, 0x1F, 0x00, 0x30, 0x0C, 0x00, 0x3F, 0xFC, 0x00, 0x30, 0x0E, 0x00, 0x07, 0xE0, 0x00, 0x60, 0x07, 0x00, 0x00, 0x00, 0x00, 0xE0, 0x03, 0x00, 0x00, 0x00, 0x00, 0xC0, 0x01, 0x80, 0x00, 0x00, 0x01, 0x80, 0x01, 0xC0, 0x00, 0x00, 0x03, 0x80, 0x00, 0xE0, 0x00, 0x00, 0x07, 0x00, 0x00, 0x78, 0x00, 0x00, 0x1E, 0x00, 0x00, 0x3C, 0x00, 0x00, 0x3C, 0x00, 0x00, 0x0F, 0x00, 0x00, 0xF0, 0x00, 0x00, 0x03, 0xE0, 0x0F, 0xE0, 0x00, 0x00, 0x00, 0xFF, 0xFF, 0x00, 0x00, 0x00, 0x00, 0x1F, 0xF8, 0x00, 0x00, 0x00, 0x00, 0x00, 0x00, 0x00, 0x00, 0x00, 0x00, 0x00, 0x00, 0x00, 0x00};

const unsigned char PROGMEM frame24 [] = {0x00, 0x00, 0x00, 0x00, 0x00, 0x00, 0x00, 0x00, 0x00, 0x00, 0x00, 0x00, 0x00, 0x00, 0x1F, 0xFC, 0x00, 0x00, 0x00, 0x00, 0xFF, 0xFF, 0x00, 0x00, 0x00, 0x07, 0xE0, 0x07, 0xE0, 0x00, 0x00, 0x0F, 0x00, 0x00, 0xF0, 0x00, 0x00, 0x3C, 0x00, 0x00, 0x3C, 0x00, 0x00, 0x78, 0x00, 0x00, 0x1E, 0x00, 0x00, 0xE0, 0x00, 0x00, 0x07, 0x00, 0x01, 0xC0, 0x00, 0x00, 0x03, 0x80, 0x03, 0x80, 0x00, 0x00, 0x01, 0xC0, 0x03, 0x00, 0x00, 0x00, 0x00, 0xC0, 0x07, 0x00, 0x00, 0x00, 0x00, 0xE0, 0x0E, 0x00, 0x00, 0x00, 0x00, 0x70, 0x0C, 0x00, 0x00, 0x00, 0x00, 0x30, 0x0C, 0x00, 0x00, 0x00, 0x00, 0x30, 0x18, 0x07, 0xE0, 0x07, 0xE0, 0x18, 0x18, 0x1F, 0xF8, 0x1F, 0xF8, 0x18, 0x18, 0x38, 0x38, 0x1C, 0x1C, 0x18, 0x30, 0x30, 0x00, 0x00, 0x0C, 0x0C, 0x30, 0x00, 0x00, 0x00, 0x00, 0x0C, 0x30, 0x00, 0x00, 0x00, 0x00, 0x0C, 0x30, 0x00, 0x00, 0x00, 0x00, 0x0C, 0x30, 0x00, 0x00, 0x00, 0x00, 0x0C, 0x30, 0x00, 0x00, 0x00, 0x00, 0x0C, 0x30, 0x00, 0x00, 0x00, 0x00, 0x0C, 0x30, 0x0C, 0x00, 0x00, 0x30, 0x0C, 0x30, 0x0C, 0x00, 0x00, 0x30, 0x0C, 0x30, 0x06, 0x00, 0x00, 0x60, 0x0C, 0x18, 0x07, 0x00, 0x00, 0xE0, 0x1C, 0x18, 0x03, 0xC0, 0x01, 0xC0, 0x18, 0x18, 0x01, 0xF0, 0x0F, 0x80, 0x18, 0x0C, 0x00, 0x7F, 0xFE, 0x00, 0x30, 0x0C, 0x00, 0x1F, 0xF8, 0x00, 0x30, 0x0E, 0x00, 0x00, 0x00, 0x00, 0x60, 0x07, 0x00, 0x00, 0x00, 0x00, 0xE0, 0x03, 0x00, 0x00, 0x00, 0x00, 0xC0, 0x01, 0x80, 0x00, 0x00, 0x01, 0x80, 0x01, 0xC0, 0x00, 0x00, 0x03, 0x80, 0x00, 0xE0, 0x00, 0x00, 0x07, 0x00, 0x00, 0x78, 0x00, 0x00, 0x1E, 0x00, 0x00, 0x3C, 0x00, 0x00, 0x3C, 0x00, 0x00, 0x0F, 0x00, 0x00, 0xF0, 0x00, 0x00, 0x03, 0xE0, 0x0F, 0xE0, 0x00, 0x00, 0x00, 0xFF, 0xFF, 0x00, 0x00, 0x00, 0x00, 0x1F, 0xF8, 0x00, 0x00, 0x00, 0x00, 0x00, 0x00, 0x00, 0x00, 0x00, 0x00, 0x00, 0x00, 0x00, 0x00};

const unsigned char PROGMEM frame34 [] = {0x00, 0x00, 0x00, 0x00, 0x00, 0x00, 0x00, 0x00, 0x00, 0x00, 0x00, 0x00, 0x00, 0x00, 0x1F, 0xFC, 0x00, 0x00, 0x00, 0x00, 0xFF, 0xFF, 0x00, 0x00, 0x00, 0x07, 0xE0, 0x07, 0xE0, 0x00, 0x00, 0x0F, 0x00, 0x00, 0xF0, 0x00, 0x00, 0x3C, 0x00, 0x00, 0x3C, 0x00, 0x00, 0x78, 0x00, 0x00, 0x1E, 0x00, 0x00, 0xE0, 0x00, 0x00, 0x07, 0x00, 0x01, 0xC0, 0x00, 0x00, 0x03, 0x80, 0x03, 0x80, 0x00, 0x00, 0x01, 0xC0, 0x03, 0x00, 0x00, 0x00, 0x00, 0xC0, 0x07, 0x00, 0x00, 0x00, 0x00, 0xE0, 0x0E, 0x00, 0x00, 0x00, 0x00, 0x70, 0x0C, 0x00, 0x00, 0x00, 0x00, 0x30, 0x0C, 0x03, 0x80, 0x02, 0x80, 0x38, 0x18, 0x0F, 0xF0, 0x0F, 0xF0, 0x18, 0x18, 0x1E, 0x78, 0x1E, 0xBC, 0x18, 0x18, 0x38, 0x08, 0x18, 0x1C, 0x18, 0x30, 0x30, 0x00, 0x00, 0x04, 0x0C, 0x30, 0x00, 0x00, 0x00, 0x00, 0x0C, 0x30, 0x00, 0x00, 0x00, 0x00, 0x0C, 0x30, 0x00, 0x00, 0x00, 0x00, 0x0C, 0x30, 0x00, 0x00, 0x00, 0x00, 0x0C, 0x30, 0x00, 0x00, 0x00, 0x00, 0x0C, 0x30, 0x18, 0x00, 0x00, 0x18, 0x0C, 0x30, 0x0C, 0x00, 0x00, 0x30, 0x0C, 0x30, 0x0E, 0x00, 0x00, 0x70, 0x0C, 0x30, 0x06, 0x00, 0x00, 0xE0, 0x0C, 0x18, 0x03, 0x80, 0x01, 0xC0, 0x1C, 0x18, 0x01, 0xC0, 0x03, 0x80, 0x18, 0x18, 0x00, 0xF8, 0x3F, 0x00, 0x18, 0x0C, 0x00, 0x3F, 0xFC, 0x00, 0x30, 0x0C, 0x00, 0x07, 0xE0, 0x00, 0x30, 0x0E, 0x00, 0x00, 0x00, 0x00, 0x60, 0x07, 0x00, 0x00, 0x00, 0x00, 0xE0, 0x03, 0x00, 0x00, 0x00, 0x00, 0xC0, 0x01, 0x80, 0x00, 0x00, 0x01, 0x80, 0x01, 0xC0, 0x00, 0x00, 0x03, 0x80, 0x00, 0xE0, 0x00, 0x00, 0x07, 0x00, 0x00, 0x78, 0x00, 0x00, 0x1E, 0x00, 0x00, 0x3C, 0x00, 0x00, 0x3C, 0x00, 0x00, 0x0F, 0x00, 0x00, 0xF0, 0x00, 0x00, 0x03, 0xE0, 0x0F, 0xE0, 0x00, 0x00, 0x00, 0xFF, 0xFF, 0x00, 0x00, 0x00, 0x00, 0x1F, 0xF8, 0x00, 0x00, 0x00, 0x00, 0x00, 0x00, 0x00, 0x00, 0x00, 0x00, 0x00, 0x00, 0x00, 0x00};

const unsigned char PROGMEM frame44 [] = {0x00, 0x00, 0x00, 0x00, 0x00, 0x00, 0x00, 0x00, 0x00, 0x00, 0x00, 0x00, 0x00, 0x00, 0x1F, 0xFC, 0x00, 0x00, 0x00, 0x00, 0xFF, 0xFF, 0x00, 0x00, 0x00, 0x07, 0xE0, 0x07, 0xE0, 0x00, 0x00, 0x0F, 0x00, 0x00, 0xF0, 0x00, 0x00, 0x3C, 0x00, 0x00, 0x3C, 0x00, 0x00, 0x78, 0x00, 0x00, 0x1E, 0x00, 0x00, 0xE0, 0x00, 0x00, 0x07, 0x00, 0x01, 0xC0, 0x00, 0x00, 0x03, 0x80, 0x03, 0x80, 0x00, 0x00, 0x01, 0xC0, 0x03, 0x00, 0x00, 0x00, 0x00, 0xC0, 0x07, 0x00, 0x00, 0x00, 0x00, 0xE0, 0x0E, 0x00, 0x00, 0x00, 0x00, 0x70, 0x0C, 0x00, 0x00, 0x00, 0x00, 0x30, 0x0C, 0x03, 0x80, 0x02, 0x80, 0x38, 0x18, 0x0F, 0xF0, 0x0F, 0xF0, 0x18, 0x18, 0x1E, 0x78, 0x1E, 0xBC, 0x18, 0x18, 0x38, 0x08, 0x18, 0x1C, 0x18, 0x30, 0x30, 0x00, 0x00, 0x04, 0x0C, 0x30, 0x00, 0x00, 0x00, 0x00, 0x0C, 0x30, 0x00, 0x00, 0x00, 0x00, 0x0C, 0x30, 0x00, 0x00, 0x00, 0x00, 0x0C, 0x30, 0x00, 0x00, 0x00, 0x00, 0x0C, 0x30, 0x00, 0x00, 0x00, 0x00, 0x0C, 0x30, 0x18, 0x00, 0x00, 0x18, 0x0C, 0x30, 0x0C, 0x00, 0x00, 0x30, 0x0C, 0x30, 0x0E, 0x00, 0x00, 0x70, 0x0C, 0x30, 0x06, 0x00, 0x00, 0xE0, 0x0C, 0x18, 0x03, 0x80, 0x01, 0xC0, 0x1C, 0x18, 0x01, 0xC0, 0x03, 0x80, 0x18, 0x18, 0x00, 0xF8, 0x3F, 0x00, 0x18, 0x0C, 0x00, 0x3F, 0xFC, 0x00, 0x30, 0x0C, 0x00, 0x07, 0xE0, 0x00, 0x30, 0x0E, 0x00, 0x00, 0x00, 0x00, 0x60, 0x07, 0x00, 0x00, 0x00, 0x00, 0xE0, 0x03, 0x00, 0x00, 0x00, 0x00, 0xC0, 0x01, 0x80, 0x00, 0x00, 0x01, 0x80, 0x01, 0xC0, 0x00, 0x00, 0x03, 0x80, 0x00, 0xE0, 0x00, 0x00, 0x07, 0x00, 0x00, 0x78, 0x00, 0x00, 0x1E, 0x00, 0x00, 0x3C, 0x00, 0x00, 0x3C, 0x00, 0x00, 0x0F, 0x00, 0x00, 0xF0, 0x00, 0x00, 0x03, 0xE0, 0x0F, 0xE0, 0x00, 0x00, 0x00, 0xFF, 0xFF, 0x00, 0x00, 0x00, 0x00, 0x1F, 0xF8, 0x00, 0x00, 0x00, 0x00, 0x00, 0x00, 0x00, 0x00, 0x00, 0x00, 0x00, 0x00, 0x00, 0x00};

const unsigned char PROGMEM frame54 [] = {0x00, 0x00, 0x00, 0x00, 0x00, 0x00, 0x00, 0x00, 0x00, 0x00, 0x00, 0x00, 0x00, 0x00, 0x1F, 0xFC, 0x00, 0x00, 0x00, 0x00, 0xFF, 0xFF, 0x00, 0x00, 0x00, 0x07, 0xE0, 0x07, 0xE0, 0x00, 0x00, 0x0F, 0x00, 0x00, 0xF0, 0x00, 0x00, 0x3C, 0x00, 0x00, 0x3C, 0x00, 0x00, 0x78, 0x00, 0x00, 0x1E, 0x00, 0x00, 0xE0, 0x00, 0x00, 0x07, 0x00, 0x01, 0xC0, 0x00, 0x00, 0x03, 0x80, 0x03, 0x80, 0x00, 0x00, 0x01, 0xC0, 0x03, 0x00, 0x00, 0x00, 0x00, 0xC0, 0x07, 0x00, 0x00, 0x00, 0x00, 0xE0, 0x0E, 0x00, 0x00, 0x00, 0x00, 0x70, 0x0C, 0x00, 0x00, 0x00, 0x00, 0x30, 0x0C, 0x00, 0x00, 0x00, 0x00, 0x30, 0x18, 0x07, 0xE0, 0x07, 0xE0, 0x18, 0x18, 0x1F, 0xF8, 0x1F, 0xF8, 0x18, 0x18, 0x38, 0x38, 0x1C, 0x1C, 0x18, 0x30, 0x30, 0x00, 0x00, 0x0C, 0x0C, 0x30, 0x00, 0x00, 0x00, 0x00, 0x0C, 0x30, 0x00, 0x00, 0x00, 0x00, 0x0C, 0x30, 0x00, 0x00, 0x00, 0x00, 0x0C, 0x30, 0x00, 0x00, 0x00, 0x00, 0x0C, 0x30, 0x00, 0x00, 0x00, 0x00, 0x0C, 0x30, 0x00, 0x00, 0x00, 0x00, 0x0C, 0x30, 0x0C, 0x00, 0x00, 0x30, 0x0C, 0x30, 0x0C, 0x00, 0x00, 0x30, 0x0C, 0x30, 0x06, 0x00, 0x00, 0x60, 0x0C, 0x18, 0x07, 0x00, 0x00, 0xE0, 0x1C, 0x18, 0x03, 0xC0, 0x01, 0xC0, 0x18, 0x18, 0x01, 0xF0, 0x0F, 0x80, 0x18, 0x0C, 0x00, 0x7F, 0xFE, 0x00, 0x30, 0x0C, 0x00, 0x1F, 0xF8, 0x00, 0x30, 0x0E, 0x00, 0x00, 0x00, 0x00, 0x60, 0x07, 0x00, 0x00, 0x00, 0x00, 0xE0, 0x03, 0x00, 0x00, 0x00, 0x00, 0xC0, 0x01, 0x80, 0x00, 0x00, 0x01, 0x80, 0x01, 0xC0, 0x00, 0x00, 0x03, 0x80, 0x00, 0xE0, 0x00, 0x00, 0x07, 0x00, 0x00, 0x78, 0x00, 0x00, 0x1E, 0x00, 0x00, 0x3C, 0x00, 0x00, 0x3C, 0x00, 0x00, 0x0F, 0x00, 0x00, 0xF0, 0x00, 0x00, 0x03, 0xE0, 0x0F, 0xE0, 0x00, 0x00, 0x00, 0xFF, 0xFF, 0x00, 0x00, 0x00, 0x00, 0x1F, 0xF8, 0x00, 0x00, 0x00, 0x00, 0x00, 0x00, 0x00, 0x00, 0x00, 0x00, 0x00, 0x00, 0x00, 0x00};

const unsigned char PROGMEM frame64 [] = {0x00, 0x00, 0x00, 0x00, 0x00, 0x00, 0x00, 0x00, 0x00, 0x00, 0x00, 0x00, 0x00, 0x00, 0x1F, 0xFC, 0x00, 0x00, 0x00, 0x00, 0xFF, 0xFF, 0x00, 0x00, 0x00, 0x07, 0xE0, 0x07, 0xE0, 0x00, 0x00, 0x0F, 0x00, 0x00, 0xF0, 0x00, 0x00, 0x3C, 0x00, 0x00, 0x3C, 0x00, 0x00, 0x78, 0x00, 0x00, 0x1E, 0x00, 0x00, 0xE0, 0x00, 0x00, 0x07, 0x00, 0x01, 0xC0, 0x00, 0x00, 0x03, 0x80, 0x03, 0x80, 0x00, 0x00, 0x01, 0xC0, 0x03, 0x00, 0x00, 0x00, 0x00, 0xC0, 0x06, 0x00, 0x00, 0x00, 0x00, 0xE0, 0x0E, 0x00, 0x00, 0x00, 0x00, 0x70, 0x0C, 0x00, 0x00, 0x00, 0x00, 0x30, 0x0C, 0x00, 0x00, 0x00, 0x00, 0x30, 0x18, 0x00, 0x00, 0x00, 0x00, 0x18, 0x18, 0x0F, 0xE0, 0x07, 0xF0, 0x18, 0x18, 0x3F, 0xF8, 0x1F, 0xFC, 0x18, 0x30, 0x38, 0x18, 0x1C, 0x1C, 0x0C, 0x30, 0x20, 0x00, 0x00, 0x04, 0x0C, 0x30, 0x00, 0x00, 0x00, 0x00, 0x0C, 0x30, 0x00, 0x00, 0x00, 0x00, 0x0C, 0x30, 0x00, 0x00, 0x00, 0x00, 0x0C, 0x30, 0x00, 0x00, 0x00, 0x00, 0x0C, 0x30, 0x00, 0x00, 0x00, 0x00, 0x0C, 0x30, 0x00, 0x00, 0x00, 0x00, 0x0C, 0x30, 0x04, 0x00, 0x00, 0x20, 0x0C, 0x30, 0x0E, 0x00, 0x00, 0x70, 0x0C, 0x18, 0x07, 0x00, 0x00, 0xE0, 0x1C, 0x18, 0x03, 0x80, 0x01, 0xC0, 0x18, 0x18, 0x01, 0xE0, 0x03, 0x80, 0x18, 0x0C, 0x00, 0xFC, 0x1F, 0x00, 0x30, 0x0C, 0x00, 0x3F, 0xFC, 0x00, 0x30, 0x0E, 0x00, 0x07, 0xE0, 0x00, 0x60, 0x07, 0x00, 0x00, 0x00, 0x00, 0xE0, 0x03, 0x00, 0x00, 0x00, 0x00, 0xC0, 0x01, 0x80, 0x00, 0x00, 0x01, 0x80, 0x01, 0xC0, 0x00, 0x00, 0x03, 0x80, 0x00, 0xE0, 0x00, 0x00, 0x07, 0x00, 0x00, 0x78, 0x00, 0x00, 0x1E, 0x00, 0x00, 0x3C, 0x00, 0x00, 0x3C, 0x00, 0x00, 0x0F, 0x00, 0x00, 0xF0, 0x00, 0x00, 0x03, 0xE0, 0x0F, 0xE0, 0x00, 0x00, 0x00, 0xFF, 0xFF, 0x00, 0x00, 0x00, 0x00, 0x1F, 0xF8, 0x00, 0x00, 0x00, 0x00, 0x00, 0x00, 0x00, 0x00, 0x00, 0x00, 0x00, 0x00, 0x00, 0x00};

const unsigned char PROGMEM frame74 [] = {0x00, 0x00, 0x00, 0x00, 0x00, 0x00, 0x00, 0x00, 0x00, 0x00, 0x00, 0x00, 0x00, 0x00, 0x1F, 0xFC, 0x00, 0x00, 0x00, 0x00, 0xFF, 0xFF, 0x00, 0x00, 0x00, 0x07, 0xE0, 0x07, 0xE0, 0x00, 0x00, 0x0F, 0x00, 0x00, 0xF0, 0x00, 0x00, 0x3C, 0x00, 0x00, 0x3C, 0x00, 0x00, 0x78, 0x00, 0x00, 0x1E, 0x00, 0x00, 0xE0, 0x00, 0x00, 0x07, 0x00, 0x01, 0xC0, 0x00, 0x00, 0x03, 0x80, 0x03, 0x80, 0x00, 0x00, 0x01, 0xC0, 0x03, 0x00, 0x00, 0x00, 0x00, 0xC0, 0x07, 0x00, 0x00, 0x00, 0x00, 0xE0, 0x0E, 0x00, 0x00, 0x00, 0x00, 0x70, 0x0C, 0x00, 0x00, 0x00, 0x00, 0x30, 0x0C, 0x00, 0x00, 0x00, 0x00, 0x38, 0x18, 0x00, 0x00, 0x00, 0x00, 0x18, 0x18, 0x07, 0xC0, 0x03, 0xE0, 0x18, 0x18, 0x1F, 0xF0, 0x0F, 0xF8, 0x18, 0x30, 0x38, 0x78, 0x1E, 0x3C, 0x0C, 0x30, 0x30, 0x18, 0x18, 0x0C, 0x0C, 0x30, 0x00, 0x00, 0x00, 0x00, 0x0C, 0x30, 0x00, 0x00, 0x00, 0x00, 0x0C, 0x30, 0x00, 0x00, 0x00, 0x00, 0x0C, 0x30, 0x00, 0x00, 0x00, 0x00, 0x0C, 0x30, 0x00, 0x00, 0x00, 0x00, 0x0C, 0x30, 0x00, 0x00, 0x00, 0x00, 0x0C, 0x30, 0x00, 0x00, 0x00, 0x00, 0x0C, 0x30, 0x04, 0x00, 0x00, 0x20, 0x0C, 0x38, 0x06, 0x00, 0x00, 0x60, 0x1C, 0x18, 0x07, 0x00, 0x00, 0xE0, 0x18, 0x18, 0x03, 0xC0, 0x03, 0xC0, 0x18, 0x0C, 0x01, 0xF0, 0x0F, 0x80, 0x30, 0x0C, 0x00, 0x7F, 0xFE, 0x00, 0x30, 0x0E, 0x00, 0x1F, 0xF8, 0x00, 0x60, 0x07, 0x00, 0x00, 0x00, 0x00, 0xE0, 0x03, 0x00, 0x00, 0x00, 0x00, 0xC0, 0x01, 0x80, 0x00, 0x00, 0x01, 0x80, 0x01, 0xC0, 0x00, 0x00, 0x03, 0x80, 0x00, 0xE0, 0x00, 0x00, 0x07, 0x00, 0x00, 0x78, 0x00, 0x00, 0x1E, 0x00, 0x00, 0x3C, 0x00, 0x00, 0x3C, 0x00, 0x00, 0x0F, 0x00, 0x00, 0xF0, 0x00, 0x00, 0x03, 0xE0, 0x0F, 0xE0, 0x00, 0x00, 0x00, 0xFF, 0xFF, 0x00, 0x00, 0x00, 0x00, 0x1F, 0xF8, 0x00, 0x00, 0x00, 0x00, 0x00, 0x00, 0x00, 0x00, 0x00, 0x00, 0x00, 0x00, 0x00, 0x00};

const unsigned char PROGMEM frame94 [] = {0x00, 0x00, 0x00, 0x00, 0x00, 0x00, 0x00, 0x00, 0x00, 0x00, 0x00, 0x00, 0x00, 0x00, 0x1F, 0xFC, 0x00, 0x00, 0x00, 0x00, 0xFF, 0xFF, 0x00, 0x00, 0x00, 0x07, 0xE0, 0x07, 0xE0, 0x00, 0x00, 0x0F, 0x00, 0x00, 0xF0, 0x00, 0x00, 0x3C, 0x00, 0x00, 0x3C, 0x00, 0x00, 0x78, 0x00, 0x00, 0x1E, 0x00, 0x00, 0xE0, 0x00, 0x00, 0x07, 0x00, 0x01, 0xC0, 0x00, 0x00, 0x03, 0x80, 0x03, 0x80, 0x00, 0x00, 0x01, 0xC0, 0x03, 0x00, 0x00, 0x00, 0x00, 0xC0, 0x07, 0x00, 0x00, 0x00, 0x00, 0xE0, 0x0E, 0x00, 0x00, 0x00, 0x00, 0x70, 0x0C, 0x00, 0x00, 0x00, 0x00, 0x30, 0x0C, 0x00, 0x00, 0x00, 0x00, 0x38, 0x18, 0x00, 0x00, 0x00, 0x00, 0x18, 0x18, 0x07, 0x80, 0x03, 0xC0, 0x18, 0x18, 0x1F, 0xF0, 0x0F, 0xF8, 0x18, 0x30, 0x3C, 0x78, 0x1E, 0x3C, 0x0C, 0x30, 0x30, 0x18, 0x18, 0x0C, 0x0C, 0x30, 0x00, 0x00, 0x00, 0x00, 0x0C, 0x30, 0x00, 0x00, 0x00, 0x00, 0x0C, 0x30, 0x00, 0x00, 0x00, 0x00, 0x0C, 0x30, 0x00, 0x00, 0x00, 0x00, 0x0C, 0x30, 0x00, 0x00, 0x00, 0x00, 0x0C, 0x30, 0x00, 0x00, 0x00, 0x00, 0x0C, 0x30, 0x00, 0x00, 0x00, 0x00, 0x0C, 0x30, 0x00, 0x00, 0x00, 0x00, 0x0C, 0x38, 0x06, 0x00, 0x00, 0x60, 0x1C, 0x18, 0x07, 0x00, 0x00, 0xE0, 0x18, 0x18, 0x03, 0x80, 0x01, 0xC0, 0x18, 0x0C, 0x01, 0xE0, 0x07, 0x80, 0x30, 0x0C, 0x00, 0x7E, 0xBE, 0x00, 0x30, 0x0E, 0x00, 0x1F, 0xFC, 0x00, 0x60, 0x07, 0x00, 0x02, 0x80, 0x00, 0xE0, 0x03, 0x00, 0x00, 0x00, 0x00, 0xC0, 0x01, 0x80, 0x00, 0x00, 0x01, 0x80, 0x01, 0xC0, 0x00, 0x00, 0x03, 0x80, 0x00, 0xE0, 0x00, 0x00, 0x07, 0x00, 0x00, 0x78, 0x00, 0x00, 0x1E, 0x00, 0x00, 0x3C, 0x00, 0x00, 0x3C, 0x00, 0x00, 0x0F, 0x00, 0x00, 0xF0, 0x00, 0x00, 0x03, 0xE0, 0x0F, 0xE0, 0x00, 0x00, 0x00, 0xFF, 0xFF, 0x00, 0x00, 0x00, 0x00, 0x1F, 0xF8, 0x00, 0x00, 0x00, 0x00, 0x00, 0x00, 0x00, 0x00, 0x00, 0x00, 0x00, 0x00, 0x00, 0x00};

//******CRYING/
const unsigned char PROGMEM frame05 [] = {0x00, 0x00, 0x00, 0x00, 0x00, 0x00, 0x00, 0x00, 0x00, 0x00, 0x00, 0x00, 0x00, 0x00, 0x1F, 0xFC, 0x00, 0x00, 0x00, 0x00, 0xFF, 0xFF, 0x00, 0x00, 0x00, 0x07, 0xE0, 0x07, 0xE0, 0x00, 0x00, 0x0F, 0x00, 0x00, 0xF0, 0x00, 0x00, 0x3C, 0x00, 0x00, 0x3C, 0x00, 0x00, 0x78, 0x00, 0x00, 0x1E, 0x00, 0x00, 0xE0, 0x00, 0x00, 0x07, 0x00, 0x01, 0xC0, 0x00, 0x00, 0x03, 0x80, 0x03, 0x80, 0x00, 0x00, 0x01, 0xC0, 0x03, 0x00, 0x00, 0x00, 0x00, 0xC0, 0x07, 0x00, 0x00, 0x00, 0x00, 0xE0, 0x0E, 0x03, 0x00, 0x01, 0x80, 0x70, 0x0C, 0x1F, 0xE0, 0x07, 0xF8, 0x30, 0x0C, 0x3D, 0x78, 0x1F, 0x7C, 0x38, 0x18, 0x30, 0x18, 0x18, 0x0C, 0x18, 0x18, 0x00, 0x00, 0x00, 0x00, 0x18, 0x18, 0x00, 0x00, 0x00, 0x00, 0x18, 0x30, 0x00, 0x00, 0x00, 0x00, 0x0C, 0x30, 0x00, 0x00, 0x00, 0x00, 0x0C, 0x30, 0x00, 0x00, 0x00, 0x00, 0x0C, 0x30, 0x00, 0x07, 0xF0, 0x00, 0x0C, 0x30, 0x00, 0x3F, 0xFC, 0x00, 0x0C, 0x30, 0x00, 0x78, 0x1E, 0x00, 0x0C, 0x30, 0x00, 0xE0, 0x07, 0x00, 0x0C, 0x30, 0x01, 0xC0, 0x03, 0x80, 0x0C, 0x30, 0x03, 0x80, 0x01, 0xC0, 0x0C, 0x30, 0x03, 0x00, 0x00, 0xC0, 0x0C, 0x18, 0x07, 0x00, 0x00, 0xE0, 0x1C, 0x18, 0x06, 0x00, 0x00, 0x60, 0x18, 0x18, 0x06, 0x00, 0x00, 0x60, 0x18, 0x0C, 0x07, 0xFF, 0xFF, 0xE0, 0x30, 0x0C, 0x0F, 0xFF, 0xFF, 0xF0, 0x30, 0x0E, 0x02, 0x00, 0x00, 0x20, 0x60, 0x07, 0x00, 0x00, 0x00, 0x00, 0xE0, 0x03, 0x00, 0x00, 0x00, 0x00, 0xC0, 0x01, 0x80, 0x00, 0x00, 0x01, 0x80, 0x01, 0xC0, 0x00, 0x00, 0x03, 0x80, 0x00, 0xE0, 0x00, 0x00, 0x07, 0x00, 0x00, 0x78, 0x00, 0x00, 0x1E, 0x00, 0x00, 0x3C, 0x00, 0x00, 0x3C, 0x00, 0x00, 0x0F, 0x00, 0x00, 0xF0, 0x00, 0x00, 0x03, 0xE0, 0x0F, 0xE0, 0x00, 0x00, 0x00, 0xFF, 0xFF, 0x00, 0x00, 0x00, 0x00, 0x1F, 0xF8, 0x00, 0x00, 0x00, 0x00, 0x00, 0x00, 0x00, 0x00, 0x00, 0x00, 0x00, 0x00, 0x00, 0x00};

const unsigned char PROGMEM frame25 [] = {0x00, 0x00, 0x00, 0x00, 0x00, 0x00, 0x00, 0x00, 0x00, 0x00, 0x00, 0x00, 0x00, 0x00, 0x1F, 0xFC, 0x00, 0x00, 0x00, 0x00, 0xFF, 0xFF, 0x00, 0x00, 0x00, 0x07, 0xE0, 0x07, 0xE0, 0x00, 0x00, 0x0F, 0x00, 0x00, 0xF0, 0x00, 0x00, 0x3C, 0x00, 0x00, 0x3C, 0x00, 0x00, 0x78, 0x00, 0x00, 0x1E, 0x00, 0x00, 0xE0, 0x00, 0x00, 0x07, 0x00, 0x01, 0xC0, 0x00, 0x00, 0x03, 0x80, 0x03, 0x80, 0x00, 0x00, 0x01, 0xC0, 0x03, 0x00, 0x00, 0x00, 0x00, 0xC0, 0x07, 0x0F, 0xC0, 0x03, 0xF0, 0xE0, 0x0E, 0x1F, 0xF0, 0x0F, 0xF8, 0x70, 0x0C, 0x38, 0x38, 0x1C, 0x1C, 0x30, 0x0C, 0x20, 0x18, 0x18, 0x04, 0x30, 0x18, 0x00, 0x00, 0x00, 0x00, 0x18, 0x18, 0x00, 0x00, 0x00, 0x00, 0x18, 0x18, 0x00, 0x00, 0x00, 0x00, 0x18, 0x30, 0x18, 0x00, 0x00, 0x00, 0x0C, 0x30, 0x30, 0x00, 0x00, 0x00, 0x0C, 0x30, 0x28, 0x00, 0x00, 0x02, 0x0C, 0x30, 0x30, 0x00, 0x00, 0x07, 0x8C, 0x30, 0x00, 0x07, 0xE0, 0x07, 0xCC, 0x30, 0x00, 0x3F, 0xFC, 0x03, 0xEC, 0x30, 0x00, 0x78, 0x1E, 0x03, 0x3C, 0x30, 0x00, 0xE0, 0x07, 0x03, 0x3C, 0x30, 0x01, 0xC0, 0x03, 0x83, 0x1C, 0x30, 0x03, 0x80, 0x01, 0xC3, 0x1C, 0x18, 0x03, 0x00, 0x00, 0xC3, 0x0C, 0x18, 0x07, 0x00, 0x00, 0xC3, 0x0C, 0x18, 0x06, 0x00, 0x00, 0x63, 0x0C, 0x0C, 0x06, 0x00, 0x00, 0x63, 0x9C, 0x0C, 0x06, 0xAD, 0xDA, 0xF1, 0xF8, 0x0E, 0x0F, 0xFF, 0xFF, 0xE0, 0xF0, 0x07, 0x06, 0xAA, 0xAA, 0xE0, 0xE0, 0x03, 0x00, 0x00, 0x00, 0x00, 0xC0, 0x01, 0x80, 0x00, 0x00, 0x01, 0x80, 0x01, 0xC0, 0x00, 0x00, 0x03, 0x80, 0x00, 0xE0, 0x00, 0x00, 0x07, 0x00, 0x00, 0x78, 0x00, 0x00, 0x1E, 0x00, 0x00, 0x3C, 0x00, 0x00, 0x3C, 0x00, 0x00, 0x0F, 0x00, 0x00, 0xF0, 0x00, 0x00, 0x03, 0xE0, 0x0F, 0xC0, 0x00, 0x00, 0x00, 0xFF, 0xFF, 0x00, 0x00, 0x00, 0x00, 0x1F, 0xF8, 0x00, 0x00, 0x00, 0x00, 0x00, 0x00, 0x00, 0x00, 0x00, 0x00, 0x00, 0x00, 0x00, 0x00};

const unsigned char PROGMEM frame35 [] = {0x00, 0x00, 0x00, 0x00, 0x00, 0x00, 0x00, 0x00, 0x00, 0x00, 0x00, 0x00, 0x00, 0x00, 0x1F, 0xFC, 0x00, 0x00, 0x00, 0x00, 0xFF, 0xFF, 0x00, 0x00, 0x00, 0x07, 0xE0, 0x07, 0xE0, 0x00, 0x00, 0x0F, 0x00, 0x00, 0xF0, 0x00, 0x00, 0x3C, 0x00, 0x00, 0x38, 0x00, 0x00, 0x78, 0x00, 0x00, 0x1E, 0x00, 0x00, 0xE0, 0x00, 0x00, 0x07, 0x00, 0x01, 0xC0, 0x00, 0x00, 0x03, 0x80, 0x03, 0x80, 0x00, 0x00, 0x01, 0xC0, 0x03, 0x02, 0x80, 0x01, 0x40, 0xC0, 0x07, 0x1F, 0xE0, 0x07, 0xF0, 0xE0, 0x0E, 0x3E, 0xF8, 0x1F, 0x7C, 0x70, 0x0C, 0x30, 0x38, 0x18, 0x0C, 0x30, 0x0C, 0x00, 0x00, 0x00, 0x00, 0x30, 0x18, 0x00, 0x00, 0x00, 0x00, 0x18, 0x18, 0x00, 0x00, 0x00, 0x00, 0x18, 0x18, 0x00, 0x00, 0x00, 0x00, 0x18, 0x30, 0x10, 0x00, 0x00, 0x00, 0x0C, 0x30, 0x38, 0x00, 0x00, 0x00, 0x0C, 0x30, 0x70, 0x00, 0x00, 0x00, 0x0C, 0x30, 0xD0, 0x00, 0x00, 0x00, 0x0C, 0x30, 0x90, 0x02, 0x80, 0x03, 0x8C, 0x31, 0x90, 0x1F, 0xF8, 0x03, 0xCC, 0x30, 0xB0, 0x3D, 0x7E, 0x03, 0xFC, 0x30, 0xE0, 0xF0, 0x0F, 0x03, 0x7C, 0x30, 0x01, 0xC0, 0x03, 0x83, 0x1C, 0x30, 0x01, 0x80, 0x01, 0x83, 0x1C, 0x18, 0x03, 0x80, 0x00, 0xC3, 0x8C, 0x18, 0x03, 0x00, 0x00, 0xC1, 0x0C, 0x18, 0x06, 0x00, 0x00, 0x63, 0x8C, 0x0C, 0x06, 0x00, 0x00, 0x61, 0x8C, 0x0C, 0x06, 0x00, 0x00, 0x61, 0x8C, 0x0E, 0x0F, 0xFF, 0xFF, 0xF1, 0xFC, 0x07, 0x07, 0xFF, 0xFF, 0xE0, 0xF8, 0x03, 0x00, 0x00, 0x00, 0x00, 0xC0, 0x01, 0x80, 0x00, 0x00, 0x01, 0x80, 0x01, 0xC0, 0x00, 0x00, 0x03, 0x80, 0x00, 0xE0, 0x00, 0x00, 0x07, 0x00, 0x00, 0x78, 0x00, 0x00, 0x1E, 0x00, 0x00, 0x1C, 0x00, 0x00, 0x3C, 0x00, 0x00, 0x0F, 0x00, 0x00, 0xF0, 0x00, 0x00, 0x03, 0xE0, 0x07, 0xC0, 0x00, 0x00, 0x00, 0xFF, 0xFF, 0x00, 0x00, 0x00, 0x00, 0x1F, 0xF8, 0x00, 0x00, 0x00, 0x00, 0x00, 0x00, 0x00, 0x00, 0x00, 0x00, 0x00, 0x00, 0x00, 0x00};

const unsigned char PROGMEM frame45 [] = {0x00, 0x00, 0x00, 0x00, 0x00, 0x00, 0x00, 0x00, 0x00, 0x00, 0x00, 0x00, 0x00, 0x00, 0x1F, 0xFC, 0x00, 0x00, 0x00, 0x00, 0xFF, 0xFF, 0x00, 0x00, 0x00, 0x07, 0xE0, 0x07, 0xE0, 0x00, 0x00, 0x0F, 0x00, 0x00, 0xF0, 0x00, 0x00, 0x3C, 0x00, 0x00, 0x3C, 0x00, 0x00, 0x78, 0x00, 0x00, 0x1E, 0x00, 0x00, 0xE0, 0x00, 0x00, 0x07, 0x00, 0x01, 0xC0, 0x00, 0x00, 0x03, 0x80, 0x03, 0x80, 0x00, 0x00, 0x01, 0xC0, 0x03, 0x00, 0x00, 0x00, 0x00, 0xC0, 0x06, 0x00, 0x00, 0x00, 0x00, 0xE0, 0x0E, 0x0F, 0xC0, 0x03, 0xF0, 0x70, 0x0C, 0x3F, 0xF0, 0x0F, 0xFC, 0x30, 0x0C, 0x38, 0x38, 0x1C, 0x1C, 0x30, 0x18, 0x20, 0x08, 0x18, 0x04, 0x18, 0x18, 0x00, 0x00, 0x00, 0x00, 0x18, 0x18, 0x00, 0x00, 0x00, 0x00, 0x18, 0x30, 0x00, 0x00, 0x00, 0x00, 0x0C, 0x30, 0x00, 0x00, 0x00, 0x00, 0x0C, 0x30, 0x70, 0x00, 0x00, 0x00, 0x0C, 0x30, 0xF0, 0x02, 0xC0, 0x00, 0x0C, 0x33, 0xF0, 0x1F, 0xF8, 0x00, 0x0C, 0x33, 0xE0, 0x7E, 0xBE, 0x00, 0x0C, 0x37, 0x60, 0xF0, 0x0F, 0x03, 0xCC, 0x3E, 0x61, 0xC0, 0x03, 0x83, 0xEC, 0x3E, 0x61, 0x80, 0x01, 0x81, 0xFC, 0x3C, 0x63, 0x00, 0x00, 0xC1, 0xBC, 0x1C, 0x63, 0x00, 0x00, 0xC1, 0x9C, 0x1F, 0xE6, 0x00, 0x00, 0x61, 0x8C, 0x1F, 0xC6, 0x00, 0x00, 0x61, 0x8E, 0x0D, 0x06, 0x5F, 0xFA, 0x61, 0x86, 0x0C, 0x0F, 0xFF, 0xFF, 0xF1, 0x86, 0x0E, 0x07, 0xD0, 0x05, 0xE1, 0x86, 0x07, 0x00, 0x00, 0x00, 0x01, 0xCE, 0x03, 0x00, 0x00, 0x00, 0x00, 0xFC, 0x01, 0x80, 0x00, 0x00, 0x01, 0xF8, 0x01, 0xC0, 0x00, 0x00, 0x03, 0x80, 0x00, 0xE0, 0x00, 0x00, 0x07, 0x00, 0x00, 0x78, 0x00, 0x00, 0x1E, 0x00, 0x00, 0x3C, 0x00, 0x00, 0x3C, 0x00, 0x00, 0x0F, 0x00, 0x00, 0xF0, 0x00, 0x00, 0x03, 0xE0, 0x0F, 0xC0, 0x00, 0x00, 0x00, 0xFF, 0xFF, 0x00, 0x00, 0x00, 0x00, 0x1F, 0xF8, 0x00, 0x00, 0x00, 0x00, 0x00, 0x00, 0x00, 0x00, 0x00, 0x00, 0x00, 0x00, 0x00, 0x00};

const unsigned char PROGMEM frame55 [] = {0x00, 0x00, 0x00, 0x00, 0x00, 0x00, 0x00, 0x00, 0x00, 0x00, 0x00, 0x00, 0x00, 0x00, 0x1F, 0xFC, 0x00, 0x00, 0x00, 0x00, 0xFF, 0xFF, 0x00, 0x00, 0x00, 0x07, 0xE0, 0x07, 0xE0, 0x00, 0x00, 0x0F, 0x00, 0x00, 0xF0, 0x00, 0x00, 0x3C, 0x00, 0x00, 0x3C, 0x00, 0x00, 0x78, 0x00, 0x00, 0x1E, 0x00, 0x00, 0xE0, 0x00, 0x00, 0x07, 0x00, 0x01, 0xC0, 0x00, 0x00, 0x03, 0x80, 0x03, 0x80, 0x00, 0x00, 0x01, 0xC0, 0x03, 0x02, 0x80, 0x01, 0x40, 0xC0, 0x07, 0x1F, 0xE0, 0x07, 0xF8, 0xE0, 0x0E, 0x3E, 0xF8, 0x1F, 0x7C, 0x70, 0x0C, 0x30, 0x38, 0x18, 0x0C, 0x30, 0x0C, 0x00, 0x00, 0x00, 0x00, 0x30, 0x18, 0x00, 0x00, 0x00, 0x00, 0x18, 0x18, 0x00, 0x00, 0x00, 0x08, 0x18, 0x18, 0x00, 0x00, 0x00, 0x08, 0x18, 0x30, 0x00, 0x00, 0x00, 0x02, 0x0C, 0x30, 0x00, 0x00, 0x00, 0x04, 0x0C, 0x30, 0x00, 0x00, 0x00, 0x00, 0x0C, 0x30, 0x00, 0x07, 0xF0, 0x00, 0x0C, 0x30, 0x00, 0x3F, 0xFC, 0x00, 0x0C, 0x30, 0x00, 0x78, 0x1E, 0x00, 0x0C, 0x31, 0xC0, 0xE0, 0x07, 0x00, 0x0C, 0x37, 0xC1, 0xC0, 0x03, 0x80, 0x0C, 0x3F, 0xC3, 0x80, 0x01, 0xC0, 0x0C, 0x3D, 0x83, 0x00, 0x00, 0xC0, 0x0C, 0x19, 0x87, 0x00, 0x00, 0xE0, 0x1C, 0x39, 0x86, 0x00, 0x00, 0x60, 0x18, 0x31, 0x86, 0x00, 0x00, 0x60, 0x18, 0x31, 0x8F, 0x55, 0x55, 0x60, 0x30, 0x33, 0x87, 0xFF, 0xFF, 0xF0, 0x30, 0x3F, 0x06, 0xDB, 0x6D, 0xA0, 0x60, 0x1F, 0x00, 0x00, 0x00, 0x00, 0xE0, 0x03, 0x00, 0x00, 0x00, 0x00, 0xC0, 0x01, 0x80, 0x00, 0x00, 0x01, 0x80, 0x01, 0xC0, 0x00, 0x00, 0x03, 0x80, 0x00, 0xE0, 0x00, 0x00, 0x07, 0x00, 0x00, 0x78, 0x00, 0x00, 0x1E, 0x00, 0x00, 0x3C, 0x00, 0x00, 0x3C, 0x00, 0x00, 0x0F, 0x00, 0x00, 0xF0, 0x00, 0x00, 0x03, 0xE0, 0x0F, 0xC0, 0x00, 0x00, 0x00, 0xFF, 0xFF, 0x00, 0x00, 0x00, 0x00, 0x1F, 0xF8, 0x00, 0x00, 0x00, 0x00, 0x00, 0x00, 0x00, 0x00, 0x00, 0x00, 0x00, 0x00, 0x00, 0x00};

const unsigned char PROGMEM frame65 [] = {0x00, 0x00, 0x00, 0x00, 0x00, 0x00, 0x00, 0x00, 0x00, 0x00, 0x00, 0x00, 0x00, 0x00, 0x1F, 0xFC, 0x00, 0x00, 0x00, 0x00, 0xFF, 0xFF, 0x00, 0x00, 0x00, 0x07, 0xE0, 0x07, 0xE0, 0x00, 0x00, 0x0F, 0x00, 0x00, 0xF0, 0x00, 0x00, 0x3C, 0x00, 0x00, 0x3C, 0x00, 0x00, 0x78, 0x00, 0x00, 0x1E, 0x00, 0x00, 0xE0, 0x00, 0x00, 0x07, 0x00, 0x01, 0xC0, 0x00, 0x00, 0x03, 0x80, 0x03, 0x80, 0x00, 0x00, 0x01, 0xC0, 0x03, 0x00, 0x00, 0x00, 0x00, 0xC0, 0x06, 0x00, 0x00, 0x00, 0x00, 0xE0, 0x0E, 0x0F, 0xC0, 0x03, 0xF0, 0x70, 0x0C, 0x3F, 0xF0, 0x0F, 0xFC, 0x30, 0x0C, 0x38, 0x38, 0x1C, 0x1C, 0x30, 0x18, 0x20, 0x08, 0x18, 0x04, 0x18, 0x18, 0x00, 0x00, 0x00, 0x00, 0x18, 0x18, 0x00, 0x00, 0x00, 0x0E, 0x18, 0x30, 0x00, 0x00, 0x00, 0x0F, 0x0C, 0x30, 0x00, 0x00, 0x00, 0x0D, 0x8C, 0x30, 0x00, 0x00, 0x00, 0x04, 0xCC, 0x30, 0x00, 0x00, 0x00, 0x04, 0xCC, 0x30, 0x00, 0x07, 0xE0, 0x04, 0x4C, 0x30, 0x00, 0x3F, 0xFC, 0x04, 0x4C, 0x30, 0x00, 0x78, 0x1E, 0x06, 0xCC, 0x30, 0x00, 0xE0, 0x07, 0x03, 0x8C, 0x30, 0x01, 0xC0, 0x03, 0x80, 0x0C, 0x30, 0x03, 0x80, 0x01, 0xC0, 0x0C, 0x18, 0x03, 0x00, 0x00, 0xC0, 0x1C, 0x18, 0x07, 0x00, 0x00, 0xE0, 0x18, 0x18, 0x06, 0x00, 0x00, 0x60, 0x18, 0x0C, 0x06, 0x00, 0x00, 0x60, 0x30, 0x0C, 0x07, 0xFF, 0xFF, 0xE0, 0x30, 0x0E, 0x0F, 0xFF, 0xFF, 0xF0, 0x60, 0x07, 0x05, 0x00, 0x00, 0xA0, 0xE0, 0x03, 0x00, 0x00, 0x00, 0x00, 0xC0, 0x01, 0x80, 0x00, 0x00, 0x01, 0x80, 0x01, 0xC0, 0x00, 0x00, 0x03, 0x80, 0x00, 0xE0, 0x00, 0x00, 0x07, 0x00, 0x00, 0x78, 0x00, 0x00, 0x1E, 0x00, 0x00, 0x3C, 0x00, 0x00, 0x3C, 0x00, 0x00, 0x0F, 0x00, 0x00, 0xF0, 0x00, 0x00, 0x03, 0xE0, 0x0F, 0xC0, 0x00, 0x00, 0x00, 0xFF, 0xFF, 0x00, 0x00, 0x00, 0x00, 0x1F, 0xF8, 0x00, 0x00, 0x00, 0x00, 0x00, 0x00, 0x00, 0x00, 0x00, 0x00, 0x00, 0x00, 0x00, 0x00};

const unsigned char PROGMEM frame75 [] = {0x00, 0x00, 0x00, 0x00, 0x00, 0x00, 0x00, 0x00, 0x00, 0x00, 0x00, 0x00, 0x00, 0x00, 0x1F, 0xFC, 0x00, 0x00, 0x00, 0x00, 0xFF, 0xFF, 0x00, 0x00, 0x00, 0x07, 0xE0, 0x07, 0xE0, 0x00, 0x00, 0x0F, 0x00, 0x00, 0xF0, 0x00, 0x00, 0x3C, 0x00, 0x00, 0x3C, 0x00, 0x00, 0x78, 0x00, 0x00, 0x1E, 0x00, 0x00, 0xE0, 0x00, 0x00, 0x07, 0x00, 0x01, 0xC0, 0x00, 0x00, 0x03, 0x80, 0x03, 0x80, 0x00, 0x00, 0x01, 0xC0, 0x03, 0x00, 0x00, 0x00, 0x00, 0xC0, 0x06, 0x00, 0x00, 0x00, 0x00, 0xE0, 0x0E, 0x0F, 0xC0, 0x03, 0xF0, 0x70, 0x0C, 0x3F, 0xF0, 0x0F, 0xFC, 0x30, 0x0C, 0x38, 0x38, 0x1C, 0x1C, 0x30, 0x18, 0x20, 0x08, 0x18, 0x04, 0x18, 0x18, 0x00, 0x00, 0x00, 0x00, 0x18, 0x18, 0x00, 0x00, 0x00, 0x00, 0x18, 0x30, 0x00, 0x00, 0x00, 0x00, 0x0C, 0x30, 0x00, 0x00, 0x00, 0x07, 0x0C, 0x30, 0x00, 0x00, 0x00, 0x07, 0x8C, 0x30, 0x00, 0x00, 0x00, 0x07, 0xCC, 0x30, 0x00, 0x07, 0xE0, 0x06, 0xEC, 0x30, 0x00, 0x3F, 0xFC, 0x06, 0x3C, 0x30, 0x00, 0x78, 0x1E, 0x07, 0x3C, 0x30, 0x00, 0xE0, 0x07, 0x02, 0x1C, 0x30, 0x01, 0xC0, 0x03, 0x87, 0x1C, 0x30, 0x03, 0x80, 0x01, 0xC3, 0x1C, 0x18, 0x03, 0x00, 0x00, 0xC3, 0x1C, 0x18, 0x07, 0x00, 0x00, 0xE3, 0x18, 0x18, 0x06, 0x00, 0x00, 0x63, 0xF8, 0x0C, 0x06, 0x00, 0x00, 0x61, 0xF0, 0x0C, 0x07, 0xFF, 0xFF, 0xE0, 0x70, 0x0E, 0x0F, 0xFF, 0xFF, 0xF0, 0x60, 0x07, 0x05, 0x00, 0x00, 0xA0, 0xE0, 0x03, 0x00, 0x00, 0x00, 0x00, 0xC0, 0x01, 0x80, 0x00, 0x00, 0x01, 0x80, 0x01, 0xC0, 0x00, 0x00, 0x03, 0x80, 0x00, 0xE0, 0x00, 0x00, 0x07, 0x00, 0x00, 0x78, 0x00, 0x00, 0x1E, 0x00, 0x00, 0x3C, 0x00, 0x00, 0x3C, 0x00, 0x00, 0x0F, 0x00, 0x00, 0xF0, 0x00, 0x00, 0x03, 0xE0, 0x0F, 0xC0, 0x00, 0x00, 0x00, 0xFF, 0xFF, 0x00, 0x00, 0x00, 0x00, 0x1F, 0xF8, 0x00, 0x00, 0x00, 0x00, 0x00, 0x00, 0x00, 0x00, 0x00, 0x00, 0x00, 0x00, 0x00, 0x00};

const unsigned char PROGMEM frame85 [] = {0x00, 0x00, 0x00, 0x00, 0x00, 0x00, 0x00, 0x00, 0x00, 0x00, 0x00, 0x00, 0x00, 0x00, 0x1F, 0xFC, 0x00, 0x00, 0x00, 0x00, 0xFF, 0xFF, 0x00, 0x00, 0x00, 0x07, 0xE0, 0x07, 0xE0, 0x00, 0x00, 0x0F, 0x00, 0x00, 0xF0, 0x00, 0x00, 0x3C, 0x00, 0x00, 0x3C, 0x00, 0x00, 0x78, 0x00, 0x00, 0x1E, 0x00, 0x00, 0xE0, 0x00, 0x00, 0x07, 0x00, 0x01, 0xC0, 0x00, 0x00, 0x03, 0x80, 0x03, 0x80, 0x00, 0x00, 0x01, 0xC0, 0x03, 0x00, 0x00, 0x00, 0x00, 0xC0, 0x07, 0x07, 0xC0, 0x03, 0xE0, 0xE0, 0x0E, 0x1F, 0xF0, 0x0F, 0xF8, 0x70, 0x0C, 0x3C, 0x78, 0x1E, 0x1C, 0x30, 0x0C, 0x30, 0x18, 0x18, 0x0C, 0x38, 0x18, 0x00, 0x00, 0x00, 0x00, 0x18, 0x18, 0x00, 0x00, 0x00, 0x00, 0x18, 0x18, 0x00, 0x00, 0x00, 0x00, 0x18, 0x38, 0x10, 0x00, 0x00, 0x00, 0x0C, 0x30, 0x38, 0x00, 0x00, 0x00, 0x0C, 0x30, 0x78, 0x00, 0x00, 0x00, 0x0C, 0x30, 0xD0, 0x07, 0xF0, 0x00, 0x0C, 0x30, 0x90, 0x3F, 0xFC, 0x00, 0x0C, 0x30, 0x90, 0x78, 0x1E, 0x03, 0x8C, 0x30, 0xF0, 0xE0, 0x07, 0x03, 0xEC, 0x30, 0xE1, 0xC0, 0x03, 0x83, 0xFC, 0x30, 0x03, 0x80, 0x01, 0xC3, 0xBC, 0x30, 0x03, 0x00, 0x00, 0xC1, 0x9C, 0x18, 0x07, 0x00, 0x00, 0xE1, 0x8C, 0x18, 0x06, 0x00, 0x00, 0x61, 0x8C, 0x18, 0x06, 0x00, 0x00, 0x61, 0x8C, 0x0C, 0x07, 0x7F, 0xFE, 0xE1, 0x86, 0x0C, 0x0F, 0xFF, 0xFF, 0xF1, 0x86, 0x0E, 0x02, 0xA0, 0x02, 0xA1, 0x8E, 0x07, 0x00, 0x00, 0x00, 0x01, 0xFC, 0x03, 0x00, 0x00, 0x00, 0x00, 0xF8, 0x01, 0x80, 0x00, 0x00, 0x01, 0xC0, 0x01, 0xC0, 0x00, 0x00, 0x03, 0x80, 0x00, 0xE0, 0x00, 0x00, 0x07, 0x00, 0x00, 0x78, 0x00, 0x00, 0x1E, 0x00, 0x00, 0x3C, 0x00, 0x00, 0x3C, 0x00, 0x00, 0x0F, 0x00, 0x00, 0xF0, 0x00, 0x00, 0x03, 0xE0, 0x0F, 0xE0, 0x00, 0x00, 0x00, 0xFF, 0xFF, 0x00, 0x00, 0x00, 0x00, 0x1F, 0xF8, 0x00, 0x00, 0x00, 0x00, 0x00, 0x00, 0x00, 0x00, 0x00, 0x00, 0x00, 0x00, 0x00, 0x00};

const unsigned char PROGMEM frame95 [] = {0x00, 0x00, 0x00, 0x00, 0x00, 0x00, 0x00, 0x00, 0x00, 0x00, 0x00, 0x00, 0x00, 0x00, 0x1F, 0xFC, 0x00, 0x00, 0x00, 0x00, 0xFF, 0xFF, 0x00, 0x00, 0x00, 0x07, 0xE0, 0x07, 0xE0, 0x00, 0x00, 0x0F, 0x00, 0x00, 0xF0, 0x00, 0x00, 0x3C, 0x00, 0x00, 0x3C, 0x00, 0x00, 0x78, 0x00, 0x00, 0x1E, 0x00, 0x00, 0xE0, 0x00, 0x00, 0x07, 0x00, 0x01, 0xC0, 0x00, 0x00, 0x03, 0x80, 0x03, 0x80, 0x00, 0x00, 0x01, 0xC0, 0x03, 0x00, 0x00, 0x00, 0x00, 0xC0, 0x07, 0x00, 0x00, 0x00, 0x00, 0xE0, 0x0E, 0x0F, 0xE0, 0x07, 0xF0, 0x70, 0x0C, 0x3F, 0xF0, 0x0F, 0xFC, 0x30, 0x0C, 0x38, 0x38, 0x1C, 0x1C, 0x38, 0x18, 0x20, 0x08, 0x10, 0x04, 0x18, 0x18, 0x00, 0x00, 0x00, 0x00, 0x18, 0x18, 0x00, 0x00, 0x00, 0x00, 0x18, 0x30, 0x00, 0x00, 0x00, 0x00, 0x0C, 0x30, 0x30, 0x00, 0x00, 0x00, 0x0C, 0x30, 0xF8, 0x00, 0x00, 0x00, 0x0C, 0x31, 0xF0, 0x07, 0xF0, 0x00, 0x0C, 0x33, 0xF0, 0x3F, 0xFC, 0x00, 0x0C, 0x33, 0x30, 0x78, 0x1E, 0x00, 0x0C, 0x36, 0x30, 0xE0, 0x07, 0x03, 0xCC, 0x36, 0x71, 0xC0, 0x03, 0x83, 0xEC, 0x36, 0x33, 0x80, 0x01, 0xC1, 0xFC, 0x3E, 0x73, 0x00, 0x00, 0xC1, 0xBC, 0x1F, 0xE7, 0x00, 0x00, 0xE1, 0x9C, 0x1F, 0xE6, 0x00, 0x00, 0x61, 0x8C, 0x19, 0x06, 0x00, 0x00, 0x61, 0x8E, 0x0C, 0x07, 0xFF, 0xFF, 0xE1, 0x86, 0x0C, 0x0F, 0xFF, 0xFF, 0xF1, 0x86, 0x0E, 0x05, 0x00, 0x00, 0xA1, 0x86, 0x07, 0x00, 0x00, 0x00, 0x01, 0xCE, 0x03, 0x00, 0x00, 0x00, 0x00, 0xFC, 0x01, 0x80, 0x00, 0x00, 0x01, 0xF8, 0x01, 0xC0, 0x00, 0x00, 0x03, 0x80, 0x00, 0xE0, 0x00, 0x00, 0x07, 0x00, 0x00, 0x78, 0x00, 0x00, 0x1E, 0x00, 0x00, 0x3C, 0x00, 0x00, 0x3C, 0x00, 0x00, 0x0F, 0x00, 0x00, 0xF0, 0x00, 0x00, 0x03, 0xE0, 0x0F, 0xE0, 0x00, 0x00, 0x00, 0xFF, 0xFF, 0x00, 0x00, 0x00, 0x00, 0x1F, 0xF8, 0x00, 0x00, 0x00, 0x00, 0x00, 0x00, 0x00, 0x00, 0x00, 0x00, 0x00, 0x00, 0x00, 0x00};
//confused
const unsigned char PROGMEM framec [] = {0x00, 0x00, 0x00, 0x00, 0x00, 0x00, 0x00, 0x00, 0x00, 0x00, 0x00, 0x00, 0x00, 0x00, 0x1F, 0xFC, 0x00, 0x00, 0x00, 0x00, 0xFF, 0xFF, 0x00, 0x00, 0x00, 0x07, 0xE0, 0x07, 0xE0, 0x00, 0x00, 0x0F, 0x00, 0x00, 0xF0, 0x00, 0x00, 0x3C, 0x00, 0x00, 0x3C, 0x00, 0x00, 0x78, 0x00, 0x00, 0x1E, 0x00, 0x00, 0xE0, 0x10, 0x00, 0x07, 0x00, 0x01, 0xC1, 0xF8, 0x00, 0x03, 0x80, 0x03, 0x87, 0xF0, 0x00, 0x01, 0xC0, 0x03, 0x0F, 0x00, 0x00, 0x00, 0xC0, 0x07, 0x1C, 0x00, 0x1E, 0x00, 0xE0, 0x0E, 0x38, 0x00, 0x0F, 0xC0, 0x70, 0x0C, 0x30, 0x00, 0x01, 0xFC, 0x30, 0x0C, 0x00, 0x00, 0x00, 0x3C, 0x30, 0x18, 0x00, 0x00, 0x00, 0x00, 0x18, 0x18, 0x00, 0x00, 0x00, 0x00, 0x18, 0x18, 0x01, 0xC0, 0x03, 0x80, 0x18, 0x30, 0x03, 0xE0, 0x07, 0xC0, 0x0C, 0x30, 0x07, 0xE0, 0x07, 0xC0, 0x0C, 0x30, 0x07, 0xE0, 0x07, 0xE0, 0x0C, 0x30, 0x03, 0xE0, 0x07, 0xC0, 0x0C, 0x30, 0x01, 0xC0, 0x03, 0x80, 0x0C, 0x30, 0x00, 0x00, 0x00, 0x00, 0x0C, 0x30, 0x00, 0x00, 0x00, 0x00, 0x0C, 0x30, 0x00, 0x00, 0x00, 0x00, 0x0C, 0x30, 0x00, 0x00, 0x00, 0x00, 0x0C, 0x30, 0x00, 0x00, 0x00, 0x00, 0x0C, 0x18, 0x00, 0x00, 0x00, 0x00, 0x1C, 0x18, 0x00, 0x00, 0x00, 0x00, 0x18, 0x18, 0x00, 0x00, 0x00, 0x00, 0x18, 0x0C, 0x00, 0x00, 0x00, 0x00, 0x30, 0x0C, 0x00, 0x00, 0x7F, 0x80, 0x30, 0x0E, 0x00, 0x03, 0xFF, 0xC0, 0x60, 0x07, 0x00, 0xBF, 0x80, 0x80, 0xE0, 0x03, 0x01, 0xFE, 0x00, 0x00, 0xC0, 0x01, 0x80, 0x40, 0x00, 0x01, 0x80, 0x01, 0xC0, 0x00, 0x00, 0x03, 0x80, 0x00, 0xE0, 0x00, 0x00, 0x07, 0x00, 0x00, 0x78, 0x00, 0x00, 0x1E, 0x00, 0x00, 0x3C, 0x00, 0x00, 0x3C, 0x00, 0x00, 0x0F, 0x00, 0x00, 0xF0, 0x00, 0x00, 0x03, 0xE0, 0x0F, 0xC0, 0x00, 0x00, 0x00, 0xFF, 0xFF, 0x00, 0x00, 0x00, 0x00, 0x1F, 0xF8, 0x00, 0x00, 0x00, 0x00, 0x00, 0x00, 0x00, 0x00, 0x00, 0x00, 0x00, 0x00, 0x00, 0x00};

/********************************************************************************************************************************/

void setup() {
  // Initialize serial and wait for port to open:
  Serial.begin(115200);

  display.begin(SSD1306_SWITCHCAPVCC, 0x3C); //initialize with the I2C addr 0x3C (128x64)
  display.clearDisplay();
  display.setTextColor(WHITE);
  display.setTextSize(2);
  display.setCursor(0, 0);

  // Defined in thingProperties.h
  initProperties();

  // Connect to Arduino IoT Cloud
  ArduinoCloud.begin(ArduinoIoTPreferredConnection);

  /*
     The following function allows you to obtain more information
     related to the state of network and IoT Cloud connection and errors
     the higher number the more granular information you’ll get.
     The default is 0 (only errors).
     Maximum is 4
  */
  setDebugMessageLevel(2);
  ArduinoCloud.printDebugInfo();
}

void loop() {
  // Your code here
  soilMoistureValue = analogRead(SensorPin);  //put Sensor insert into soil
  Serial.println(soilMoistureValue);
  int percent = map(soilMoistureValue, AirValue, WaterValue, 0, 100);

  if (percent < 0) {
    soilmoisturepercent = 0;
  }

  else if (percent > 100) {
    soilmoisturepercent = 100;
  }

  else if (percent >= 0 && percent <= 100) {
    soilmoisturepercent = percent;
  }

  if (soilmoisturepercent >= 0 && soilmoisturepercent <= 20)
  {
    //Crying
    display.clearDisplay();
    display.drawBitmap(10, 8, frame05, 48, 48, WHITE);
    display.setCursor(65, 25);
    display.print(soilmoisturepercent);
    display.println(" %");
    display.display();
    delay(30);

    display.clearDisplay();
    display.drawBitmap(10, 8, frame25, 48, 48, WHITE);
    display.setCursor(65, 25);
    display.print(soilmoisturepercent);
    display.println(" %");
    display.display();
    delay(30);

    display.clearDisplay();
    display.drawBitmap(10, 8, frame35, 48, 48, WHITE);
    display.setCursor(65, 25);
    display.print(soilmoisturepercent);
    display.println(" %");
    display.display();
    delay(30);

    display.clearDisplay();
    display.drawBitmap(10, 8, frame45, 48, 48, WHITE);
    display.setCursor(65, 25);
    display.print(soilmoisturepercent);
    display.println(" %");
    display.display();
    delay(30);

    display.clearDisplay();
    display.drawBitmap(10, 8, frame55, 48, 48, WHITE);
    display.setCursor(65, 25);
    display.print(soilmoisturepercent);
    display.println(" %");
    display.display();
    delay(30);

    display.clearDisplay();
    display.drawBitmap(10, 8, frame65, 48, 48, WHITE);
    display.setCursor(65, 25);
    display.print(soilmoisturepercent);
    display.println(" %");
    display.display();
    delay(30);

    display.clearDisplay();
    display.drawBitmap(10, 8, frame75, 48, 48, WHITE);
    display.setCursor(65, 25);
    display.print(soilmoisturepercent);
    display.println(" %");
    display.display();
    delay(30);

    display.clearDisplay();
    display.drawBitmap(10, 8, frame85, 48, 48, WHITE);
    display.setCursor(65, 25);
    display.print(soilmoisturepercent);
    display.println(" %");
    display.display();
    delay(30);

    display.clearDisplay();
    display.drawBitmap(10, 8, frame95, 48, 48, WHITE);
    display.setCursor(65, 25);
    display.print(soilmoisturepercent);
    display.println(" %");
    display.display();
    delay(70);
  }

  else if (soilmoisturepercent >= 21 && soilmoisturepercent <= 40)
  {
    //sad
    delay(50);

    display.clearDisplay();
    display.drawBitmap(10, 8, frame011, 48, 48, WHITE);
    display.setCursor(65, 25);
    display.print(soilmoisturepercent);
    display.println(" %");
    display.display();
    delay(70);

    display.clearDisplay();
    display.drawBitmap(10, 8, frame21, 48, 48, WHITE);
    display.setCursor(65, 25);
    display.print(soilmoisturepercent);
    display.println(" %");
    display.display();
    delay(70);

    display.clearDisplay();
    display.drawBitmap(10, 8, frame31, 48, 48, WHITE);
    display.setCursor(65, 25);
    display.print(soilmoisturepercent);
    display.println(" %");
    display.display();
    delay(70);

    display.clearDisplay();
    display.drawBitmap(10, 8, frame51, 48, 48, WHITE);
    display.setCursor(65, 25);
    display.print(soilmoisturepercent);
    display.println(" %");
    display.display();
    delay(70);

    display.clearDisplay();
    display.drawBitmap(10, 8, frame61, 48, 48, WHITE);
    display.setCursor(65, 25);
    display.print(soilmoisturepercent);
    display.println(" %");
    display.display();
    delay(70);

    display.clearDisplay();
    display.drawBitmap(10, 8, frame81, 48, 48, WHITE);
    display.setCursor(65, 25);
    display.print(soilmoisturepercent);
    display.println(" %");
    display.display();
    delay(70);

    display.clearDisplay();
    display.drawBitmap(10, 8, frame91, 48, 48, WHITE);
    display.setCursor(65, 25);
    display.print(soilmoisturepercent);
    display.println(" %");
    display.display();
    delay(70);

    display.clearDisplay();
    display.drawBitmap(10, 8, frame111, 48, 48, WHITE);
    display.setCursor(65, 25);
    display.print(soilmoisturepercent);
    display.println(" %");
    display.display();
    delay(70);

    display.clearDisplay();
    display.drawBitmap(10, 8, frame121, 48, 48, WHITE);
    display.setCursor(65, 25);
    display.print(soilmoisturepercent);
    display.println(" %");
    display.display();
    delay(100);

  }

  else if (soilmoisturepercent >= 41 && soilmoisturepercent <= 60)
  {
    //Neutral
    display.clearDisplay();
    display.drawBitmap(10, 8, frame03, 48, 48, WHITE);
    display.setCursor(65, 25);
    display.print(soilmoisturepercent);
    display.println(" %");
    display.display();
    delay(60);

    display.clearDisplay();
    display.drawBitmap(10, 8, frame013, 48, 48, WHITE);
    display.setCursor(65, 25);
    display.print(soilmoisturepercent);
    display.println(" %");
    display.display();
    delay(60);

    display.clearDisplay();
    display.drawBitmap(10, 8, frame23, 48, 48, WHITE);
    display.setCursor(65, 25);
    display.print(soilmoisturepercent);
    display.println(" %");
    display.display();
    delay(60);

    display.clearDisplay();
    display.drawBitmap(10, 8, frame33, 48, 48, WHITE);
    display.setCursor(65, 25);
    display.print(soilmoisturepercent);
    display.println(" %");
    display.display();
    delay(60);

    display.clearDisplay();
    display.drawBitmap(10, 8, frame43, 48, 48, WHITE);
    display.setCursor(65, 25);
    display.print(soilmoisturepercent);
    display.println(" %");
    display.display();
    delay(60);

    display.clearDisplay();
    display.drawBitmap(10, 8, frame53, 48, 48, WHITE);
    display.setCursor(65, 25);
    display.print(soilmoisturepercent);
    display.println(" %");
    display.display();
    delay(60);

    display.clearDisplay();
    display.drawBitmap(10, 8, frame63, 48, 48, WHITE);
    display.setCursor(65, 25);
    display.print(soilmoisturepercent);
    display.println(" %");
    display.display();
    delay(60);

    display.clearDisplay();
    display.drawBitmap(10, 8, frame73, 48, 48, WHITE);
    display.setCursor(65, 25);
    display.print(soilmoisturepercent);
    display.println(" %");
    display.display();
    delay(60);

    display.clearDisplay();
    display.drawBitmap(10, 8, frame83, 48, 48, WHITE);
    display.setCursor(65, 25);
    display.print(soilmoisturepercent);
    display.println(" %");
    display.display();
    delay(500);

  }

  else if (soilmoisturepercent >= 61 && soilmoisturepercent <= 80)
  {
    //Blessed
    display.clearDisplay();
    display.drawBitmap(10, 8, frame04, 48, 48, WHITE);
    display.setCursor(65, 25);
    display.print(soilmoisturepercent);
    display.println(" %");
    display.display();
    delay(50);

    display.clearDisplay();
    display.drawBitmap(10, 8, frame14, 48, 48, WHITE);
    display.setCursor(65, 25);
    display.print(soilmoisturepercent);
    display.println(" %");
    display.display();
    delay(30);

    display.clearDisplay();
    display.drawBitmap(10, 8, frame24, 48, 48, WHITE);
    display.setCursor(65, 25);
    display.print(soilmoisturepercent);
    display.println(" %");
    display.display();
    delay(30);

    display.clearDisplay();
    display.drawBitmap(10, 8, frame34, 48, 48, WHITE);
    display.setCursor(65, 25);
    display.print(soilmoisturepercent);
    display.println(" %");
    display.display();
    delay(35);

    display.clearDisplay();
    display.drawBitmap(10, 8, frame44, 48, 48, WHITE);
    display.setCursor(65, 25);
    display.print(soilmoisturepercent);
    display.println(" %");
    display.display();
    delay(30);

    display.clearDisplay();
    display.drawBitmap(10, 8, frame54, 48, 48, WHITE);
    display.setCursor(65, 25);
    display.print(soilmoisturepercent);
    display.println(" %");
    display.display();
    delay(30);

    display.clearDisplay();
    display.drawBitmap(10, 8, frame64, 48, 48, WHITE);
    display.setCursor(65, 25);
    display.print(soilmoisturepercent);
    display.println(" %");
    display.display();
    delay(35);

    display.clearDisplay();
    display.drawBitmap(10, 8, frame74, 48, 48, WHITE);
    display.setCursor(65, 25);
    display.print(soilmoisturepercent);
    display.println(" %");
    display.display();
    delay(40);

    display.clearDisplay();
    display.drawBitmap(10, 8, frame94, 48, 48, WHITE);
    display.setCursor(65, 25);
    display.print(soilmoisturepercent);
    display.println(" %");
    display.display();
    delay(80);
  }

  else if (soilmoisturepercent >= 81 && soilmoisturepercent <= 100)
  {

    //Happy
    delay(30);

    display.clearDisplay();
    display.drawBitmap(10, 8, frame012, 48, 48, WHITE);
    display.setCursor(65, 25);
    display.print(soilmoisturepercent);
    display.println(" %");
    display.display();
    delay(40);

    display.clearDisplay();
    display.drawBitmap(10, 8, frame22, 48, 48, WHITE);
    display.setCursor(65, 25);
    display.print(soilmoisturepercent);
    display.println(" %");
    display.display();
    delay(40);

    display.clearDisplay();
    display.drawBitmap(10, 8, frame42, 48, 48, WHITE);
    display.setCursor(65, 25);
    display.print(soilmoisturepercent);
    display.println(" %");
    display.display();
    delay(40);

    display.clearDisplay();
    display.drawBitmap(10, 8, frame52, 48, 48, WHITE);
    display.setCursor(65, 25);
    display.print(soilmoisturepercent);
    display.println(" %");
    display.display();
    delay(30);

    display.clearDisplay();
    display.drawBitmap(10, 8, frame72, 48, 48, WHITE);
    display.setCursor(65, 25);
    display.print(soilmoisturepercent);
    display.println(" %");
    display.display();
    delay(30);

    display.clearDisplay();
    display.drawBitmap(10, 8, frame82, 48, 48, WHITE);
    display.setCursor(65, 25);
    display.print(soilmoisturepercent);
    display.println(" %");
    display.display();
    delay(30);

    display.clearDisplay();
    display.drawBitmap(10, 8, frame92, 48, 48, WHITE);
    display.setCursor(65, 25);
    display.print(soilmoisturepercent);
    display.println(" %");
    display.display();
    delay(30);

    display.clearDisplay();
    display.drawBitmap(10, 8, frame102, 48, 48, WHITE);
    display.setCursor(65, 25);
    display.print(soilmoisturepercent);
    display.println(" %");
    display.display();
    delay(30);

    display.clearDisplay();
    display.drawBitmap(10, 8, frame122, 48, 48, WHITE);
    display.setCursor(65, 25);
    display.print(soilmoisturepercent);
    display.println(" %");
    display.display();
    delay(30);

    display.clearDisplay();
    display.drawBitmap(10, 8, frame132, 48, 48, WHITE);
    display.setCursor(65, 25);
    display.print(soilmoisturepercent);
    display.println(" %");
    display.display();
    delay(30);

  }

  ArduinoCloud.update();

}
Capacitive Soil Moisture Sensor Calibration
While talking about the accuracy, the capacitive soil moisture sensor is not so much accurate as expected. But you can do the calibration to get the closest accurate reading. Just upload the code to the ESP8266 board and check the sensor analog reading when the sensor is in dry air and when the sensor is in water. From here you can find the maximum and minimum analog values that can be mapped to percentage values from 0 to 100% as per the program.
  soilMoistureValue = analogRead(SensorPin);  //put Sensor insert into soil
  Serial.println(soilMoistureValue);
  int percent = map(soilMoistureValue, AirValue, WaterValue, 0, 100);
From the above code change the AirValue and WaterValue with the value you got.
const int AirValue = 650;   //you need to replace this value with Value_1
const int WaterValue = 310;  //you need to replace this value with Value_2
const int SensorPin = A0;
Uploading Source Code
Apart from the code part, we need to upload the code. But before that, we need to install an Agent to flash the code directly from the browser. Follow the instructions on your screen to install the agent. Once the driver is installed, the COM port will appear.
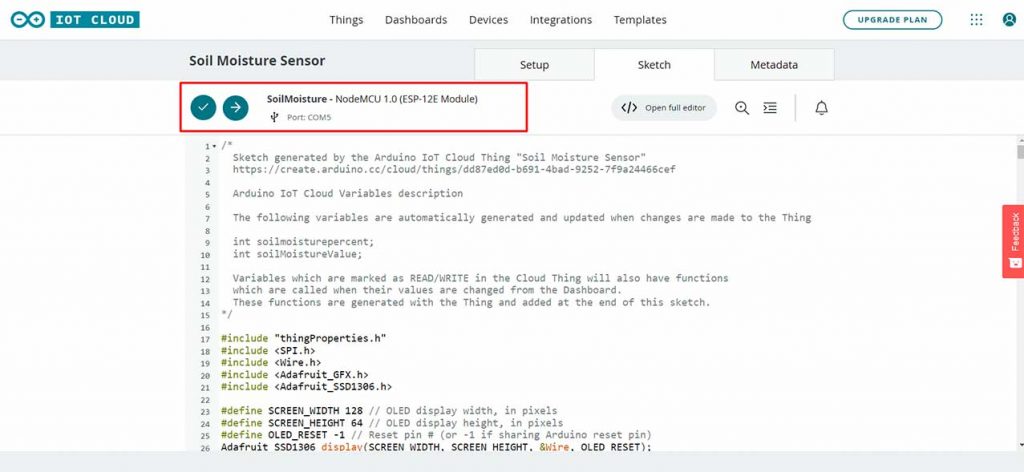
Then select the ESP8266 NodeMCU Board from the list and the COM port as well. Then, upload the code. It will take some time to upload the code and when it’s done, some upload success message will appear.
Project Demonstration
Once the code is uploaded the OLED Display will start showing different emotional expressions with the soil moisture value in percentage(%). Now you can check the soil moisture value by dipping the soil moisture sensor probe in water or soil or any liquid. You can see five different emotional expressions of a plant on OLED Display based on soil moisture percent present.
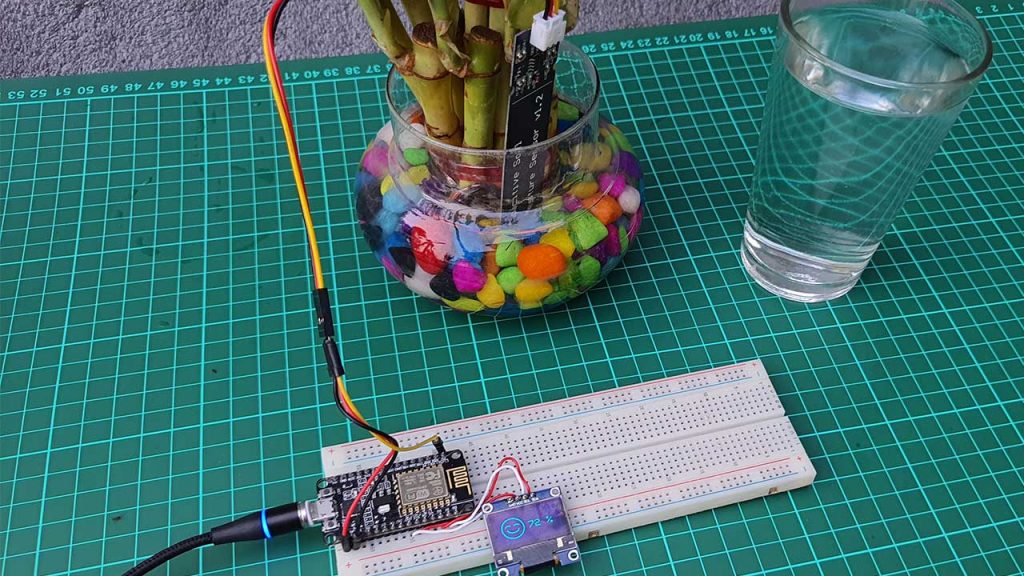
Similarly, You can also monitor the soil moisture data on the Arduino IoT Cloud dashboard. You can also download the “Arduino IoT remote” App and sign in with the same credentials to monitor data through your smartphone.
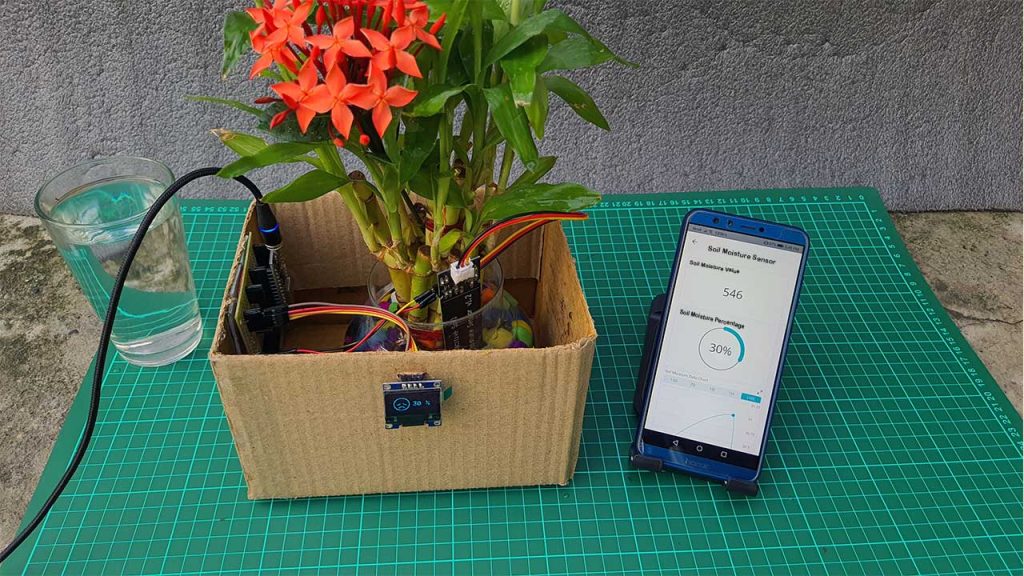
Conclusion
This tutorial shows you how to make an IoT based Plant Monitoring System with ESP8266, OLED Display & Capacitive Soil Moisture Sensor using Arduino IoT Cloud. I hope this tutorial was interesting to you. If you need any type of help related to this project, then let me know in the comment section below.


Code did not work until I’ve added soilmoisturepercent;
void loop() {
// Your code here
soilmoisturepercent;
what line? i have error on soilmoisturevalue not in scope