IoT Energy Meter using INA219 Sensor ESP8266 & Blynk
Multifunction IoT Energy Meter using ESP8266
In this tutorial, I will show you how to make an IoT Energy Meter using INA219 Sensor ESP8266 & Blynk. This multifunction small energy meter senses the current and voltage by using the INA219 current sensor. According to this voltage and current, ESP8266 calculates power, energy, and capacity. Similarly, from energy consumption, the energy cost is calculated based on the energy price per kWh. These data are sent to Blynk IoT Cloud for live monitoring through the internet.

Overview: IoT Energy Meter using ESP8266 & INA219
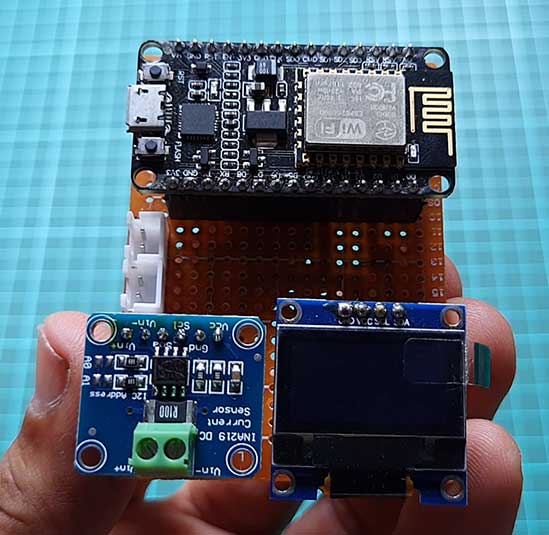
Today we will make an IoT based energy meter using the INA219 sensor and ESP8266, NodeMCU, OLED Display, and Blink IoT Cloud. This small device can be very useful for you in your day-to-day life. It can measure Voltage, Current, Power, Energy, Capacity, and Energy cost is calculated from energy consumption and energy price per kWh. We can monitor those calculated data on 0.96 inch OLED Display as well as on Blynk 2.0 IoT platform from anywhere in the world. We can use this little device for measuring the real capacity of the battery pack or power bank using a dummy load. It is suitable for almost any DC Device. It can measure voltage from 0 – 26V and a maximum current of 3.2A.
Features of IoT Multifunction Energy Meter
- Measure voltage, Current, Power, Energy Consumption, Battery Capacity, and Energy Cost.
- Monitor all the data locally on OLED Display.
- Monitor the parameters using a smartphone or a PC through the Internet.
- Use it for solar power monitoring.
- Can be used as a USB device tester.
- Monitor your electricity bill.
- Easily reconfigure your device to a new WiFi network without hardcoding.
Components Required
Following is the list of all the components required for making this project. All the components are available on amazon.
| S.N | Components Name | Quantity | |
|---|---|---|---|
| 1 | ESP8266 NodeMCU | 1 | https://amzn.to/3y0zmyq |
| 2 | 0.96" I2C OLED Display | 1 | https://amzn.to/3xFdiYO |
| 3 | INA219 Current Sensor | 1 | https://amzn.to/3zIGK2p |
| 4 | Few jumpers wires | 20 | https://amzn.to/3klh0A4 |
INA219 Current Sensor
The INA219 Current Sensor is an I2C-supported interface-based zero drift and bi-directional current/power monitoring module. It can measure the current, voltage, and power of a circuit. This Sensor module is provided with 0.1 ohms, and a 1% shunt resistor to fulfill the requirement of current measurements. The maximum voltage that can be measured with the INA219 sensor is 26V and the maximum current is 3.2A.
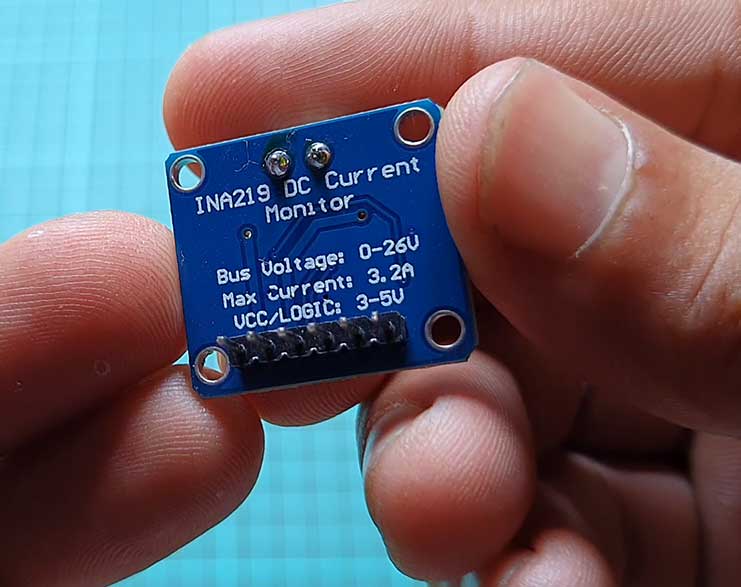
The operation voltage of the INA219 is between 3V and 5.5V. So, we can use different Arduino boards with an operating voltage of 5V or ESP8266 and ESP32 microcontroller with a lower operation voltage of 3.3V to read the voltage and current sensor values.
The sensor values are transferred via the I2C communication protocol between the INA219 module and the microcontroller.
Also check:
- ESP8266 Monitor its Own Battery Level using IoT
- IoT based Decibel Meter with ESP8266 & Sound Sensor
- Arduino-based Decibel meter with Sound Sensor
- IoT Smart RFID Door Lock System Using NodeMCU ESP8266
- IoT Smart RFID Door Lock System Using NodeMCU ESP8266
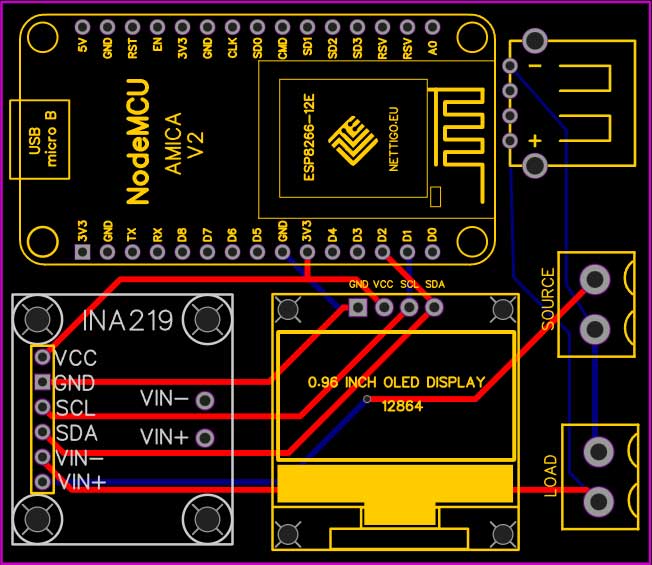
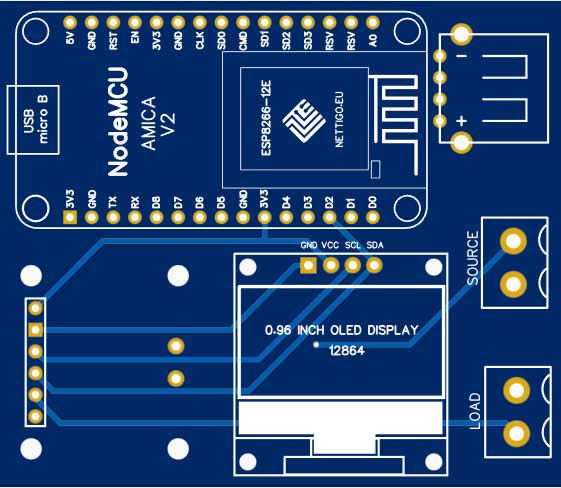
IoT Energy Meter Circuit Diagram:
The wiring of the INA219 with ESP8266 is shown here. In my case, I powered the INA219 from the microcontroller with 3.3V but you can also use 5V instead. Also, you have to connect the clock (SCL) and data (SDA) pins for the I2C communication to send the information about voltage, current, and power from the INA219 to the microcontroller.
Now connect the NodeMCU ESP8266 with the INA219 current sensor & OLED Display as per the circuit diagram:
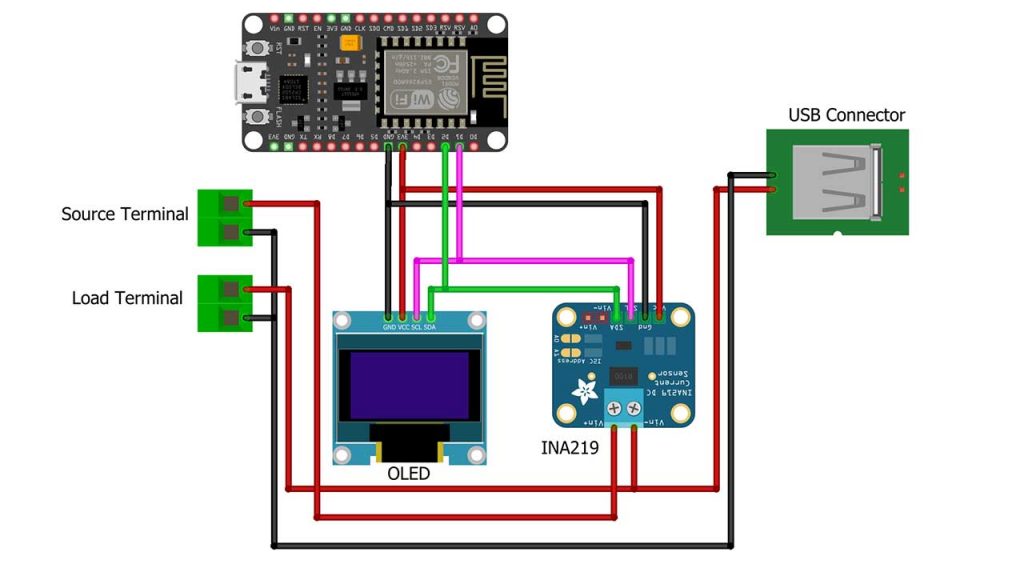
Now let’s take a look at the schematic I used for testing the INA219 module. I used a 12V battery on the Source and for the load, I used one 12V servo. To display the change in the current, voltage, power, energy, and capacity I used this small OLED Display.
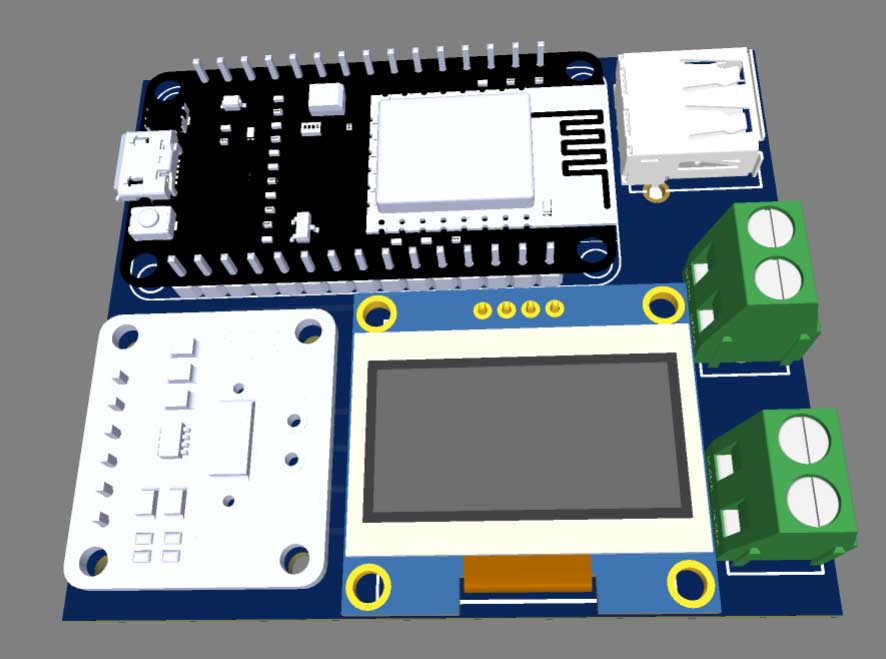
PCB Designing & Ordering
You can simply assemble the circuit on a breadboard. But if you don’t want to assemble the circuit on a breadboard, you can follow this schematic and build your own PCB. You can download the Gerber file of my PCB Design from the link attached below. The PCB looks like the image shown below.
I provided the Gerber File for IoT Energy Meter using INA219 Sensor ESP8266 & Blynk PCB below.
You can simply download the Gerber File and order your custom PCB from PCBWay

Visit the PCBWay official website by clicking here: https://www.PCBWay.com/. Simply upload your Gerber File to the Website and place an order. The reason behind most people trusting PCBWay for PCB & PCBA Services is because of their quality. The PCB quality is superb and has a very high finish, as expected.
Setting up Blynk IoT Dashboard
In order to monitor and control Energy Meter using Blynk IoT Server, you first need to set up the Blynk IoT Cloud dashboard. To set up the Blynk Server, visit https://blynk.cloud. Create an account or simply sign in if you created the account earlier.
Creating Blynk New template
A template is a project in which we can create a web and mobile dashboard for specific hardware. In our case, it’s an IoT Energy Meter. For creating a project, first, you have to click on the New Template.
- Enter a template name. I am Giving it an “IoT Energy Meter ”.
- Select the hardware board (ESP8266).
- The connection type will be WiFi.
- You can add a description of your project if required.
- Click on Done.
- Now the template is created.
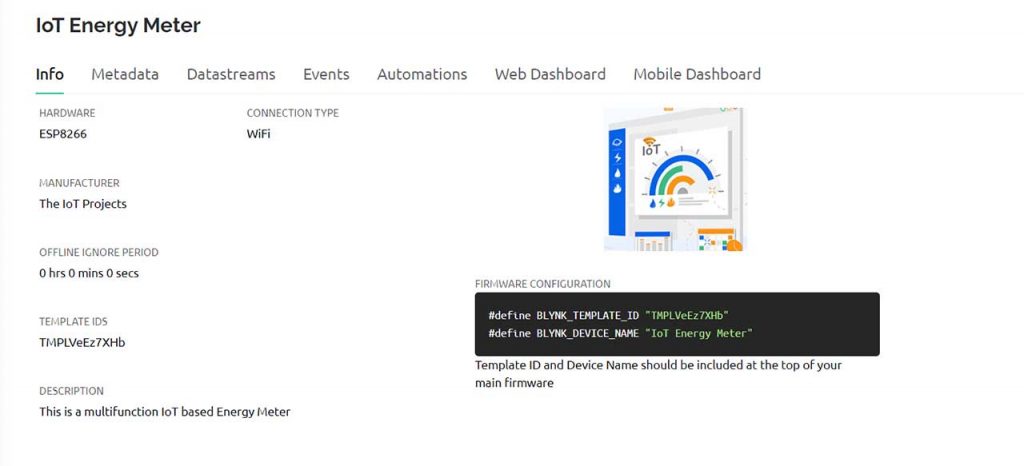
Here are two important things that you should remember one is the template id and another one is the device name which is required during the time of programming.
Creating New Blynk Datastream
A data stream is like a pipeline or channel. The data will be sent or received through these data channels.
In a single project or template, there can be multiple DataStreams. In our project, we are monitoring eight parameters. So you can give names to those parameters. In my case, Voltage, Current, Power, Energy, Capacity, Price per kWh, Energy cost, and Current graph are eight DataStream.
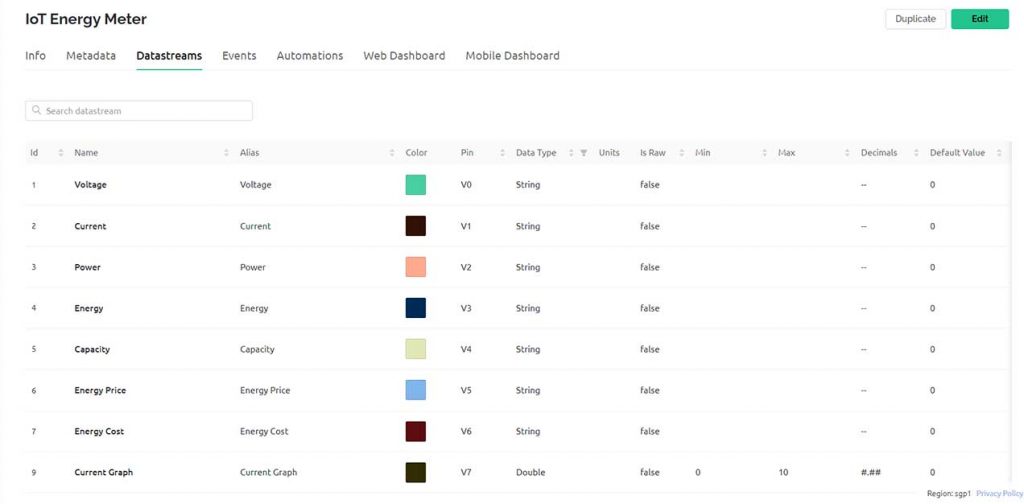
I choose virtual pins V0, V1, V2, V3, V4, V5, V6, V7, and V8 respectively for our DataStreams for the Live Monitoring. The Variable data type is a string for all the variables except the current graph which is an integer type variable.
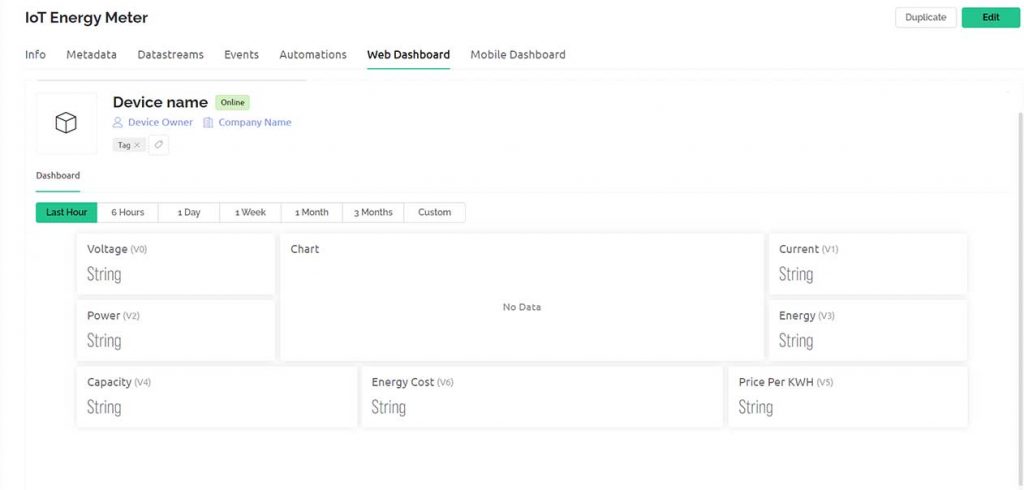
Design the Blynk 2.0 Web Dashboard
After that move on to the web dashboard. In this section, you will be able to see some widgets for making your cool-looking web dashboard. Now, simply add 7 Value Display widgets and 1 Chart widget to your main screen. You need to configure them by providing a name and selecting datastream from the list.
IoT Energy Meter Program Code
Before you start the programming, first of all, make sure you have downloaded all the necessary libraries.
Download the program sketch zip file
Before uploading the code make sure to replace your Blynk Template ID and Device ID that we have created earlier. The maximum of the program code is explained in our previous project. In this project, we have just added some useful features and blynk iot support is integrated.
// Fill-in information from your Blynk Template here
#define BLYNK_TEMPLATE_ID "TMPLVeEzxxx"
#define BLYNK_DEVICE_NAME "IoT Energy Meter"

#define BLYNK_FIRMWARE_VERSION        "0.1.0"

#define BLYNK_PRINT Serial
//#define BLYNK_DEBUG

#define APP_DEBUG

// Uncomment your board, or configure a custom board in Settings.h
//#define USE_SPARKFUN_BLYNK_BOARD
#define USE_NODE_MCU_BOARD
//#define USE_WITTY_CLOUD_BOARD
//#define USE_WEMOS_D1_MINI

#include "BlynkEdgent.h"
#include <Wire.h>
#include <Adafruit_INA219.h>
#include <Adafruit_SSD1306.h>

/****************************************************************************/

#define SCREEN_WIDTH 128 // OLED display width, in pixels
#define SCREEN_HEIGHT 64 // OLED display height, in pixels
#define OLED_RESET     -1 // Reset pin # (or -1 if sharing Arduino reset pin)
#define SCREEN_ADDRESS 0x3C ///< See datasheet for Address; 0x3D for 128x64, 0x3C for 128x32
// Declaration for an SSD1306 display connected to I2C (SDA, SCL pins)
Adafruit_SSD1306 display(SCREEN_WIDTH, SCREEN_HEIGHT, &Wire, OLED_RESET);
Adafruit_INA219 ina219;

unsigned long previousMillis = 0;
unsigned long interval = 2000;
float shuntvoltage = 0.00;
float busvoltage = 0.00;
float current = 0.00;
float loadvoltage = 0.00;
float energy = 0.00,  energyCost, energyPrevious, energyDifference;
float energyPrice = 6.50 ;
float power = 0.00;
float capacity = 0.00;

void setup()
{
  Serial.begin(115200);
  while (!Serial) {
    // will pause Zero, Leonardo, etc until serial console opens
    delay(1);
  }

  uint32_t currentFrequency;

  Serial.begin(115200);
  // initialize OLED display
  display.begin(SSD1306_SWITCHCAPVCC, 0x3C);
  display.clearDisplay();
  display.setTextColor(WHITE);
  display.setTextSize(1);
  display.setCursor(10, 30);
  display.print("IoT Energy Meter");
  display.display();
  //Start Blynk 2.0
  BlynkEdgent.begin();

  // Initialize the INA219.
  // By default the initialization will use the largest range (32V, 2A).  However
  // you can call a setCalibration function to change this range (see comments).
  if (! ina219.begin()) {
    Serial.println("Failed to find INA219 chip");
    while (1) {
      delay(10);
    }
  }
  // To use a slightly lower 32V, 1A range (higher precision on amps):
  //ina219.setCalibration_32V_1A();
  // Or to use a lower 16V, 400mA range (higher precision on volts and amps):
  //ina219.setCalibration_16V_400mA();

  Serial.println("IoT Energy Meter with INA219 ...");
}

void loop()
{
  BlynkEdgent.run();
  unsigned long currentMillis = millis();
  if (currentMillis - previousMillis >= interval)
  {
    previousMillis = currentMillis;
    ina219values();
    displaydata();
  }
}


void ina219values()  {

  shuntvoltage = ina219.getShuntVoltage_mV();
  busvoltage = ina219.getBusVoltage_V();
  current = ina219.getCurrent_mA();
  loadvoltage = busvoltage + (shuntvoltage / 1000);
  power = loadvoltage * current;
  energy = energy + power / 3600; //Wh
  capacity = capacity + current / 1000;
  energyDifference = energy - energyPrevious;
  energyPrevious = energy;
  energyCost = energyCost + (energyPrice / 1000 * energyDifference);
    // Send data to blynk
  Blynk.virtualWrite(V7, current);
  Blynk.virtualWrite(V5, String("Rs.") + String(energyPrice) );

  // nothing connected? set all to 0, otherwise they float around 0.

  if (loadvoltage < 1 )loadvoltage = 0;
  if (current < 1 )
  {
    current = 0;
    power = 0;
    energy = 0;
    capacity = 0;
    energyCost=0;
  }

  Serial.print("Bus Voltage:   "); Serial.print(busvoltage); Serial.println(" V");
  Serial.print("Shunt Voltage: "); Serial.print(shuntvoltage); Serial.println(" mV");
  Serial.print("Load Voltage:  "); Serial.print(loadvoltage); Serial.println(" V");
  Serial.print("Current:       "); Serial.print(current); Serial.println(" mA");
  Serial.print("Power:         "); Serial.print(power); Serial.println(" mW");
  Serial.print("Energy:        "); Serial.print(energy); Serial.println(" Wh");
  Serial.print("Capacity:      "); Serial.print(capacity); Serial.println(" Ah");
  Serial.print("Energy Cost:   "); Serial.print("Rs. "); Serial.println(energyCost);
  Serial.println("-------------------------");
}
void displaydata() {
  display.clearDisplay();
  display.setTextColor(WHITE);
  display.setTextSize(1);
  // VOLTAGE
  Blynk.virtualWrite(V0, String(loadvoltage, 2) + String(" V") );
  display.setCursor(0, 5);
  display.print(loadvoltage, 2);
  display.print(" V");
  // CURRENT
  if (current > 1000) {
    Blynk.virtualWrite(V1, String((current / 1000), 2) + String(" A") );
    display.setCursor(60, 5);
    display.print((current / 1000), 2);
    display.println(" A");
    display.setCursor(0, 15);
    display.println("--------------------");
  }
  else
  {
    Blynk.virtualWrite(V1, String(current, 2) + String(" mA"));
    display.setCursor(60, 5);
    display.print(current, 1);
    display.println(" mA");
    display.setCursor(0, 15);
    display.println("--------------------");
  }


  display.setCursor(60, 20);
  display.print("|");
  display.setCursor(60, 24);
  display.print("|");
  display.setCursor(60, 28);
  display.print("|");
  display.setCursor(60, 32);
  display.print("|");
  display.setCursor(60, 36);
  display.print("|");
  display.setCursor(60, 40);
  display.print("|");
  display.setCursor(0, 46);
  display.print("--------------------");

  // POWER
  if (power > 1000) {
    Blynk.virtualWrite(V2, String((power / 1000), 2) + String(" W") );
    display.setCursor(0, 24);
    display.print(String((power / 1000), 2));
    display.println(" W");
  }
  else {
    Blynk.virtualWrite(V2, String(power, 2) + String(" mW") );
    display.setCursor(0, 24);
    display.print(power, 2);
    display.println(" mW");
  }

  //Energy Comsumption
  if (energy > 1000) {
    Blynk.virtualWrite(V3, String((energy / 1000), 2) + String(" kWh"));
    display.setCursor(0, 36);
    display.print((energy / 1000), 2);
    display.println(" kWh");
  }
  else {
    Blynk.virtualWrite(V3, String(energy, 2) + String(" Wh"));
    display.setCursor(0, 36);
    display.print(energy, 2);
    display.println(" Wh");
  }


  // CAPACITY
  if (capacity > 1000) {
    Blynk.virtualWrite(V4, String((capacity / 1000), 2) + String(" Ah") );
    display.setCursor(65, 24);
    display.println("Capacity:");
    display.setCursor(65, 36);
    display.print((capacity / 1000), 2);
    display.println(" Ah");

  }
  else
  {
    Blynk.virtualWrite(V4, String((capacity), 2) + String(" mAh") );
    display.setCursor(65, 24);
    display.println("Capacity:");
    display.setCursor(65, 36);
    display.print(capacity, 2);
    display.println(" Ah");

  }


  // ENERGY COST
  Blynk.virtualWrite(V6, String("Rs.") + String(energyCost, 5) );
  display.setCursor(10, 54);
  display.print("E Cost:Rs ");
  display.println(energyCost, 5);
  display.display();
}
Now choose your NodeMCU board and correct port. Compile the Program sketch and Upload it to the NodeMCU 12E Board. After successful upload of the program to the NodeMCU board. We need to configure Blynk IoT App on your smartphone.
Blynk IoT 2.0 Mobile application setup
Download the blynk application to your mobile.
- New Blynk Mobile App (Android)
- New Blynk Mobile App (iOS)
After installing the application login into your account. Turn on the developer mode if it is not turned on by going into your profile.
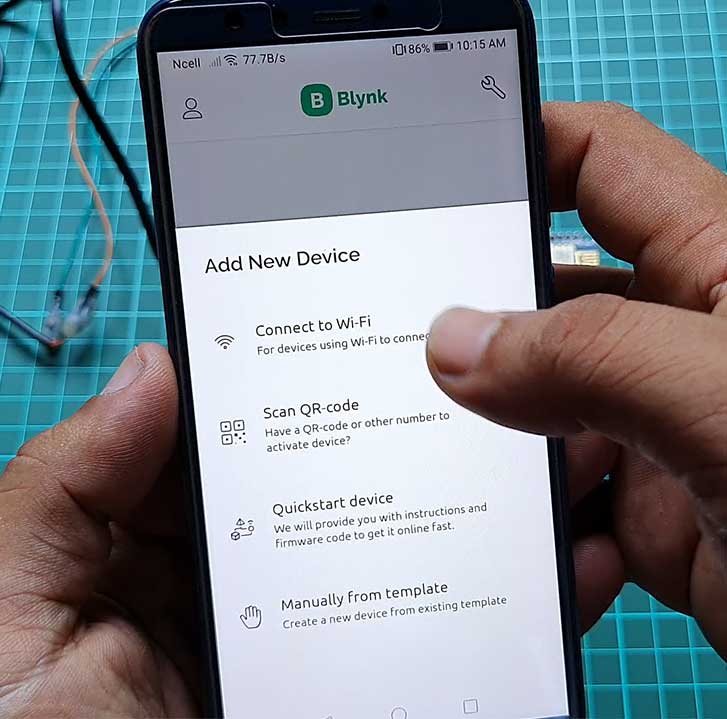
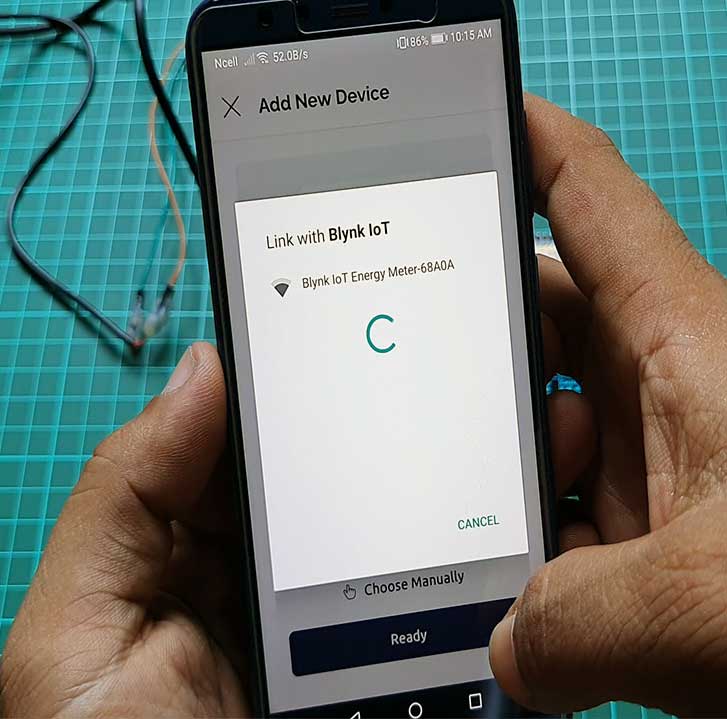
- Click on Add new device
- Click on Ready
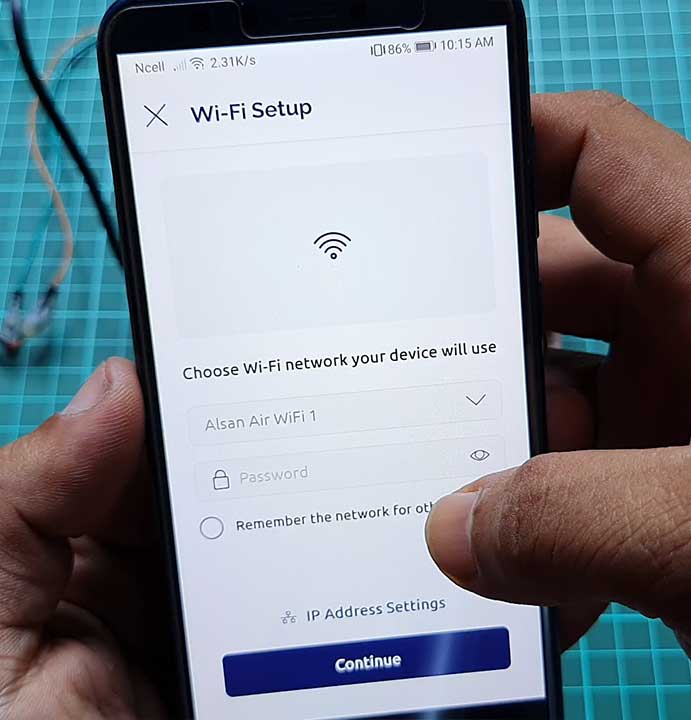
- Choose the wifi which is created by the NodeMCU.
- Give the wifi credentials of the router with which you want to connect the NodeMCU.
- Click on Continue
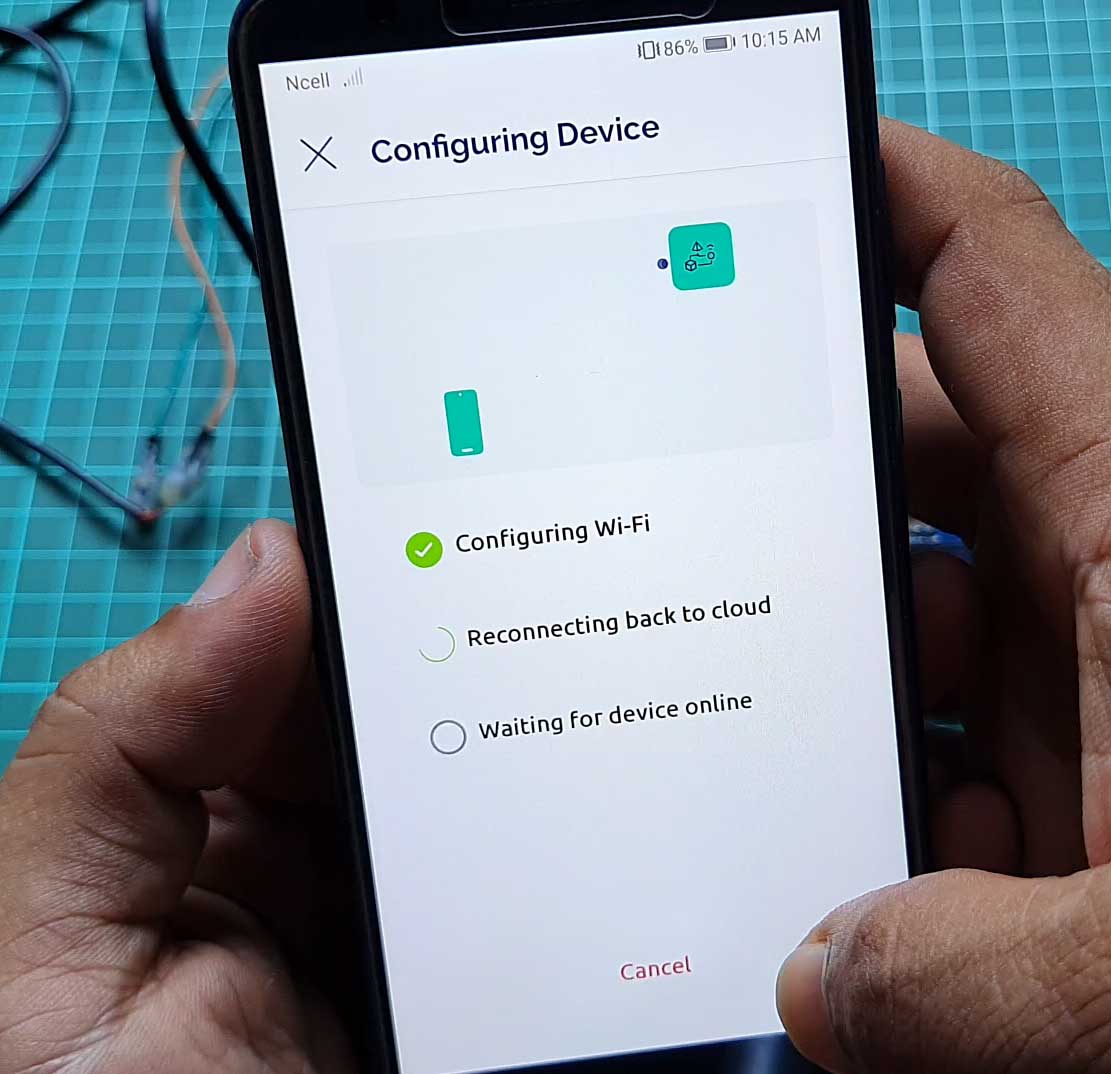
- Now the board will connect to the router if the given wifi credentials are true.
- Click on –> Continue
- Provide your Device Name and click Continue.
- Add 7 Value display widgets and 0ne chart widget to the main screen.
- Similarly, configure all the widgets with their respective data streams as shown here.
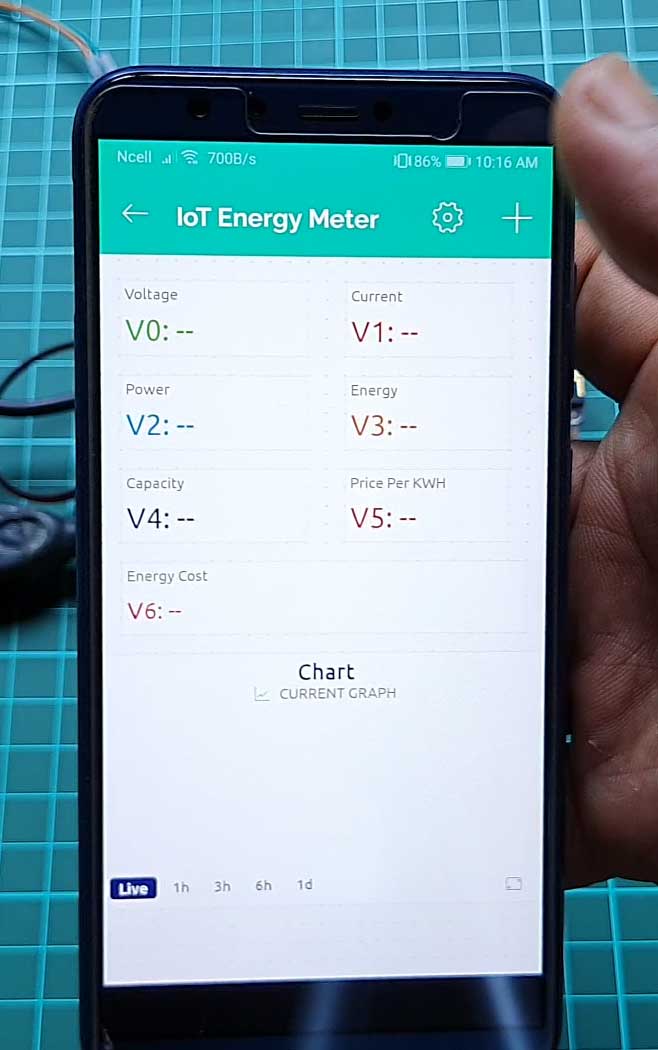
So, that’s all for the Mobile dashboard setup. Further, you can now monitor the parameters from anywhere in the world.
Demonstration of IoT Energy Meter
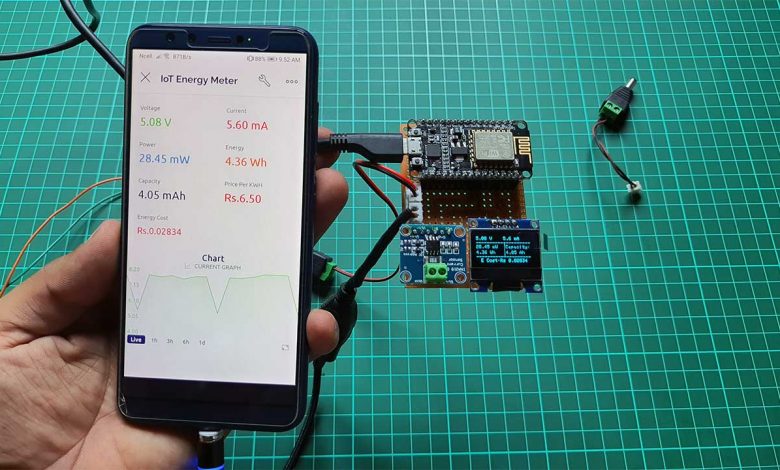
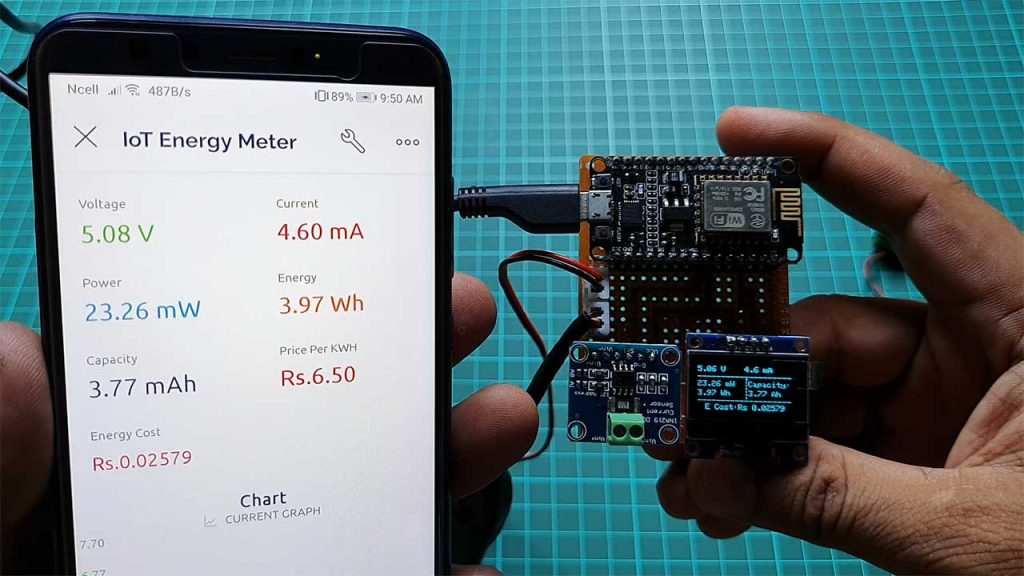
I have tested this project through a 12V battery and 5V USB source and some dummy loads like running servo, charging phone, etc. The test results shown are fairly accurate.
You can see all the parameters displayed on the OLED screen as well as on a mobile phone.
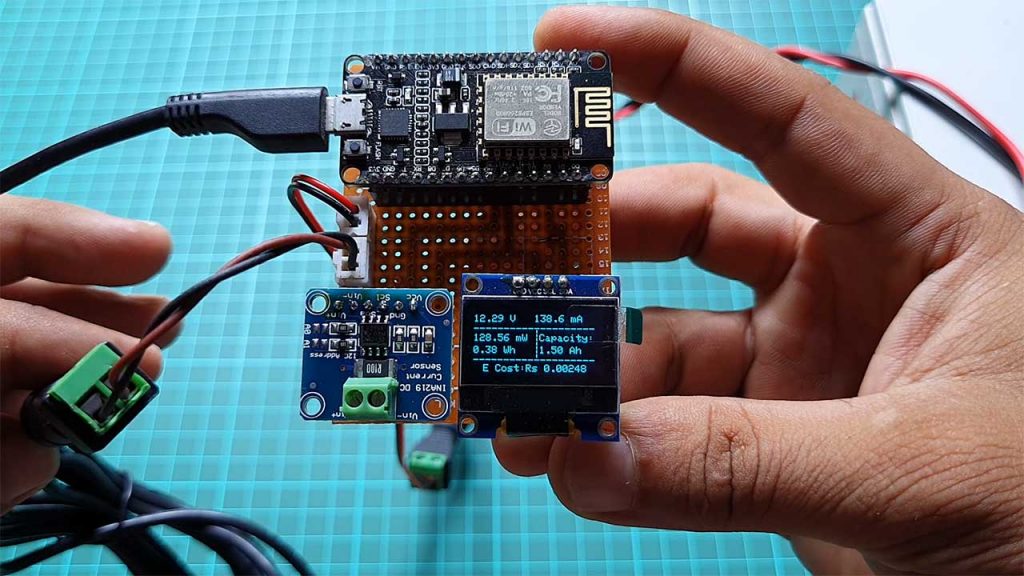
The parameters in the first row are Voltage and Current. Power and Energy consumption on the first column. Similarly, the Capacity tester on the second column and lastly, energy cost at the end.
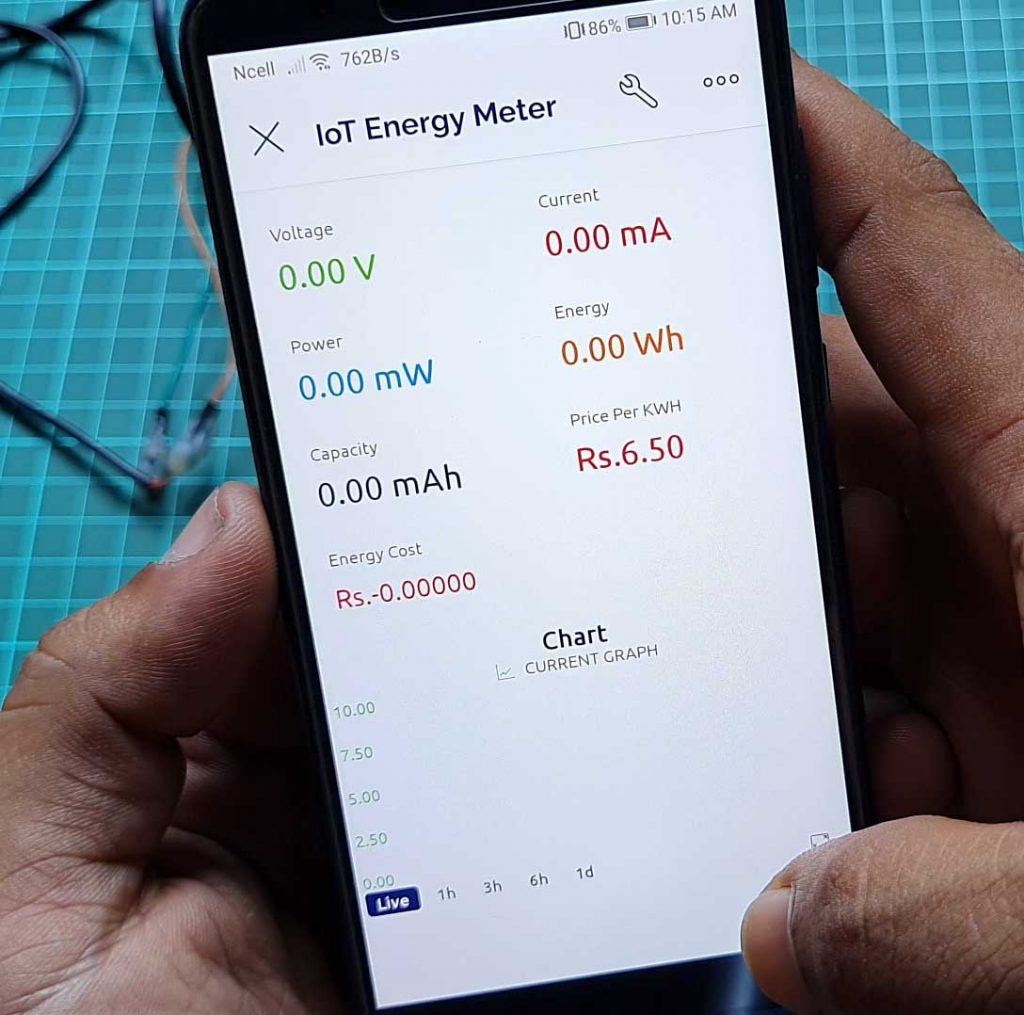
Now open the Blynk app to monitor all the above parameters from your smartphone. To check the accuracy I used my multimeter and the result was satisfying.
Conclusion
Finally, we have successfully made a pocket-size IoT Energy Meter using INA219 Sensor ESP8266 & Blynk. I hope this pocket-size gadget was useful to you. For more amazing content keep supporting us by sharing the post on social media. Comments and feedback are always welcome.


Thanks for your project.
I have a small 200w solar kit currently it does not reach 10-12 amps of charge, I can change the ina219 3.2A max for the ina226 I think its maximum charge is 20A. sorry my english
What is the use of the USB connector?
To measure voltage, power, and energy consumed by devices connected through a USB port.
Can we take rid of the USB connector and only measure the 12V servo consumption?
what change have to be made for coding if using ESP32 WROOM32 ?
blynk library for ESP32. Then Pin connection defined.
Do you have any project that can measure DC energy and voltage for solar with 72V and up to 100A?
i have to compile with Blynk library ver 1.2.0 for uploading to Wemos Mini D1 and NodeMCU 12E, other version cannot compile.
I am doing this as my first year project can u tell me where is the “user_interface.h” . I am getting a error msg like this
In file included from C:\Users\Yashwanth\Documents\Arduino\IOT_Energy_meter_using_INA219_Sensor\IOT_Energy_meter_using_INA219_Sensor.ino:19:0:
C:\Users\Yashwanth\Documents\Arduino\IOT_Energy_meter_using_INA219_Sensor\BlynkEdgent.h:3:12: fatal error: user_interface.h: No such file or directory
#include “user_interface.h”
^~~~~~~~~~~~~~~~~~
compilation terminated.
exit status 1
Compilation error: user_interface.h: No such file or directory
and can i use a 9v battery and a 9v motor instead of a 12v battery and a 12v servo motor