Today we will learn how to Plot Sensor readings to Webserver in Real-Time Chart using the ESP8266. We will use an HC-SR04 Ultrasonic sensor to read (Distance in cm) on a web server. The ESP8266 will host a web page with real-time charts that have new readings added every 3 seconds. We also don’t need to keep refreshing the page to read new readings.
Project Overview
To run this project, we’ll build an asynchronous web server. So we will be using the ESPAsyncWebServer library.
We will also design the web page using HTML. The HTML file is stored on the ESP8266 File System (SPIFFS). Here are the few tutorials based on the NodeMCU web server.
- NodeMCU ESP8266 Monitoring DHT11/DHT22 Temperature and Humidity with Local Web Server
- IoT Web Controlled Smart Notice Board using NodeMCU ESP8266
We’ll display distance in cm, from the HC-SR04 Ultrasonic sensor on a chart. You can modify this project to display sensor readings from any other sensor like temperature, humidity, and pressure, etc.
Simply, to build the charts, we’ll use the Highcharts library. We’ll create a single chart: Distance. Actually, the chart displays a maximum of 40 data points. Every 3 seconds, a new reading is added, but you can modify these values according to your project requirements.
Learn More Arduino Projects:
- Dual Axis Solar Tracker Arduino Project Using LDR & Servo Motors
- IoT Based RFID Smart Door Lock System Using NodeMCU ESp8266
Watch the Video Demonstration
You can watch this video demonstration to know how projects work.
Prerequisites
Make sure you check all the prerequisites before starting the project in order to compile the code.
1. Install ESP8266 Board in Arduino IDE
First of All, we’ll program ESP8266 using Arduino IDE. So, you will need ESP8266 add-on to compile the code in IDE. Follow the installation ESP8266 board in the Arduino IDE guide from this post.
2. Filesystem Uploader Plugin
Secondly, we are uploading an HTML file to ESP8266 flash memory. Hence, we’ll need a plugin for Arduino IDE called Filesystem uploader. Follow this tutorial to install a filesystem uploader for ESP8266.
- ESP8266: Install FileSystem Uploader Plugin in Arduino IDE -By Random Nerd Tutorials
3. Installing Libraries
Thirdly, to run the asynchronous web server, you need to install the following libraries.
- ESP8266: you need to install the ESPAsyncWebServer and the ESPAsyncTCP libraries.
These libraries aren’t available on the Arduino Library Manager, so you need to download and copy the library files to the Arduino Installation folder.
To get readings from the Ultrasonic HC-SR04 sensor module you need to have the next library installed:
Note: These Libraries are available on Arduino Library Manager. Simply you can install them from Library Manager on Arduino IDE.
Components Required
To make this project you need the following components:
- ESP8266 Development Board
- HC-SR04 Ultrasonic sensor
- Breadboard
- Jumper wires
Schematic Diagram
The HC-SR04 Ultrasonic sensor module provides the measurement of the time that it takes for sound to bounce off an object and return back to the sensor. Want to know more visit the Link- Working Principle of HC-SR04 Ultrasonic Sensor.
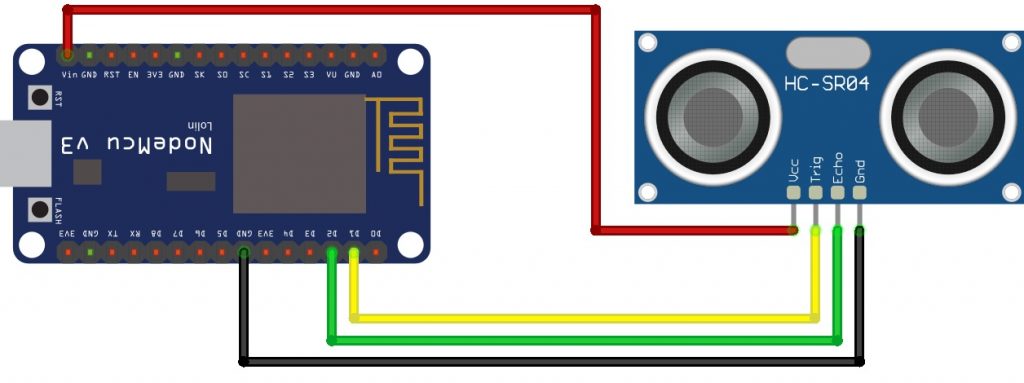
Ultrasonic HC-SR04 wiring to ESP8266
| Ultrasonic HC-SR04 | ESP8266 |
| Vcc Pin | Vin Pin |
| Trig Pin | D1 (GPIO 5) |
| Echo Pin | D2 (GPIO 4) |
| GND Pin | GND |
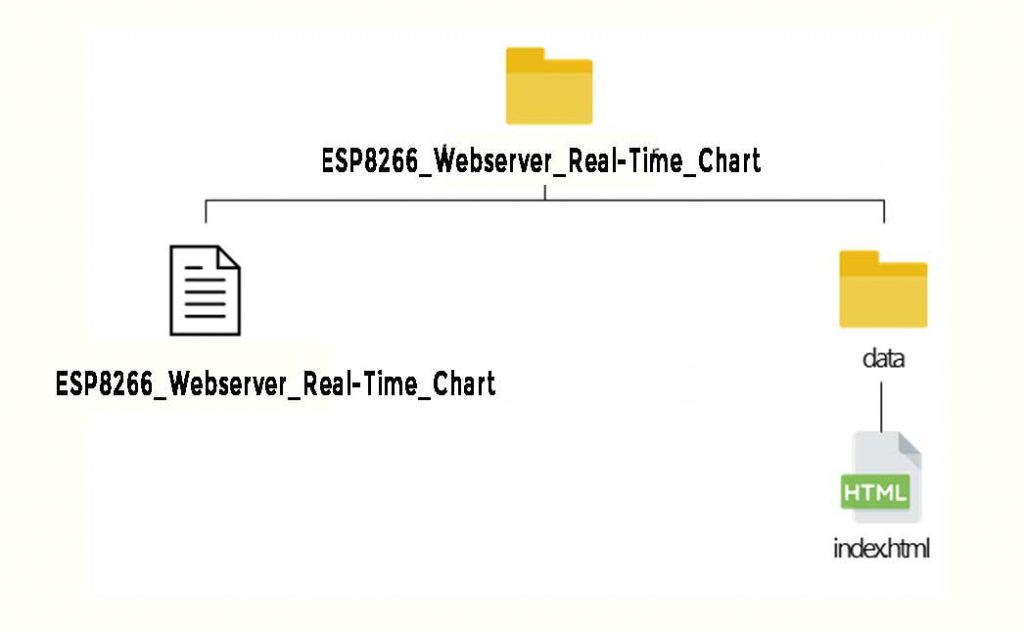
Organizing your Files
Finally, to build the web server we need two different files. One is The Arduino sketch and the other is an HTML file. So, the HTML file should be saved inside a folder called data. It resides inside the Arduino sketch folder, as shown below:
This experiment focuses on Javascript for plotting formation. The initial idea of this experiment was to use an Asynchronous Web Server.
Creating the HTML File
Create an index.html file with the following content or Download all project files from below. The index.html file will contain web pages that will be displayed by the server along with JavaScript that will process the formation of graphics. While all server programs and sensor readings are in the ESP8266_Webserver_Real-Time_Chart file.
<!DOCTYPE HTML><html>
<head>
  <meta name="viewport" content="width=device-width, initial-scale=1">
  <script src="https://code.highcharts.com/highcharts.js"></script>
  <style>
    body {
      min-width: 310px;
    	max-width: 800px;
    	height: 400px;
      margin: 0 auto;
    }
    h2 {
      font-family: Arial;
      font-size: 2.5rem;
      text-align: center;
    }
  </style>
</head>
<body>
  <h2>ESP8266 Distance Plot</h2>
  <div id="chart-distance" class="container"></div>
</body>
<script>
var chartT = new Highcharts.Chart({
  chart:{ renderTo : 'chart-distance' },
  title: { text: 'HC-SR04 Distance' },
  series: [{
    showInLegend: false,
    data: []
  }],
  plotOptions: {
    line: { animation: false,
      dataLabels: { enabled: true }
    },
    series: { color: '#059e8a' }
  },
  xAxis: { type: 'datetime',
    dateTimeLabelFormats: { second: '%H:%M:%S' }
  },
  yAxis: {
    title: { text: 'Distance (CM)' }
  },
  credits: { enabled: false }
});
setInterval(function ( ) {
  var xhttp = new XMLHttpRequest();
  xhttp.onreadystatechange = function() {
    if (this.readyState == 4 && this.status == 200) {
      var x = (new Date()).getTime(),
          y = parseFloat(this.responseText);
      //console.log(this.responseText);
      if(chartT.series[0].data.length > 40) {
        chartT.series[0].addPoint([x, y], true, true, true);
      } else {
        chartT.series[0].addPoint([x, y], true, false, true);
      }
    }
  };
  xhttp.open("GET", "/distance", true);
  xhttp.send();
}, 3000 ) ;
</script>
</html>
In the code above you can see that there is a <script> </script> section. This section will be written in the Javascript program code for beautiful graphics.
var chartT = new Highcharts.Chart({
  chart:{ renderTo : 'chart-distance' },
  title: { text: 'HC-SR04 Distance' },
  series: [{
    showInLegend: false,
    data: []
  }],
  plotOptions: {
    line: { animation: false,
      dataLabels: { enabled: true }
    },
    series: { color: '#059e8a' }
  },
  xAxis: { type: 'datetime',
    dateTimeLabelFormats: { second: '%H:%M:%S' }
  },
  yAxis: {
    title: { text: 'Distance (CM)' }
  },
  credits: { enabled: false }
});
setInterval(function ( ) {
  var xhttp = new XMLHttpRequest();
  xhttp.onreadystatechange = function() {
    if (this.readyState == 4 && this.status == 200) {
      var x = (new Date()).getTime(),
          y = parseFloat(this.responseText);
      //console.log(this.responseText);
      if(chartT.series[0].data.length > 40) {
        chartT.series[0].addPoint([x, y], true, true, true);
      } else {
        chartT.series[0].addPoint([x, y], true, false, true);
      }
    }
  };
  xhttp.open("GET", "/distance", true);
  xhttp.send();
}, 3000 ) ;
The code explains that a new Highcharts object was formed to be rendered to the <div> tag with the chart-distance id in the HTML code. Then, the X-axis is defined as the time of reading the data, and the Y-axis is the value of the reading which is the distance in centimeters (cm). Then, the setInterval function will send data from the server every 3 seconds by accessing the “/ distance” endpoint provided by the server and sending the data to the chart object earlier.
Program Sketch
Then, now it’s time to create a web server that will be placed in the ESP8266_Webserver_Real-Time_Chart file using the Arduino IDE. The following is the code.
//iotprojectsideas.com
#include <Ultrasonic.h>
#include <ESP8266WiFi.h>
#include <ESPAsyncTCP.h>
#include <ESPAsyncWebServer.h>
#include <FS.h>
#include <Wire.h>
// Instantiate trig and echo pins for ultrasonic sensors
Ultrasonic ultrasonic (D1, D2);
// Replace with your network credentials
const char* ssid = "Alsan Air WiFi 4";
const char* password = "11122235122@kap1";
// Create AsyncWebServer object on port 80
AsyncWebServer server(80);

String getDistance() {
  // Read Distance
  float d = ultrasonic.read();
  if (isnan(d)) {
    Serial.println("Failed to read from HC-SR04 sensor!");
    return "";
  }
  else {
    Serial.println(d);
    return String(d);
  }
}
void setup () {
  // Serial port for debugging purposes
  Serial.begin (115200);

  // Initialize SPIFFS
  if (! SPIFFS.begin ()) {
    Serial.println ("An Error has occurred while mounting SPIFFS");
    return;
  }

  // Connect to Wi-Fi
  WiFi.begin(ssid, password);
  while (WiFi.status() != WL_CONNECTED) {
    delay(1000);
    Serial.println("Connecting to WiFi..");
  }

  // Print ESP32 Local IP Address
  Serial.println(WiFi.localIP());

  // Route for web page
  server.on ("/", HTTP_GET, [] (AsyncWebServerRequest * request) {
    request-> send (SPIFFS, "/index.html");
  });
  server.on ("/distance", HTTP_GET, [] (AsyncWebServerRequest * request) {
    request-> send_P (200, "text / plain", getDistance(). c_str ());
  });

  // start server
  server.begin ();
}
void loop() {
}
Code Explaination
#include <Ultrasonic.h>
#include <ESP8266WiFi.h>
#include <ESPAsyncTCP.h>
#include <ESPAsyncWebServer.h>
#include <FS.h>
#include <Wire.h>
// Instantiate trig and echo pins for ultrasonic sensors
Ultrasonic ultrasonic (D1, D2);
// Replace with your network credentials
const char* ssid = "Alsan Air WiFi 4";
const char* password = "11122235122@kap1";
// Create AsyncWebServer object on port 80
AsyncWebServer server(80);
In the above program, I do include the library needed to run this web server. Instantiate trig and echo pins for ultrasonic sensors at the beginning according to the wiring. Then, I also assign variables that contain the SSID and password of the network/wifi/hotspot that I use. and finally, do an instance to build an Asynchronous server on port 80.
String getDistance() {
  // Read Distance
  float d = ultrasonic.read();
  if (isnan(d)) {
    Serial.println("Failed to read from HC-SR04 sensor!");
    return "";
  }
  else {
    Serial.println(d);
    return String(d);
  }
}
Then, above I created a getDistance function that will return a string that is the result of reading from the Ultrasonic sensor.
void setup () {
  // Serial port for debugging purposes
  Serial.begin (115200);

  // Initialize SPIFFS
  if (! SPIFFS.begin ()) {
    Serial.println ("An Error has occurred while mounting SPIFFS");
    return;
  }

  // Connect to Wi-Fi
  WiFi.begin(ssid, password);
  while (WiFi.status() != WL_CONNECTED) {
    delay(1000);
    Serial.println("Connecting to WiFi..");
  }

  // Print ESP32 Local IP Address
  Serial.println(WiFi.localIP());

  // Route for web page
  server.on ("/", HTTP_GET, [] (AsyncWebServerRequest * request) {
    request-> send (SPIFFS, "/index.html");
  });
  server.on ("/distance", HTTP_GET, [] (AsyncWebServerRequest * request) {
    request-> send_P (200, "text / plain", getDistance(). c_str ());
  });

  // start server
  server.begin ();
}
In the setup procedure, I specify a serial program to run at a speed of 115200 Baudrate. Then make a SPIFFS connection and start the connection based on the SSID and password that have been previously defined. After that, I determine the route served by the server. In this project, I determined that there would only be 2 routes, namely root, and distance. Route root will return the index.html page when accessed, while route distance will call the getDistance function which will return the HC-SR04 sensor readings when accessed. Then the server starts.
void loop () {

}
In the void loop, no code will be executed because this server will be run asynchronously. So, there is no need to execute the loop section.
Uploading Code and HTML File
You need to save the code as ESP8266_Webserver_Real-Time_Chart or Download all project files here. Go to Sketch > Show Sketch Folder, and create a new folder called data. Inside that folder, you should save the index.html file created previously.
Now you need to upload the HTML file to the ESP8266 filesystem. Go to Tools > ESP8266 Data Sketch Upload and wait for the files to be uploaded.
Then, upload the code to your NodeMCU board. Make sure you have selected the right board and COM port. Also, make sure you’ve inserted your WiFi Credentials in the code.
After a successful upload, open the Serial Monitor at a baud rate of 115200. Press the “EN/RST” button on the ESP8266 board. Now it should print its IP address.
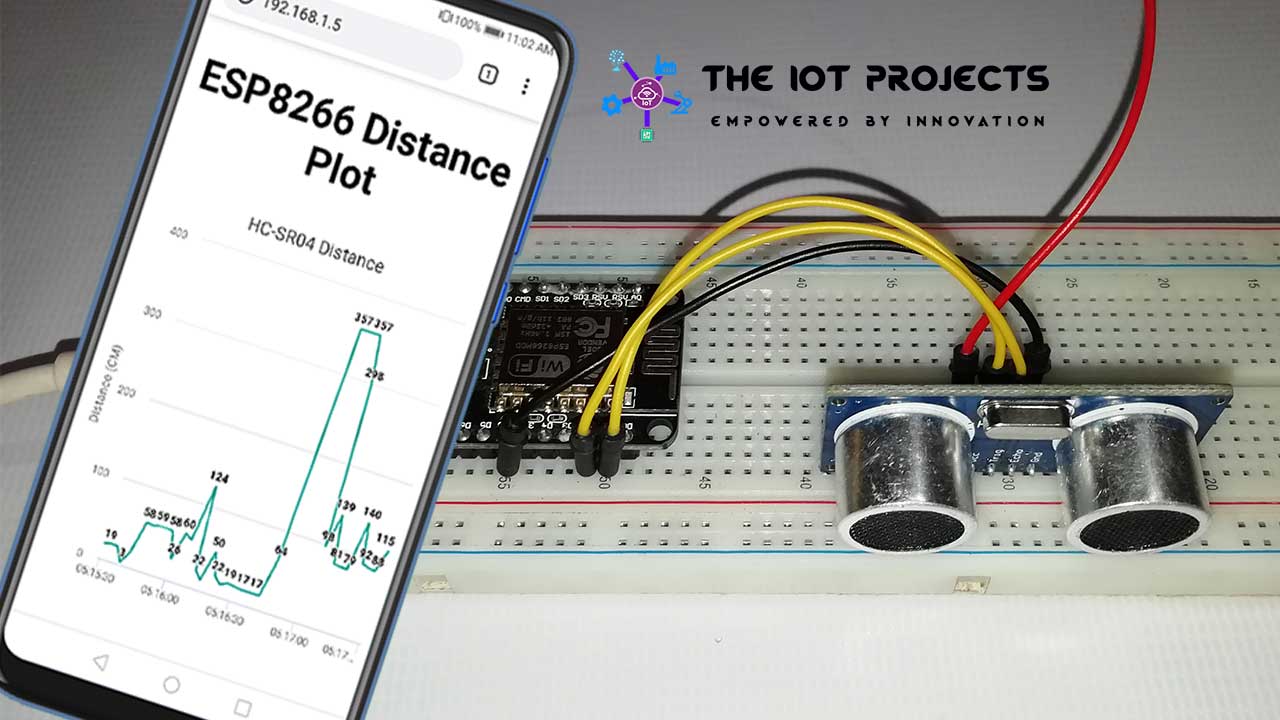
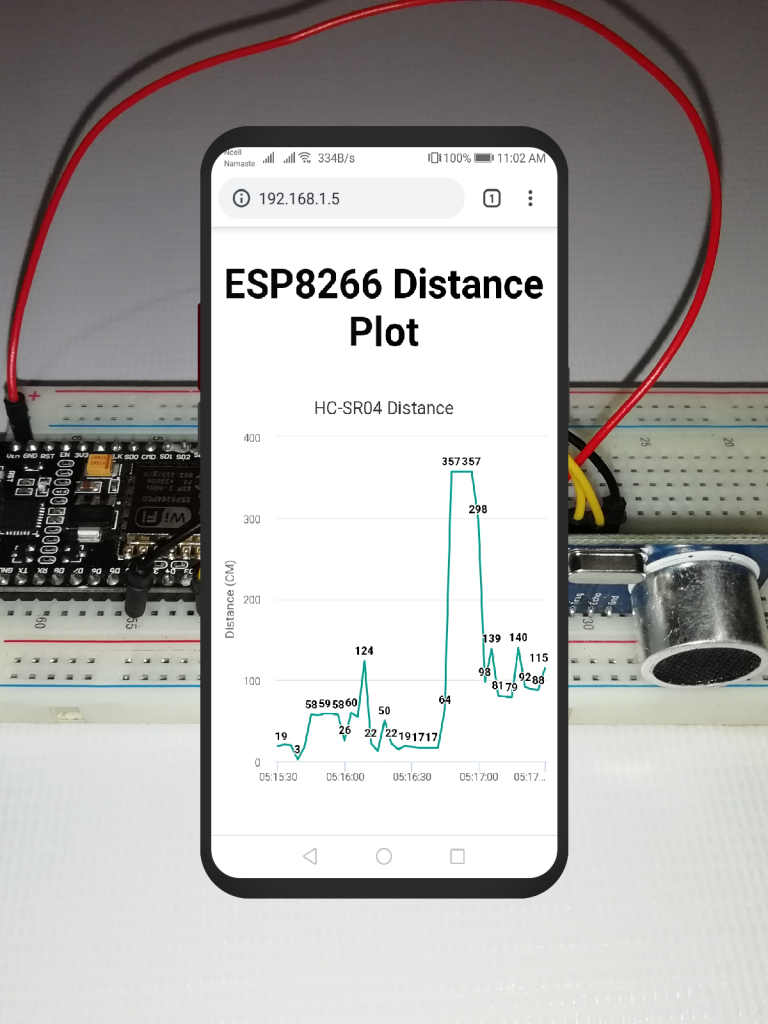
Demonstration
Open your favorite browser and type the ESP8266 IP address. Now you should see the chart. A new data point is added every 3 seconds to a total of 40 points. As long as your browser tab is open the data is continuously displayed on Charts.
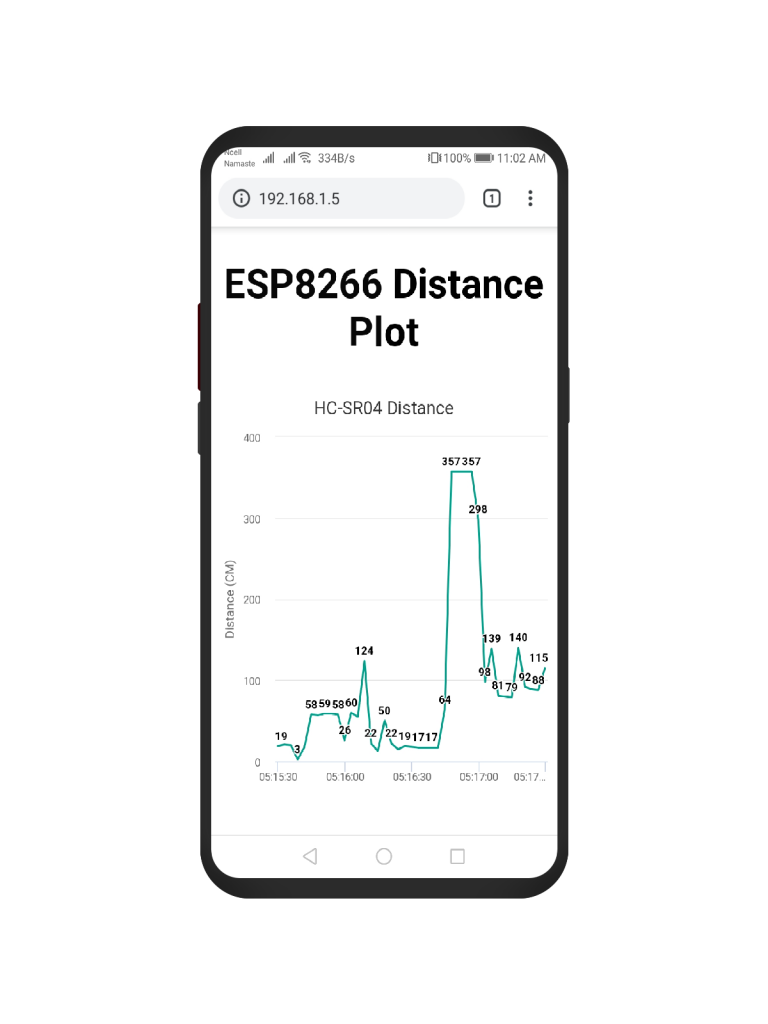
Here is an example of the distance chart: You can select each point to see the exact timestamp.
Conclusion
In this tutorial, we have shown you how to create ESP8266 Plot Sensor readings to Webserver in Real-Time Chart. Now you can modify this project and add any other sensor to read data in charts. I hope you enjoyed reading this article. If you need any type of help related to this project then do let me know in the comment section below.


great project but can you explain how to change the time interval im bit lost with that
I want to plot second sensor data on x axis… Instate of time… Like voltage vs current graph….. Please help me to modify html file…
doesnt work at my offgrid cabin.
After the code is uploaded, COM3 terminal displays as connecting to wifi repeatedly even after pressing rst button
Can you please give any suggestions to it