Indoor Air Quality Monitoring with BME680 & ESP8266 Webserver
IAQ Monitor using BME680 BSEC Libray & ESP8266 on Webserver
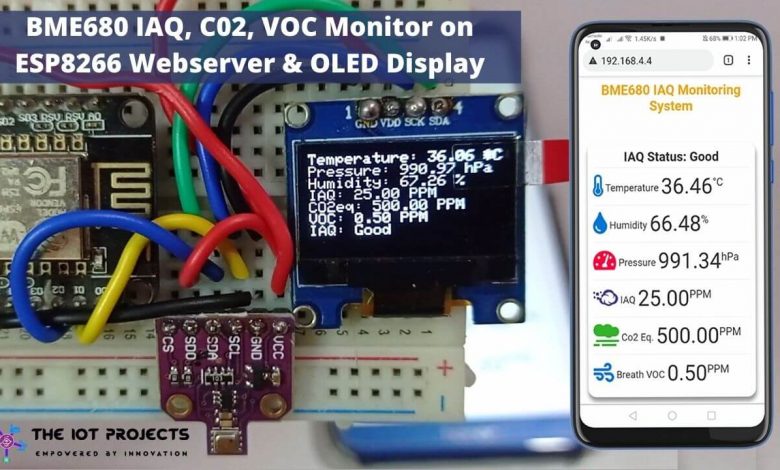
- Overview: BME680 IAQ Monitoring on webserver & OLED Display
- Components Required
- Circuit: Interfacing BME680 & OLED with ESP8266
- Preparing Arduino IDE For BME680 BSEC Library
- Source Code: Indoor Air Quality Monitoring BME680
- Indoor Air Quality Monitoring using BME680 & ESP8266 on Webserver
- Video Tutorial & Guide
- Conclusion
Overview: BME680 IAQ Monitoring on webserver & OLED Display
In this project, we will make the Indoor Air Quality Monitoring with BME680 & ESP8266 Webserver and 0.96″ SSD1306 OLED Display. We will use the advanced BSEC library for BME680 and monitor its parameters including IAQ on OLED Display and ESP8266 web server simultaneously. So, that you can monitor the sensor values remotely from your local network.
In our previous projects, we have interfaced Arduino with an integrated BME680 Environmental Sensor. Further, we made an IoT-based Indoor Air Quality Monitoring system on the Blynk IoT Cloud. But the drawback of that project was, we could not calculate the IAQ value i.e. Index of Air Quality, C02 equivalent, and percentage of (VOC) Volatile Organic Compound. we could only measure the environmental parameters like temperature, humidity, pressure, altitude, dew point, and Gas Resistance.
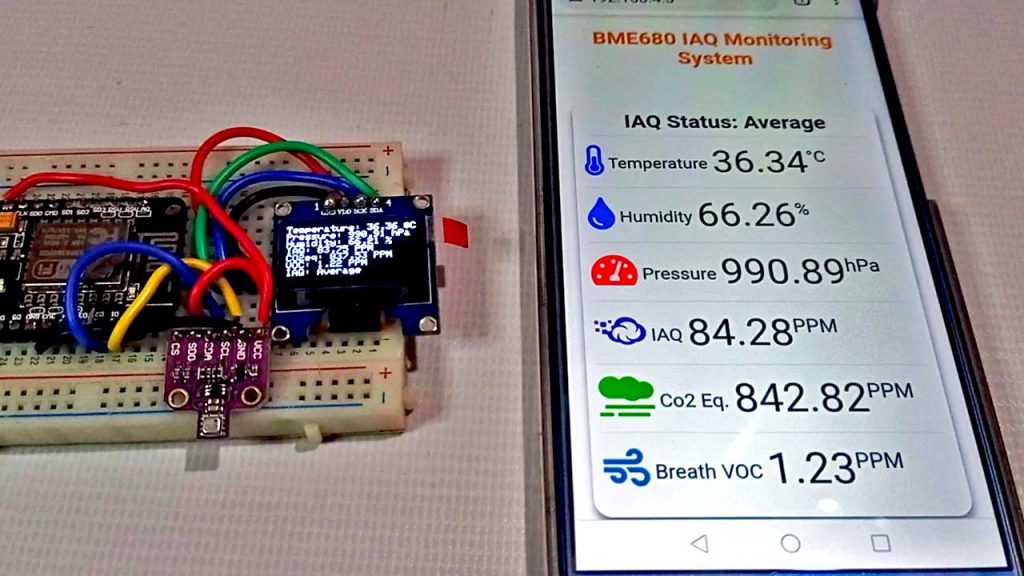
So in this tutorial, we will use a highly advanced BME680 Library called BSEC library, Which is now supported by NodeMCU ESP8266 and ESP32 Development Board. With the help of this library, we can measure the Temperature, Humidity, Pressure, value of IAQ, equivalent carbon dioxide, and Total volatile compound. SSD1306 0.96” OLED Display is used to monitor environmental data. We can also use ESP8266 Webserver to remotely monitor those values. The ESP8266 connects to your WiFi network & uploads the data regularly to the webserver. In this way, we can use BME680 Sensor with ESP8266 for monitoring Indoor Air Quality or IAQ from any device on your network.
Components Required
The list of components that we need for making this Local Area-based IAQ monitoring project can be found below. You can purchase all the components from the Amazon links.
| S.N | Components Name | Quantity | |
|---|---|---|---|
| 1 | NodeMCU ESP8266 12E Board | 1 | https://amzn.to/3mTuL95 |
| 2 | BME680 Environmental Sensor | 1 | https://amzn.to/2R7LhXZ |
| 3 | 0.96" I2C OLED Display | 1 | https://amzn.to/32WRubSv |
| 4 | Jumper Wires | 4 | https://amzn.to/3vw9ZAt |
| 5 | Breadboard | 1 | https://amzn.to/2NP2UKL |
BME680 Integrated Environmental Sensor
The BME680 is a digital 4-in-1 sensor that can measure gas, humidity, pressure, and temperature measurement based on proven sensing principles. The BME680 is the upgraded version of its previous sensors like BMP180, BMP280, or BME280. The gas sensor on the BME680 can detect a wide variety of volatile organic compounds (VOCs) to monitor indoor air quality. The sensor has high linearity and high accuracy.
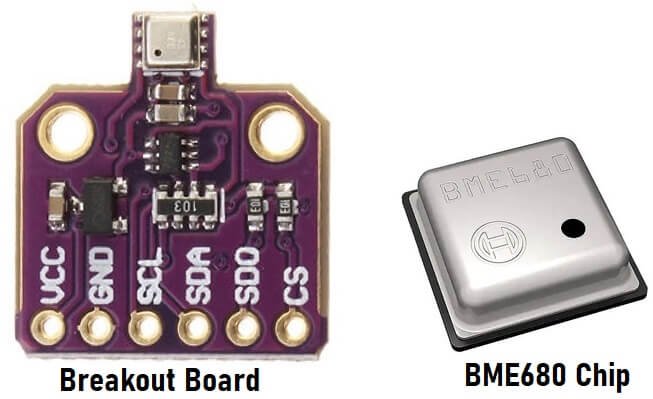
The sensor operates between 1.7V to 3.6V. The standby power consumption of this module is 0.29 to 0.8 uA and while in sleep mode the power consumption is between 0.15 to 1 uA.
| Sensor | Accuracy | Operation Range |
| Temperature | +/- 1.0ºC | -40 to 85 ºC |
| Humidity | +/- 3% | 0 to 100 % |
| Pressure | +/- 1 hPa | 300 to 1100 hPa |
| Altitude | +/- 1 M | 0 – 30,000ft |
BME680 can measure the Air quality index (IAQ) from 0-500 PPM.

The default I2C address of the sensor is 0x76 but it can be changed to 0x77 simply by connecting SDO to 3.3v. To learn more about the BME680 Sensor, you can check BME680 Datasheet.
Circuit: Interfacing BME680 & OLED with ESP8266
For Indoor Air Quality Monitoring with BME680 & ESP8266 Webserver, The main component used is NodeMCU ESP8266 Development Board. You can also use any other ESP8266 board like Wemos D1 Mini. All these boards have ESP8266-12E Chip which has a built-in WiFi chip that can upload the data to the internet or server using a WiFi Network.
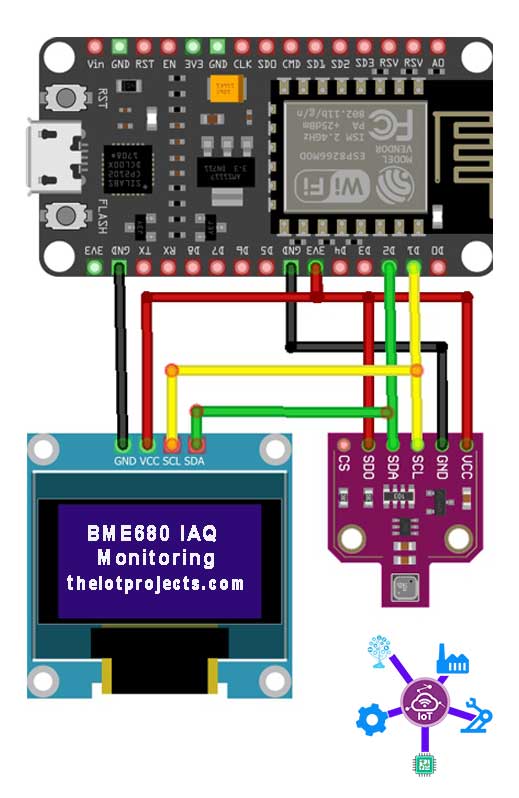
Here is a connection diagram between NodeMCU ESP8266, BME680 Sensor, and OLED Display. Connect the BME680 and OLED SCL & SDA Pin to D1 & D2 default I2C pin of NodeMCU Board. Supply the 3.3v power to both BME680 and OLED Display through 3.3V Pin of ESP8266 Board.
Connect the SDO to 3.3V. Connecting the SDO pin from the BME680 to the 3.3V is important because the original code was programmed to use the alternative I2C address (0x77). You can access this I2C address from the BME680 sensor by connecting the SDO pin to the 3.3v.
You can try this connection on a breadboard or simply use a custom-designed PCB Board. I prefer a breadboard connection for testing the circuit. But, if you want to use this project for monitoring IAQ value I recommend you to use PCB. You can simply download the Gerber file and order the PCB from https://www.PCBWay.com at a cheap price.
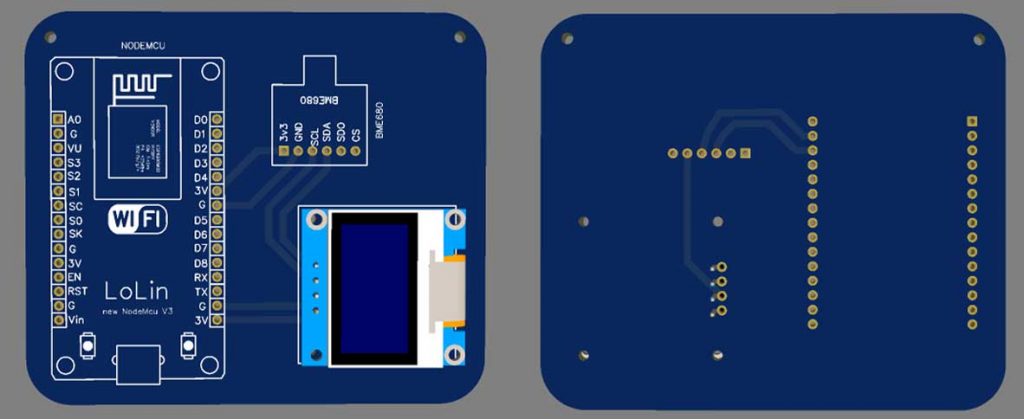
PCBWay is quite professional in PCB manufacturing. You can try their services at extremely low prices. Only $5 for 10 PCBs and $30 in total for 20 PCBs assembly. Besides this, the new members also get a $5 sign-up bonus. That means the new users can order 10 PCBs for free.
Preparing Arduino IDE For BME680 BSEC Library
For calculating IAQ and other VOCs gas parameters we use the BSEC Library for BME680. It is a complicated and advanced library, where BSEC means Bosch Sensortec Environment Cluster. This library is conceptualized to provide a higher-level processing signal. The library receives raw sensor values from the sensor API then processes the BME680 signals to provide the requested output. Check the BSEC Github Repository for more details.
BSEC library is supported by a 32, 16 & 8-bit controller. It doesn’t support most of the Arduino Boards but supports ARM Controllers, ESP8266, ESP32, MSP430 & Raspberry Pi.
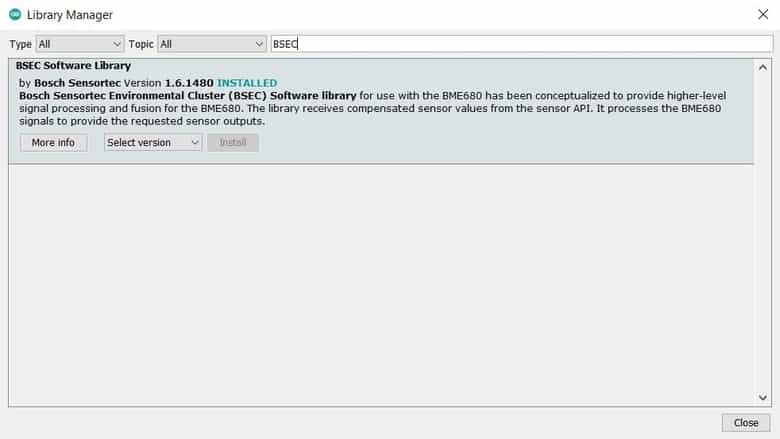
You can install the library from the library manager as well.
Solving BSEC Library Compilation issue
Before using this library you need to modify some system files as per the instructions.
1. Go up to the following folder:
C:UsersusernameAppDataLocalArduino15packagesesp8266hardwareesp82663.0.0
2. Open the file platform.txt.
3. Look for the following piece of code on line 96
# These can be overridden in platform.local.txtcompiler.c.extra_flags=compiler.c.elf.extra_flags=compiler.S.extra_flags=compiler.cpp.extra_flags=compiler.ar.extra_flags=compiler.objcopy.eep.extra_flags=compiler.elf2hex.extra_flags=
3. Now we need to add this little piece of code at the bottom.
compiler.libraries.ldflags=
4. Now look for the following piece of code on line 112:
## Combine gc-sections, archives, and objectsrecipe.c.combine.pattern="{compiler.path}{compiler.c.elf.cmd}" {build.exception_flags} -Wl,-Map "-Wl,{build.path}/{build.project_name}.map" {compiler.c.elf.flags} {compiler.c.elf.extra_flags} -o "{build.path}/{build.project_name}.elf" -Wl,--start-group {object_files} "{archive_file_path}" {compiler.c.elf.libs} -Wl,--end-group "-L{build.path}"5. We need to add these lines to the above code:
{compiler.libraries.ldflags}You may find difficulty in finding the exact lines. So I would suggest deleting the entire above code from line 112 and replace with the following code.
## Combine gc-sections, archives, and objectsrecipe.c.combine.pattern="{compiler.path}{compiler.c.elf.cmd}" {build.exception_flags} -Wl,-Map "-Wl,{build.path}/{build.project_name}.map" {compiler.c.elf.flags} {compiler.c.elf.extra_flags} -o "{build.path}/{build.project_name}.elf" -Wl,--start-group {object_files} "{archive_file_path}" {compiler.c.elf.libs} {compiler.libraries.ldflags} -Wl,--end-group "-L{build.path}"6. The final step is to save the file. That’s it, now you can close it.
Source Code: Indoor Air Quality Monitoring BME680
Here is Indoor Air Quality Monitoring with BME680 & ESP8266 Webserver program code to retrieve BME680 IAQ value & other gas parameters. You can use this code for Indoor Air Quality Monitoring on OLED Display and ESP8266 webserver.
Before uploading the code make sure to change your WiFi Network credentials.
// Replace with your network credentials
const char* ssid = "xxxxxx-xxxxx";  // Enter SSID here
const char* password = "xxxx-xxxx-xxx-xxx";  //Enter Password here
Copy final program code for IAQ Monitoring on Webserver from below.
#include <Wire.h>
#include <Adafruit_SSD1306.h>
#include "bsec.h"
#include <ESP8266WiFi.h>
#include <ESP8266WebServer.h>

#define SEALEVELPRESSURE_HPA (1013.25)

Bsec iaqSensor;
String output;
void checkIaqSensorStatus(void);
void errLeds(void);

float temperature;
float humidity;
float pressure;
float IAQ;
float carbon;
float VOC;
const char* IAQsts;

Adafruit_SSD1306 display = Adafruit_SSD1306(128, 64, &Wire);
// Replace with your network credentials
const char* ssid = "xxx-xxxx-xxx";  // Enter SSID here
const char* password = "xxx-xxx-xxx-xxx";  //Enter Password here

ESP8266WebServer server(80);

void setup() {
  // put your setup code here, to run once:
  Serial.begin(115200);
  delay(100);
  Wire.begin();

  Serial.println(F("Starting..."));
  if(!display.begin(SSD1306_SWITCHCAPVCC, 0x3C)) { // Address 0x3D for 128x64
    Serial.println(F("SSD1306 allocation failed"));
    for(;;);
  }

  Serial.println("OLED begun");

  display.display();
  delay(100);
  display.clearDisplay();
  display.display();
  display.setTextSize(1);
  display.setTextColor(SSD1306_WHITE);
  display.setRotation(0);
  Serial.println("Connecting to ");
  Serial.println(ssid);


  //Connect to your local wi-fi network
  WiFi.begin(ssid, password);

  //check wi-fi is connected to wi-fi network
  while (WiFi.status() != WL_CONNECTED) {
    delay(1000);
    Serial.print(".");
  }
  Serial.println("");
  Serial.println("WiFi connected..!");
  Serial.print("Got IP: ");  Serial.println(WiFi.localIP());


  server.on("/", handle_OnConnect);
  server.onNotFound(handle_NotFound);

  server.begin();

  Serial.println("HTTP server started");

  iaqSensor.begin(BME680_I2C_ADDR_SECONDARY, Wire);
  output = "nBSEC library version " + String(iaqSensor.version.major) + "." + String(iaqSensor.version.minor) + "." + String(iaqSensor.version.major_bugfix) + "." + String(iaqSensor.version.minor_bugfix);

  Serial.println(output);
  checkIaqSensorStatus();
  bsec_virtual_sensor_t sensorList[10] = {
    BSEC_OUTPUT_RAW_TEMPERATURE,
    BSEC_OUTPUT_RAW_PRESSURE,
    BSEC_OUTPUT_RAW_HUMIDITY,
    BSEC_OUTPUT_RAW_GAS,
    BSEC_OUTPUT_IAQ,
    BSEC_OUTPUT_STATIC_IAQ,
    BSEC_OUTPUT_CO2_EQUIVALENT,
    BSEC_OUTPUT_BREATH_VOC_EQUIVALENT,
    BSEC_OUTPUT_SENSOR_HEAT_COMPENSATED_TEMPERATURE,
    BSEC_OUTPUT_SENSOR_HEAT_COMPENSATED_HUMIDITY,
  };

  iaqSensor.updateSubscription(sensorList, 10, BSEC_SAMPLE_RATE_LP);
  checkIaqSensorStatus();
  }

void loop() {
  // put your main code here, to run repeatedly
  server.handleClient();
  display.setCursor(0,0);
  display.clearDisplay();

  unsigned long time_trigger = millis();
  if (iaqSensor.run()) { // If new data is available
    output = String(time_trigger);
    output += ", " + String(iaqSensor.rawTemperature);
    output += ", " + String(iaqSensor.pressure);
    output += ", " + String(iaqSensor.rawHumidity);
    output += ", " + String(iaqSensor.gasResistance);
    output += ", " + String(iaqSensor.iaq);
    output += ", " + String(iaqSensor.iaqAccuracy);
    output += ", " + String(iaqSensor.temperature);
    output += ", " + String(iaqSensor.humidity);
    output += ", " + String(iaqSensor.staticIaq);
    output += ", " + String(iaqSensor.co2Equivalent);
    output += ", " + String(iaqSensor.breathVocEquivalent);
    Serial.println(output);
  } else {
    checkIaqSensorStatus();
  }

  Serial.print("Temperature = ");
  Serial.print(iaqSensor.temperature);
  Serial.println(" *C");
  display.print("Temperature: ");
  display.print(iaqSensor.temperature);
  display.println(" *C");

  Serial.print("Pressure = ");
  Serial.print(iaqSensor.pressure / 100.0);
  Serial.println(" hPa");
  display.print("Pressure: ");
  display.print(iaqSensor.pressure / 100);
  display.println(" hPa");

  Serial.print("Humidity = ");
  Serial.print(iaqSensor.humidity);
  Serial.println(" %");
  display.print("Humidity: ");
  display.print(iaqSensor.humidity);
  display.println(" %");

  Serial.print("IAQ = ");
  Serial.print(iaqSensor.staticIaq);
  Serial.println(" PPM");
  display.print("IAQ: ");
  display.print(iaqSensor.staticIaq);
  display.println(" PPM");

  Serial.print("CO2 equiv = ");
  Serial.print(iaqSensor.co2Equivalent);
  Serial.println(" PPM");
  display.print("CO2eq: ");
  display.print(iaqSensor.co2Equivalent);
  display.println(" PPM");

  Serial.print("Breath VOC = ");
  Serial.print(iaqSensor.breathVocEquivalent);
  Serial.println(" PPM");
  display.print("VOC: ");
  display.print(iaqSensor.breathVocEquivalent);
  display.println(" PPM");

  if ((iaqSensor.staticIaq > 0)  && (iaqSensor.staticIaq  <= 50)) {
    IAQsts = "Good";
    Serial.print("IAQ: Good");
    display.print("IAQ: Good");
  }
  if ((iaqSensor.staticIaq > 51)  && (iaqSensor.staticIaq  <= 100)) {
    IAQsts = "Average";
    Serial.print("IAQ: Average");
    display.print("IAQ: Average");
  }
  if ((iaqSensor.staticIaq > 101)  && (iaqSensor.staticIaq  <= 150)) {
    IAQsts = "Little Bad";
    Serial.print("IAQ: Little Bad");
    display.print("IAQ: Little Bad");
  }
  if ((iaqSensor.staticIaq > 151)  && (iaqSensor.staticIaq  <= 200)) {
    IAQsts = "Bad";
    Serial.print("IAQ: Bad");
    display.print("IAQ: Bad");
  }
  if ((iaqSensor.staticIaq > 201)  && (iaqSensor.staticIaq  <= 300)) {
    IAQsts = "Worse";
    Serial.print("IAQ: Worse");
    display.print("IAQ: Worse");
  }
  if ((iaqSensor.staticIaq > 301)  && (iaqSensor.staticIaq  <= 500)) {
    IAQsts = "Very Bad";
    Serial.print("IAQ: Very Bad");
    display.print("IAQ: Very Bad");
  }
  if ((iaqSensor.staticIaq > 500)){
  IAQsts = "Very Very Bad";
  Serial.print("IAQ: Very Very Bad");
  display.print("IAQ: Very Very Bad");
  }
  Serial.println();
  display.display();
  delay(2000);
}

// Helper function definitions
void checkIaqSensorStatus(void)
{
  if (iaqSensor.status != BSEC_OK) {
    if (iaqSensor.status < BSEC_OK) {
      output = "BSEC error code : " + String(iaqSensor.status);
      Serial.println(output);
      for (;;)
        errLeds(); /* Halt in case of failure */
    } else {
      output = "BSEC warning code : " + String(iaqSensor.status);
      Serial.println(output);
    }
  }

  if (iaqSensor.bme680Status != BME680_OK) {
    if (iaqSensor.bme680Status < BME680_OK) {
      output = "BME680 error code : " + String(iaqSensor.bme680Status);
      Serial.println(output);
      for (;;)
        errLeds(); /* Halt in case of failure */
    } else {
      output = "BME680 warning code : " + String(iaqSensor.bme680Status);
      Serial.println(output);
    }
  }
}

void handle_OnConnect() {

  temperature = iaqSensor.temperature;
  humidity = iaqSensor.humidity;
  pressure = iaqSensor.pressure / 100.0;
  IAQ = iaqSensor.staticIaq;
  carbon = iaqSensor.co2Equivalent;
  VOC = iaqSensor.breathVocEquivalent;

  server.send(200, "text/html", SendHTML(temperature, humidity, pressure, IAQ, carbon, VOC, IAQsts));
}

void handle_NotFound() {
  server.send(404, "text/plain", "Not found");
}

String SendHTML(float temperature, float humidity, float pressure, float IAQ, float carbon, float VOC, const char* IAQsts) {
String html = "<!DOCTYPE html>";
html += "<html>";
html += "<head>";
html += "<title>BME680 Webserver</title>";
html += "<meta name='viewport' content='width=device-width, initial-scale=1.0'>";
html += "<link rel='stylesheet' href='https://cdnjs.cloudflare.com/ajax/libs/font-awesome/5.7.2/css/all.min.css'>";
html += "<link rel='stylesheet' type='text/css' href='styles.css'>";
html += "<style>";
html += "body { background-color: #fff; font-family: sans-serif; color: #333333; font: 12px Helvetica, sans-serif box-sizing: border-box;}";
html += "#page { margin: 18px; background-color: #fff;}";
html += ".container { height: inherit; padding-bottom: 18px;}";
html += ".header { padding: 18px;}";
html += ".header h1 { padding-bottom: 0.3em; color: #f4a201; font-size: 25px; font-weight: bold; font-family: Garmond, 'sans-serif'; text-align: center;}";
html += "h2 { padding-bottom: 0.2em; border-bottom: 1px solid #eee; margin: 2px; text-align: center;}";
html += ".box-full { padding: 18px; border 1px solid #ddd; border-radius: 1em 1em 1em 1em; box-shadow: 1px 7px 7px 1px rgba(0,0,0,0.4); background: #fff; margin: 18px; width: 300px;}";
html += "@media (max-width: 494px) { #page { width: inherit; margin: 5px auto; } #content { padding: 1px;} .box-full { margin: 8px 8px 12px 8px; padding: 10px; width: inherit;; float: none; } }";
html += "@media (min-width: 494px) and (max-width: 980px) { #page { width: 465px; margin 0 auto; } .box-full { width: 380px; } }";
html += "@media (min-width: 980px) { #page { width: 930px; margin: auto; } }";
html += ".sensor { margin: 10px 0px; font-size: 2.5rem;}";
html += ".sensor-labels { font-size: 1rem; vertical-align: middle; padding-bottom: 15px;}";
html += ".units { font-size: 1.2rem;}";
html += "hr { height: 1px; color: #eee; background-color: #eee; border: none;}";
html += "</style>";

//Ajax Code Start
  html += "<script>n";
  html += "setInterval(loadDoc,1000);n";
  html += "function loadDoc() {n";
  html += "var xhttp = new XMLHttpRequest();n";
  html += "xhttp.onreadystatechange = function() {n";
  html += "if (this.readyState == 4 && this.status == 200) {n";
  html += "document.body.innerHTML =this.responseText}n";
  html += "};n";
  html += "xhttp.open("GET", "/", true);n";
  html += "xhttp.send();n";
  html += "}n";
  html += "</script>n";
  //Ajax Code END

html += "</head>";
html += "<body>";
html += "<div id='page'>";
html += "<div class='header'>";
html += "<h1>BME680 IAQ Monitoring System</h1>";
html += "</div>";
html += "<div id='content' align='center'>";
html += "<div class='box-full' align='left'>";
html += "<h2>";
html += "IAQ Status: ";
html += IAQsts;
html += "</h2>";
html += "<div class='sensors-container'>";

//For Temperature
html += "<div class='sensors'>";
html += "<p class='sensor'>";
html += "<i class='fas fa-thermometer-half' style='color:#0275d8'></i>";
html += "<span class='sensor-labels'> Temperature </span>";
html += temperature;
html += "<sup class='units'>°C</sup>";
html += "</p>";
html += "<hr>";
html += "</div>";

//For Humidity
html += "<p class='sensor'>";
html += "<i class='fas fa-tint' style='color:#0275d8'></i>";
html += "<span class='sensor-labels'> Humidity </span>";
html += humidity;
html += "<sup class='units'>%</sup>";
html += "</p>";
html += "<hr>";

//For Pressure
html += "<p class='sensor'>";
html += "<i class='fas fa-tachometer-alt' style='color:#ff0040'></i>";
html += "<span class='sensor-labels'> Pressure </span>";
html += pressure;
html += "<sup class='units'>hPa</sup>";
html += "</p>";
html += "<hr>";

//For VOC IAQ
html += "<div class='sensors'>";
html += "<p class='sensor'>";
html += "<i class='fab fa-cloudversify' style='color:#483d8b'></i>";
html += "<span class='sensor-labels'> IAQ </span>";
html += IAQ;
html += "<sup class='units'>PPM</sup>";
html += "</p>";
html += "<hr>";

//For C02 Equivalent
html += "<p class='sensor'>";
html += "<i class='fas fa-smog' style='color:#35b22d'></i>";
html += "<span class='sensor-labels'> Co2 Eq. </span>";
html += carbon;
html += "<sup class='units'>PPM</sup>";
html += "</p>";
html += "<hr>";

//For Breath VOC
html += "<p class='sensor'>";
html += "<i class='fas fa-wind' style='color:#0275d8'></i>";
html += "<span class='sensor-labels'> Breath VOC </span>";
html += VOC;
html += "<sup class='units'>PPM</sup>";
html += "</p>";


html += "</div>";
html += "</div>";
html += "</div>";
html += "</div>";
html += "</div>";
html += "</body>";
html += "</html>";
return html;
}

void errLeds(void)
{
  pinMode(LED_BUILTIN, OUTPUT);
  digitalWrite(LED_BUILTIN, HIGH);
  delay(100);
  digitalWrite(LED_BUILTIN, LOW);
  delay(100);
}
Now, go to the tools menu and select the NodeMCU ESP8266 12-E Board from the list. Then select the COM port & finally hit the upload button to upload the code.
Open the Serial Monitor now. You will find the IP address of your NodeMCU Board. Simply copy the IP Address and paste it into a web browser. A beautiful web page loads and you will be able to monitor the BME680 sensor readings remotely from the same network.
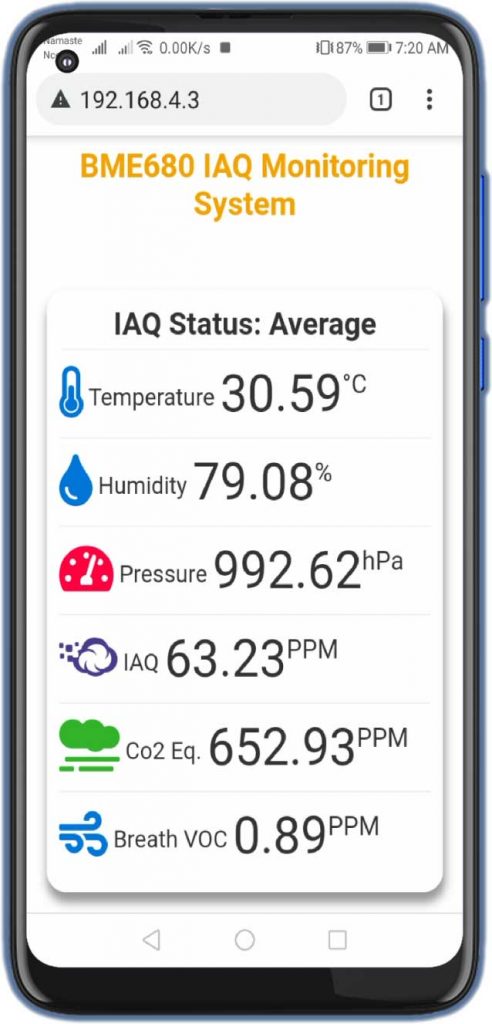
The following parameters will be displayed on the webserver in every second:
- IAQ Status: Depending upon static IAQ Index value ( see the IAQ Index and Air Quality Table above)
- Temperature in °C
- Relative Humidity in %
- Pressure in hPa
- IAQ index in PPM (begins at 25 after startup, and takes 15-20 minutes to get stable readings).
- CO2 equivalent (estimation of the CO2 equivalent in ppm in the environment)
- Breath VOC equivalent output (estimates the total VOC concentration in ppm in the environment)
After the BME680 sensor reading gets stable, you can check the correct value of IAQ, CO2 & VOC.
Indoor Air Quality Monitoring using BME680 & ESP8266 on Webserver
The ESP8266 Board will try connecting to the Wifi Network using the given SSID & Password. The BME680 IAQ data is uploaded to the ESP8266 after the interval of every second. The data can be monitored on a 9.96″ OLED Display and Serial Monitor as well as on smartphones or pc.
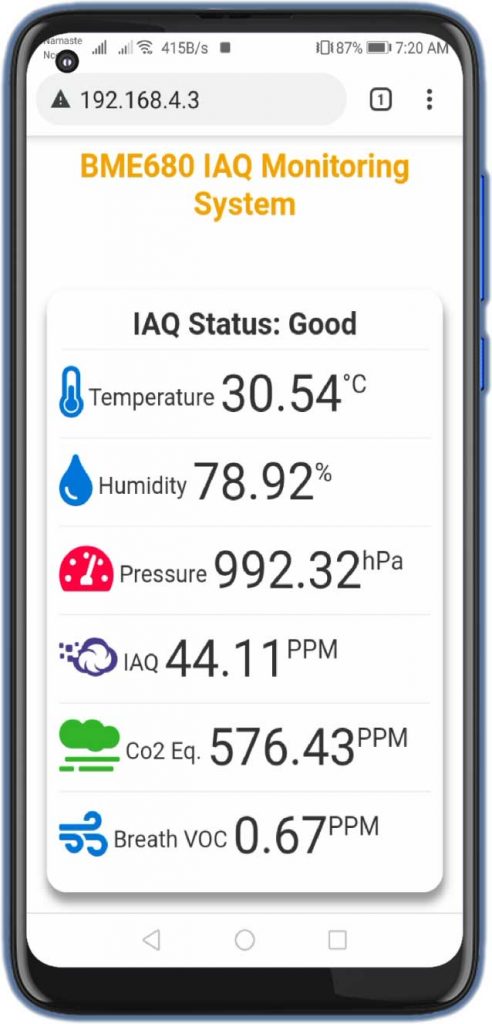
The data changes whenever the sensor pushes some values. The beautiful widgets for pressure, temperature, humidity, IAQ, CO2 & VOC will appear here. This is how you can use BME680 with ESP8266 and OLED display to monitor the indoor air quality as well as outdoor air quality. It’s a very simple and nice way of monitoring the environmental air quality in the Local Area Network.
Video Tutorial & Guide
Conclusion
So, that’s all about Indoor Air Quality Monitoring System using BME680, OLED Display, and ESP8266 Webserver project. I hope the project was informative and helpful. If yes comment down below:

Thanks for your excellent tutorial. However, I recommend a correction. The AQI is a dimensionless value, it should not be indicated in ppm, it makes no sense. This is an arbitrary scale on which air quality is rated. Everything else seems excellent to me.https://www.bosch-sensortec.com/media/boschsensortec/downloads/datasheets/bst-bme680-ds001.pdf
Hi Alsan, I have a problem with BME680. Serial monitor says bme680 error -2.
Do you have any idea what to do.
greetings
The wiring diagram is not correct. SDO should be GND not 3v3
I followed the instructions to the letter but it will not compile.
I get an exit status 1 error
Any help gratefully received
same hear bro
same here
Ragazzi io ho risolto utilizzando la libreria bsec 1.6.1418
exit status 1
‘BME680_I2C_ADDR_SECONDARY’ was not declared in this scope; did you mean ‘BME68X_I2C_ADDR_LOW’?