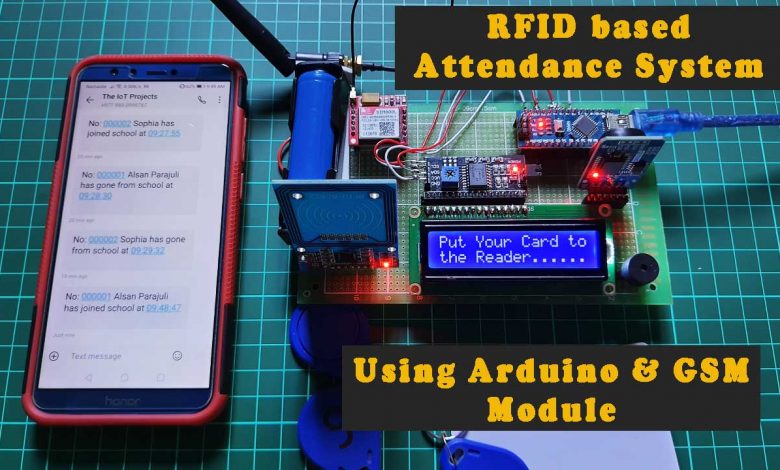
RFID based Attendance System using Arduino & SIM800L Module
RFID based Attendance System with SMS Notification
Overview: RFID based Attendance System
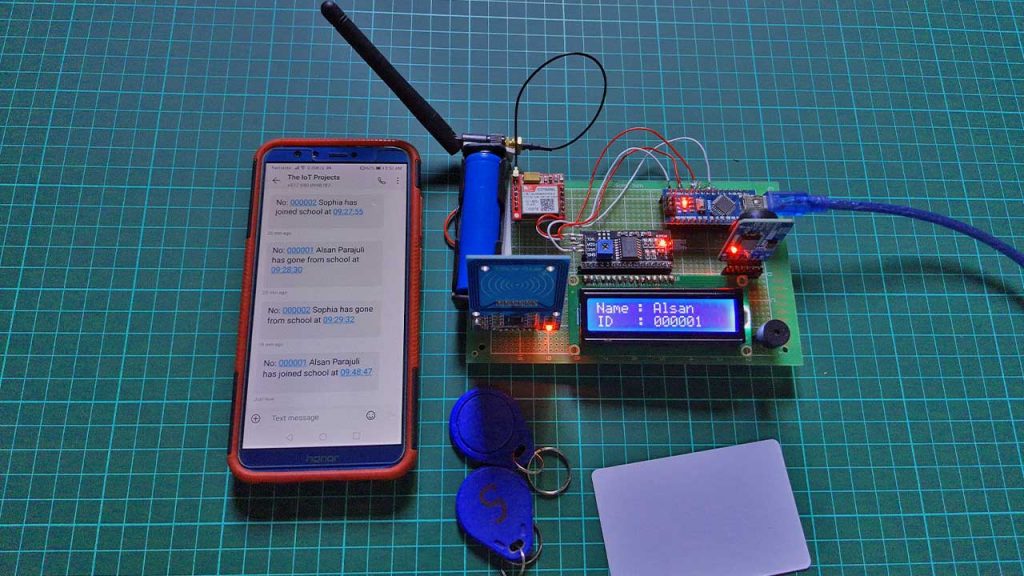
In this tutorial, we are going to show you an RFID based Attendance System using Arduino & SIM800L Module with SMS notifications. We can use this project to take the student’s and office employees’ attendance. It sends the SMS notification whenever they join or leave the school/work. So, this is one of the popular experimental projects among high school and college students.

The key function of this project is, when you place an RFID card/tag on the RFID reader, it scans the card checks the card UID stored on the microcontroller. Then it sends the SMS to the pre-defined mobile number with the help of the GSM Module when a valid card UID is found.
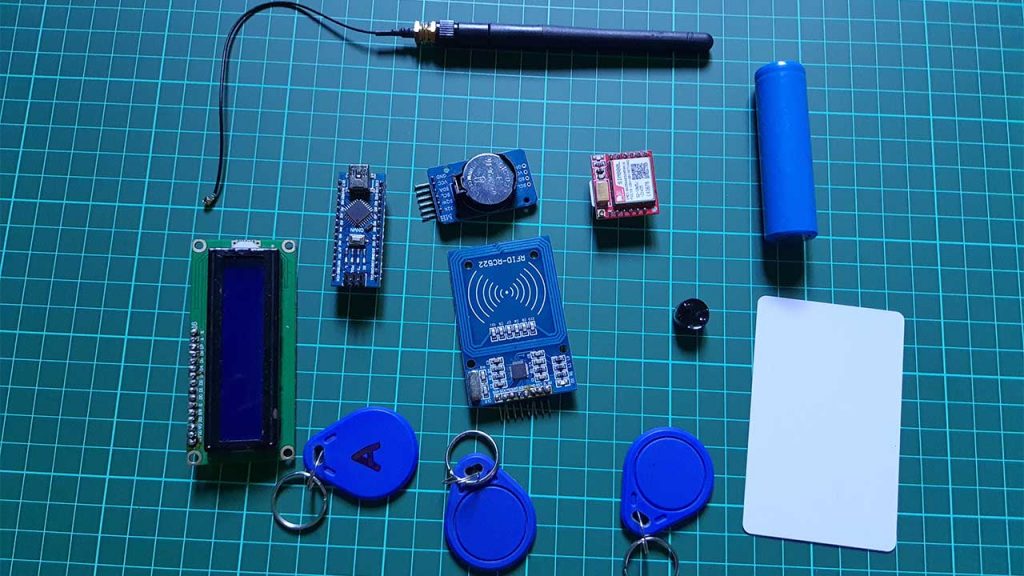
Components Required
To built this RFID based Attendance System, we will need the following components:
We can easily purchase all the components from the Amazon links below:
| S.N | Components Name | Quantity | |
|---|---|---|---|
| 1 | Arduino Nano | 1 | https://amzn.to/2Ym97CW |
| 2 | GSM SIM800L Module | 1 | https://amzn.to/3jMdsHV |
| 3 | 16x2 I2C LCD Display | 1 | https://amzn.to/3lwNg4O |
| 4 | RFID MF-RC522 Module | 1 | https://amzn.to/3mHvz28 |
| 5 | DS3231 RTC Module | 1 | https://amzn.to/2YJT96g |
| 6 | Few jumpers wires | 20 | https://amzn.to/3klh0A4 |
| 7 | 3.7V 18650 holder with battery | 1 | https://amzn.to/3BJovrt |
| 8 | Buzzer | 1 | https://amzn.to/3mJNp4p |
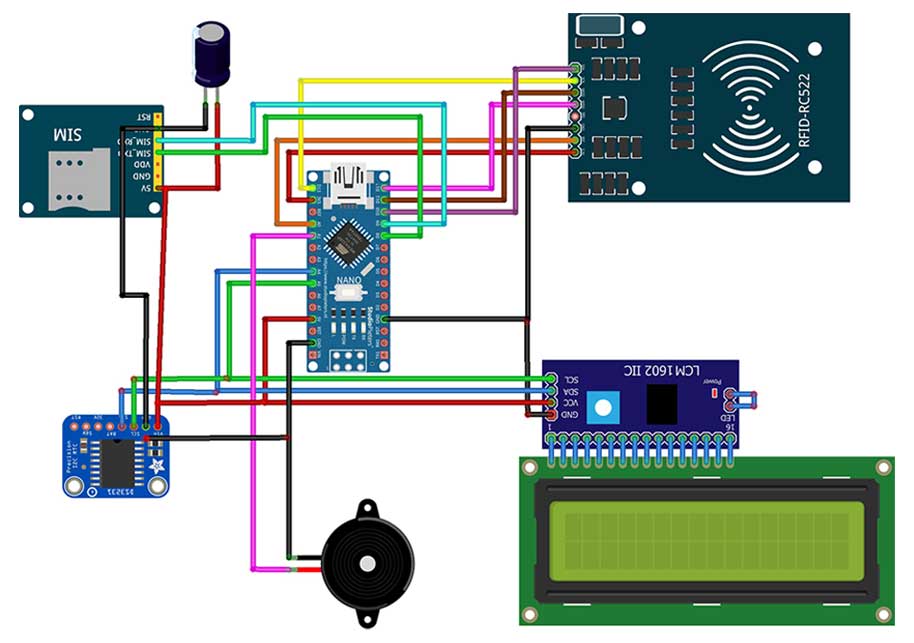
Circuit Diagram & Hardware
The circuit for RFID based Attendance System using Arduino & SIM800L Module is very simple. I used Fritzing software to draw this schematic. The below diagram is simply for the breadboard Assembly.
| RFID MF-RC522 Module | Arduino Nano |
| VCC | 3.3V |
| RST | A0 |
| GND | GND |
| MISO | Pin 12 |
| MOSI | Pin 11 |
| SCK | Pin 13 |
| SDA | Pin 10 |
| SIM800L Module | Arduino Nano |
| VCC | 5V |
| GND | GND |
| TX | Pin 8 |
| RX | Pin 9 |
| 10V 1000uf capacitor | VCC & GND |
| DS3231 RTC Module | Arduino Nano |
| GND | GND |
| VCC | 5V |
| SDA | Pin A4 |
| SCL | Pin A5 |
| 16×2 I2C Display | Arduino Nano |
| VCC | 5V |
| GND | GND |
| SDA | Pin A4 |
| SCL | Pin A5 |
| Buzzer | Arduino Nano |
| GND | GND |
| VCC | Pin A1 |
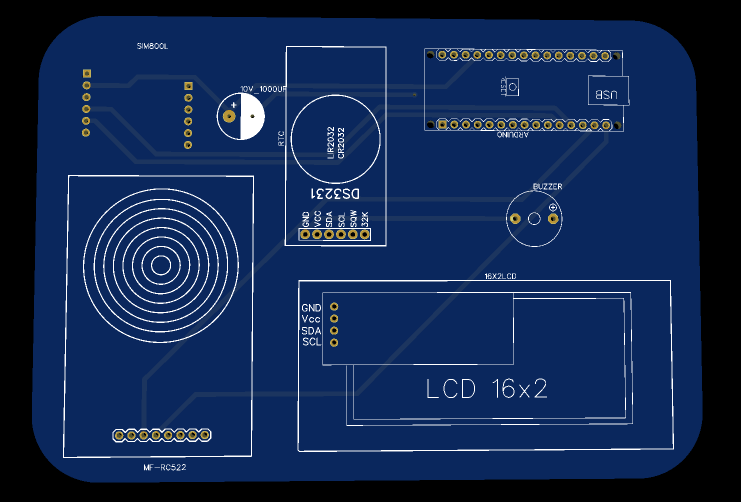
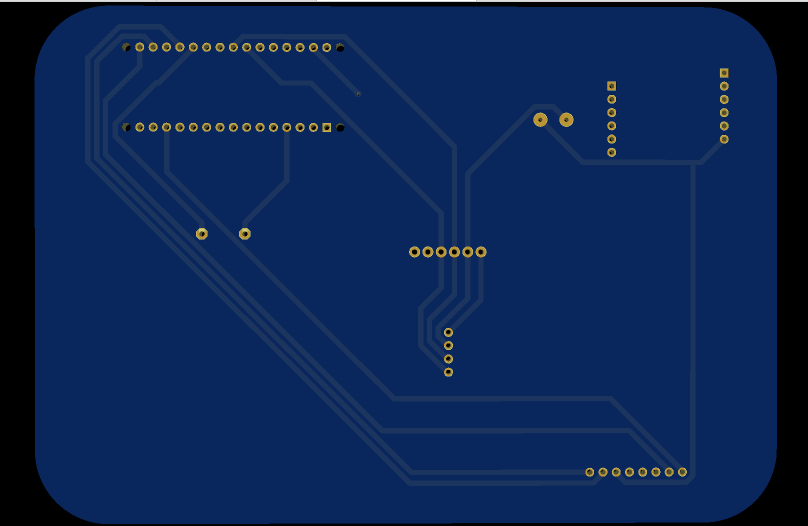
Project PCB Gerber File & PCB Ordering Online
It is very difficult to assemble the circuit on a breadboard. You will need a custom PCB for this project. Here I have designed the PCB for you. The PCB Board for RFID based Attendance System using Arduino & SIM800L Module looks something like below.
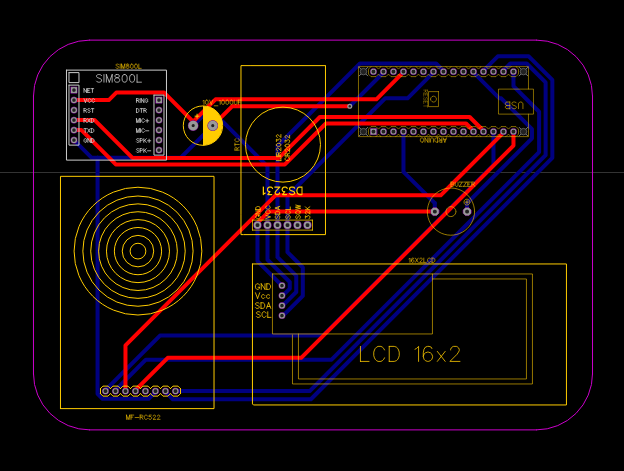
The Gerber File for the PCB is given below. You can simply download the Gerber File and order the PCB from https://www.PCBWay.com/

Steps to order PCB from PCBWay
To order the PCB first visit PCBWay.com.

Now enter the following details:
- PCB Size (Length & Width) in mm & PCB quantity
- Select masking color for the PCB
- Select country and shipping method
- Click on the “Save to Cart” button
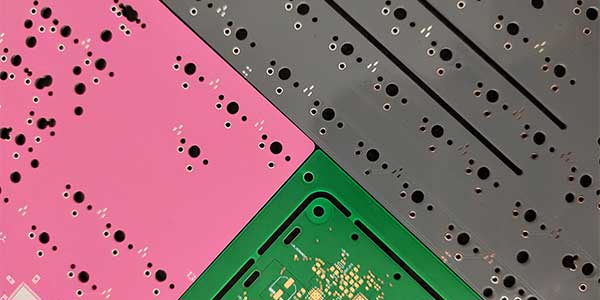
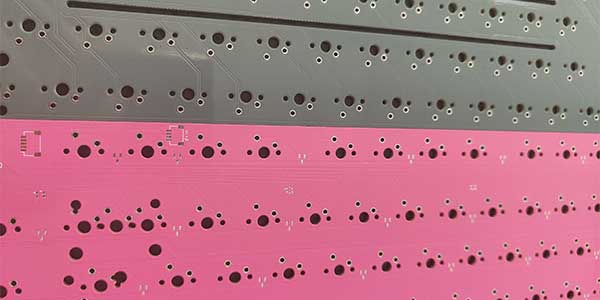
If you need some advanced features in your PCB to produce Pink, Orange, Grey, or even a Transparent Solder Mask you can get it here: High-Quality Advanced PCB. You can also get a full Black Core PCB from PCBWay.
Now click on the “Add Gerber Files” to upload the PCB Gerber file.

Then click on the “Submit Order Now” to place the order.
After that, they will review the Gerber file and accordingly confirm the order. Generally, you will receive the PCB within a week. But, It also depends upon the shipping method that you have chosen.
More RFID based projects:
- RFID Based Attendance System Using NodeMCU with PHP Web App
- IoT Based RFID Attendance System using ESP32
- IoT Based RFID Smart Door Lock System Using NodeMCU ESp8266
- Arduino Based GSM Mobile Phone using SIM800L
Setting Up Arduino IDE
Download and Install all these required libraries files for this project.
You can also install these library files manually from the Arduino IDE Library Manager.
SPI.h and MFRC522.h are for the RFID reader. Liquidcrystal_I2C.h is for LCD. Software serial. h is for serial communication between Arduino and GSM Module. DS3231.h is for RTC Module.
#include <SPI.h>
#include <MFRC522.h>
#include <Wire.h>
#include <LiquidCrystal_I2C.h>
#include <SoftwareSerial.h>
#include <DS3231.h>
Program Source Code
Here is the brief explanation of the program code. After adding the library header file, we Initialize the Arduino pins that are connected with the LCD and GSM modules.
// Set the LCD address to 0x27 for a 16 chars and 2 line display
LiquidCrystal_I2C lcd(0x27, 16, 2);
SoftwareSerial sim(6, 7);
Declare a string for which number you want to send the SMS notification.
String number = "+9779862xxxxx"; // +977 is the country code
Here, I declare five integer-type variables.
int state1 = 0;
int state2 = 0;
int state3 = 0;
int state4 = 0;
int state5 = 0;
Define the buzzer pin and RFID SDA and RST pins.
#define buzzerPin  A1
#define RST_PIN    A0
#define SDA_PIN    10
Create an RFID MFRC522 and DS3231 instance.
MFRC522 mfrc522(SDA_PIN, RST_PIN);
DS3231  rtc(SDA, SCL);
In the setup section, I initialize the LCD, serial monitor, GSM module, RFID, and RTC module. Set the buzzer pins as output and print the welcome message to the LCD.
void setup() {

  lcd.begin();
  // Turn on the blacklight
  lcd.backlight();
  Serial.begin(9600);
  sim.begin(9600);
  SPI.begin();
  mfrc522.PCD_Init();
  rtc.begin();

  pinMode(buzzerPin, OUTPUT);

  lcd.setCursor(0, 0);
  lcd.print("  WELCOME TO  ");
  lcd.setCursor(0, 1);
  lcd.print("The IoT Projects");
  delay(4000);
  lcd.clear();
}
Inside the loop function, there are two user-defined functions: RTC & RFID
void loop() {
  RTC();
  rfid();
}
RTC Function
In the RTC function, these three lines of code are used to set the date and time.
void RTC()
{
  //rtc.setDOW(SATURDAY);     // Set Day-of-Week to SUNDAY
  //rtc.setTime(08, 50, 0);     // Set the time to 12:00:00 (24hr format)
  //rtc.setDate(10, 12, 2021);   // Set the date to January 1st, 2014
Next, I print the message to the LCD.
lcd.setCursor(0, 0);
  lcd.print("Put Your Card to" );
  lcd.setCursor(0, 1);
  lcd.print("the Reader......");
  delay(3000);
  lcd.clear();
If you want to display Date and Time on LCD instead of the message uncomment, these lines of code.
 lcd.setCursor(0, 0);
  lcd.print("Time: ");
  lcd.print(rtc.getTimeStr());
  lcd.setCursor(0, 1);
  lcd.print("Date: ");
  lcd.print(rtc.getDateStr());
  delay(2000);
  lcd.clear();
RFID Function
Now in the RFID function: These lines are used to read the RFID tag and return the tag UID as a Hexadecimal number.
void rfid()
{
  // Look for new cards
  if ( ! mfrc522.PICC_IsNewCardPresent())
  {
    return;
  }
  // Select one of the cards
  if ( ! mfrc522.PICC_ReadCardSerial())
  {
    return;
  }
  //Show UID on serial monitor
  String content = "";
  byte letter;
  for (byte i = 0; i < mfrc522.uid.size; i++)
  {
    Serial.print(mfrc522.uid.uidByte[i] < 0x10 ? " 0" : " ");
    Serial.print(mfrc522.uid.uidByte[i], HEX);
    content.concat(String(mfrc522.uid.uidByte[i] < 0x10 ? " 0" : " "));
    content.concat(String(mfrc522.uid.uidByte[i], HEX));
  }

  content.toUpperCase();
Here, In this code, I have defined five UID tags for 5 different people. Here I compare the UID. If the UID value matches with the tag UID then, Buzzer gives a beep and LCD shows the details about the tag holder. Also, send an SMS notification to the default number.
if (content.substring(1) == "76 91 74 F8" && state1 == 0) //change here the UID of the card/cards that you want to give access
  {
    beepON();
    lcd.clear();
    lcd.setCursor(7, 0);
    lcd.print("Alsan    ");
    lcd.setCursor(7, 1);
    lcd.print("000001");
    info();
    SendAlsan();
    state1 = 1;
  }
  else if (content.substring(1) == "76 91 74 F8" && state1 == 1) //change here the UID of the card/cards that you want to give access
  {
    beepON();
    lcd.clear();
    lcd.setCursor(7, 0);
    lcd.print("Alsan    ");
    lcd.setCursor(7, 1);
    lcd.print("000001");
    info();
    SendAlsan();
    state1 = 0;
  }
  else if (content.substring(1) == "39 EA B0 6D" && state2 == 0) //change here the UID of the card/cards that you want to give access
  {
    beepON();
    lcd.clear();
    lcd.setCursor(7, 0);
    lcd.print("Sophia    ");
    lcd.setCursor(7, 1);
    lcd.print("000002");
    info();
    SendSophia();
    state2 = 1;
  }
  else if (content.substring(1) == "39 EA B0 6D" && state2 == 1) //change here the UID of the card/cards that you want to give access
  {
    beepON();
    lcd.clear();
    lcd.setCursor(7, 0);
    lcd.print("Sophia    ");
    lcd.setCursor(7, 1);
    lcd.print("000002");
    info();
    SendSophia();
    state2 = 0;
  }
  else if (content.substring(1) == "A1 6E B5 D4" && state3 == 0) //change here the UID of the card/cards that you want to give access
  {
    beepON();
    lcd.clear();
    lcd.setCursor(7, 0);
    lcd.print("Azad    ");
    lcd.setCursor(7, 1);
    lcd.print("000003");
    info();
    SendAzad();
    state3 = 1;
  }
  else if (content.substring(1) == "A1 6E B5 D4" && state3 == 1) //change here the UID of the card/cards that you want to give access
  {
    beepON();
    lcd.clear();
    lcd.setCursor(7, 0);
    lcd.print("Azad    ");
    lcd.setCursor(7, 1);
    lcd.print("000003");
    info();
    SendAzad();
    state3 = 0;
  }
  else if (content.substring(1) == "F1 72 62 D5" && state4 == 0) //change here the UID of the card/cards that you want to give access
  {
    beepON();
    lcd.clear();
    lcd.setCursor(7, 0);
    lcd.print("Akib    ");
    lcd.setCursor(7, 1);
    lcd.print("000004");
    info();
    SendAkib();
    state4 = 1;
  }
  else if (content.substring(1) == "F1 72 62 D5" && state4 == 1) //change here the UID of the card/cards that you want to give access
  {
    beepON();
    lcd.clear();
    lcd.setCursor(7, 0);
    lcd.print("Akib    ");
    lcd.setCursor(7, 1);
    lcd.print("000004");
    info();
    SendAkib();
    state4 = 0;
  }
  else if (content.substring(1) == "21 BD 21 D5" && state5 == 0) //change here the UID of the card/cards that you want to give access
  {
    beepON();
    lcd.clear();
    lcd.setCursor(7, 0);
    lcd.print("Noman    ");
    lcd.setCursor(7, 1);
    lcd.print("000005");
    info();
    SendNoman();
    state5 = 1;
  }
  else if (content.substring(1) == "21 BD 21 D5" && state5 == 1) //change here the UID of the card/cards that you want to give access
  {
    beepON();
    lcd.clear();
    lcd.setCursor(7, 0);
    lcd.print("Noman    ");
    lcd.setCursor(7, 1);
    lcd.print("000005");
    info();
    SendNoman();
    state5 = 0;
  }
  else   {
    digitalWrite(buzzerPin, HIGH);
    lcd.clear();
    lcd.setCursor(0, 0);
    lcd.print("ID : ");
    lcd.print("Unknown");
    lcd.setCursor(0, 1);
    lcd.print("Access denied");
    Serial.println(" Access denied");
    delay(1500);
    digitalWrite(buzzerPin, LOW);
    lcd.clear();
  }
}
In the send (user) function, first LCD displays sending SMS message, then I set the GSM module in test mode. Next, send an SMS to the number. Here you can replace the message with your custom message. The code also sends the timestamps with the message.
void smsSend()
{
  lcd.setCursor(0, 0);
  lcd.print("Sending SMS");
  for (int x = 11; x < 16; x++)
  {
    lcd.setCursor(x, 0);
    lcd.print(".");
    delay(1000);
  }

}
void beepON()
{
  digitalWrite(buzzerPin, HIGH);
  delay(200);
  digitalWrite(buzzerPin, LOW);
  delay(100);
}
void info()
{
  lcd.setCursor(0, 0);
  lcd.print("Name : ");
  lcd.setCursor(0, 1);
  lcd.print("ID   : ");
  delay(1500);
  lcd.clear();
  lcd.setCursor(0, 0);
  lcd.print("Authorized Access");
  delay(1000);
  lcd.clear();
}

void SendAlsan()
{
  lcd.setCursor(0, 0);
  lcd.print("SMS Sending");
  sim.println("AT+CMGF=1");
  delay(1000);
  sim.println("AT+CMGS="" + number + ""r");
  delay(1000);
When state1=0 it sends the joining message, and when state1=1, it sends the leaving message.
if (state1 == 0) {
    const char Alsan[] = "No: 000001 Alsan Parajuli has joined school at ";
    sim.print(Alsan);
  }
  else if (state1 == 1) {
    const char Alsan[] = "No: 000001 Alsan Parajuli has gone from school at ";
    sim.print(Alsan);
  }
  sim.println(rtc.getTimeStr());
  delay(100);
  sim.println((char)26);
  smsSend();
}
Then I repeated the same for the rest of the 4 employees/students.
void SendSophia()
{
lcd.setCursor(0, 0);
lcd.print("SMS Sending");
sim.println("AT+CMGF=1");
delay(1000);
sim.println("AT+CMGS="" + number + ""r");
delay(1000);
if (state2 == 0) {
const char Sophia[] = "No: 000002 Sophia has joined school at ";
sim.print(Sophia);
}
else if (state2 == 1) {
const char Sophia[] = "No: 000002 Sophia has gone from school at ";
sim.print(Sophia);
}
sim.println(rtc.getTimeStr());
delay(100);
sim.println((char)26);
smsSend();
}
void SendAzad()
{
lcd.setCursor(0, 0);
lcd.print("SMS Sending");
sim.println("AT+CMGF=1");
delay(1000);
sim.println("AT+CMGS="" + number + ""r");
delay(1000);
if (state3 == 0) {
const char Azad[] = "No: 000003 zad has joined school at ";
sim.print(Azad);
}
else if (state3 == 1) {
const char Azad[] = "No: 000003 Azad has gone from school at ";
sim.print(Azad);
}
sim.println(rtc.getTimeStr());
delay(100);
sim.println((char)26);
smsSend();
}
void SendAkib()
{
lcd.setCursor(0, 0);
lcd.print("SMS Sending");
sim.println("AT+CMGF=1");
delay(1000);
sim.println("AT+CMGS="" + number + ""r");
delay(1000);
if (state4 == 0) {
const char Akib[] = "No: 000004 Akib has joined school at ";
sim.print(Akib);
}
else if (state4 == 1) {
const char Akib[] = "No: 000004 Akib has gone form school at";
sim.print(Akib);
}
sim.println(rtc.getTimeStr());
delay(100);
sim.println((char)26);
smsSend();
}
void SendNoman()
{
lcd.setCursor(0, 0);
lcd.print("SMS Sending");
sim.println("AT+CMGF=1");
delay(1000);
sim.println("AT+CMGS="" + number + ""r");
delay(1000);
if (state5 == 0) {
const char Noman[] = "No: 000005 Noman has joined school at ";
sim.print(Noman);
}
else if (state5 == 1) {
const char Noman[] = "No: 000005 Noman has gone form school at ";
sim.print(Noman);
}
sim.println(rtc.getTimeStr());
delay(100);
sim.println((char)26);
smsSend();
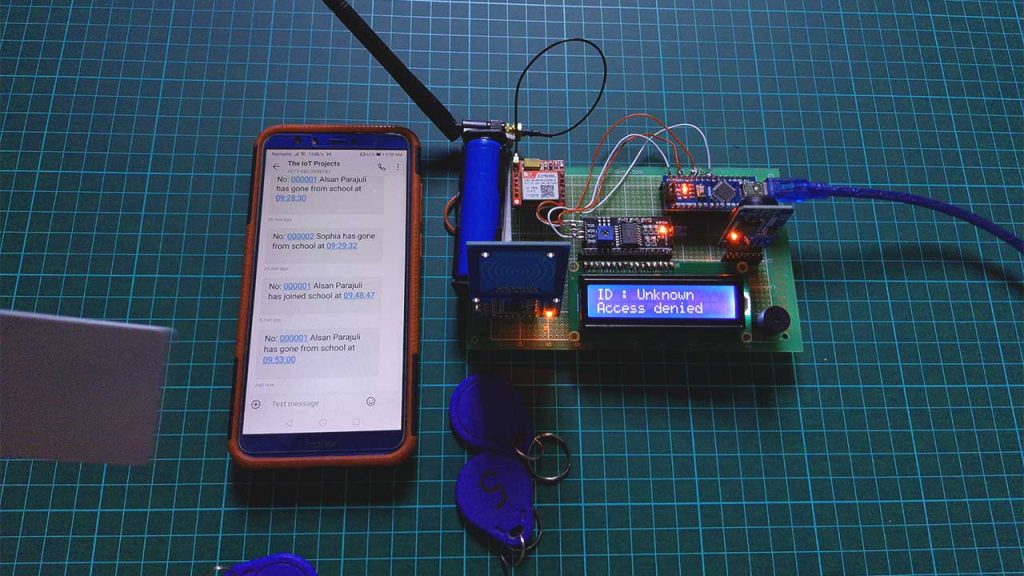
}If Arduino finds any unregistered UID, then LCD shows “Unknown Access Denied” with a buzzer beep.
else   {
    digitalWrite(buzzerPin, HIGH);
    lcd.clear();
    lcd.setCursor(0, 0);
    lcd.print("ID : ");
    lcd.print("Unknown");
    lcd.setCursor(0, 1);
    lcd.print("Access denied");
    Serial.println(" Access denied");
    delay(1500);
    digitalWrite(buzzerPin, LOW);
    lcd.clear();
  }
Final Program Code
So, this is the final program code for RFID based Attendance System using Arduino & SIM800L Module project. Simply copy and paste it into your Arduino IDE.
#include <SPI.h>
#include <MFRC522.h>
#include <Wire.h>
#include <LiquidCrystal_I2C.h>
#include <SoftwareSerial.h>
#include <DS3231.h>

// Set the LCD address to 0x27 for a 16 chars and 2 line display
LiquidCrystal_I2C lcd(0x27, 16, 2);
SoftwareSerial sim(6, 7);

String number = "+97798620xxxx"; // +977 is the country code

int state1 = 0;
int state2 = 0;
int state3 = 0;
int state4 = 0;
int state5 = 0;


#define buzzerPin  A1
#define RST_PIN    A0
#define SDA_PIN    10

MFRC522 mfrc522(SDA_PIN, RST_PIN);
DS3231  rtc(SDA, SCL);

void setup() {

  lcd.begin();
  // Turn on the blacklight
  lcd.backlight();
  Serial.begin(9600);
  sim.begin(9600);
  SPI.begin();
  mfrc522.PCD_Init();
  rtc.begin();

  pinMode(buzzerPin, OUTPUT);

  lcd.setCursor(0, 0);
  lcd.print("  WELCOME TO  ");
  lcd.setCursor(0, 1);
  lcd.print("The IoT Projects");
  delay(4000);
  lcd.clear();
}

void loop() {
  RTC();
  rfid();
}

void RTC()
{
  //rtc.setDOW(SATURDAY);     // Set Day-of-Week to SUNDAY
  //rtc.setTime(08, 50, 0);     // Set the time to 12:00:00 (24hr format)
  //rtc.setDate(10, 12, 2021);   // Set the date to January 1st, 2014

  lcd.setCursor(0, 0);
  lcd.print("Put Your Card to" );
  lcd.setCursor(0, 1);
  lcd.print("the Reader......");
  delay(3000);
  lcd.clear();
  lcd.setCursor(0, 0);
  lcd.print("Time: ");
  lcd.print(rtc.getTimeStr());
  lcd.setCursor(0, 1);
  lcd.print("Date: ");
  lcd.print(rtc.getDateStr());
  delay(2000);
  lcd.clear();
}

void rfid()
{
  // Look for new cards
  if ( ! mfrc522.PICC_IsNewCardPresent())
  {
    return;
  }
  // Select one of the cards
  if ( ! mfrc522.PICC_ReadCardSerial())
  {
    return;
  }
  //Show UID on serial monitor
  String content = "";
  byte letter;
  for (byte i = 0; i < mfrc522.uid.size; i++)
  {
    Serial.print(mfrc522.uid.uidByte[i] < 0x10 ? " 0" : " ");
    Serial.print(mfrc522.uid.uidByte[i], HEX);
    content.concat(String(mfrc522.uid.uidByte[i] < 0x10 ? " 0" : " "));
    content.concat(String(mfrc522.uid.uidByte[i], HEX));
  }

  content.toUpperCase();


  if (content.substring(1) == "76 91 74 F8" && state1 == 0) //change here the UID of the card/cards that you want to give access
  {
    beepON();
    lcd.clear();
    lcd.setCursor(7, 0);
    lcd.print("Alsan    ");
    lcd.setCursor(7, 1);
    lcd.print("000001");
    info();
    SendAlsan();
    state1 = 1;
  }
  else if (content.substring(1) == "76 91 74 F8" && state1 == 1) //change here the UID of the card/cards that you want to give access
  {
    beepON();
    lcd.clear();
    lcd.setCursor(7, 0);
    lcd.print("Alsan    ");
    lcd.setCursor(7, 1);
    lcd.print("000001");
    info();
    SendAlsan();
    state1 = 0;
  }
  else if (content.substring(1) == "39 EA B0 6D" && state2 == 0) //change here the UID of the card/cards that you want to give access
  {
    beepON();
    lcd.clear();
    lcd.setCursor(7, 0);
    lcd.print("Sophia    ");
    lcd.setCursor(7, 1);
    lcd.print("000002");
    info();
    SendSophia();
    state2 = 1;
  }
  else if (content.substring(1) == "39 EA B0 6D" && state2 == 1) //change here the UID of the card/cards that you want to give access
  {
    beepON();
    lcd.clear();
    lcd.setCursor(7, 0);
    lcd.print("Sophia    ");
    lcd.setCursor(7, 1);
    lcd.print("000002");
    info();
    SendSophia();
    state2 = 0;
  }
  else if (content.substring(1) == "A1 6E B5 D4" && state3 == 0) //change here the UID of the card/cards that you want to give access
  {
    beepON();
    lcd.clear();
    lcd.setCursor(7, 0);
    lcd.print("Azad    ");
    lcd.setCursor(7, 1);
    lcd.print("000003");
    info();
    SendAzad();
    state3 = 1;
  }
  else if (content.substring(1) == "A1 6E B5 D4" && state3 == 1) //change here the UID of the card/cards that you want to give access
  {
    beepON();
    lcd.clear();
    lcd.setCursor(7, 0);
    lcd.print("Azad    ");
    lcd.setCursor(7, 1);
    lcd.print("000003");
    info();
    SendAzad();
    state3 = 0;
  }
  else if (content.substring(1) == "F1 72 62 D5" && state4 == 0) //change here the UID of the card/cards that you want to give access
  {
    beepON();
    lcd.clear();
    lcd.setCursor(7, 0);
    lcd.print("Akib    ");
    lcd.setCursor(7, 1);
    lcd.print("000004");
    info();
    SendAkib();
    state4 = 1;
  }
  else if (content.substring(1) == "F1 72 62 D5" && state4 == 1) //change here the UID of the card/cards that you want to give access
  {
    beepON();
    lcd.clear();
    lcd.setCursor(7, 0);
    lcd.print("Akib    ");
    lcd.setCursor(7, 1);
    lcd.print("000004");
    info();
    SendAkib();
    state4 = 0;
  }
  else if (content.substring(1) == "21 BD 21 D5" && state5 == 0) //change here the UID of the card/cards that you want to give access
  {
    beepON();
    lcd.clear();
    lcd.setCursor(7, 0);
    lcd.print("Noman    ");
    lcd.setCursor(7, 1);
    lcd.print("000005");
    info();
    SendNoman();
    state5 = 1;
  }
  else if (content.substring(1) == "21 BD 21 D5" && state5 == 1) //change here the UID of the card/cards that you want to give access
  {
    beepON();
    lcd.clear();
    lcd.setCursor(7, 0);
    lcd.print("Noman    ");
    lcd.setCursor(7, 1);
    lcd.print("000005");
    info();
    SendNoman();
    state5 = 0;
  }
  else   {
    digitalWrite(buzzerPin, HIGH);
    lcd.clear();
    lcd.setCursor(0, 0);
    lcd.print("ID : ");
    lcd.print("Unknown");
    lcd.setCursor(0, 1);
    lcd.print("Access denied");
    Serial.println(" Access denied");
    delay(1500);
    digitalWrite(buzzerPin, LOW);
    lcd.clear();
  }
}

void smsSend()
{
  lcd.setCursor(0, 0);
  lcd.print("Sending SMS");
  for (int x = 11; x < 16; x++)
  {
    lcd.setCursor(x, 0);
    lcd.print(".");
    delay(1000);
  }

}
void beepON()
{
  digitalWrite(buzzerPin, HIGH);
  delay(200);
  digitalWrite(buzzerPin, LOW);
  delay(100);
}
void info()
{
  lcd.setCursor(0, 0);
  lcd.print("Name : ");
  lcd.setCursor(0, 1);
  lcd.print("ID   : ");
  delay(1500);
  lcd.clear();
  lcd.setCursor(0, 0);
  lcd.print("Authorized Access");
  delay(1000);
  lcd.clear();
}

void SendAlsan()
{
  lcd.setCursor(0, 0);
  lcd.print("SMS Sending");
  sim.println("AT+CMGF=1");
  delay(1000);
  sim.println("AT+CMGS="" + number + ""r");
  delay(1000);
  if (state1 == 0) {
    const char Alsan[] = "No: 000001 Alsan Parajuli has joined school at ";
    sim.print(Alsan);
  }
  else if (state1 == 1) {
    const char Alsan[] = "No: 000001 Alsan Parajuli has gone from school at ";
    sim.print(Alsan);
  }
  sim.println(rtc.getTimeStr());
  delay(100);
  sim.println((char)26);
  smsSend();
}

void SendSophia()
{
  lcd.setCursor(0, 0);
  lcd.print("SMS Sending");
  sim.println("AT+CMGF=1");
  delay(1000);
  sim.println("AT+CMGS="" + number + ""r");
  delay(1000);
  if (state2 == 0) {
    const char Sophia[] = "No: 000002 Sophia has joined school at ";
    sim.print(Sophia);
  }
  else if (state2 == 1) {
    const char Sophia[] = "No: 000002 Sophia has gone from school at ";
    sim.print(Sophia);
  }
  sim.println(rtc.getTimeStr());
  delay(100);
  sim.println((char)26);
  smsSend();
}
void SendAzad()
{
  lcd.setCursor(0, 0);
  lcd.print("SMS Sending");
  sim.println("AT+CMGF=1");
  delay(1000);
  sim.println("AT+CMGS="" + number + ""r");
  delay(1000);
  if (state3 == 0) {
    const char Azad[] = "No: 000003  zad has joined school at ";
    sim.print(Azad);
  }
  else if (state3 == 1) {
    const char Azad[] = "No: 000003 Azad has gone from school at ";
    sim.print(Azad);
  }
  sim.println(rtc.getTimeStr());
  delay(100);
  sim.println((char)26);
  smsSend();
}
void SendAkib()
{
  lcd.setCursor(0, 0);
  lcd.print("SMS Sending");
  sim.println("AT+CMGF=1");
  delay(1000);
  sim.println("AT+CMGS="" + number + ""r");
  delay(1000);
  if (state4 == 0) {
    const char Akib[] = "No: 000004 Akib has joined school at ";
    sim.print(Akib);
  }
  else if (state4 == 1) {
    const char Akib[] = "No: 000004 Akib has gone form school at";
    sim.print(Akib);
  }
  sim.println(rtc.getTimeStr());
  delay(100);
  sim.println((char)26);
  smsSend();
}
void SendNoman()
{
  lcd.setCursor(0, 0);
  lcd.print("SMS Sending");
  sim.println("AT+CMGF=1");
  delay(1000);
  sim.println("AT+CMGS="" + number + ""r");
  delay(1000);
  if (state5 == 0) {
    const char Noman[] = "No: 000005 Noman has joined school at ";
    sim.print(Noman);
  }
  else if (state5 == 1) {
    const char Noman[] = "No: 000005 Noman has gone form school at ";
    sim.print(Noman);
  }
  sim.println(rtc.getTimeStr());
  delay(100);
  sim.println((char)26);
  smsSend();
}
Now, to upload the code to your Arduino select the correct board and its COM port from the tools menu. Then press the upload button, It will take some time to compile and upload code to the board.
Demonstration: RFID based Attendance System using Arduino & SIM800L Module
Here we have a detailed demonstration of this project.
Conclusion
So, that’s all about the RFID based Attendance System using Arduino & SIM800L Module with SMS notification project. I hope the project was helpful for you. If you have any doubts and queries regarding this project then do let us know them in the comment section below.


DS3231 rtc(SDA, SCL);
Arduino: 1.8.13 (Windows 10), Board: “Arduino Uno”
sketch_jan15a:37:21: error: no matching function for call to ‘DS3231::DS3231(const uint8_t&, const uint8_t&)’
DS3231 rtc(SDA, SCL);
^
In file included from C:\Users\HP\Dropbox\My PC (LAPTOP-UHRCB3NG)\Downloads\5TH SEMESTER\sketch_jan15a\sketch_jan15a.ino:6:0:
C:\Users\HP\Dropbox\My PC (LAPTOP-UHRCB3NG)\Documents\Arduino\libraries\DS3231/DS3231.h:67:3: note: candidate: DS3231::DS3231(TwoWire&)
DS3231(TwoWire & w);
^~~~~~
C:\Users\HP\Dropbox\My PC (LAPTOP-UHRCB3NG)\Documents\Arduino\libraries\DS3231/DS3231.h:67:3: note: candidate expects 1 argument, 2 provided
C:\Users\HP\Dropbox\My PC (LAPTOP-UHRCB3NG)\Documents\Arduino\libraries\DS3231/DS3231.h:66:3: note: candidate: DS3231::DS3231()
DS3231();
^~~~~~
C:\Users\HP\Dropbox\My PC (LAPTOP-UHRCB3NG)\Documents\Arduino\libraries\DS3231/DS3231.h:66:3: note: candidate expects 0 arguments, 2 provided
C:\Users\HP\Dropbox\My PC (LAPTOP-UHRCB3NG)\Documents\Arduino\libraries\DS3231/DS3231.h:62:7: note: candidate: constexpr DS3231::DS3231(const DS3231&)
class DS3231 {
^~~~~~
C:\Users\HP\Dropbox\My PC (LAPTOP-UHRCB3NG)\Documents\Arduino\libraries\DS3231/DS3231.h:62:7: note: candidate expects 1 argument, 2 provided
C:\Users\HP\Dropbox\My PC (LAPTOP-UHRCB3NG)\Documents\Arduino\libraries\DS3231/DS3231.h:62:7: note: candidate: constexpr DS3231::DS3231(DS3231&&)
C:\Users\HP\Dropbox\My PC (LAPTOP-UHRCB3NG)\Documents\Arduino\libraries\DS3231/DS3231.h:62:7: note: candidate expects 1 argument, 2 provided
sketch_jan15a:69:10: error: ‘void rtc()’ redeclared as different kind of symbol
void rtc()
^
C:\Users\HP\Dropbox\My PC (LAPTOP-UHRCB3NG)\Downloads\5TH SEMESTER\sketch_jan15a\sketch_jan15a.ino:37:9: note: previous declaration ‘DS3231 rtc’
DS3231 rtc(SDA, SCL);
^~~
C:\Users\HP\Dropbox\My PC (LAPTOP-UHRCB3NG)\Downloads\5TH SEMESTER\sketch_jan15a\sketch_jan15a.ino: In function ‘void setup()’:
sketch_jan15a:42:13: error: no matching function for call to ‘LiquidCrystal_I2C::begin()’
lcd.begin();
^
In file included from C:\Users\HP\Dropbox\My PC (LAPTOP-UHRCB3NG)\Downloads\5TH SEMESTER\sketch_jan15a\sketch_jan15a.ino:4:0:
C:\Users\HP\Dropbox\My PC (LAPTOP-UHRCB3NG)\Documents\Arduino\libraries\LiquidCrystal_I2C-1.1.2/LiquidCrystal_I2C.h:58:8: note: candidate: void LiquidCrystal_I2C::begin(uint8_t, uint8_t, uint8_t)
void begin(uint8_t cols, uint8_t rows, uint8_t charsize = LCD_5x8DOTS );
^~~~~
C:\Users\HP\Dropbox\My PC (LAPTOP-UHRCB3NG)\Documents\Arduino\libraries\LiquidCrystal_I2C-1.1.2/LiquidCrystal_I2C.h:58:8: note: candidate expects 3 arguments, 0 provided
sketch_jan15a:49:7: error: ‘class DS3231’ has no member named ‘begin’
rtc.begin();
^~~~~
C:\Users\HP\Dropbox\My PC (LAPTOP-UHRCB3NG)\Downloads\5TH SEMESTER\sketch_jan15a\sketch_jan15a.ino: In function ‘void loop()’:
sketch_jan15a:64:7: error: no match for call to ‘(DS3231) ()’
rtc();
^
C:\Users\HP\Dropbox\My PC (LAPTOP-UHRCB3NG)\Downloads\5TH SEMESTER\sketch_jan15a\sketch_jan15a.ino: In function ‘void rtc()’:
sketch_jan15a:69:10: error: ‘void rtc()’ redeclared as different kind of symbol
void rtc()
^
C:\Users\HP\Dropbox\My PC (LAPTOP-UHRCB3NG)\Downloads\5TH SEMESTER\sketch_jan15a\sketch_jan15a.ino:37:9: note: previous declaration ‘DS3231 rtc’
DS3231 rtc(SDA, SCL);
^~~
sketch_jan15a:71:7: error: ‘class DS3231’ has no member named ‘setDOW’; did you mean ‘setDoW’?
rtc.setDOW(SATURDAY); // Set Day-of-Week to SUNDAY
^~~~~~
setDoW
sketch_jan15a:72:7: error: ‘class DS3231’ has no member named ‘setTime’; did you mean ‘setA1Time’?
rtc.setTime(23, 59, 50); // Set the time to 12:00:00 (24hr format)
^~~~~~~
setA1Time
sketch_jan15a:73:27: error: no matching function for call to ‘DS3231::setDate(int, int, int)’
rtc.setDate(10, 12, 2021); // Set the date to January 1st, 2014
^
In file included from C:\Users\HP\Dropbox\My PC (LAPTOP-UHRCB3NG)\Downloads\5TH SEMESTER\sketch_jan15a\sketch_jan15a.ino:6:0:
C:\Users\HP\Dropbox\My PC (LAPTOP-UHRCB3NG)\Documents\Arduino\libraries\DS3231/DS3231.h:103:8: note: candidate: void DS3231::setDate(byte)
void setDate(byte Date);
^~~~~~~
C:\Users\HP\Dropbox\My PC (LAPTOP-UHRCB3NG)\Documents\Arduino\libraries\DS3231/DS3231.h:103:8: note: candidate expects 1 argument, 3 provided
sketch_jan15a:84:17: error: ‘class DS3231’ has no member named ‘getTimeStr’; did you mean ‘getMinute’?
lcd.print(rtc.getTimeStr());
^~~~~~~~~~
getMinute
sketch_jan15a:87:17: error: ‘class DS3231’ has no member named ‘getDateStr’; did you mean ‘getDate’?
lcd.print(rtc.getDateStr());
^~~~~~~~~~
getDate
C:\Users\HP\Dropbox\My PC (LAPTOP-UHRCB3NG)\Downloads\5TH SEMESTER\sketch_jan15a\sketch_jan15a.ino: In function ‘void SendAlsan()’:
sketch_jan15a:311:19: error: ‘class DS3231’ has no member named ‘getTimeStr’; did you mean ‘getMinute’?
sim.println(rtc.getTimeStr());
^~~~~~~~~~
getMinute
C:\Users\HP\Dropbox\My PC (LAPTOP-UHRCB3NG)\Downloads\5TH SEMESTER\sketch_jan15a\sketch_jan15a.ino: In function ‘void SendSophia()’:
sketch_jan15a:333:19: error: ‘class DS3231’ has no member named ‘getTimeStr’; did you mean ‘getMinute’?
sim.println(rtc.getTimeStr());
^~~~~~~~~~
getMinute
C:\Users\HP\Dropbox\My PC (LAPTOP-UHRCB3NG)\Downloads\5TH SEMESTER\sketch_jan15a\sketch_jan15a.ino: In function ‘void SendAzad()’:
sketch_jan15a:354:19: error: ‘class DS3231’ has no member named ‘getTimeStr’; did you mean ‘getMinute’?
sim.println(rtc.getTimeStr());
^~~~~~~~~~
getMinute
C:\Users\HP\Dropbox\My PC (LAPTOP-UHRCB3NG)\Downloads\5TH SEMESTER\sketch_jan15a\sketch_jan15a.ino: In function ‘void SendAkib()’:
sketch_jan15a:375:19: error: ‘class DS3231’ has no member named ‘getTimeStr’; did you mean ‘getMinute’?
sim.println(rtc.getTimeStr());
^~~~~~~~~~
getMinute
C:\Users\HP\Dropbox\My PC (LAPTOP-UHRCB3NG)\Downloads\5TH SEMESTER\sketch_jan15a\sketch_jan15a.ino: In function ‘void SendNoman()’:
sketch_jan15a:396:19: error: ‘class DS3231’ has no member named ‘getTimeStr’; did you mean ‘getMinute’?
sim.println(rtc.getTimeStr());
^~~~~~~~~~
getMinute
Multiple libraries were found for “LiquidCrystal_I2C.h”
Used: C:\Users\HP\Dropbox\My PC (LAPTOP-UHRCB3NG)\Documents\Arduino\libraries\LiquidCrystal_I2C-1.1.2
Not used: C:\Users\HP\Dropbox\My PC (LAPTOP-UHRCB3NG)\Documents\Arduino\libraries\Arduino-LiquidCrystal-I2C-library-master
Multiple libraries were found for “SoftwareSerial.h”
Used: C:\Program Files (x86)\Arduino\hardware\arduino\avr\libraries\SoftwareSerial
Not used: C:\Users\HP\Dropbox\My PC (LAPTOP-UHRCB3NG)\Documents\Arduino\libraries\SoftwareSerial-master
exit status 1
no matching function for call to ‘DS3231::DS3231(const uint8_t&, const uint8_t&)’
This report would have more information with
“Show verbose output during compilation”
option enabled in File -> Preferences.
Hello Friend, I have a Question.
What if I want to integrate with a biometric scanner or fingerprint sensor?
Secondly, I would like the system to ask for a card presentation or fingerprint every 30 minutes or less to avoid students who sign in and get out, then comes back to sign out.