Water Quality Monitoring using TDS Sensor & Arduino
Interface Analog TDS Sensor with Arduino for a simple TDS Meter
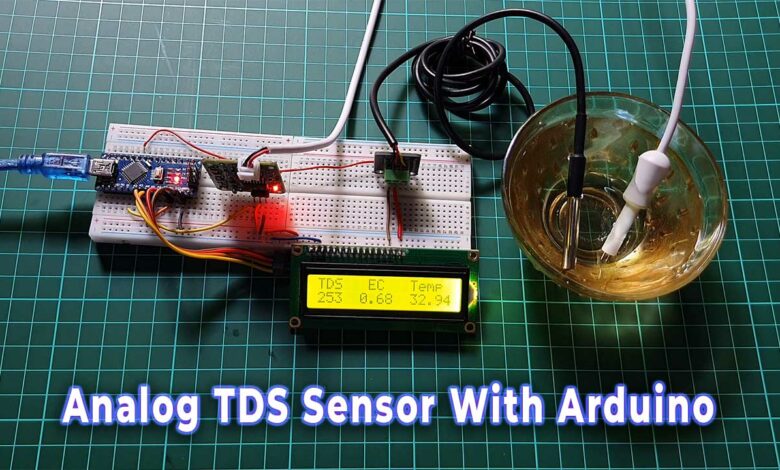
In this project, we will explore how to monitor water quality using a TDS (Total Dissolved Solids) sensor and an Arduino Nano. We will also use a 16×2 I2C LCD display to show the measured TDS, electrical conductivity (EC), and water temperature. Discover the world of water quality monitoring using a TDS sensor and Arduino Nano.
Project Overview
The device uses a TDS sensor and Arduino Nano, along with the 16×2 I2C LCD display, which helps in water quality monitoring by providing measurements of the TDS (Total Dissolved Solids) level and water temperature. Here’s how it aids in water quality monitoring:
- TDS Measurement: The TDS sensor measures the concentration of dissolved solids in water. This includes minerals, salts, metals, and other particles. By measuring the TDS level, you can assess the overall quality of the water. Higher TDS values may indicate a higher concentration of impurities, while lower values may indicate purer water.
- Electrical Conductivity (EC) Measurement: The TDS sensor also measures the electrical conductivity of the water. EC is directly related to the TDS level because dissolved solids in water increase their conductivity. By measuring EC, you can gain insights into the water’s ability to conduct electrical current, which indicates its quality.
- Temperature Monitoring: The device also includes a DS18B20 temperature sensor to measure the water temperature. Water temperature can impact various factors, such as the solubility of minerals and the growth of microorganisms. Monitoring temperature allows you to account for temperature variations when analyzing the TDS and EC measurements.
- Real-time Display: The 16×2 I2C LCD display provides a convenient way to view the TDS value, EC, and water temperature in real time. With the readings displayed on the LCD, you can quickly assess the water quality without the need for complex analysis or external devices.
- Data Logging and Analysis: The device can be further enhanced to log the TDS, EC, and temperature readings over time. By storing this data, you can analyze trends, detect changes in water quality, and identify potential issues such as contamination or variations in TDS levels. Data logging enables long-term monitoring and allows for historical data analysis.
Components Required
The components used in this Water Quality Monitoring using TDS Sensor & Arduino are:
- Arduino Nano: The microcontroller that controls the system.
- TDS Sensor: Measures the concentration of dissolved solids in water.
- DS18B20 Temperature Sensor: Measures the water temperature.
- 16×2 I2C LCD Display: Shows the TDS, EC, and temperature readings.
- Jumper Wires: Connect the components together.
- Breadboard: Provides a platform for circuit prototyping.
Together, these components create a system that measures TDS, monitors the temperature, and displays the results on an LCD screen, allowing for water quality assessment and analysis.
| S.N | COMPONENTS NAME | QUANTITY | PURCHASE LINKS |
|---|---|---|---|
| 1 | Arduino Nano | 1 | Amazon | AliExpress |
| 2 | TDS Sensor | 1 | Amazon | AliExpress |
| 3 | DS18B20 Temperature Sensor | 1 | Amazon | AliExpress |
| 4 | DS18B20 Temperature Sensor Terminal Adaptor | 1 | Amazon | AliExpress |
| 5 | 16x2 I2C LCD Display | 1 | Amazon | AliExpress |
| 6 | Breadboard | 1 | Amazon | AliExpress |
| 7 | Jumper Cables | 20 | Amazon | AliExpress |
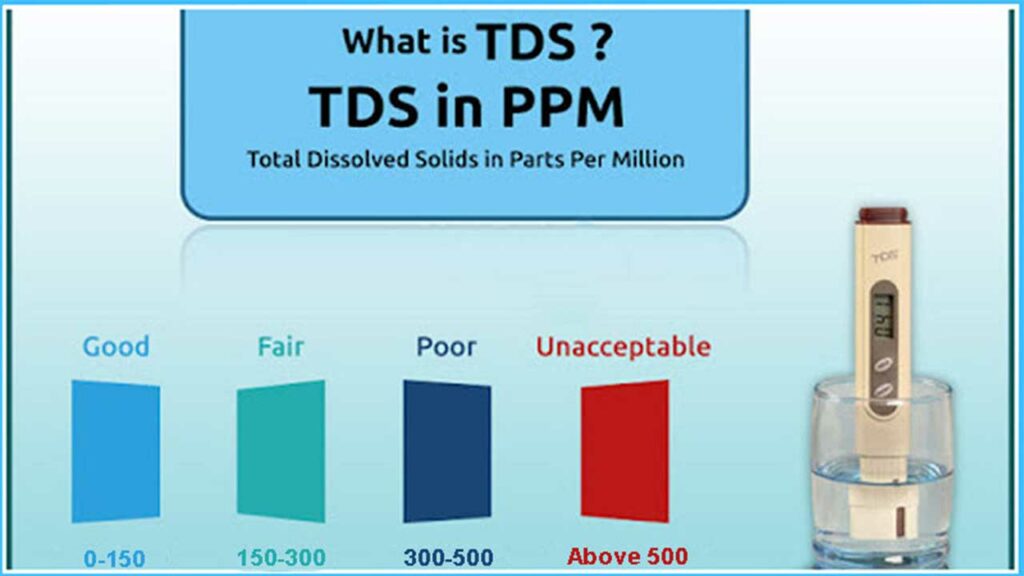
What is TDS?
TDS stands for Total Dissolved Solids. It represents the combined content of all inorganic and organic substances contained in a liquid, primarily water. These substances can include minerals, salts, metals, cations, anions, and other dissolved particles.
What is a TDS Meter and How Does It Work?
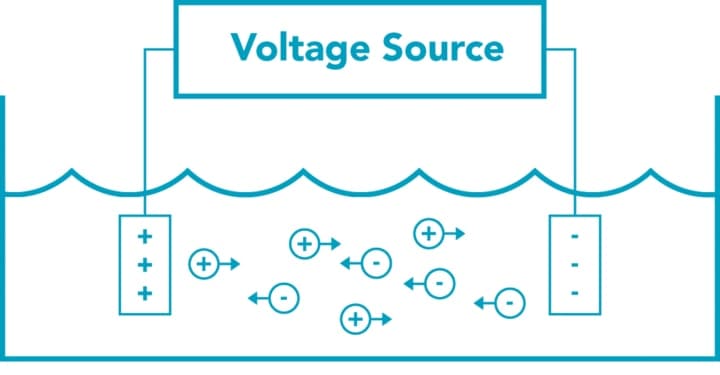
A TDS meter is a device used to measure the TDS level in water. It works by measuring the electrical conductivity of the water sample. The more dissolved solids present in the water, the higher the electrical conductivity. The TDS meter measures the conductivity and converts it into a TDS value, usually expressed in parts per million (ppm) or milligrams per liter (mg/L).
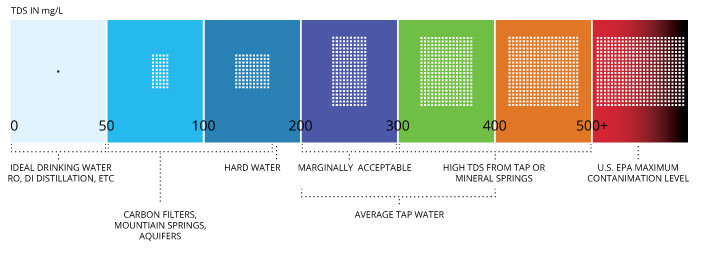
What Can a TDS Meter Be Used For?
A TDS meter is commonly used in various applications, including:
- Monitoring drinking water quality
- Testing water for aquariums and hydroponics
- Assessing water quality in pools and spas
- Evaluating water for industrial processes
- Checking the effectiveness of water filtration systems
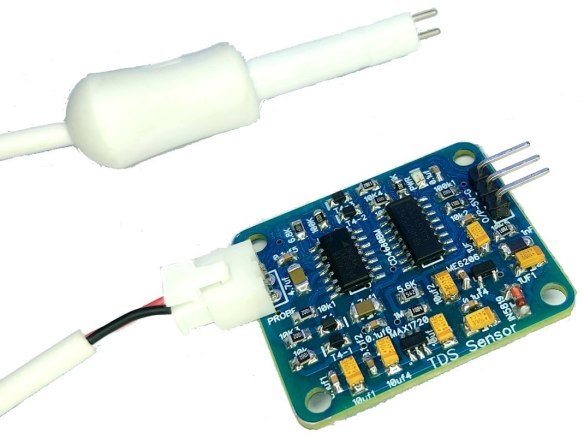
Specification & Precautions
The TDS sensor used in this project operates based on the electrical conductivity principle. It provides accurate measurements of the TDS level in water. Make sure to refer to the datasheet or specifications of your specific TDS sensor for detailed information on its operating range and calibration.
Specification
- Input Voltage: 3.3 ~ 5.5V
- Output Voltage: 0 ~ 2.3V
- Working Current: 3 ~ 6mA
- TDS Measurement Range: 0 ~ 1000ppm
- TDS Measurement Accuracy: ± 10% F.S. (25 ℃)
- Module Size: 29.5 * 36mm
- Module Interface: PH2.0-3P
- Electrode Interface: XH2.54-2P
- TDS probe Number of Needles: 2
- Total Length: 83cm
- Connection Interface: XH2.54-2P
- Probe Color: White
- Other: Waterproof Probe.
Precautions while using TDS Sensor
- When using this TDS meter, there are a few important things to remember. First, avoid putting the probe in water that is hotter than 55 degrees Celsius. High temperatures can damage the probe and affect its accuracy.
- Second, make sure to keep the probe away from the edges of the container. Placing it too close to the edge can cause interference, leading to incorrect readings.
- Lastly, while the probe’s head and cable are waterproof, the connector and signal transmitter board are not. So, be careful not to expose these parts to water to prevent any damage or malfunction. Take care when using the TDS meter Analog Sensor kit to ensure accurate measurements and avoid any water-related issues.
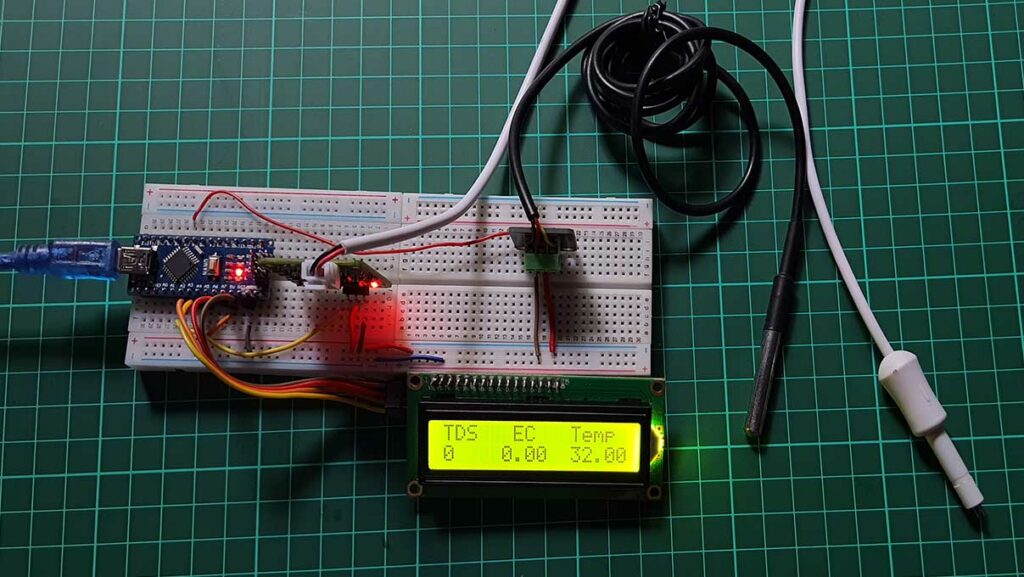
Interfacing Analog TDS Sensor with Arduino & LCD Display
To connect the components, follow these connections:
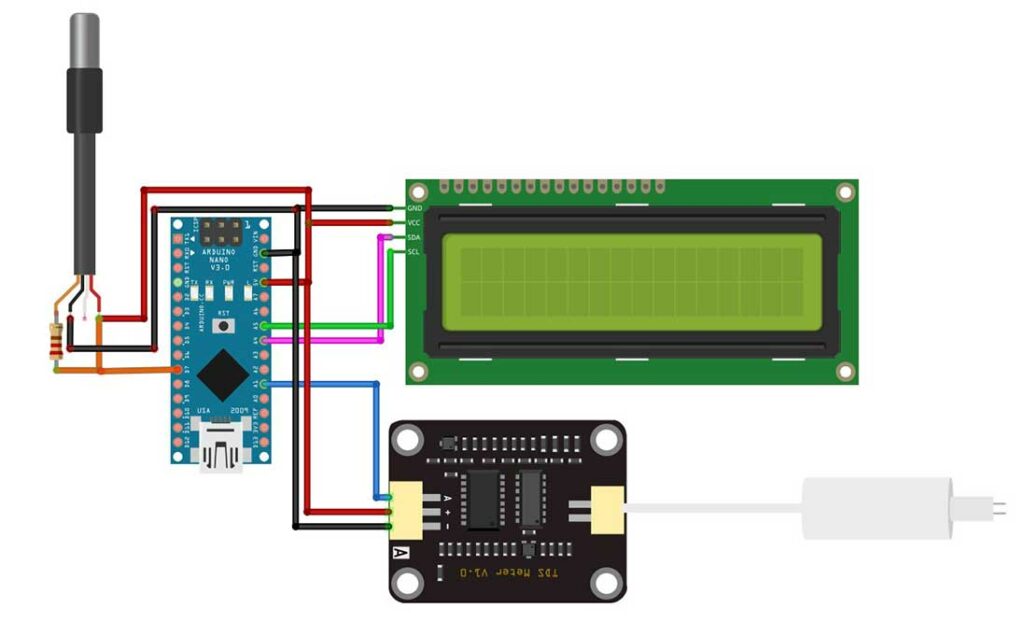
DS18B20 Temperature Sensor: Connect the data pin of the sensor to digital pin D7 on the Arduino Nano.
TDS Sensor: Connect the sensor’s output pin to analog pin A1 on the Arduino Nano.
16×2 I2C LCD Display: Connect the SDA and SCL pins of the LCD module to the corresponding I2C pins (A4 and A5) on the Arduino Nano.
Connect all modules’ VCC and GND pins to the 5V and GND pins of Arduino.
BME680 Comprehensive Tutorial:
- BME680 Indoor Air Quality Monitoring System using ESP32
- BME680 Indoor Air Quality Monitoring with ESP32
- Indoor Air Quality Monitoring with BME680 & ESP8266 Webserver
Source Code/Program
Here is the complete source code for Water Quality Monitoring using TDS Sensor & Arduino:
#include <OneWire.h>
#include <DallasTemperature.h>
#include <Wire.h>
#include <LiquidCrystal_I2C.h>
// 16x2 LCD with I2C
LiquidCrystal_I2C lcd(0x27, 16, 2); // Replace 0x27 with the I2C address of your LCD module
namespace pin {
const byte tds_sensor = A1;
const byte one_wire_bus = 7; // Dallas Temperature Sensor
}
namespace device {
float aref = 4.3;
}
namespace sensor {
float ec = 0;
unsigned int tds = 0;
float waterTemp = 0;
float ecCalibration = 1;
}
OneWire oneWire(pin::one_wire_bus);
DallasTemperature dallasTemperature(&oneWire);
void setup() {
Serial.begin(115200); // Dubugging on hardware Serial 0
lcd.begin(16, 2, LCD_5x8DOTS);
lcd.backlight(); // Turn on the LCD backlight
dallasTemperature.begin();
}
void loop() {
readTdsQuick();
delay(1000);
}
void readTdsQuick() {
dallasTemperature.requestTemperatures();
sensor::waterTemp = dallasTemperature.getTempCByIndex(0);
float rawEc = analogRead(pin::tds_sensor) * device::aref / 1024.0; // read the analog value more stable by the median filtering algorithm, and convert to voltage value
float temperatureCoefficient = 1.0 + 0.02 * (sensor::waterTemp - 25.0); // temperature compensation formula: fFinalResult(25^C) = fFinalResult(current)/(1.0+0.02*(fTP-25.0));
sensor::ec = (rawEc / temperatureCoefficient) * sensor::ecCalibration; // temperature and calibration compensation
sensor::tds = (133.42 * pow(sensor::ec, 3) - 255.86 * sensor::ec * sensor::ec + 857.39 * sensor::ec) * 0.5; //convert voltage value to tds value
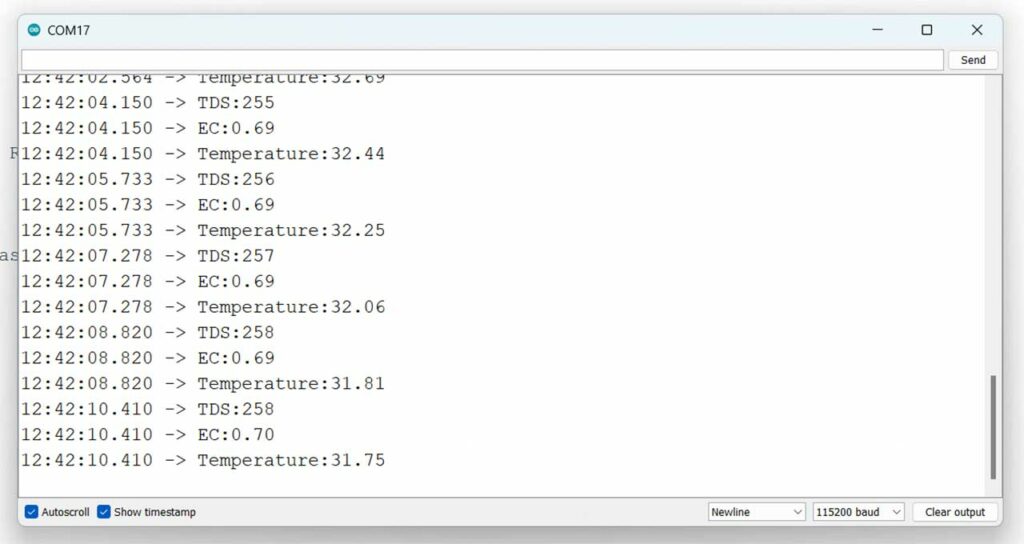
Serial.print(F("TDS:")); Serial.println(sensor::tds);
Serial.print(F("EC:")); Serial.println(sensor::ec, 2);
Serial.print(F("Temperature:")); Serial.println(sensor::waterTemp, 2);
lcd.clear();
lcd.print("TDS EC Temp");
lcd.setCursor(0, 1);
lcd.print(sensor::tds);
lcd.setCursor(5, 1);
lcd.print(sensor::ec, 2);
lcd.setCursor(11, 1);
lcd.print(sensor::waterTemp, 2);
}Source Code/Program Explanation
We start by including the necessary libraries: OneWire, DallasTemperature, and LiquidCrystal_I2C.
#include <OneWire.h>
#include <DallasTemperature.h>
#include <Wire.h>
#include <LiquidCrystal_I2C.h>
The code initializes the LiquidCrystal_I2C object with the I2C address and the dimensions of the LCD module.
// 16x2 LCD with I2C
LiquidCrystal_I2C lcd(0x27, 16, 2); // Replace 0x27 with the I2C address of your LCD module
In the setup function, we begin the serial communication, initialize the LCD, and turn on the backlight.
void setup() {
  Serial.begin(115200); // Dubugging on hardware Serial 0
  lcd.begin(16, 2, LCD_5x8DOTS);
  lcd.backlight(); // Turn on the LCD backlight
  dallasTemperature.begin();
}
The loop function calls the readTdsQuick function repeatedly with a delay of 1 second.
void loop() {
  readTdsQuick();
  delay(1000);
}
The readTdsQuick function reads the water temperature from the DS18B20 sensor, measures the TDS level using the TDS sensor, performs temperature compensation, and calculates the TDS value. The measured values are displayed on both the serial monitor and the LCD display.
void readTdsQuick() {
  dallasTemperature.requestTemperatures();
  sensor::waterTemp = dallasTemperature.getTempCByIndex(0);
  float rawEc = analogRead(pin::tds_sensor) * device::aref / 1024.0; // read the analog value more stable by the median filtering algorithm, and convert to voltage value
  float temperatureCoefficient = 1.0 + 0.02 * (sensor::waterTemp - 25.0); // temperature compensation formula: fFinalResult(25^C) = fFinalResult(current)/(1.0+0.02*(fTP-25.0));
  sensor::ec = (rawEc / temperatureCoefficient) * sensor::ecCalibration; // temperature and calibration compensation
  sensor::tds = (133.42 * pow(sensor::ec, 3) - 255.86 * sensor::ec * sensor::ec + 857.39 * sensor::ec) * 0.5; //convert voltage value to tds value
  Serial.print(F("TDS:")); Serial.println(sensor::tds);
  Serial.print(F("EC:")); Serial.println(sensor::ec, 2);
  Serial.print(F("Temperature:")); Serial.println(sensor::waterTemp, 2);
  lcd.clear();
  lcd.print("TDS   EC   Temp");
  lcd.setCursor(0, 1);
  lcd.print(sensor::tds);
  lcd.setCursor(5, 1);
  lcd.print(sensor::ec, 2);
  lcd.setCursor(11, 1);
  lcd.print(sensor::waterTemp, 2);
}
Demonstration: Arduino Water Quality Monitoring Syatem
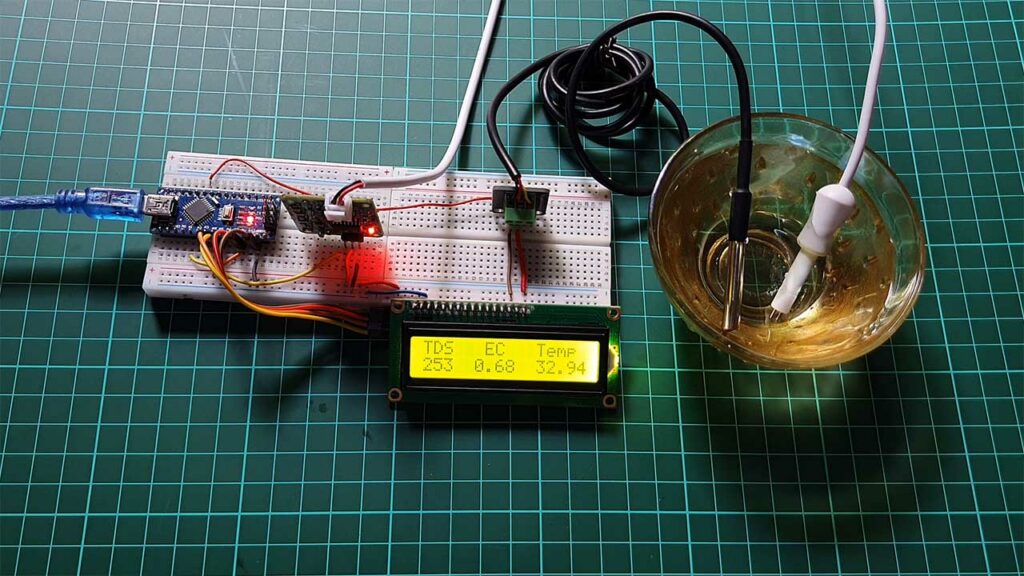
Once you have assembled the circuit and uploaded the code to the Arduino Nano, the LCD display will show the TDS value, electrical conductivity (EC), and water temperature.
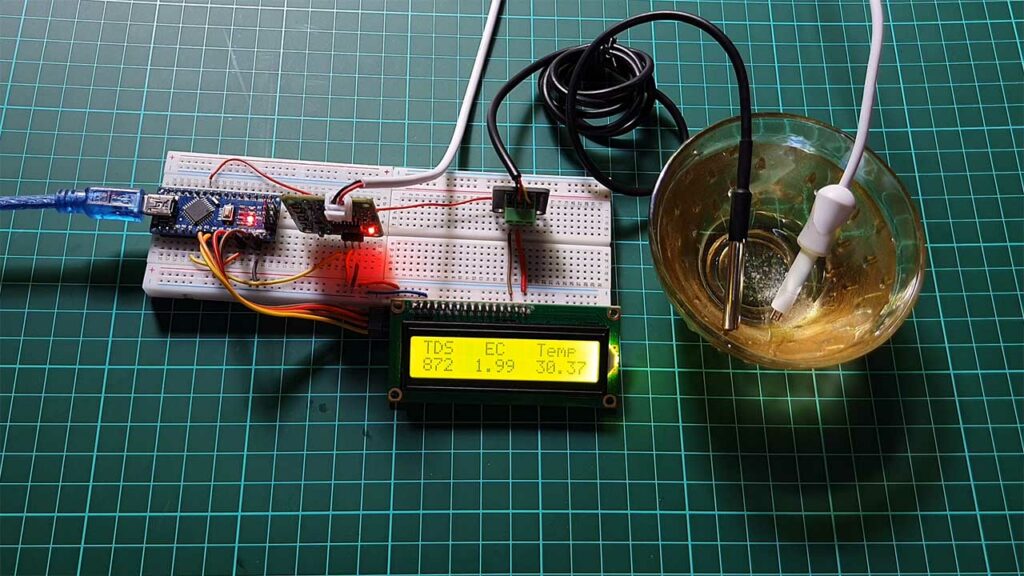
You can also monitor the readings on the serial monitor.
Overall, this device helps in water quality monitoring by providing a simple and accessible way to measure and display TDS levels, EC, and water temperature. It empowers users to assess the quality of water sources, identify potential issues, and take appropriate actions to maintain or improve water quality in various applications such as drinking water, aquariums, hydroponics, and industrial processes.
Conclusion
Water quality monitoring is crucial in various applications, and using a TDS sensor and Arduino Nano makes it easier to measure the TDS level and EC of water. In this project, we successfully demonstrated how to monitor water quality using a TDS sensor and display the results on a 16×2 I2C LCD display. Feel free to customize and expand this project further to suit your specific water quality monitoring needs.


Hello, the project is very beautiful and useful. I want to ask if you can help me with something.
I want to connect an AC filter using a relay, and I want it to work when the TDS level becomes unsuitable for the aquarium and stop working when the TDS level is normal.
Can you help me please with connection and programming as soon as possible?